kye
-
Posts
8,224 -
Joined
-
Last visited
Content Type
Profiles
Forums
Articles
Everything posted by kye
-
I think there's a real art to blacks in colour grading, I've learned that getting the right levels in the dark parts of the image has a huge impact on image pop and the overall look. I'd suggest putting in a pretty aggressive knee, so that anything lower than a certain value gets compressed but doesn't go completely to black and get clipped. You could put that knee quite close to 0 IRE so you don't have to get washed out looking images, but also it would mean that you'd keep whatever information is in the shadows but still squash the noise so it's not too obvious, and it would also make the image look a bit higher end too as a significant part of the look of high-end cine cameras is how they handle the shadows. I often set up a curve that compresses the shadows more than the highlights and grade under that. This is a random image I found online that shows what such a curve might look like: My curve is often more aggressive than this, and the more aggressive you make the curve the more filmic the final image will look. When you first apply such a curve everything will look over-contrasty, and you will need to manually grade every shot underneath it. Often the Lift Gamma and Gain (LGG) controls are great for this, as the Lift places how far down the curve your blacks go (and also defines overall perceived contrast and adjusts saturation), the Gain places the highlights and gives a nice rolloff (making the edges of any clipping much less obvious) and then you can adjust the overall brightness of the shot with the Gamma. Often you have to go back and forward with these controls as you often pull the Lift down to get the shadows right, then pull Gamma up to adjust the mids but that also pulls the shadows up a bit, so you pull the Lift down more, etc, until you've pushed/pulled the exposure to a point that looks good. I've graded many projects by just applying such a curve, then on each shot tweaking WB, then using LGG controls to get levels, then Saturation, and often that will be all the project needs. If you have a control surface then the LGG adjustments can take very little time and you can rip through an edit very quickly. Happy to elaborate further, just ask.
-
You're really not getting this... You rejected the test because it involves interpolation, which is common to almost every camera, as most cameras have less photosites than their output resolution has colour values. You also rejected the test because the Alexa is a 6K camera and not a 4K camera and therefore involves interpolation. The Alexa isn't a common camera, sure, but it shares the same colour subsampling properties of most cameras, shares the same 'over-capture' aspects as many other workflows, and is a high quality imaging device, so if you can't tell 2K from 4K from an Alexa 65 then it's a good test and it is applicable to most other situations. A camera with a Foveon sensor does not share the same colour subsampling properties of most cameras, therefore isn't a good test, which is why it's a red herring and not applicable to any sensible conversation about perception.
-
I ordered my Tiffen Black Promist 1/8 filter in 58mm as that fits all my lenses, but didn't want to have to use step-up rings on my tiniest setups (GF3 + 15/8 or 14/2.5) so looked around for the cheapest 52mm diffusion filter I could find. Enter the "52mm Softfilter Spezialeffekt Diffusor Weich Filter für DSLR kameraobjektiv" which cost EURO5.49 with free shipping. Hey big spender! It took quite some time to arrive here in AU. It came with the normal hard crystal plastic case and in a padded envelope, of course I'd have preferred that the filter was IN the case, rather than WITH the case in the envelope, but that just made me clean it and carefully check it for any damage, but it seems unharmed. It is a little strange though. The surface is a bit bumpy, and this is what it looks like: and here is a test with and without the filter (GF3, 14/2.5, RAW stills): It seems to be quite a strong effect, although I find it a bit deceptive because if you zoom in there isn't that much blurring. Given that I bought it for use on 1080p cameras, that will lessen the impacts on fine detail, so I'll have to put it through its paces on some real footage.

-
If 2K and 4K+ are only perceptually different with cameras that are very uncommon then who cares. You might care about this as a theoretical exercise for its own sake, but I'd suggest that not many other people do. If this was a thread comparing perceptual differences between 600x400 and 640x480 then no-one would have cared because it doesn't apply to the real world or to our lives in any way. This thread is only useful because of its applicability. See my above point.
-
I actually think that it's a pretty killer camera for cine uses. If you're a P4K / P6K potential customer then I think you're also an FP / FP-L potential customer because you're willing to rig the camera up for external storage, you're willing to deal with large file sizes, you're willing to deal with external power solutions (although that's way better on the FP than the BMs), you're willing to sacrifice RS performance for image, etc. The compromises that prevented me from buying an FP were to do with the lower bitrate codecs and the elements that are more 'video' than 'cinema', but even those could be fixed in firmware updates down the track potentially. And yeah, alternatives? None. Most cameras have competitors that overlap with all or almost all features, but even the closest alternatives to the FP or FP-L have quite a number of significant differences, so really there's nothing even close.
-
I've heard zoom lenses are super tricky to service, so you wouldn't be alone. Also, unless it's an Angenieux or something then it doesn't really matter - most of the zoom lenses ever made are cheap now because they were common in the past and undesirable now. I've recently started exploring the FB film-making and equipment groups and vintage lenses with dented filter rings are common, people posting "I bought this lens from a seller who said 'no fungus' but look at these pictures - should I return it?" is common, and I've seen more than one post of "I'm abandoning my attempt to convert my collection of <famous vintage lens name> lenses, lens repairer X quoted me $Y and all the parts are here - offers above $Z please".
-
The whole point of the test was to compare the perceptibility of 2K vs higher resolutions. This is the point you keep missing. Determining if there is a difference between 2K and some other resolution on a camera that no-one ever uses is a useless test. Once again, missing the point.
-
You forgot about people dropping them, fungus, rust, and botched attempts to fix them. In terms of getting on the bandwagon earlier, I bet these manual lenses were at rock bottom prices when AF reached significant market penetration, so that was probably the time to buy. I bet if you went to the right places you could have bought boxes of them, maybe by weight.
-
We have, we did, and.... *sigh* Let me ask you this. If Yedlin has made such basic failures, and you claim to be sufficiently knowledgeable to be able to easily see through them when others do not, why don't you go ahead and do a test that meets the criteria you say he hasn't met? I will then proceed to persistently claim you haven't met your own criteria, criticise every line you have written in isolation, and generally take the perspective that if the test does not directly apply to every single camera ever made, every screen and every eyeball in existence then it can't have any value whatsoever. I think it will be fun, I've seen it done recently with such gusto....
-
Clicking is a common symptom of a dead drive. I remember back in the day I ordered the latest and greatest HDD to my local IT store and it was the largest and fastest HDD they'd ever seen and it was a special order - way larger and hugely more expensive than the ones they stocked. They were quite excited to know what kind of person would order such a thing and what I wanted it for and it was quite a buzz when I collected it. When I brought it back in the next day, clicking and refusing to format there was mild shock in the store, but they confirmed that indeed it was dead and so they ordered a replacement. When I brought the replacement one back in the day after I got it, clicking like the previous one had, the tone had changed completely and I think they might have suspected that I might be the cause. I was also trying to ignore that thought myself. Luckily the third one was all good. Needless to say that when I plugged it in and it worked I was quite relieved!!
-
Have you used lenses with OIS? IBIS is often of a similar performance, so perhaps that will be a useful reference point? You can always shoot a short shutter speed and stabilise in post, and algorithms for adding motion-blur in post are getting better too, so that's an option under very simple conditions (they're not great yet). If your shots are out of focus there is nothing you can do in post that will fix that. I'm not really familiar with what cameras are around for those prices, but maybe someone else will give some suggestions. At this point all cameras can make a great image under the right circumstances and working within their limitations, so it's more about what you shoot and how you shoot than the camera. Everyone looks at a camera and sees different things because we all shoot differently.
-
It probably won't. It might slow down when phones get better, but even then people won't want to sell for much lower than they paid. Housing bubbles burst because people buy them on finance and are forced to sell because they can't make repayments, that doesn't happen with vintage lenses. Think about it this way - digital cameras aren't getting any more analog looking and both cameras and lenses are getting more and more perfect so people will increasingly look to the past for 'character'. India and China and parts of Africa are growing their middle classes by millions of people a year, and they will get better access to online shopping and eBay. and lastly, lenses don't last forever and wear out or get broken. So.. increasing demand + decreasing numbers available + no additional supply = prices go up
-
Very nice. I find that the footage looks 'right' with little to no work, and it really responds well to grading if you have the time/inclination to try. It's also very unforgiving. Sure, lots of your shots are overexposed from a technical point of view, but they don't look overexposed, or at least, look overexposed in a bad way. Take a Canon camera and do that and watch the image fall apart into digital clipping hell almost immediately.... The texture of the image might be the nicest aspect to it. It's really a pocketable super 16mm film camera with virtually unlimited film refills and no development costs or delays. The Laowa 7.5mm MFT lens isn't that much larger than the 14mm Panny lens, and is 22mm FF equivalent, so is nice and wide. It's a nice lens too. I'd suggest staying away from the SLR Magic 8mm F4 - it's too slow for lots of things and the ergonomics are pretty rubbish.
-
Judging what something is worth to someone in dollars is very difficult considering we don't know how much money that is to you and what else you might spend it on instead. I'm sure lots of people will take the tiny scraps of info about what you do and how you do it and guess wildly what would be suitable for you, but if you were to give more info then the guessing wouldn't be quite so wild. What do you currently really like about the XT3? What are your current limitations from the XT3? What future goals do you have for your film-making? etc..
-
.....and is FF and 8K. What price would we pay for such a thing? Easy - history teaches us this lesson time after time... 100Mbps 8-bit codec with 11 stops of DR.
-
Makes sense. Let's hope they decide to focus on image instead of specs...
-
I think @scotchtape nailed it - it's about AF. Step 1: work out if you want AF or not and then buy the Canon if you do and P6KPro if you don't Step 2: setup some test scenes with a colour checker (or some brightly coloured objects) and shoot it with both cameras and then work on a preset colour grade that will match the colours in post Step 3: go shoot stuff
-
I got that from watching - the idea that there's a normal public street and a secret garden right next to each other was a cool idea to start the teaser with and pulls you in.
-
The 14mm really surprised me from that shoot actually. The edit you guys saw was only a subset of the larger video I shot which included lots of shots of my wife who was there with me (she's internet shy) and the lens looks great for people. Specifically the ~40mm equivalent focal length, the rendering of detail at a normal subject distance and with the lens wide-open is quite flattering, it's borderline as long a focal length as you'd like to use hand-held in a small rig without OIS, and the DoF was shallow enough (or even moreso) to create some subject separation. My follow-up to that video was to do more tests with the 14-42mm f3.5-5.6 kit lens to see what the DoF and subject separation is like on that slightly slower lens, and I also bought a 12-35/2.8 to try that too. I think that using these lenses (any of the ones I mentioned above) wide-open is probably a good balance between getting a softer rendering to avoid moire, to not have too digital a look, to get shallow enough DoF to separate your subject, but also to not have too shallow a DoF to be able to manually focus relatively easily, especially on a smaller screen. I can imagine that I might end up with these setups: P2K with 7.5/2 and 14/2.5 as a truly "pocketable" setup M2K with 7.5/2 and 12-35/2.8 as a larger rig for slow-motion P2K / M2K with my 17.5/0.95 as a low-light solution
-
As @fuzzynormal suggested, proxies are the best approach. In terms of habits dying hard, which I understand, it sounds like you're at one of the rare points where you're going to change your habits anyway, so I'd suggest considering what will be the best investment in the long-term. Sure, proxies are a different way of working, but: If you render to a Digital Intermediate then you're encoding an extra step unnecessarily and taking the hit to the image quality - I'd even question if shooting 6K with an extra conversion lowers the quality to 4K levels.... a test I'd suggest you try before committing to a DI workflow When you archive your project you will either have to delete the DI (meaning you can't load your project and hit play), store both (more than doubling the storage requirements because h265 is much more efficient than Prores for the same quality), or if you delete the originals then you'll both increase the size of the media you stored and be stuck forever with a degradation in quality. When you work with proxies you can just delete them at the end (if you want to) and the project will still be in-tact, or if you don't delete them they won't take up much space as they'll be much smaller You can edit on virtually any computer you like, as you can make your proxies whatever resolution you want Yes, there are some operations best done on the full-resolution files (like stabilisation and adjusting image texture such as NR and halation / grain effects etc) but these typically don't have to be done real-time and they can be done at the end of a project during the mastering phase. The only obstacles I've seen for these is 1) if you are colour grading live with a client in the room, or 2) if your computer is so under-powered that things like the new AI functions just won't work regardless of how long you leave them to process, but these may not apply to your situation. The only thing worse than having to spend $4K on a new camera is having to spend an additional $4K on a new machine that can handle the extra K's in the image.... oh, and just wait for h.266 - it's coming, and it will make editing h265 seem like editing, well, h.264 in comparison!
-
My question was deliberately ridiculous. I asked it that way because your answer is obvious - that you want a camera more than you want the crypto you have that totals that value. This is the basis for any exchange economy as division-of-labour and specialisation is the foundation of civilisation. The fact you own crypto and know it's worth money sort of implies that you're aware that you can sell some for fiat currency and turn that into a camera via a normal store, but the way you worded your question indicates you don't want to go via a fiat currency, and also that you kind of wanted to hide that aspect of it, or at least not lead with it. This has certain implications, most significantly: Your question is actually "how can I buy a camera with crypto while bypassing the whole fiat currency system", and begs the question of why you are so interested in bypassing it I own some crypto myself, not a lot of it, but enough to be familiar with the waters, so to speak, and it's a rather strange and involved question, thus my deliberately ridiculous answer. To actually go back to your question, I heard PayPal was implementing a feature that allowed you to pay a vendor in fiat currency but to pay PayPal in crypto, so if that's been rolled out already then you can use that mechanism to buy almost anything from almost anyone.
-
Why trade an appreciating asset for a depreciating one?
-
They can always implement a haptic feedback engine that can emulate it, assuming there is enough demand. Not sure if you've used a MacBook Pro touchpad or an iPhone home button, but they're pressure sensitive and don't click, however the illusion that they do click is (at least to me) completely flawless. I didn't realise it they weren't physical buttons until I tried it when the devices were powered off and literally I got a small shock because I genuinely thought it was physically clicking. Even now if I happen to press when the device is off I am still surprised. ...who are fuelled by the continuous appetite for more resolution. That's the thing about capitalism, it's a feedback loop from the consumer to the manufacturers, and then back again through marketing. If we all just stopped voting for huge-resolution cameras with our wallets, they'd eventually stop selling them. Do most people do that? No.
-

Music Video with Bmpcc4K in CNDG and Bmmcc with old 16mm Russian Lenses
kye replied to alvaromedina's topic in Cameras
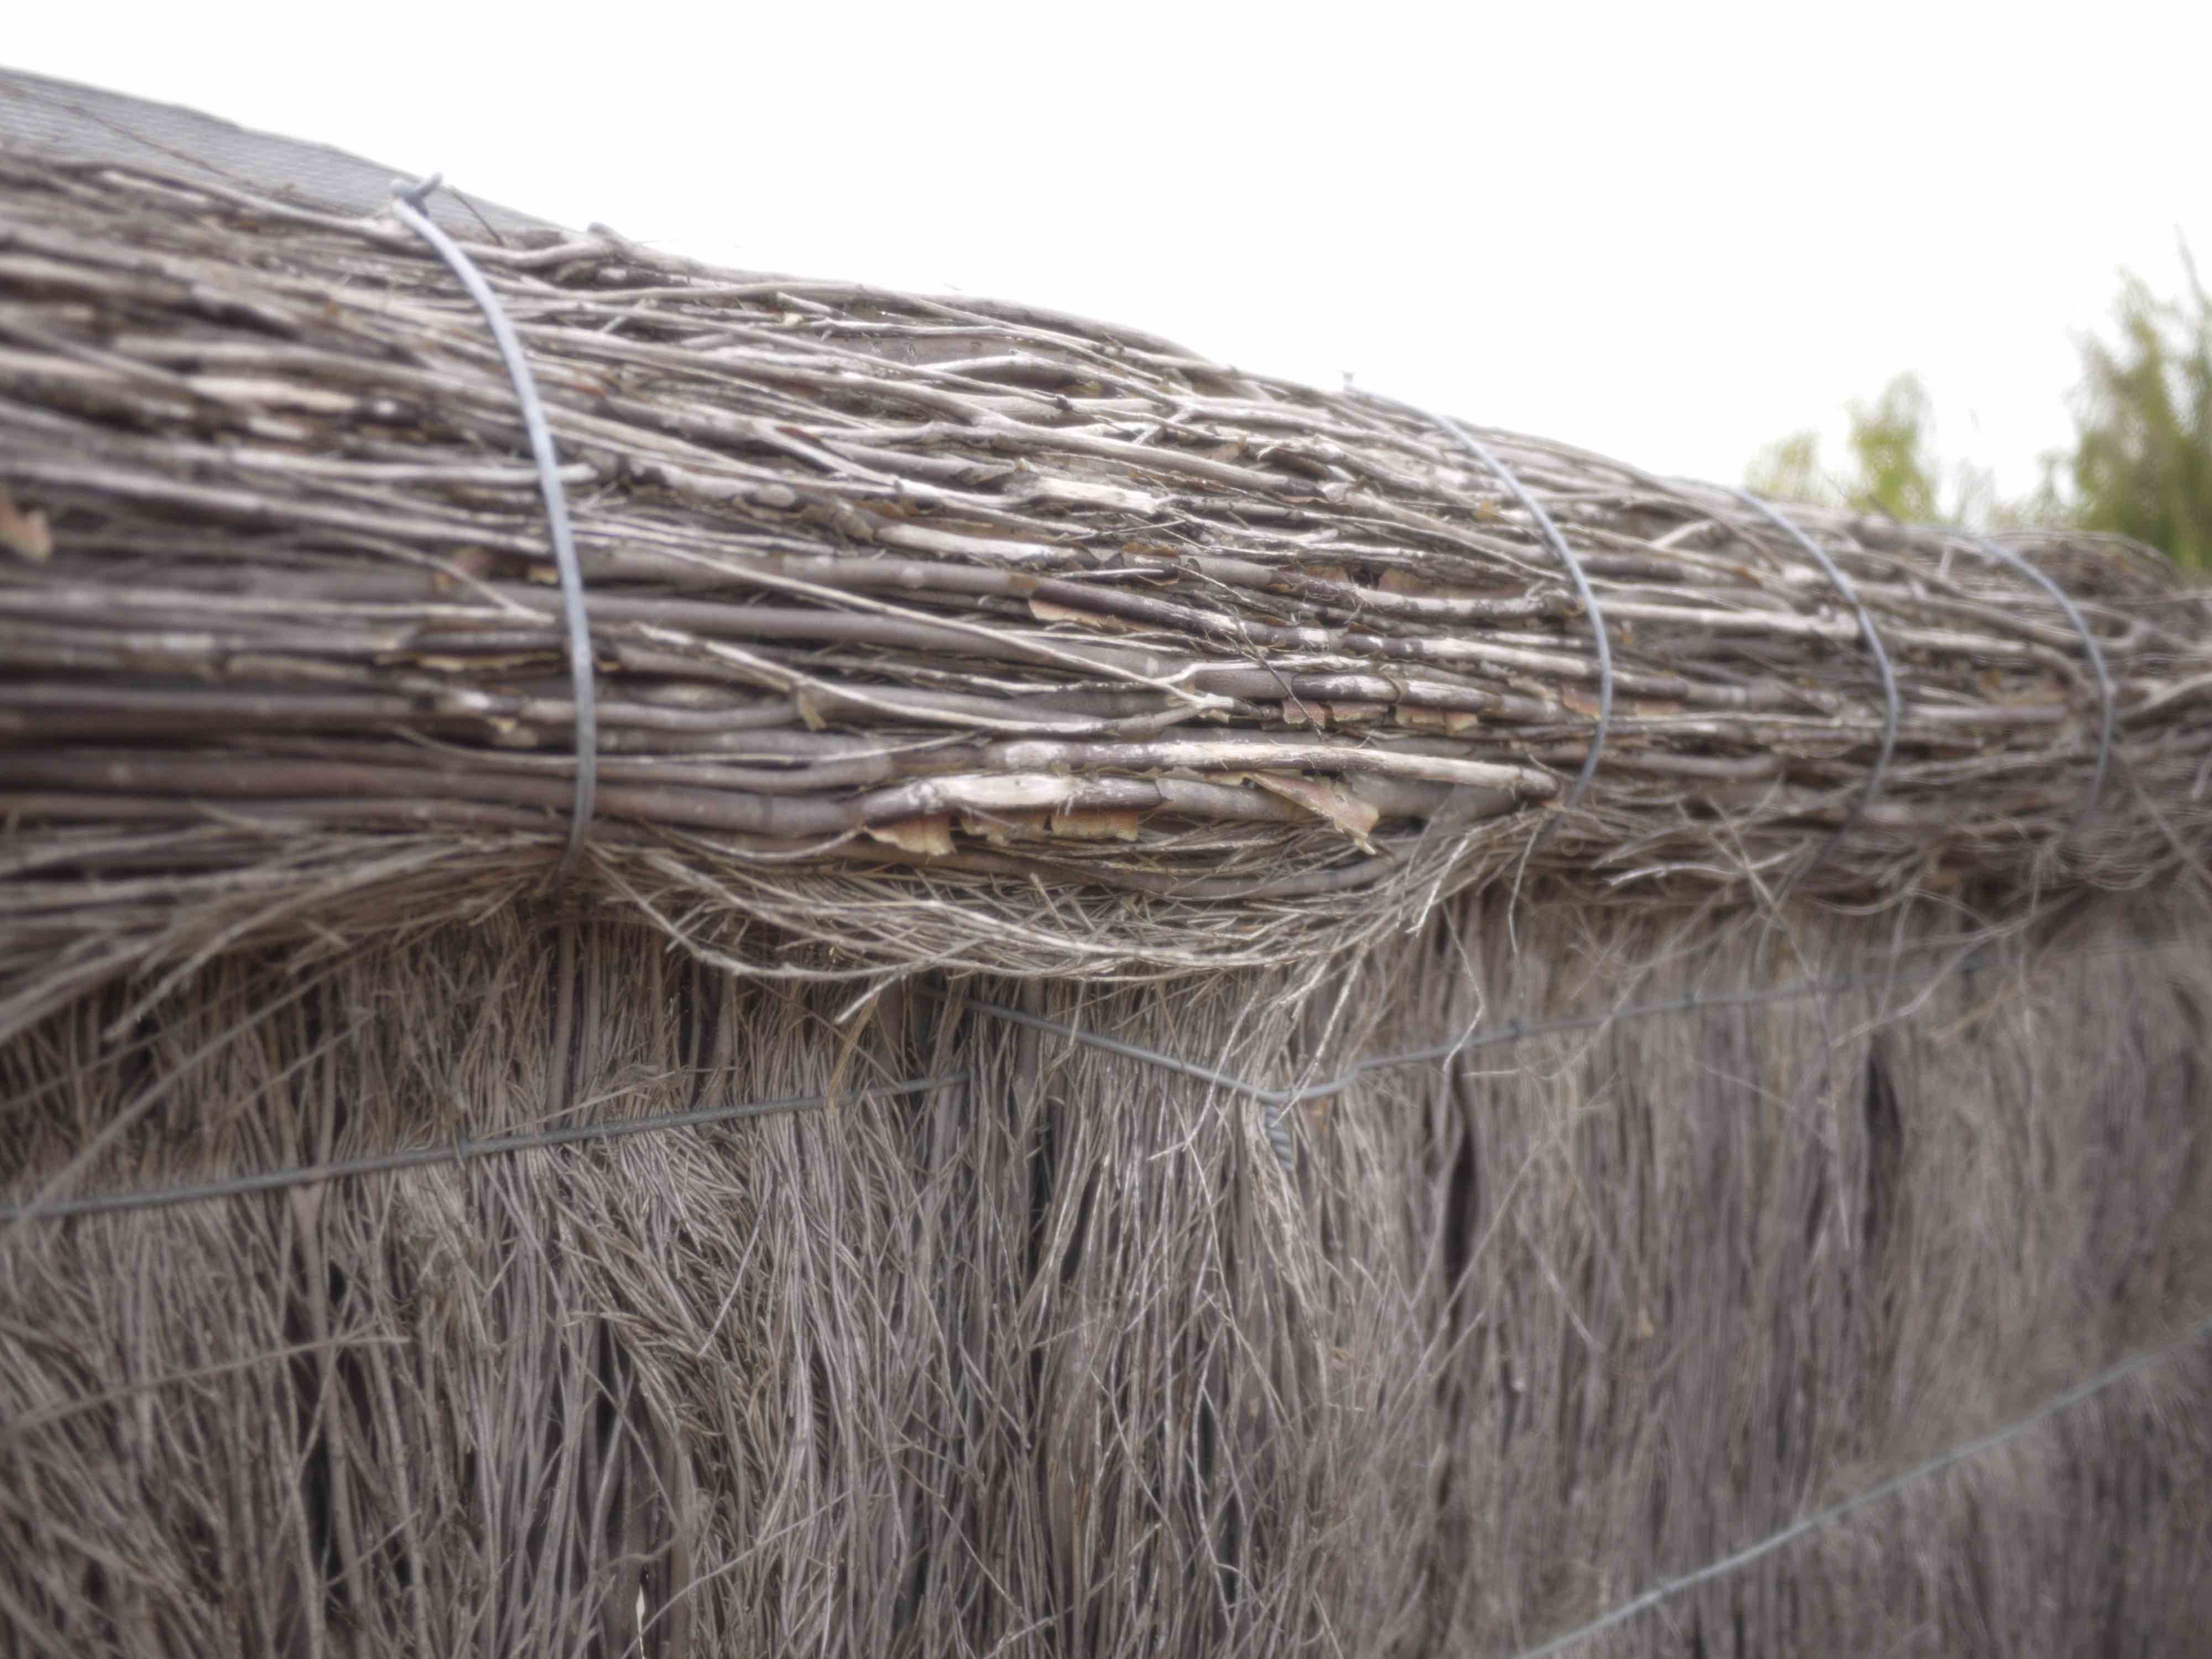
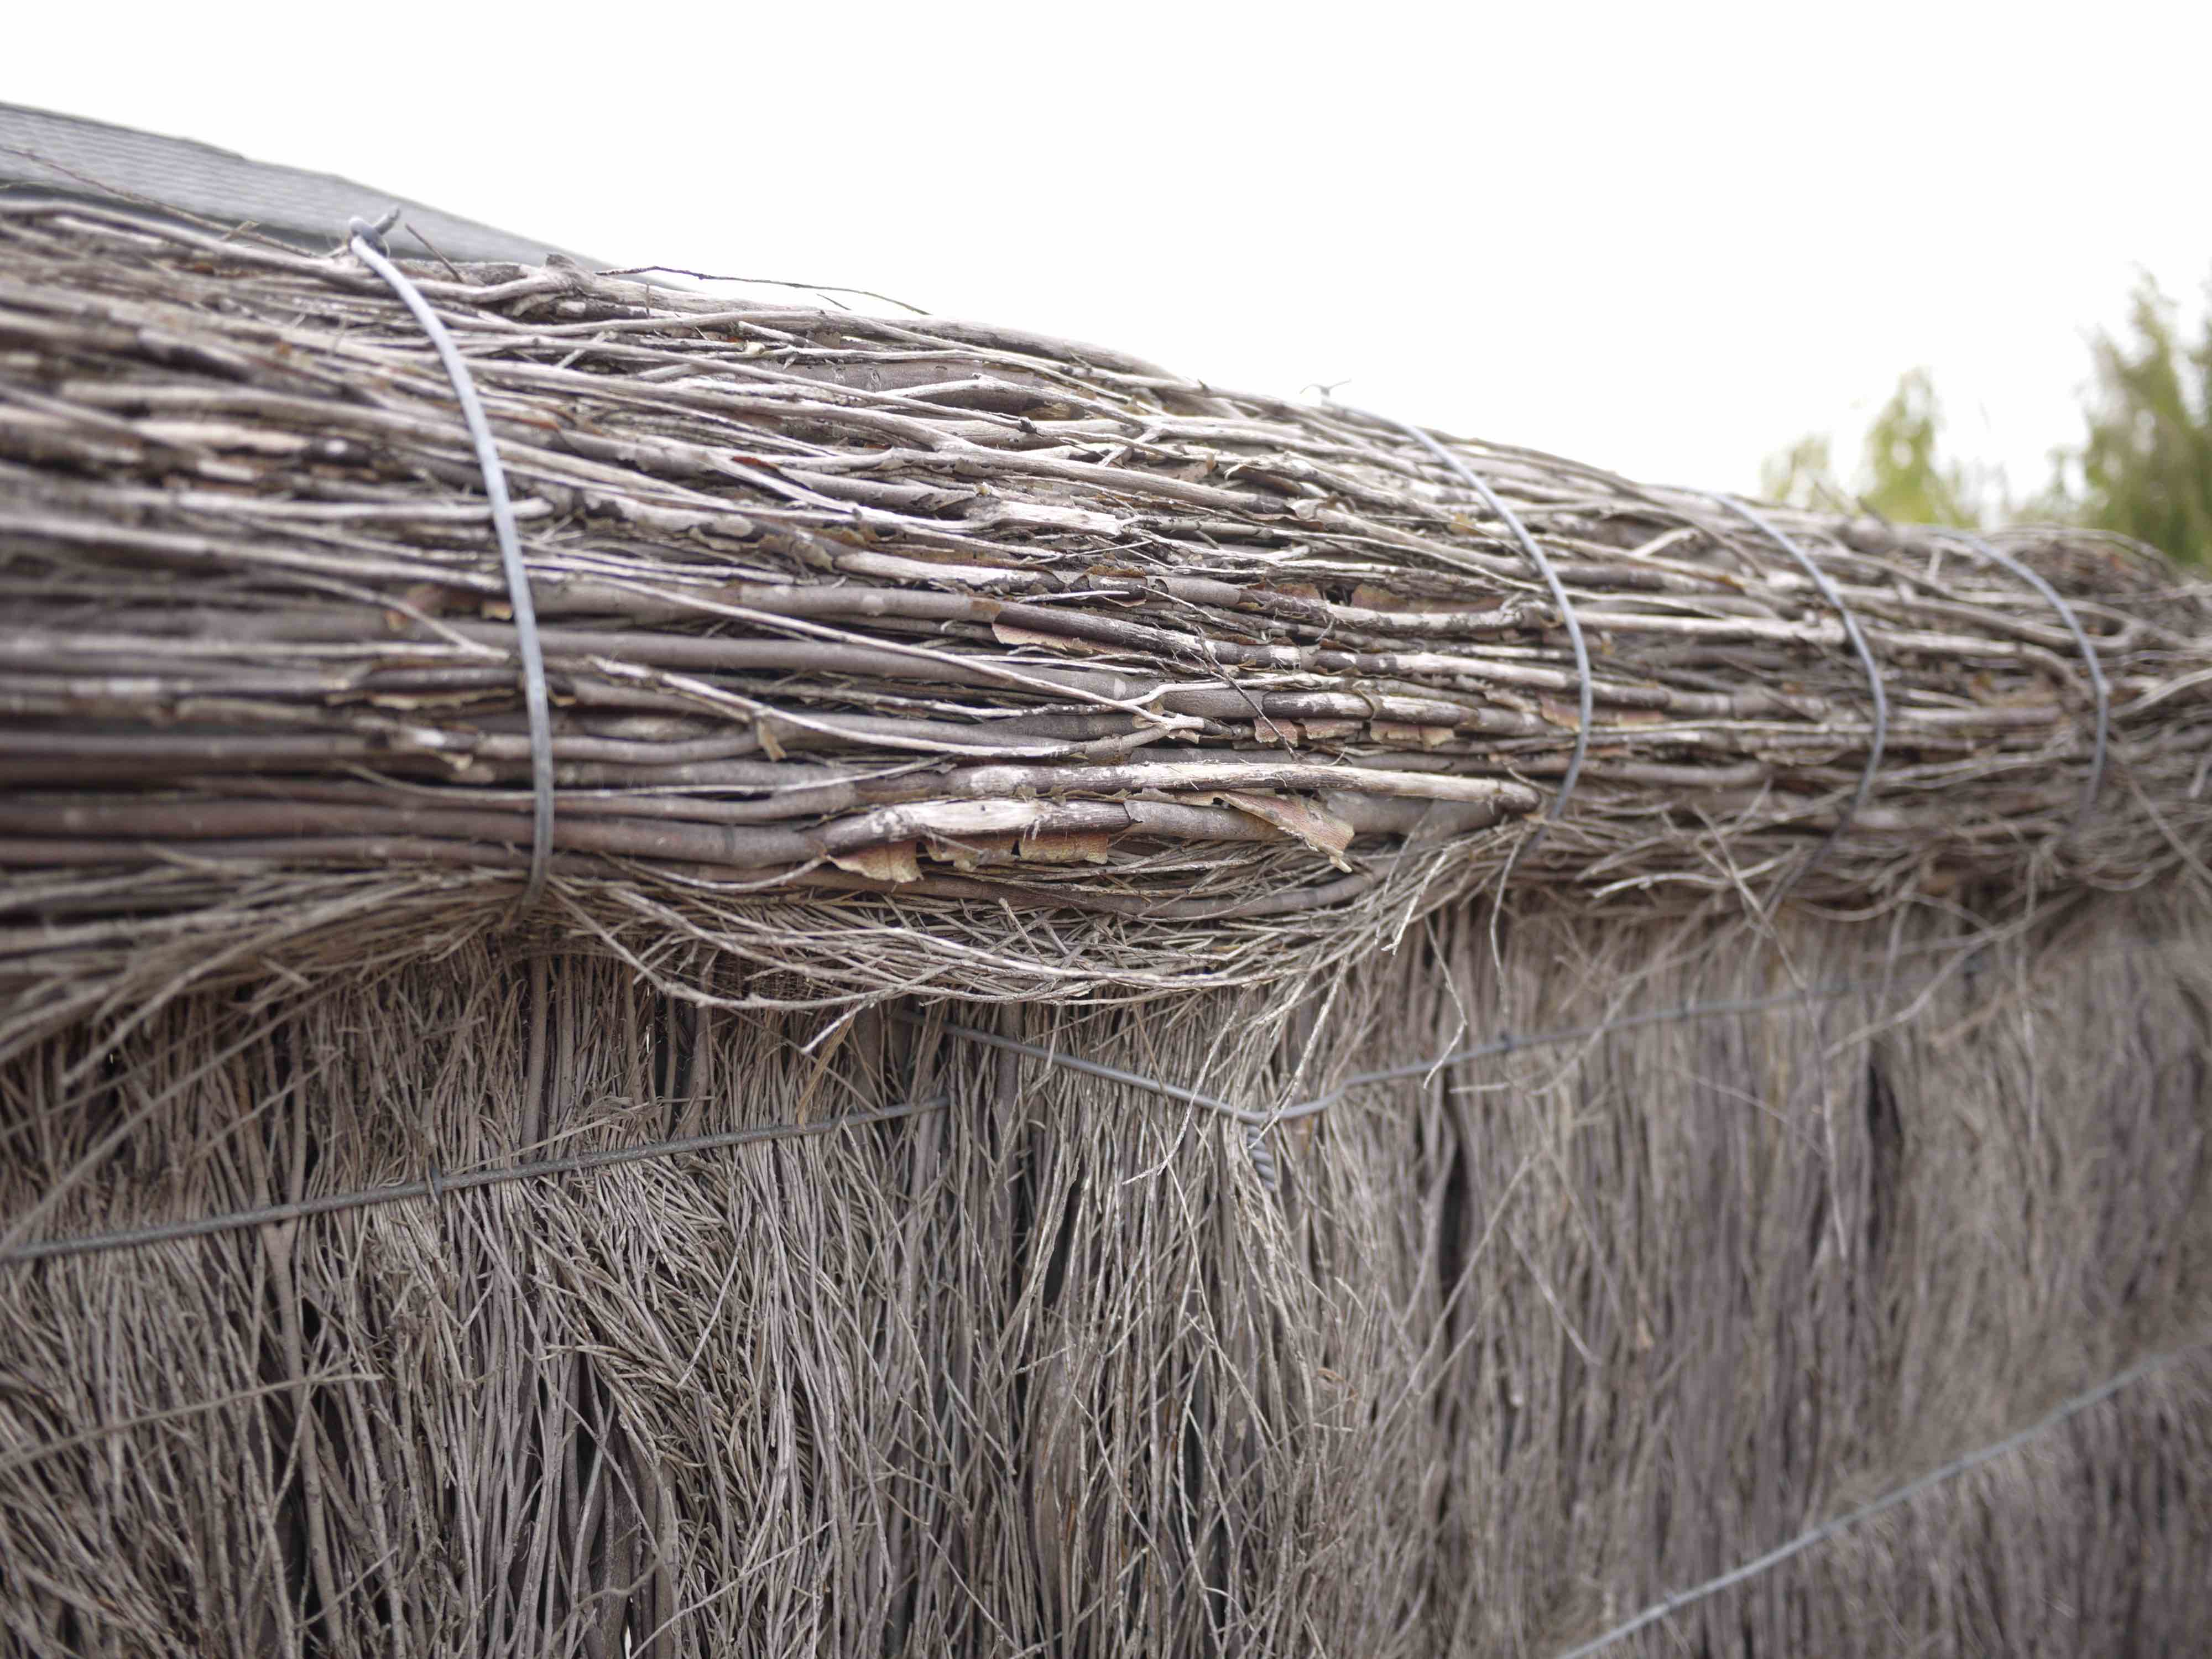
Great stuff! You are taking on a mammoth challenge by trying to match the Fairlight sensor from the Micro with the Sony sensor of the P4K. I would suggest the differences are in colour, texture, and resolution. To match the colour, I'd suggest building a test scene with a number of colour swatches and lighting it with a high-CRI light, then shooting the same scene with both cameras. After that you can adjust one camera to match the other. I'd suggest matching the WB first, the levels second, and then paying attention to the Hue of colours, the saturation of them, and the luminance of them third. That should get you into the ballpark. In terms of resolution, I'd suggest filming a test scene with some high-contrast edges and fine detail. One thing I have used in the past is a few grass seeds that have been backlit as they tend to have little hairs and other textures, like this: Once you have that scene, shoot with both cameras, match the framing between them, and ensure to stop the lens down (I'd suggest 4 stops from wide-open) to get the sharpest image hitting the sensor. Then, in post, match the cameras by either adding sharpening to the Micro so it perceptually matches as closely as possible to the P4K, or adding a small-radius blur to the P4K, potentially adding the blur at a lower opacity than 100% (experiment with it). Lastly, we deal with texture. I'd suggest doing the above matching first, then leaving this one last. Texture is a funny thing, and is very subjective, but I'd suggest experimenting with some combination of adding NR and film grain. Maybe you don't need any NR but maybe you will. Obviously matching the Micro to the P4K will be very different to matching the P4K to the Micro, but it's probably worthwhile doing both so you have these things worked out later on when you want to use these on real projects. It's also worth noting that you won't be able to match these exactly, and that it won't matter. Firstly, you won't be shooting the exact same angle with both cameras (and I'd suggest avoiding that if you can), secondly, on a real project you would probably match the cameras and then put a look over the top, which will partially obscure any differences that you didn't manage to match, and thirdly, you don't have to match cameras at all, you only have to match them so that the differences don't draw too much attention to themselves and break the viewer out of the experience of the content of your edit. Good luck!!
-
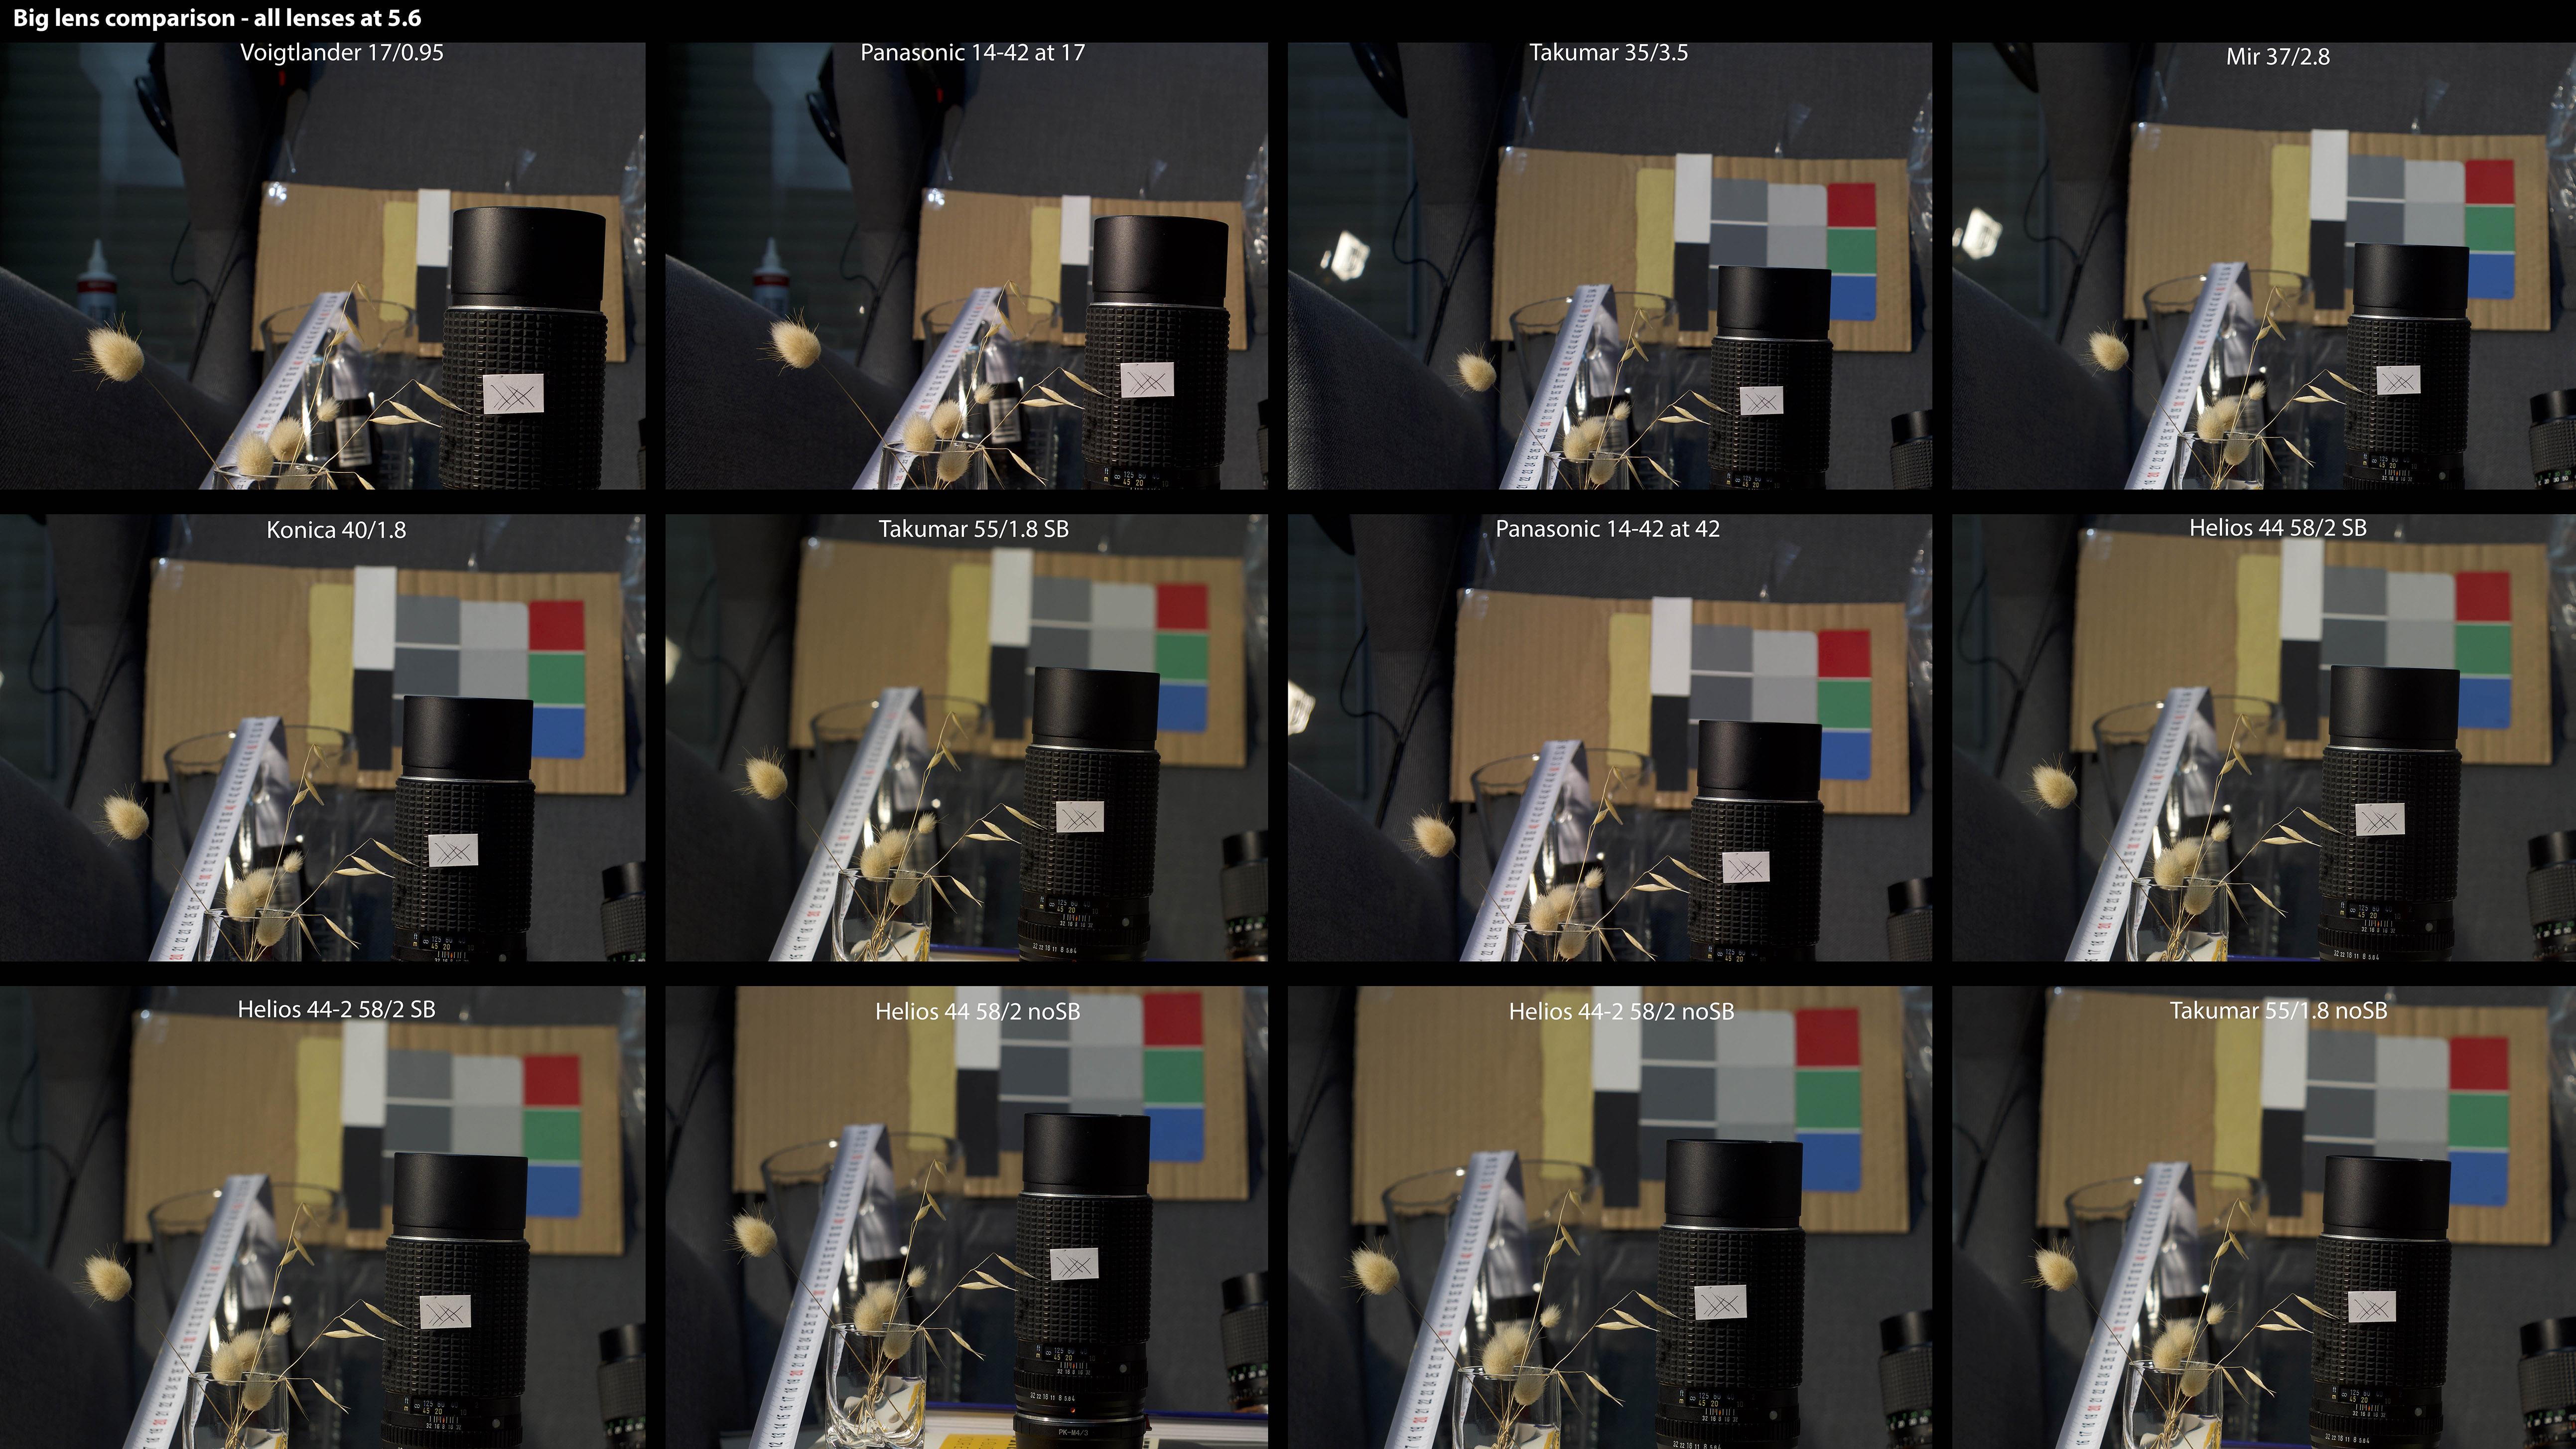
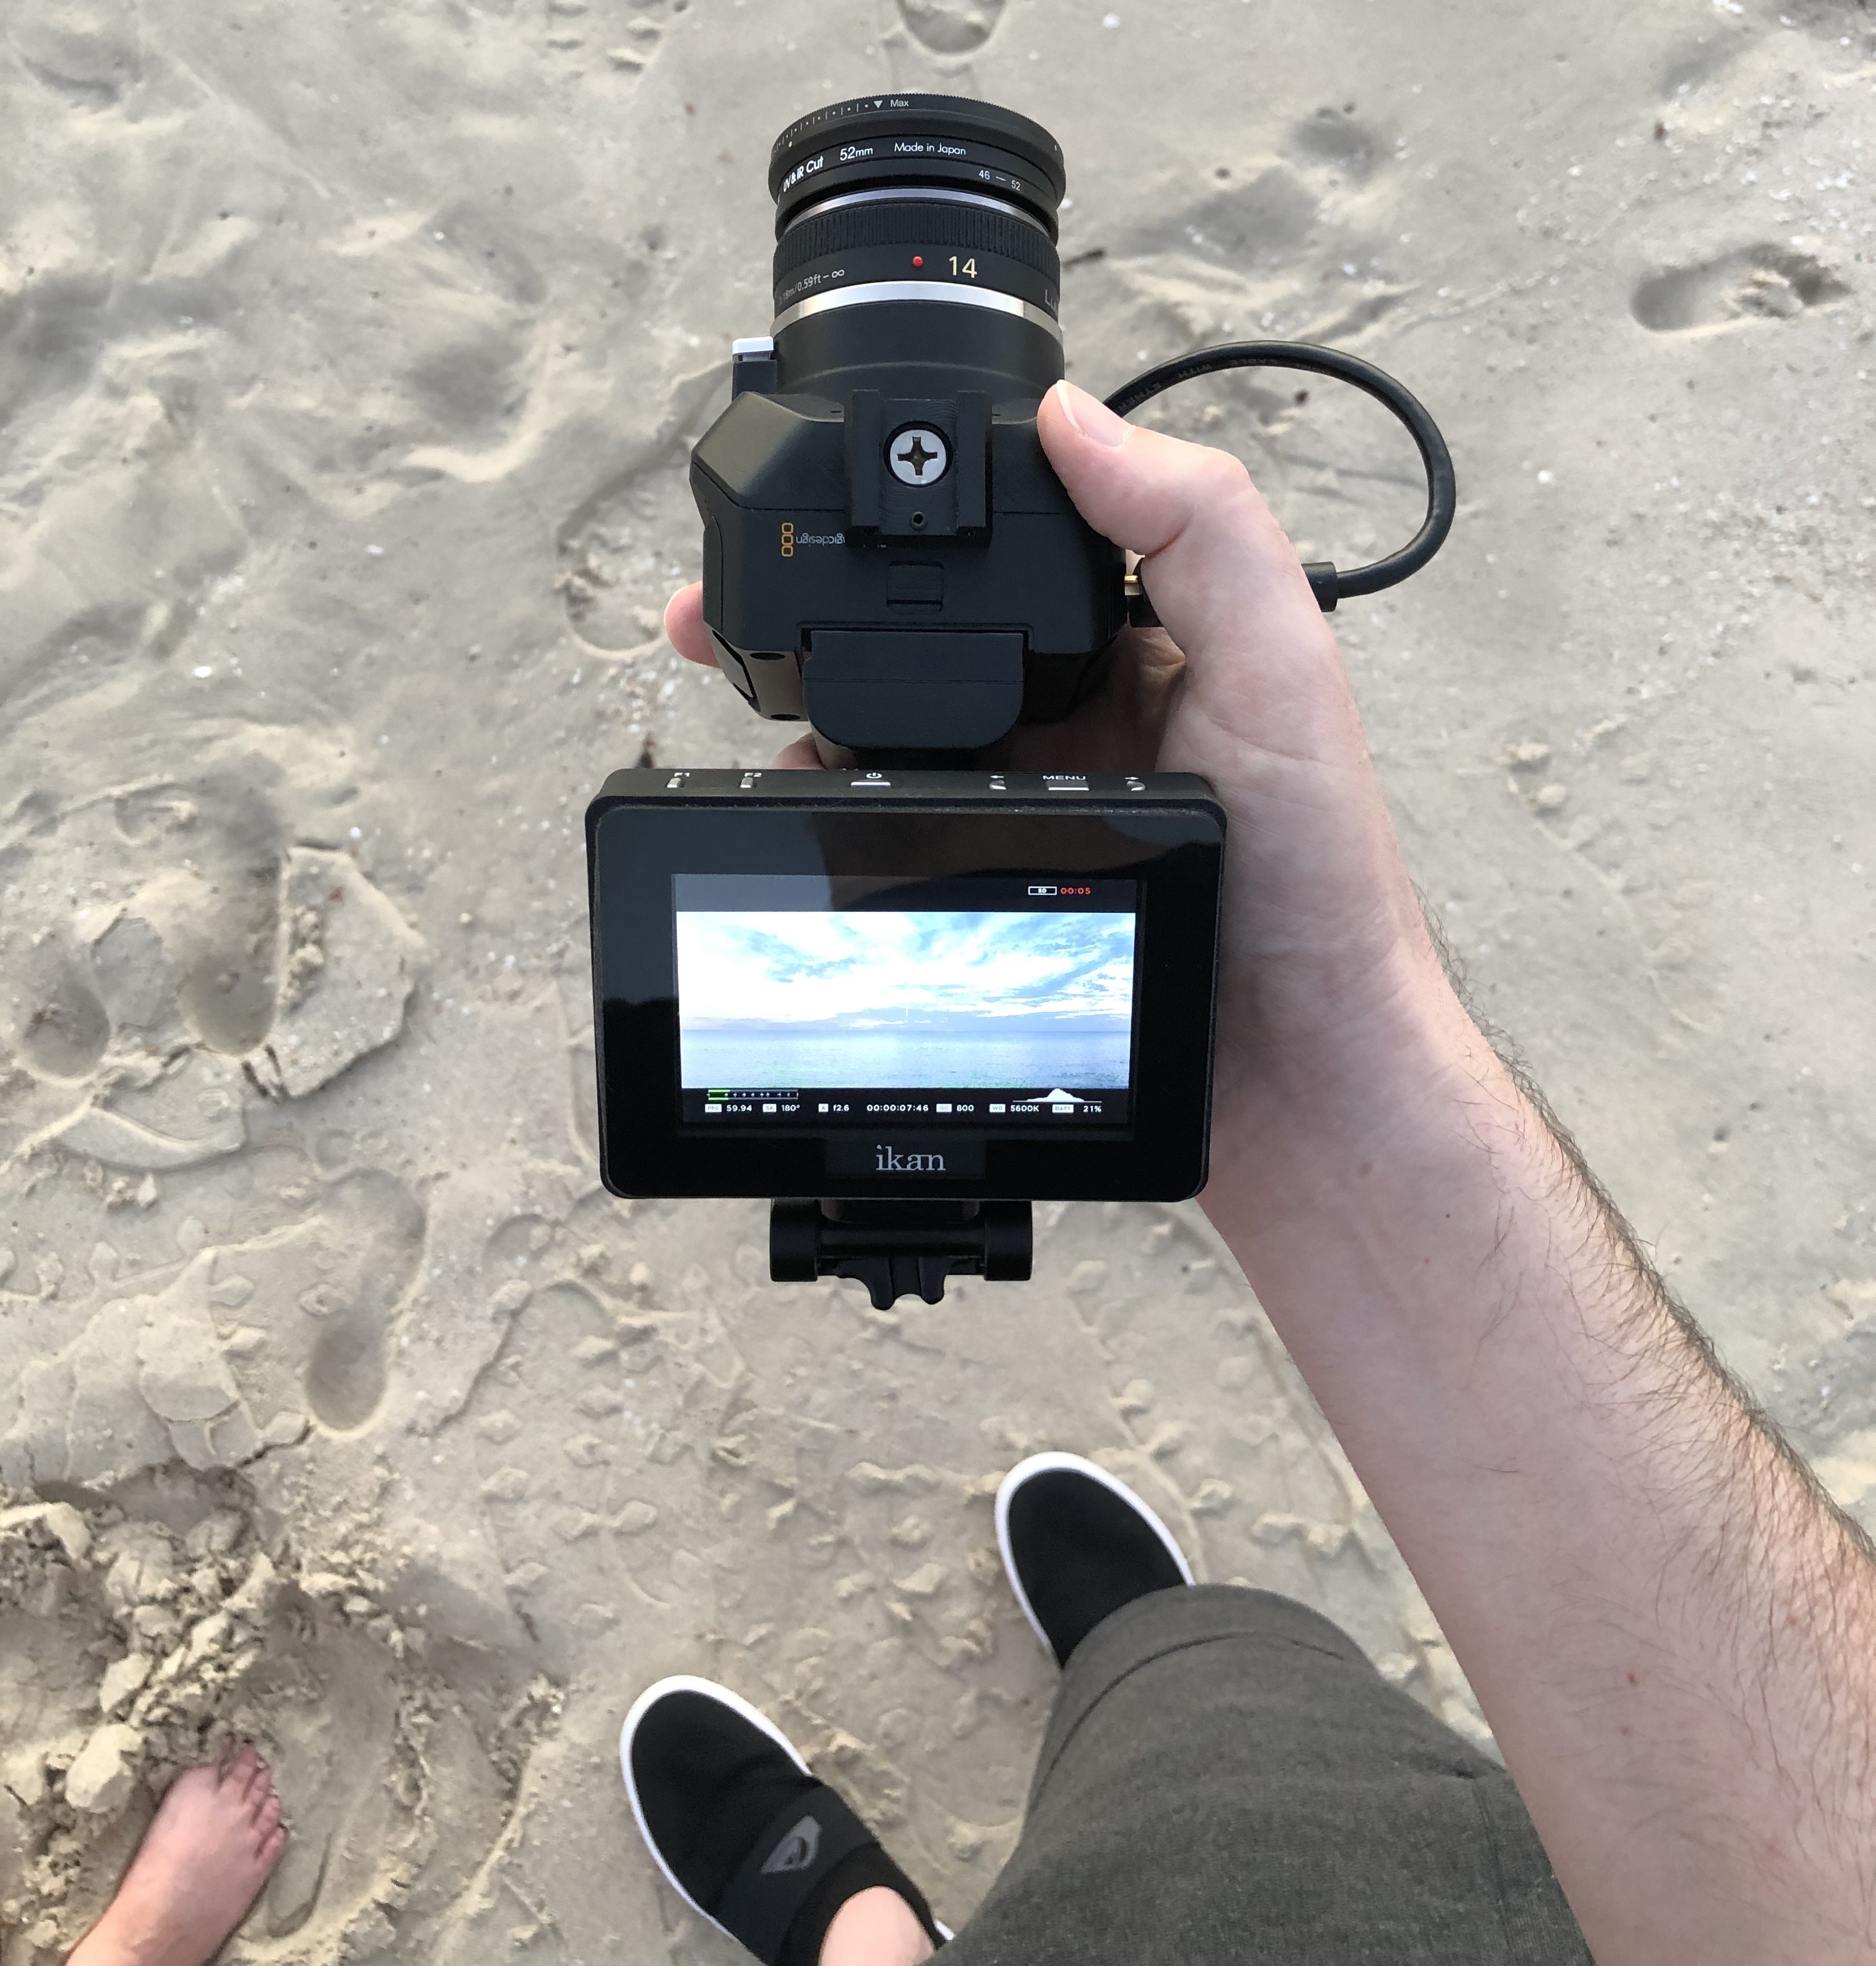
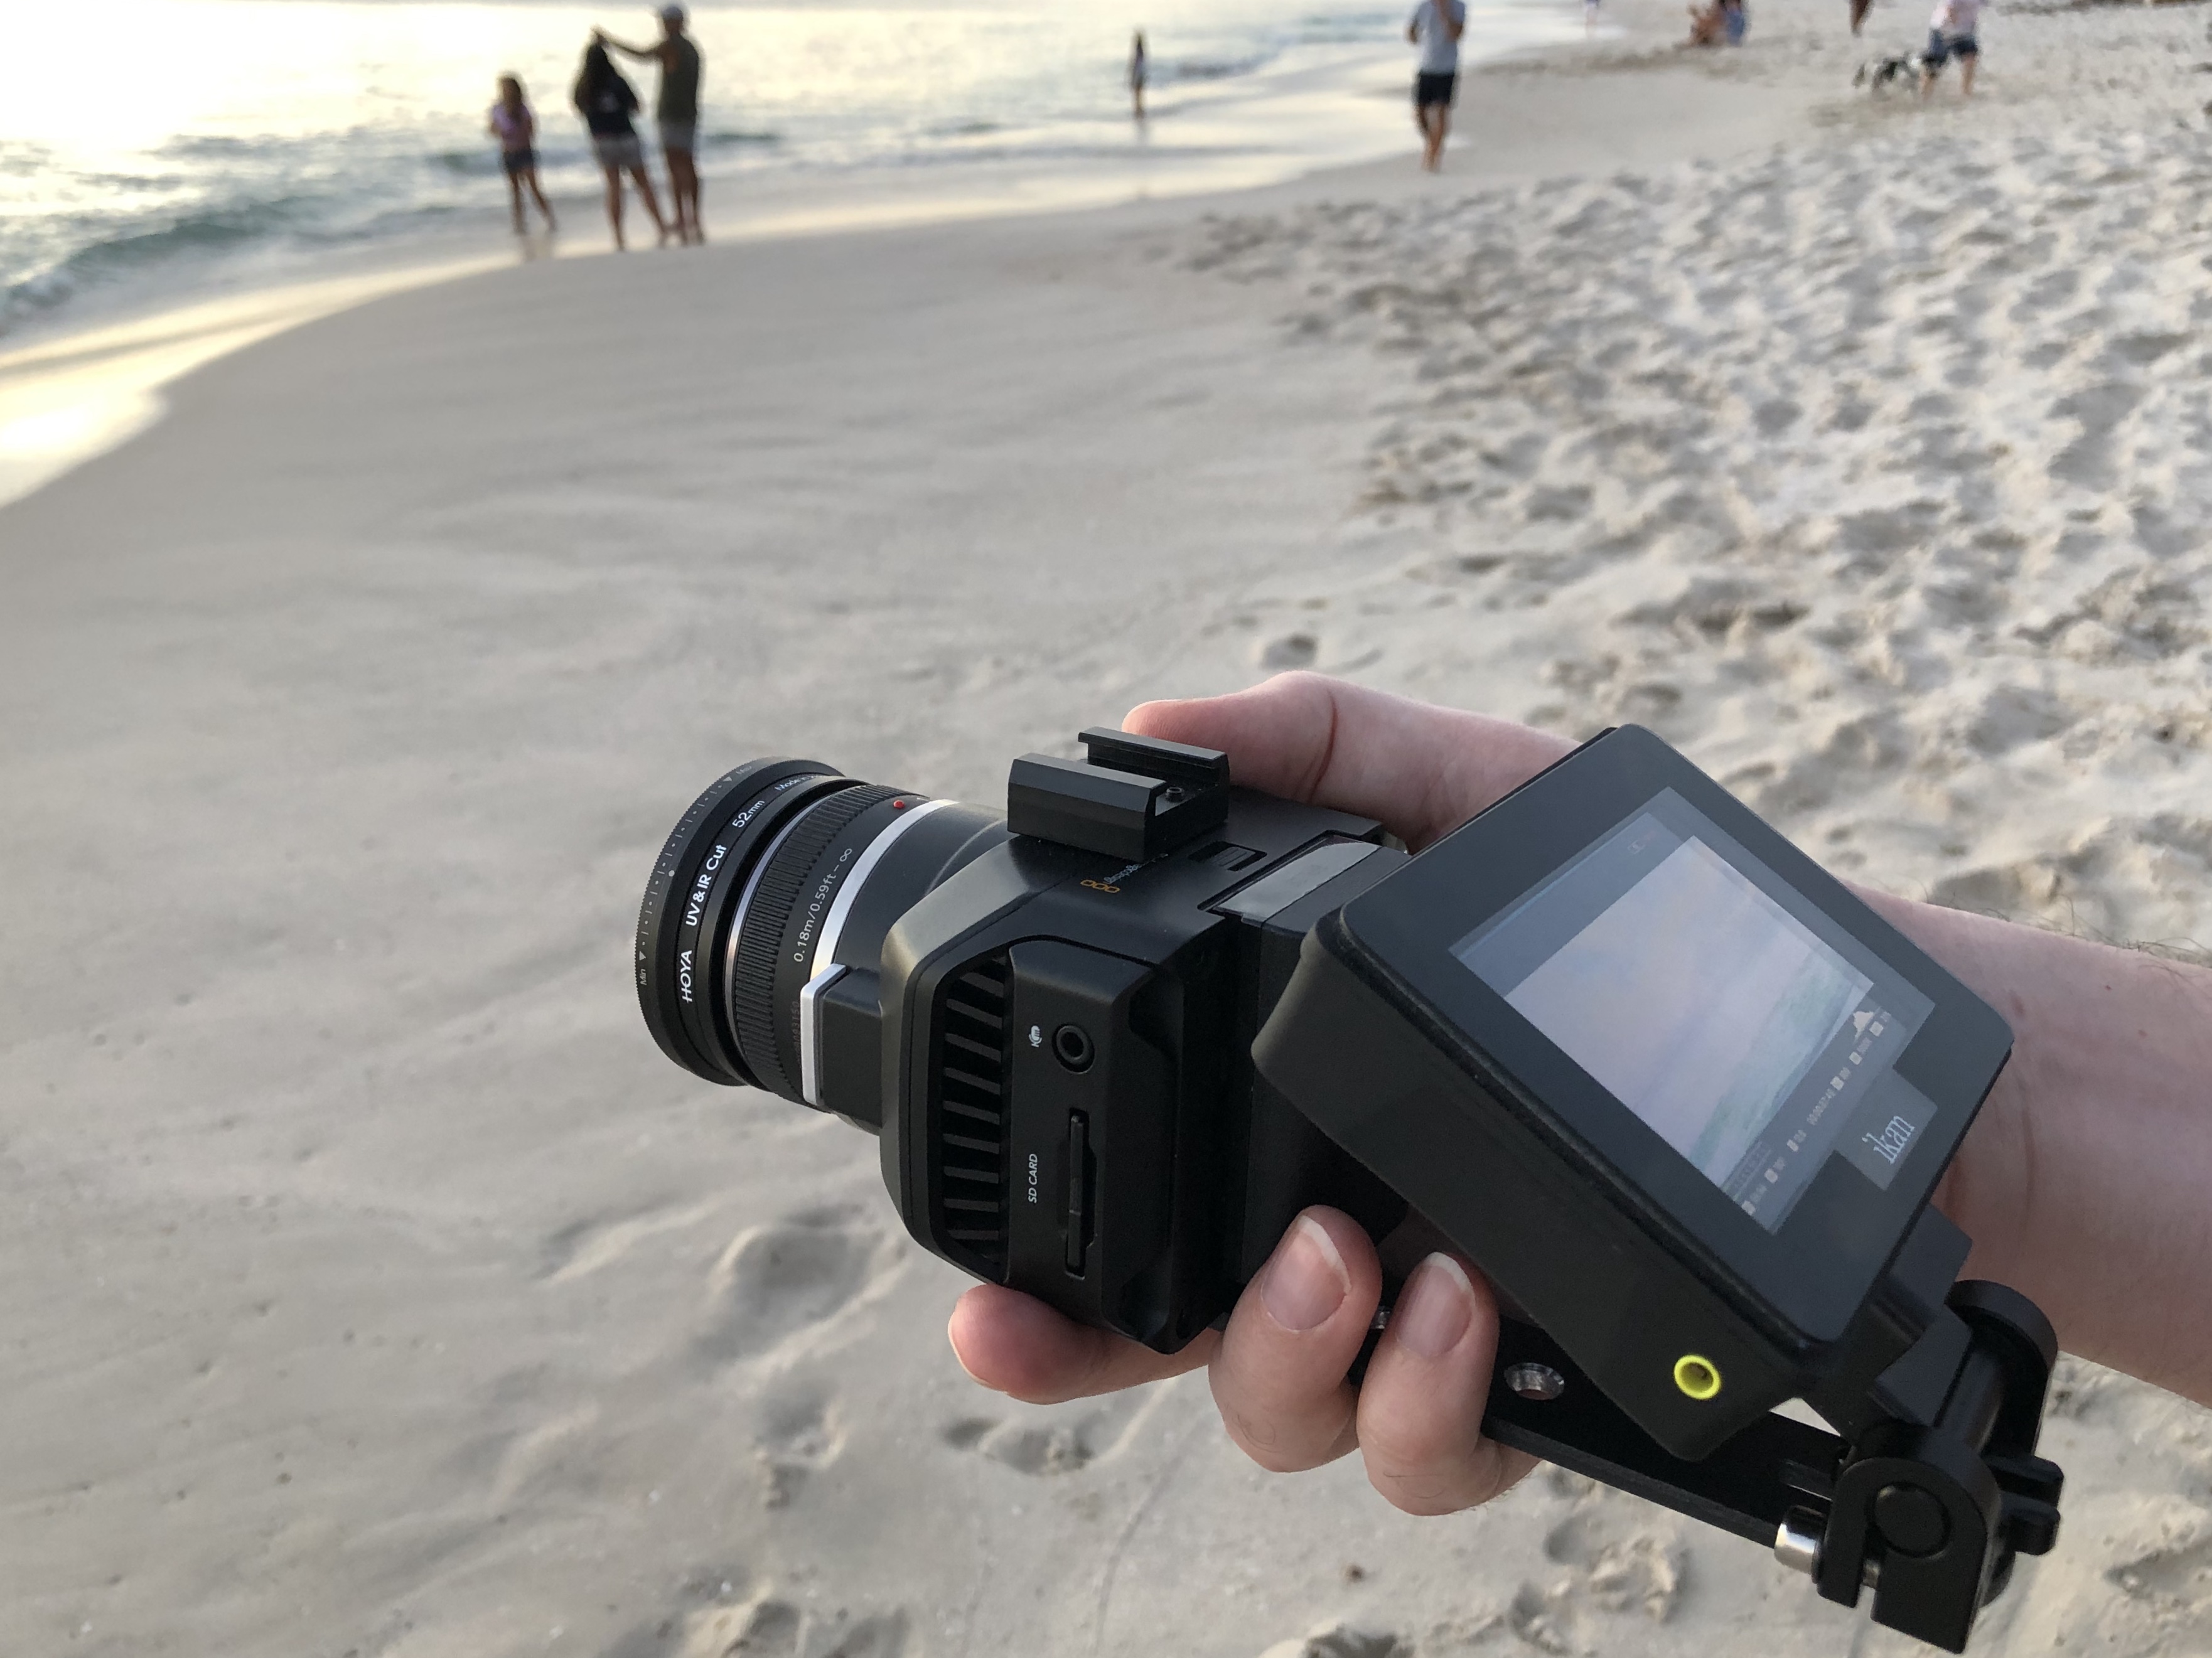
I shot prores, which does a good job of minimising the aliasing, and also the 14mm isn't tack sharp wide open. The setup for that video was this: So the image pipeline was: vND -> IR/UV Cut-> 14mm at f2.5-> Micro -> Prores A number of people online say that there is a special synergy between the P2K / M2K and the 14/2.5 lens, so it could be that. Certainly as a 40mm equivalent prime it's a nice focal length, although it's at the longer end of what you'd want to hand-hold unless you had a bigger rig. I'm also looking at options with OIS like my 14-42/3.5-5.6 kit lens, the 14-42/3.5-5.6 PZ pancake lens, and also perhaps the 12-35/2.8 so will see how I go. It would be great if there was a wider zoom with OIS, but the crop factor is working against us here. I have bought a Black Promist filter since I shot this as well, so I'm keen to try that out on a real location too.