

tupp
-
Posts
1,151 -
Joined
-
Last visited
Content Type
Profiles
Forums
Articles
Posts posted by tupp
-
-
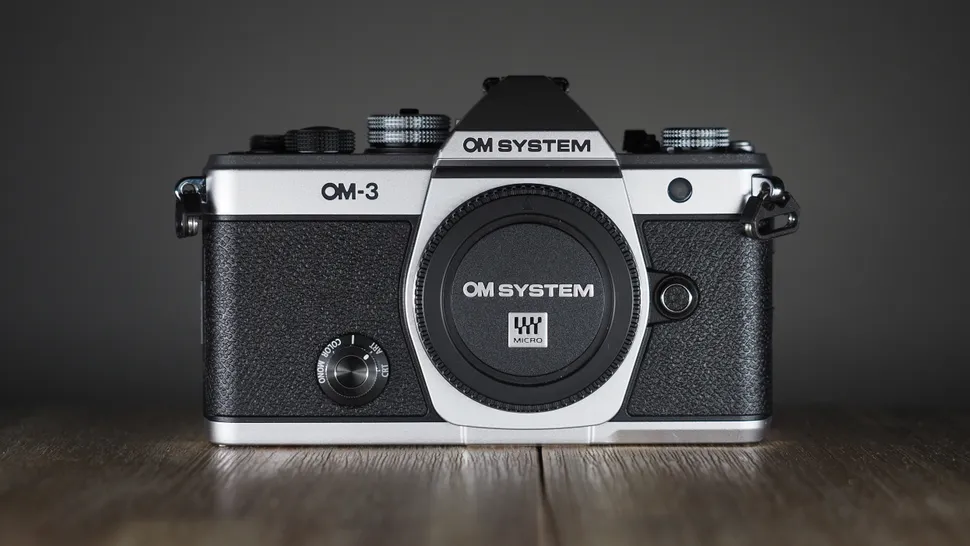
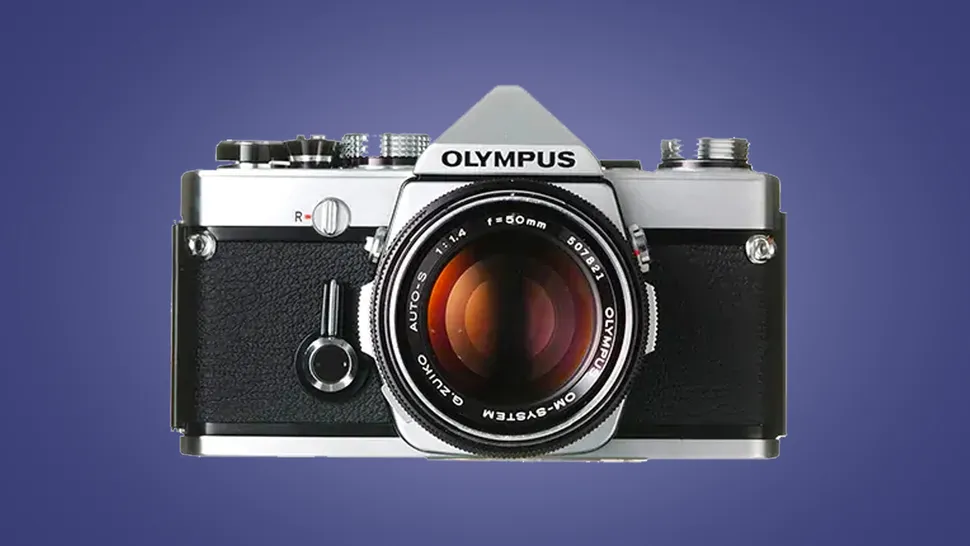
The design DNA of the OM-3 seems to flow from the OM-1 SLR of the 1970's:

-
Panasonic GH7
In: Cameras
Micro Four Nerds video:
-
Rossmann made three recent videos:
-
With a dark teal subject, it should be possible to remove a key green or a key blue background. Many digital keyers come with parametric filters that allows selection of a precise keying range in regards to hue, saturation and luminance.
Of course, the same parametric controls can be used to key out other colors than key green or key blue.
If your camera can be locked down, you could use a difference mask. In this method, one shoots the background without subject, and, then, with the camera still locked down, the subject is shot in front of the background. The difference mask then keys out any part of the image that is identical in both videos. So, the unobstructed background becomes transparent.
Here is a video that shows a few other possible keying techniques using After Effects:
-
Ricoh just announced a monochrome version of the Pentax K-3 Mark III DSLR.
Evidently, it is 25.73MP, and it shoots up to 4K 30P video.
Here is a video showing footage and stills from the camera.
-
Here is a video showing ways to install and use AgX in Resolve:
It's free and open source. The way it attenuates saturation in the highlights is similar to what Arri does in-camera (and similar to film emulsion). I think that AgX additionally reduces saturation in the shadows.
If you have suffered "rat piss yellow" and "nuclear cyan" in the brighter/highlight areas, it might be good to try AgX. After using the related Filmic RGB module in Darktable, I want to go back and regrade all my images with AgX/Filmic.
-
On 11/1/2022 at 5:55 AM, Andrew Reid said:
Impressive strides?
😆
Cinemarting achieved first light from an 8K cinema camera in a relatively short time, and within ten months of that milestone they had self-contained, working prototypes. Some would say that such accelerated steps ("strides") were remarkable ("impressive").
On 11/1/2022 at 8:05 AM, BTM_Pix said:Impressive Strides sounds like the name of a shop in 1960s Carnaby Street where Austin Powers would go to buy his best kecks.
One can almost hear the echoes of snickering coming from a junior high school classroom. Glad that we can all laugh at jokes that avoid personal digs. Keep 'em coming!
Actually, I would say that "impressive strides" sounds less like an Austin Powers 1960's Carnaby Street shop and more like the extraordinary accomplishments from someone who creates wireless camera accessories and camera apps (in addition to those who create cinema cameras).
-
5 hours ago, Andrew Reid said:
Nobody is allowed an opinion if they haven't first developed, designed and marketed a cinema camera.
I guess we should all just shut up then
Apart from tupp?
Not sure how one could come to such a notion from my post.
I was responding to the latest episode in a long line of ridicule directed at a few intrepid individuals who took on the challenge of creating an 8K cinema camera -- and who actually achieved working prototypes.
It's one thing to criticize the indomitable, powerful giants such as Canon, Sony, Fuji, Blackmagic, etc., but it seems distasteful to pick on a couple of little guys with scarce resources making bold, impressive strides (regardless of their eccentricities).
-
On 10/25/2022 at 2:28 PM, tupp said:
Global shutter and S16 optics are significant to the look of the D16.
On 10/25/2022 at 5:47 PM, BenEricson said:It really depends what people define the "film look" to be.
I was referring to the look of the D16 -- I wasn't referring to film emulation.
On 10/25/2022 at 5:47 PM, BenEricson said:... it has the caked on color look due to the CCD sensor. There's also nice look noise and really nice baked in looks.
When's dessert?
Actually, "caked-on" color is a good way to describe the look from some CCD's (but not from all CCD's -- consider look of the striped CCD of the Pany-Genesis/Sony F35).
1 hour ago, Grimor said:My vote is for Cinemartin 🤪
That's a real funny joke.
However, Cinemartin rapidly achieved working prototypes of a cinema camera. They preceded the Octopus camera (still in development, but which is discussed with interest in this very thread) by demonstrating the use of a similar (but earlier) Ximea sensor module in a cinema camera.
What camera developments have you achieved?
-
Global shutter and S16 optics are significant to the look of the D16.
-
2 hours ago, Ty Harper said:
... should I calibrate each camera using their individual custom WB functions or by inputting the initial base temp I got via the Sekonic C-800? ... And while I know the WB calibrations from each camera will be off from each other to some degree - I wonder whether using the base color temp of the C-800 will result in the cams being off by the least degrees.
I don't know which method is more "accurate" in matching the cameras to the reading on your meter or in matching the cameras to each other. I would guess that the difference is minor, but it would be interesting to see a comparison of the two methods.
I know that merely using the custom white balance on each camera without a color meter will get a close enough color temp match, and it is quick, easy and consistent. Either way, you will still be tweaking sliders (or clicking eyedroppers) in post to get the final correction.
By the way, it is generally a good idea to avoid mixing light sources of different colors on the same side of the subject, especially on a person's face.
Also, you might try leaving a slight difference between the color temperature of the exterior light and that of the interior lights. I usually keep the interior key light neutral. If a window is visible in frame and if only skylight is streaming through it, I tend to keep it around 1/4 CTB -1/2 CTB from neutral. If direct sunlight is visible in the background, I sometimes keep it at neutral -1/4 CTO.
-
If you are doing a multi-camera shoot, first put the grey/white card and color chart together, lit by the dominant full-spectrum light source of the scene/event. Flag other light sources from hitting card and chart. To avoid glare, the light source should be at about 45 degrees (or less) to the plane formed by the card and chart.
Position all the cameras side-by-side as close as possible to each other, about 6-8 feet directly in front of the card and chart, and perform a custom white balance on each camera.
Then, record about five seconds of footage of the card and chart with each camera.
If the dominant light source of the scene/event is intentionally not full-spectrum, perform the above procedure using a separate full spectrum source with a color balance that is close to color of the dominant source of the event/scene.
If you are shooting at separate times/locations with each camera (not a multi-camera session), do the same procedure above at each time/location with the one camera.
Of course, if you are shooting raw, the white balance will not affect the captured image, but having a custom white balance should provide a decent starting point for your NLE and for color grading software. The footage of the charts will help in more finely "dialing-in" the color correction in post.
-
-
On 8/9/2022 at 9:26 AM, tupp said:
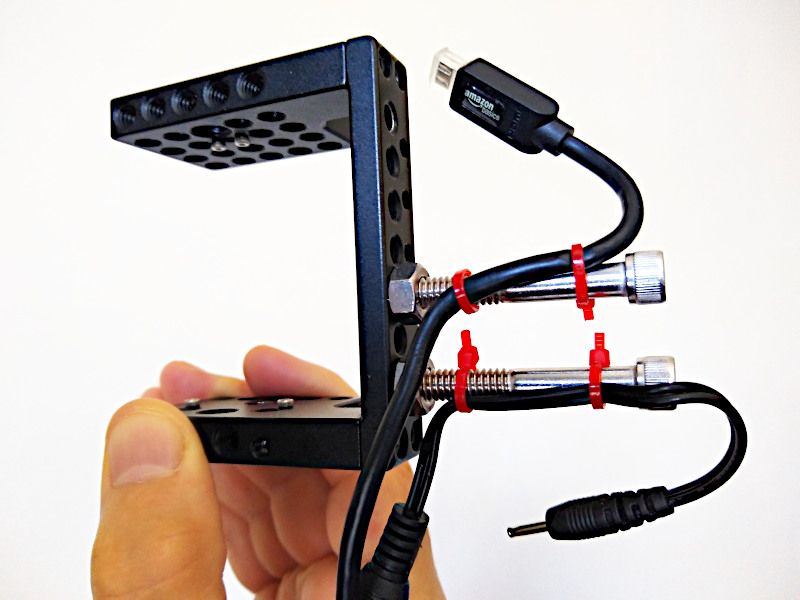
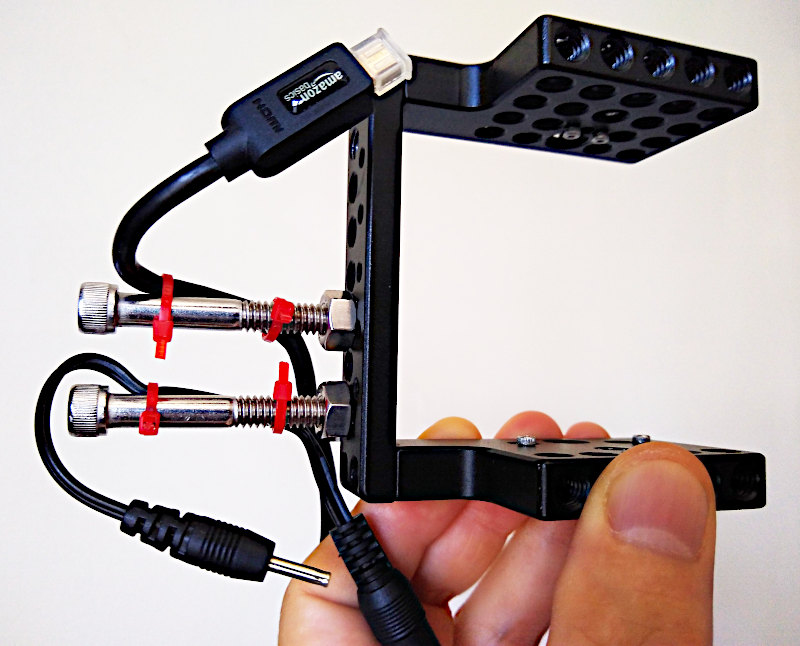
I have done this before on a caged OG BMPCC simply with two, long, stainless steel, 1/4"-20 bolts and cable ties. nothing would happen if you pulled on the cables. We were able to keep the camera rigged in a bag with a monitor, external battery and lens attached.
On 8/9/2022 at 10:10 AM, FHDcrew said:Can you send a picture?
Here you go:

- webrunner5, FHDcrew and kye
-
 2
2
-
 1
1
-
4 hours ago, FHDcrew said:
My question is how to rig this so that my recorder can stay attached, and this clamp setup can stay attached without bending the HDMI port on my Z6, saying as the camera will be in my bag which can be jostled around at times.
There are countless ways to solve this problem. The cables just need strain relief to the cage and the connectors need to be protected from flexing.
I have done this before on a caged OG BMPCC simply with two, long, stainless steel, 1/4"-20 bolts and cable ties. nothing would happen if you pulled on the cables. We were able to keep the camera rigged in a bag with a monitor, external battery and lens attached.
@BTM_Pix has made an excellent suggestion. I can also envision a solution using the aforementioned 1/4"-20 bolts plus a couple of washers and a small dollup of PC-7 epoxy (or plumbers epoxy -- but you have to work fast!).
-
-
2 hours ago, hyalinejim said:
I'm a sucker for cheap wide angle and have found a nice contender for APSC and speedboosted M43
It looks good! Thanks for the test!
I bought the Canon 10mm-18mm EF-S lens on the strength of this video by @ZEEK:
@ZEEK says that the lens works on full frame down to about 14mm, but he mainly uses it with a speedbooster on the EOSM.
- PannySVHS and hyalinejim
-
2
-
I know that there are a lot of normal open source keyers, but in regards to AI keyers, I don't know what's available in open source other than what you have linked in this thread.
-
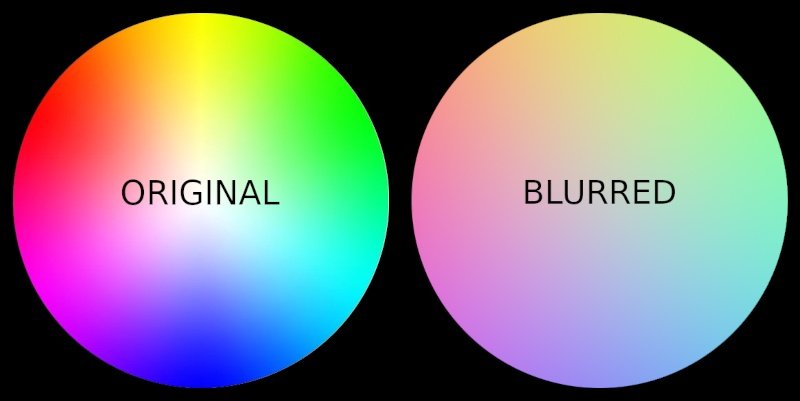
6 hours ago, androidlad said:
the "Smooth Skin Effect" is a blur effect only, it was added to GFX cameras a long time ago, it does not affect colour.
Blurring definitely affects color:
Note that there are none of the more saturated tones in the blurred version.
Likewise, lowering resolution (within the same bit depth) reduces color depth.
-
7 minutes ago, Emanuel said:
Does it beat the handy Osmo Pocket series?
Camcorder, right? So, forget that cinematic mantra then
OP said that the cameras will be used in a "talk show" setting.
So, they will likely be on sticks and require a lens that can get fairly tight, with smooth zoom-in/zoom-outs.
-
Sounds like small camcorder with a decent rocker zoom and manual capability would be ideal.
Markus Pix recently touted the Sony CX405, but it would be smart to look at offerings from other brands:
Tell your friend to put all the cameras side-by-side before shooting, and then to white balance them simultaneously off of the same white/gray card. Additionally, your friend should shoot a short clip of the white/gray card with each camera -- just in case!
- webrunner5 and kaylee
-
2
-
44 minutes ago, FHDcrew said:
My concern however is privacy. The successor to this project, Robust Video Matting, has the following on its GitHub page: that it was developed at ByteDance Inc. I know this company owns TikTok and are known for storing user data on Chinese servers. My question is, is background matting v2 safe to use? I mean the developers seem like fine people, but the lead developer worked at ByteDance for a while, and just seeing that text I’m the GitHub description I guess got me a little worried. Should I be concerned?
Robust Video Matting appears to be open source, licensed under the GPL-3.0.
If that is so, there isn't too much to worry about -- the source code is open for all to scrutinize.
-
1 hour ago, Attila Bakos said:
Okay, for those who find this kind of stuff interesting, here is a comparison of Cr channels (with added contrast for easy visualisation) from the C70, X-T3, and X-H2s
Thanks for comparison!
The Fuji cameras definitely introduce a significant blotchiness that is not inherent in the Canon footage.
It would be interesting to see unaltered footage without the added contrast. I wish that the Canon position/framing was aligned more closely with the Fujis.
-


How come expensive camera's look so much better?
In: Cameras
Posted
Kendy Ty and his T2i?