Leaderboard


Popular Content
Showing content with the highest reputation on 01/15/2024 in all areas
-
Some underwater macro marvel. Not bad for a little pocket cam. Upload is 1080p, so wandering if it was even filmed in 4K. So here the little Lumix LX10 for some underwater footage. I really like the framing and the cinematography as such. What do you think? @Davide DB 🙂2 points
-
Hello filmmakers. I hate to do it again, but I’d love fresh new perspective for the new year. I’ve purchased a Sigma FP as another cam, and am rigging it out. I’m attracted to its small form factor. So mounting a V-Mount defeats the purpose of keeping it small. So I’ve decided to go with NP-F batteries to power the rig. I’ve had to have the camera repaired by sigma once already as somehow I fried the PCB board by failing to shut off my camera before disassembly. I’ve since upgraded to SmallRig’s latest NP-F plate, which has built-in overcurrent and short circuit protection (to prevent me from frying the board again since I tend to move fast sometimes.) Because of this, I’ve created a whole new fear of frying another board, with any camera in my future. I feel better having the new SmallRig plate, but also have noticed some NP-F batteries advertise that they have a built in chip to also protect from over-current/short circuiting. I can’t get myself to purchase a true Sony NP-F as they’re so expensive and seemingly hard to find. So, I’m gonna give some Amazon brands a chance. I also have a gift card to Amazon from the holidays, so I’d prefer to use it. I’ve used Wasabi Power batteries for other cameras and have generally been happy. Check out this link though, as this person disassembled a lot of 3rd party NP-F batteries and found that they’re not even wired to deliver their claimed capacity. He also disassembled a Wasabi Power NP-F and found there was steel taped to the batteries. Seems sketchy, unless there’s a real use that I’m unaware of? Bummer. The only high capacity 990 I can find on Amazon is from Kastar. The reviews also are not great, claiming that the capacity isn’t as high as claimed. It also says it has a built-in circuit protection chip. Anyone like Kastar batteries despite being seemingly some of the cheapest on Amazon? The Wasabi Power NP-F (linked above) has great reviews, has built in chip, but it looks like the forum poster (linked above/first link) left their findings as a review too. Bummer, as I like this brand. They have a good warranty too. Still considering it anyway. I know Watson batteries are generally good. But the price is still high. Still onsidering it though. Any other decent 3rd party Amazon brands ya’ll have had a good experience with? Again, I don’t wanna fry my board. So a battery with a circuit protection chip is preferred. Thanks all!1 point
-

Blackmagic Micro Studio Camera 4k G2 - now shipping
IronFilm reacted to Yannick Willox for a topic
I really do not get it. If it would have bluetooth and the same record/crop modes as P4K they would sell a shitload of these camera's ! Apparantly it does have Gyro.1 point -
I’m working on a new reel and website. I had a weird year. Jan 23: got fired from my full time job feb - sept 23: got fairly depressed due to being rejected after around 350 job applications. at the same time i tried out freelancing while searching for a new job, done a little decently paid corporate work, a lot of barely paid and unpaid work as a dp, gaffer or colorist on short films and music videos. oct - dec 23: got lucky due to a cinematography bootcamp i followed and ended up working as a DIT on a feature. income wise it ended up being almost the same as 2022, so hopefully the freelancing thing will pick up more steam. I’m going to try making some spec ads with some directors i know this year, so we could get work that way.1 point
-
I know that video and the author well. yes it's shot in 4K. To achieve such extreme magnification he used no less than three additional wet lenses (diopters) stacked together. AOI UCL-09 closeup lens, Inon UCL-165 closeup lens, Backscatter Macromate Mini closeup lens. It is inevitable that the image will degrade, especially at the edges. Especially the last lens is the result of desperation to increase magnifications. It is a GoPro-specific lens. Surely with just one or two stronger lenses the quality would have been better, but one tries to make soup out of the ingredients one has 🙂 Still, the shot is exceptional for the ethology of this species.1 point
-
Well, actually yes, for most people, most of the time. It’s not quite what I’d do today but was an approach I took once. The phone is the most convenient but for me there is zero joy in that. I personally cannot be bothered to lug around a full sized mirrorless with a decent sized zoom, never mind a bag full of options. If I was going on safari, fair enough, but more general travel & trips, nah. The compact for me could work…but it’s a bit too close to the phone so I always ended up using the phone. This is based on a Sony RX100V and later the ZV1. The sweet spot for me therefore would be in no particular order, but selecting one set up from each sensor size: Olympus OM1 + 12-40mm f2.8 Fuji XS20 + Sigma 18-50mm f2.8 Sony A7CR + 20-70mm f4 I think the APSC Fuji/Sigma combo is the most compact and lightest and though has a shorter focal length than the M4/3 combo, but has more cropping potential, but there is just something special about the OM1 and that lens that makes it very satisfying. I had it briefly, loved it, but it did not have the outright pro capability compared with my FF stuff for my work, so sadly sent it back. I personally would go with the Sony because it’s basically as compact as the others, the lack of a decent rear LCD and only a single card slot would not bother me for non-pro work and neither would f4, because the big draw would be being able to crop the f*ck out of that 60mp full frame sensor and forgo the ‘need’ for a longer focal length. For me, a travel camera that is not pro work needs to be a ‘one and done’ set up. The only other contender for me would be the Sigma FP-L but it’s just (sadly) too damned quirky and flawed.1 point
-
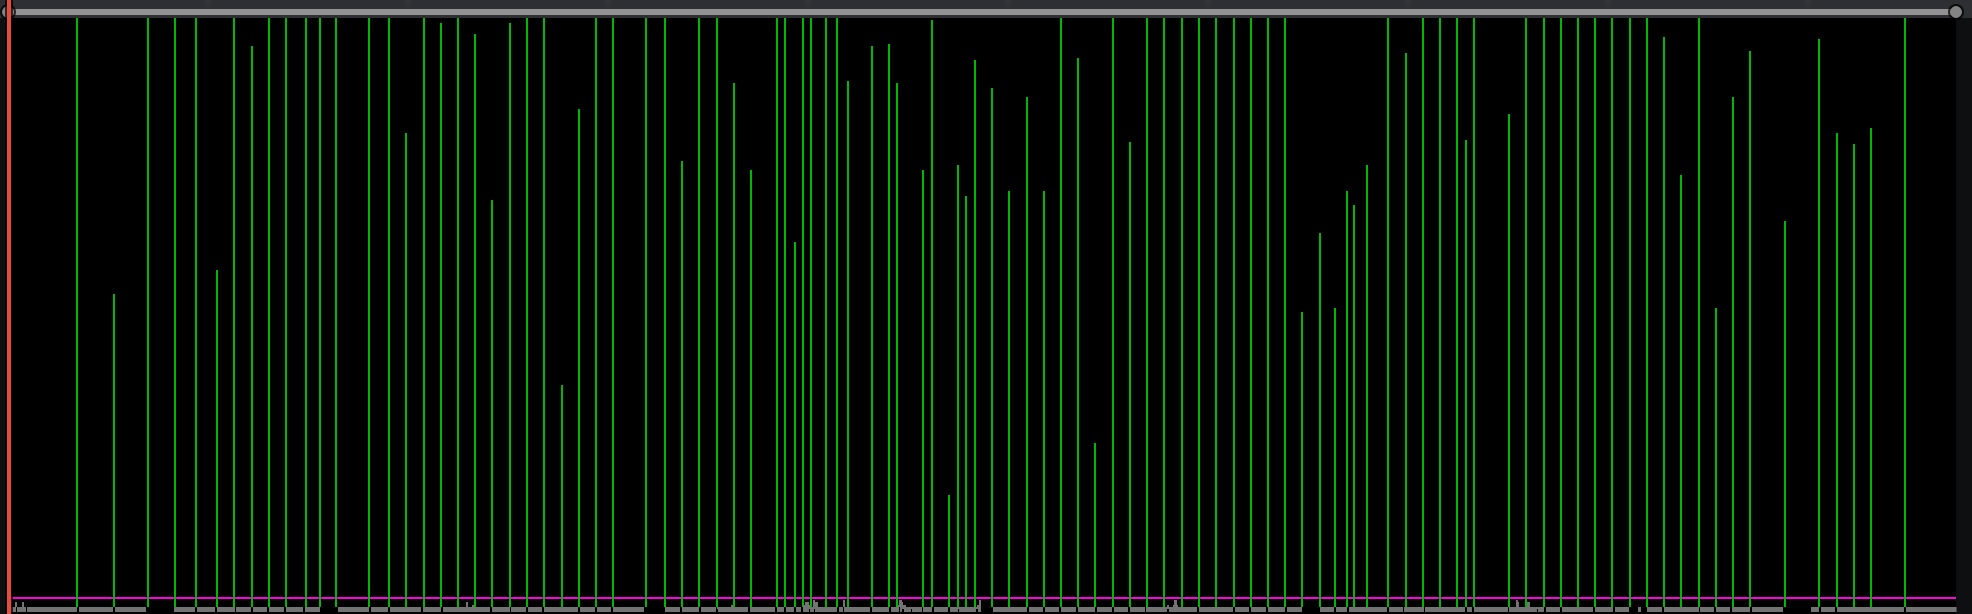
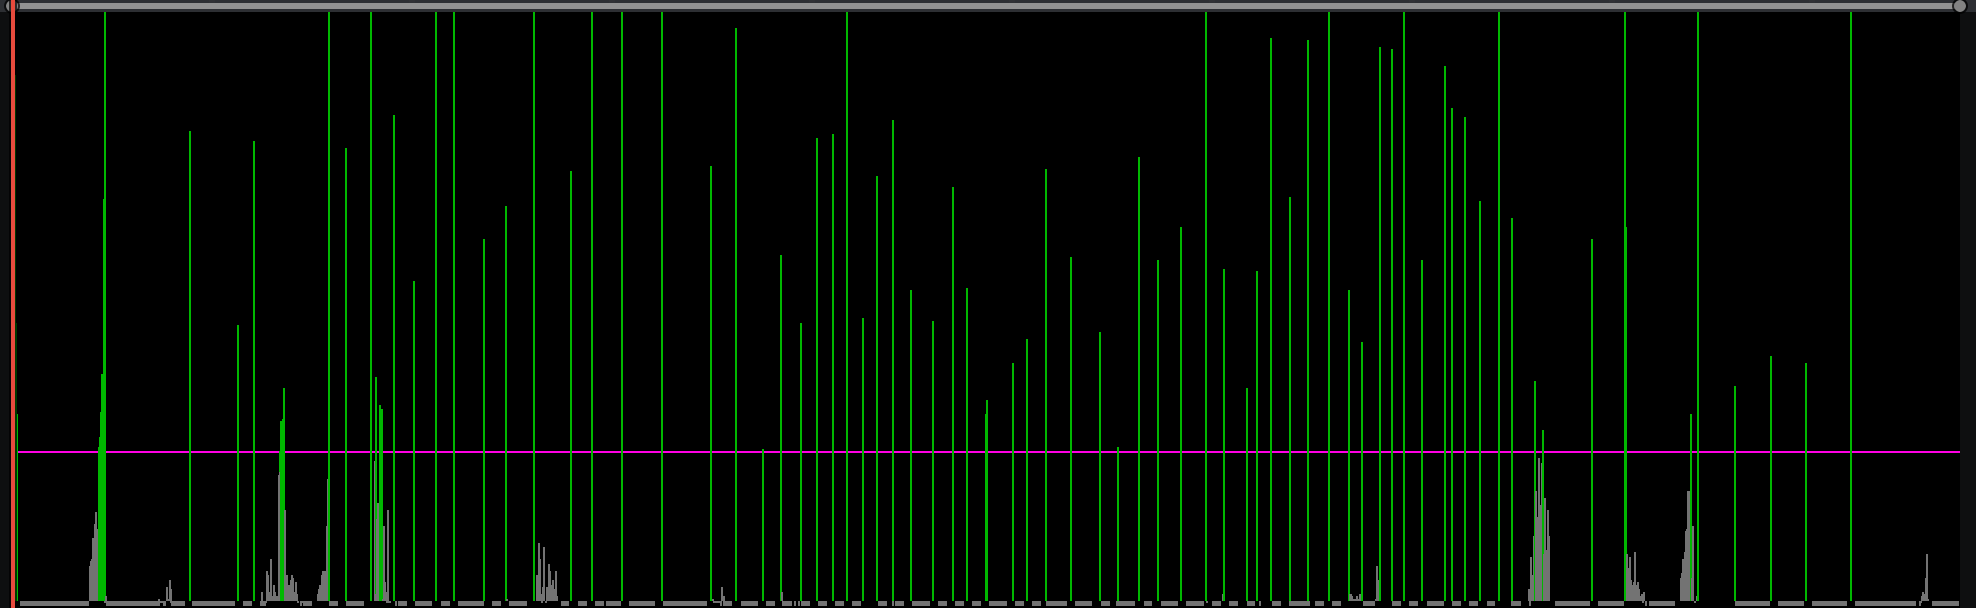
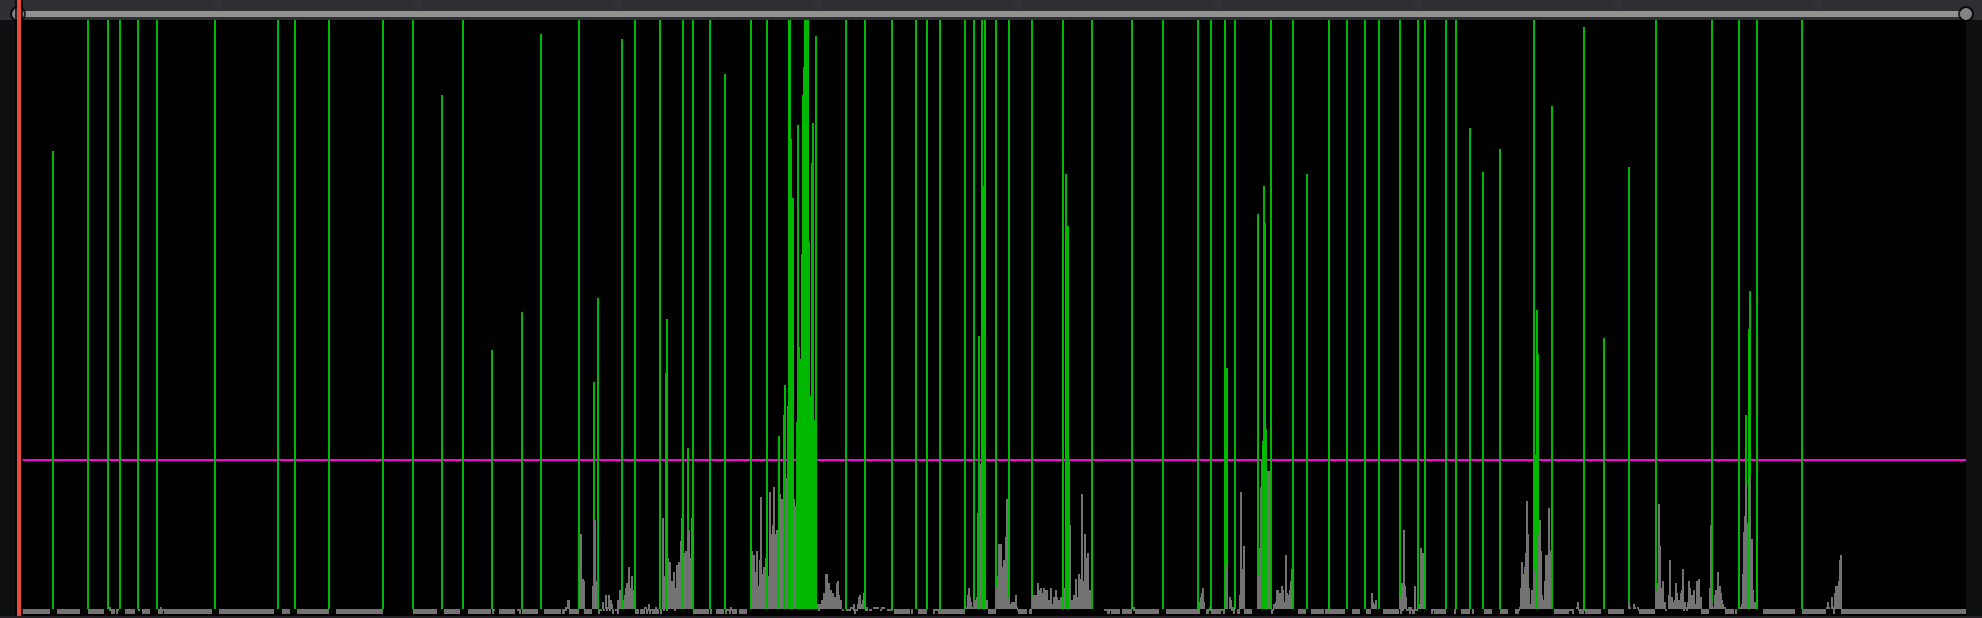
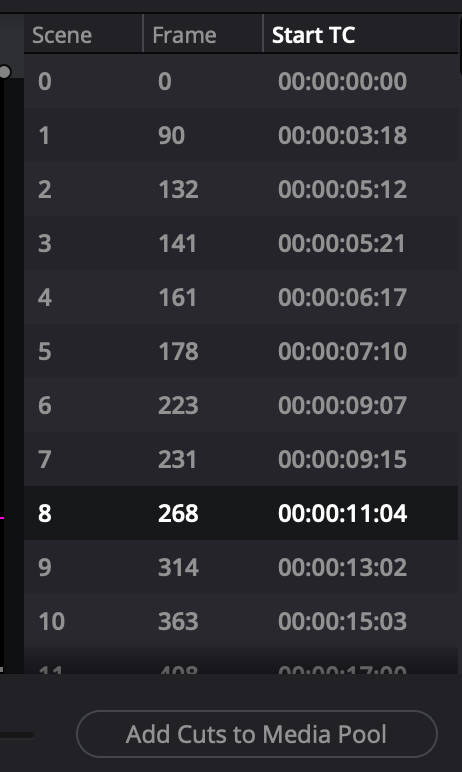
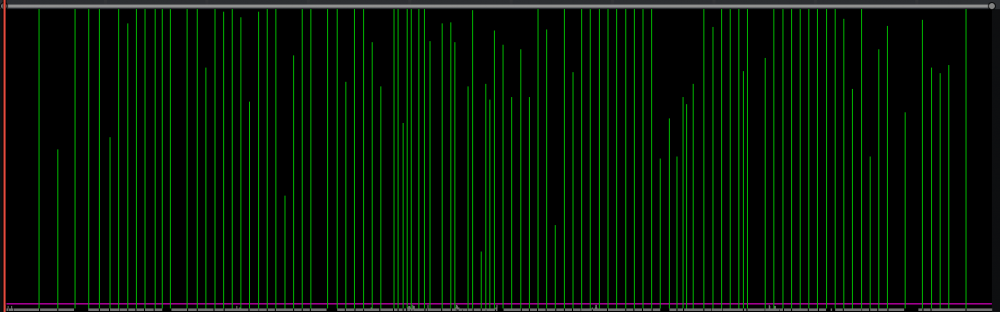
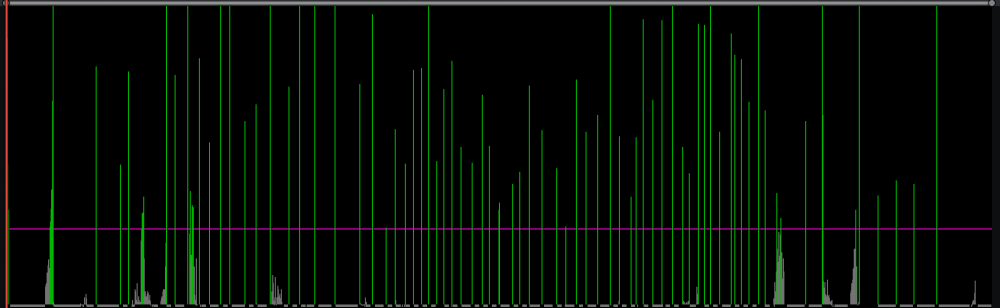
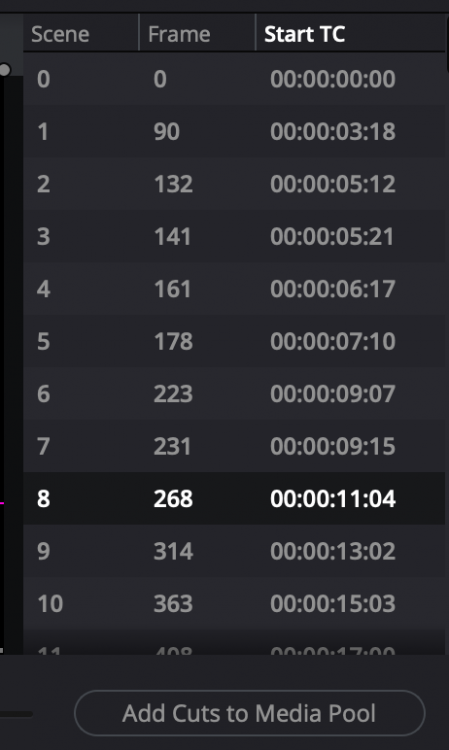
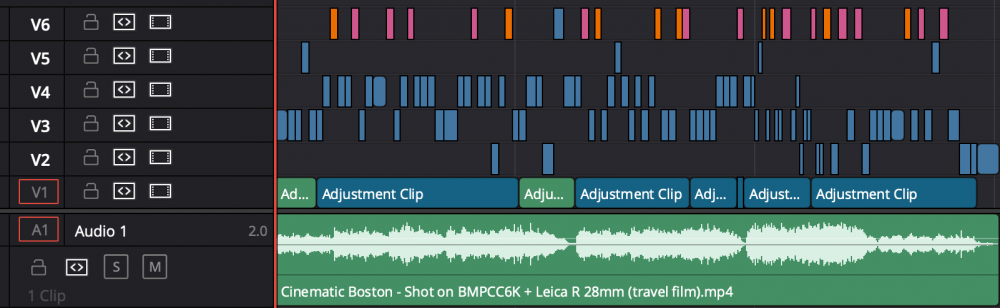
As I gradually get more serious about learning the art of editing, I've discovered it's a very under-represented topic on social media. There are definitely some good resources, but compared to cinematography or colour grading, it's much more difficult to find resources, especially if your interest isn't purely narrative film-making. A good strategy is to search for editors by name, as often the good stuff is just called "<name> presents at <event>" and no mention of editing or even film at all. However, you can search for editor after editor and find nothing useful at all. As such, I've now started analysing other people's edits directly, hoping to glean interesting things from their work. My process is this. Step 1: Download the video in a format that Resolve can read I use 4K Video Downloader for Mac, but there's tonnes of options. You're probably violating terms of service by doing this, so beware. Step 2: Use the Scene Cut Detection feature in Resolve Resolve has this amazing function that not many people know about. It analyses the video frame-by-frame and tries to guess where the cut points are by how visually different one frame is from the previous one. It's designed for colourists to be able to chop up shots when given a single file with the shots all back-to-back. This isn't a tutorial on how to use it (the manual is excellent for this) but even this tool shows useful things. Once it has analysed the video, it gives you the window to review and edit the cut points. Here's a window showing a travel video from Matteo Bertoli: What we can see here is that the video has very clear cuts (the taller the line the more change between frames) and they occur at very regular intervals (he's editing to the music), but that there are periods where the timing is different. Let's contrast that with the trailer for Mindhunter: We can see that there's more variation in pacing, and more gradual transitions between faster and slower cutting. Also, there are these bursts, which indicate fading in and out, which is used throughout the trailer. These require some work to clean up before importing the shots to the project. Lastly, this is the RED Komodo promo video with Jason Momoa and the bikers: There are obviously a lot of clean edits, but the bursts in this case are shots with lots of movement, as this trailer has some action-filled and dynamic camera work. I find this tool very useful to see pace and timing and overall structure of a video. I haven't used it yet on things longer than 10 minutes, so not sure how it would go in those instances, but you can zoom in and scroll in this view, so presumably you could find a useful scale and scroll through, seeing what you see. This tool creates a list of shots, and gives a magic button... Then you get the individual shots in your media pool. Step 3: "Recreation" of the timeline From there you can pull those shots into the timeline, which looks like this: However, this wouldn't have been how they would have edited it, and for educational purposes we can do better. I like to start by manually chopping up the audio independently from the video (the Scene Cut Detection tool is visual-only after all). For this you would pull in sections of music, maybe sections of interviews, speeches, or ambient soundscapes as individual clips. If there are speeches overlapping with music then you could duplicate these, with one track showing the music and another showing the speeches. Remember, this timeline doesn't have to play perfectly, it's for studying the edit they made by trying to replicate the relevant details. This travel video had one music track and no foley, so I'd just represent it like this: I've expanded the height of the audio track as with this type of music-driven edit, the swells of the music are a significant structural component to the edit. It's immediately obvious, even in such a basic deconstruction, that the pace of editing changes each time the music picks up in intensity, that once it's at its highest the pace of editing stays relatively stable and regular, and then at the end the pace gradually slows down. Even just visually we can see the structure of the story and journey that the video takes through its edit. But, we can do more. Wouldn't it be great to be able to see where certain techniques were used? Framing, subject matter, scenes, etc etc? We can represent these visually, through layers and colour coding and other techniques. Here is my breakdown of another Matteo video: Here's what I've done: V6 are the "hero" shots of the edit. Shots in orange are where either Matteo or his wife (the heroes of the travel video) are the subject of the video, and pink are close-ups of them V5 is where either Matteo or his wife are in the shot, but it doesn't feature them so prominently. IIRC these examples are closeup shots of Matteo's wife holding her phone, or one of them featured non-prominently in the frame, perhaps not even facing camera V4 and below do not feature our heroes... V4 either features random people (it's a travel video so people are an important subject) prominently enough to distinguish individuals, or features very significant inanimate objects V3 features people at a significant enough distance to not really notice individuals, or interesting inanimate objects (buildings etc) V2 are super-wide shots with no details of people (wides of the city skyline, water reflections on a river, etc) V1 is where I've put in dummy clips to categorise "scenes", and in this case Green is travel sections shot in transport or of transport, and Blue is shots at a location V2-V6 are my current working theory of how to edit a travel film, and represents a sort of ranking where closeups of your heroes are the most interesting and anonymous b-roll is the least interesting. You should adapt this to be whatever you're interested in. You could categorise shots based on composition, which characters are in the shot, which lens was used, if there was movement in the shot, if there was dialogue from the person in-shot or dialog from the person not-in-shot or no dialog at all, etc etc. Remember you can sort between tracks, you can colour code, and probably other things I haven't yet tried. NLEs have lots of visual features so go nuts. Step 4: Understand what the editor has done Really this depends on what you're interested in learning, but I recommend the following approach: Make a list of questions or themes to pay attention to Focus on just one question / theme and review the whole timeline just looking at this one consideration I find that it's easy to review an edit and every time you look at the start you notice one thing (eg, pacing), and then in the next section you notice another (eg, compositions), and then at the end you notice a third (eg, camera movement). The problem with this is that every time you review the video you're only going to think of those things at those times, which means that although you've seen the pacing at the start you're not going to be noticing the compositions and camera movement at the start, or other factors at other times. This is why focusing on one question or one theme at a time is so powerful, it forces you to notice things that aren't the most obvious. Step 5: Look for patterns We have all likely read about how in many films different characters have different music - their "theme". Star Wars is the classic one, of course, with Darth Vaders theme being iconic. This is just using a certain song for a certain character. There are an almost infinite number of other potential relationships that an editor could be paying attention to, but because we can't just ask them, we have to try and notice them for ourselves. Does the editor tend to use a certain pacing for a certain subject? Colour grade for locations (almost definitely, but study them and see what you can learn)? Combinations of shots? What about the edit points themselves? If it's a narrative, does the editor cut some characters off, cutting to another shot while they're still talking, or immediately after they've stopped speaking, rather than lingering on them for longer? Do certain characters get a lot of J cuts? Do certain characters get more than their fair share of reaction shots (typically the main characters would as we care more about what main characters think than what secondary characters feel while they're talking). On certain pivotal scenes or moments, watch the footage back very slowly and see what you can see. Even stepping through frame-by-frame can be revealing and potentially illuminate invisible cuts or other small tweaks. Changing the timing of an edit point by even a single frame can make a non-trivial aesthetic difference. Step 6: Optional - Change the edit Change the timing of edits and see what happens. In Resolve the Scene Cut Detection doesn't include any extra frames, so you can't slide edit points the way you normally would be able to when working with the real source footage, but if you pull in the whole video into a track underneath the individual clips you can sometimes rearrange clips to leave gaps and they're not that noticeable. This obviously won't create a publishable re-edit, but for the purposes of learning about the edit it can be useful. You can change the order of the existing clips, you can shorten clips and change the timing, etc. You could even re-mix the whole edit if you wanted to, working within the context of a severely limited set of "source footage" of course, but considering that the purpose of this is to learn and understand, it's worth considering. Final thoughts Is this a lot of work? Yes. But learning anything is hard work - the brain is lazy that way. Also, this might be the only way to learn certain things about certain editors, as it seems that editors are much less public people than other roles in film-making. One experiment I tried was instead of taking the time to chop up and categorise a film, I just watched it on repeat for the same amount of time. I watched a 3.5 minute travel film on repeat for about 45 minutes - something like a dozen times. I started watching it just taking it in and paying attention to what I noticed, then I started paying attention to how I felt in response to each shot, then to the timing of the shots (I clapped along to the music paying attention to the timing of edits - I was literally repeating out loud "cut - two - three - four"), I paid attention to the composition, to the subject, etc etc.. But, I realised that by the time I had watched a minute of footage I'd sort-of forgotten what happened 30 shots ago, so getting the big-picture wasn't so easy, and when I chopped that film up, although I'd noticed some things, there were other things that stood out almost immediately that I hadn't noticed the dozen times I watched it, despite really paying attention. Hopefully this is useful.


 1 point
 -
Or the GX850/GX800/GF9 camera, which is discussed heavily in this thread... The rules in travel shooting are simple: Rule 1: Get the shot. To get the shot you must have your camera with you (so it must be small, must not have been taken by security, and must not attract too much attention from others around you). You must have it handy and ready with the right lenses (so a zoom is often more practical). You don't know what you will encounter, so you must be able to shoot quickly. You don't know what will happen and how you will edit so get a lot of varied coverage. Rule 2: Get a high quality capture of the shot. This rule is secondary to the first rule. If anything about the camera decreases your ability to get the shot (rule 1) then it is hurting your efforts, not helping them. Rule 3: The magic is in the edit. Once you've returned from shooting, get to work. Even a casual review of any travel TV series will make it obvious that the individual shots are not what make the show great, but the editing and storytelling and sound design. If you want a good travel film, shoot a lot then open up your NLE and get to work. Here is an award winning episode of a travel TV series - I encourage you to look through it and analyse the footage and the edit, as I have done with many examples. I think you'll find that almost no shots are beyond a modern point-and-shoot. (NSFW) I have done frame-by-frame analysis of this episode, and this is one of the finest examples of editing I have ever seen. It has a complex and nuanced storytelling and cultural narrative, has great music and sound design, uses more editing "tricks" than those nauseating YT travel videos that used every fancy transition they could find, and does it all in a way that is sensitive to the narrative. It makes even the best YT editors look like toddlers playing with crayons.1 point
-
Resolve has an AI depth map plugin, but the edges aren't good enough to use yet, and neither is the above. It will get better, but it's got a way to go. Flyaways in the hair is the giveaway, and unfortunately it's both very difficult to do effectively, and it's also visually quite obvious. If you want to use this technique then you'd have to sacrifice the more cinematic lighting and compositions to hide the artefacts.1 point
-
It plays in 4K for me, and looks pretty good! There is some optical distortions, but it looks like the normal ones from filming through glass, so not the cameras fault.1 point