

kye
-
Posts
7,885 -
Joined
-
Last visited
Content Type
Profiles
Forums
Articles
Posts posted by kye
-
-
9 hours ago, Trek of Joy said:
Anyone in this thread worked with HLG files in Resolve? Lots of googling doesn't bring any consensus on workflow.
Chris
I have worked with GH5 HLG, and also found confusion out there.
What are you trying to do?
-
-
4 minutes ago, Sage said:
That's the way its done. I dabbled in that arena with the DK2 a few years back; my feeling was that the new Unreal Engine 4 at the time was the way to go. Its a free platform, with uncompromising graphic fidelity, integrated VR handling, and exposed C++ source if you want. I will be getting back in with CV2
I've just started with Unity.
I read a bunch of comparisons and they seemed to think that Unity was better for smaller studios and for doing mobile, so I'll see how I go. In a sense I'm not the typical user because I know how to code and I don't want to use it for what it's designed for, so I guess we'll see. I've learned so many programming languages over the years that it's not that hard to pick things up, although these things are very far removed from programming, so I guess I'll see how I go. I suspect that I'll likely abandon the game interface and end up coding most things, as my goal is more around algorithmically rendered environments rather than typical 3D apps or games.
-
1 hour ago, leslie said:
i'll bite, how do you do that ? oscilloscope or something else ? i guess its expensive or technical or both
Interesting question.
You get a reference clip and then encode it to whatever codec you want to measure and then compare the compressed clip to the original and then do some math and get the result.
The tricky thing is that to compare BRAW with uncompressed RAW with the P4K you would have to point the camera at something recording uncompressed RAW and then set it to compressed BRAW and point the camera at the exact identical same thing, which is practically impossible. In reality you'd have to be able to take uncompressed RAW and then convert it into BRAW so you had the the same thing in the two codecs, so it's something that only BM would be able to do I think.
I'd bet that looking at signal-to-noise ratios would have been done probably thousands of times during the development of BRAW, and they'd have been comparing it to all the other codecs they could analyse too, but I doubt we'd ever see any of their numbers.
The only way we'd get a glimpse of it would be for someone to buy a P4K, crack it open and then tap into the RAW feed coming off the sensor before it gets to the video processing circuitry and save that stream as uncompressed RAW and let the camera record to BRAW, then to compare those two files. Of course, they would have to do a similar test for every BRAW setting, and as the codec quality is signal-dependent they'd have to do it many times for each set of settings in order to be able to reliably compare two different compression levels.
-
1 hour ago, Anaconda_ said:
So basically, editing on a 4K timeline is a waste of my computer's resources? I'd get the same end results (4k master) if I edit on a 1080/720 timeline?
Not a waste, but it's not required.
Just did a few tests. I got a project, changed the timeline to 720p, added a 4K still image, then exported at 4K, changed the timeline to be 4K, then exported at 4K again. This is what you get:
- if you export at 4K from a 720p timeline you get a 4K file but with 720p quality
- if you export at 4K from a 4K timeline you get a 4K file and 4K quality
An easy way to judge what quality you're getting in the output is to add a Text generator and make the font size really big and look at how sharp the edges are in the output file, especially on curves or edges close to horizontal or vertical.
-
4 hours ago, anonim said:
Yep - bright and wide is a nice combo.. especially paired with the extra low-light of the GH5s!
-
It would be interesting to see a signal-to-noise analysis of BRAW at various bitrates vs competing formats. I doubt we'll see one, but after seeing how h265 is roughly the same as h264 with double the bitrate, it might be a similar situation between BRAW and CDNG formats where BRAW gives similar image quality to a much higher bitrate CDNG stream.
-
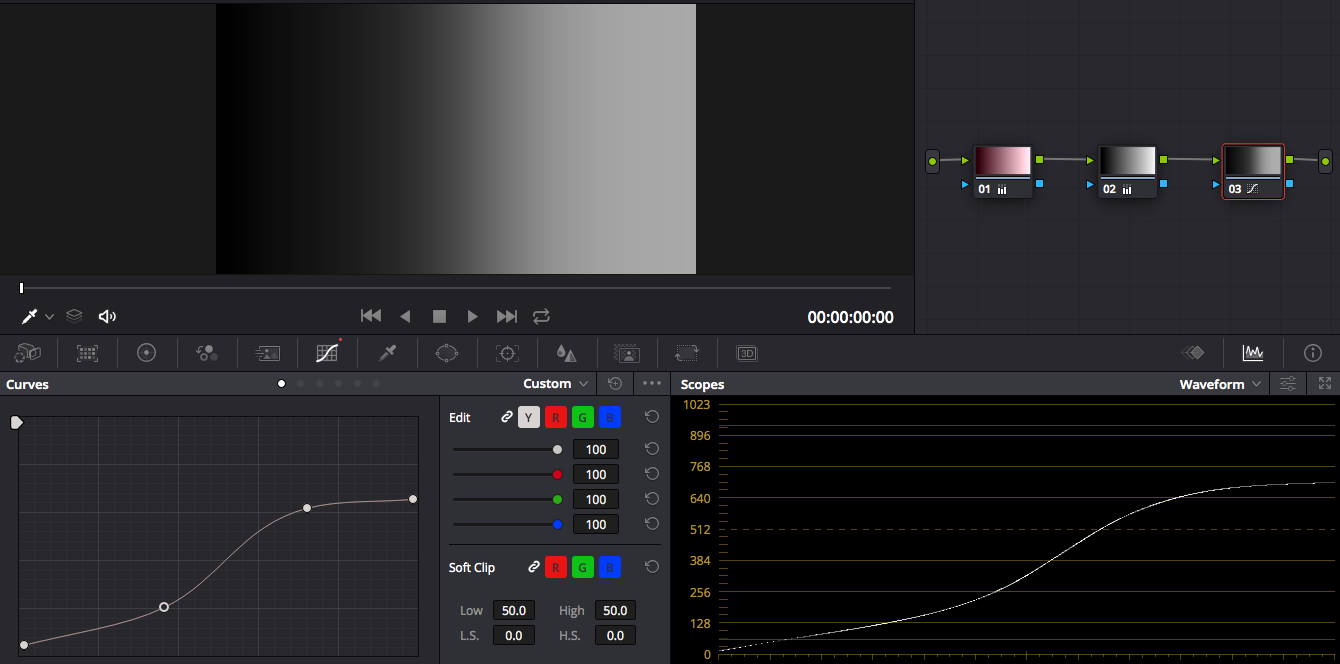
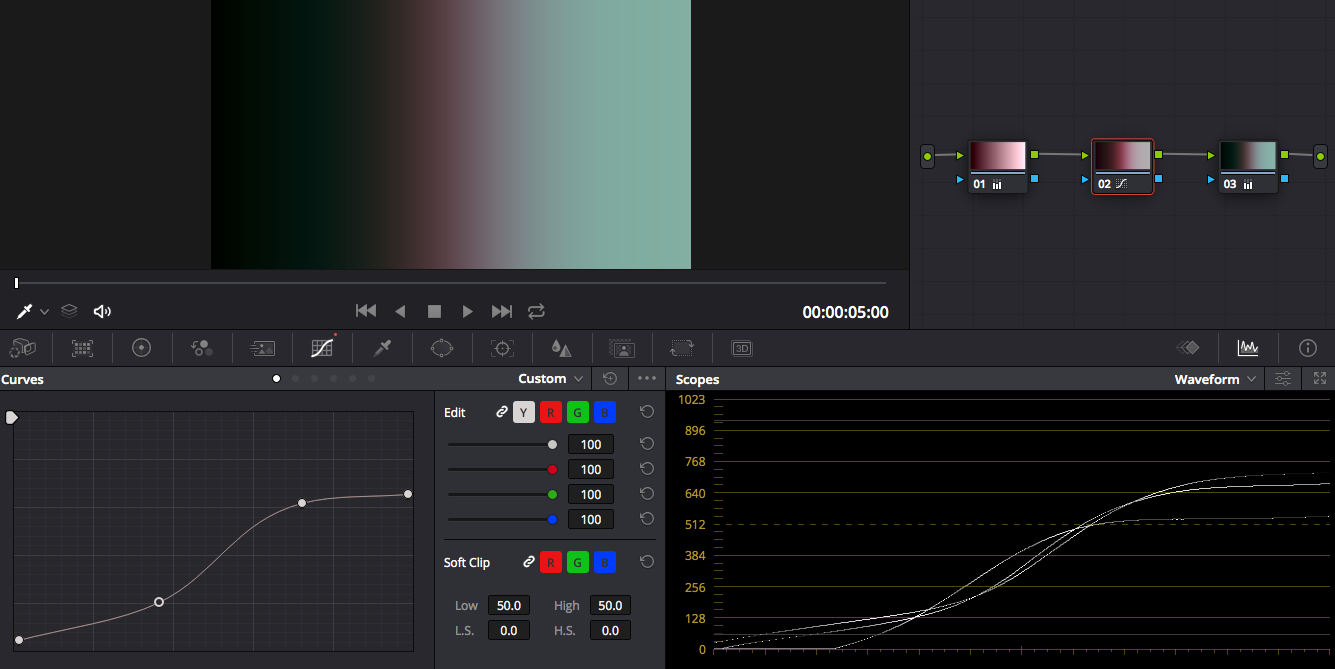
Edit: to expand on the order of operations comment with an example..
If we take a gradient, apply a colour treatment, apply an opposite colour treatment, then add some contrast with some curves, this is what we get:

However, if we apply the same adjustments but change the order so that we apply the curve in-between the colour adjustments we get this:
This is relevant because it simulates having an incorrect WB in camera, then trying to balance it in post but doing it in the wrong order.
Inside the camera the sensor sees in Linear, then transforms to LOG (or whatever the codec is set to) and so the camera has already made the first two adjustments of WB adjustment and then a set of curves. This is further complicated by the fact that different tools work in different colour spaces. Some are designed to work in LOG (IIRC specifically the Cineon LOG curve - Juan Melara recommends ARRI LogC as being the closest match to this) - I believe the Cffset, Contrast/Pivot, and other tools are for LOG. Others are designed to work in Rec709, such as the Lift Gamma Gain wheels.
In a sense this isn't a problem as there is no such thing as 'correct' as very few of us are trying to capture a scene accurately, we deliberately adjust the WB of shadows and highlights separately (orange/teal, film emulation LUTs, etc) and we deliberately abandon a Linear gamma curve (almost any adjustment), and we apply separate treatments to different items within the scene (keys, power windows, gradients) so none of the above really matters in these cases, however it's good to be aware as if you're going for a natural look then you might be applying a teal/orange style adjustment like I showed above, but not in a good way.
This is why there is such an emphasis on getting WB correct in-camera if you're using a colour profile - anyone who has done this and tried to recover the shot in post faces an impossible task of basically having to work out how to reverse the adjustments that the colour profiles applied. That magical Canon colour science isn't so magical if you're trying to work out how to un-do it, make an adjustment, and then re-apply it!
-
6 hours ago, Anaconda_ said:
Including me, as a RAW noob... Can help me with project settings for working with Braw? Does this look right?
While editing, there's no problem in adjusting the 'Decode Quality' to half or quarter for smoother playback on a laptop right? as long as I change it back to full for the export?
Should I have Highlight Recovery on by default? Or adjust that on a clip by clip basis in the Color tab?
All help is greatly appreciated.
EDIT: also, I've generated a sidecar file, but the Blackmagic RAW Player still shows me the ungraded clip, even when the video and sidecar are the only files in the folder it's playing from. - anyone else having a similar experience?
I don't have much experience grading RAW so not really my area unfortunately.
What I can tell you is that Resolve seems to do everything in a non-destructive way. What I mean is that you can have a node that pushes the exposure to clip the whole frame, but if you then pull it down with the next node it's all still there. Also, you can have a 4K clip on a 720p timeline and if you export it as a 4K clip it will pull all the resolution from the source clip regardless of what the timeline resolution was.
So, in a sense it kind of doesn't matter what you do as long as the end result is where you want it. One exception to this is that you have to be careful with the order of operations as you can get funny results. Ie, you can get different results applying adjustments by applying them before or after various conversions or other adjustments, so that's the thing to watch out for.
-
1 hour ago, currensheldon said:
And I think it's a pretty good one. I still prefer other manufacturers' cameras, but the Ursa G2 + Pocket 4K is pretty close. For me, most of my headaches come in the form of workflow now, with different codecs, resolutions, bit-rates, etc being all over the map on other manufacturer's lineups. Black Magic is really streamlining things - I'd love to have those two cameras, shoot 8:1 or 12:1 BM Raw, which has amazingly smooth playback in Da Vinci on my Macbook Pro (tested it yesterday), and then hand off to a colorist or do a quick grade myself. Brilliant. And all in 12-bit raw capture and native editing.
Despite neither camera being my favorite form factor, it's almost worth it for the streamlined workflow alone.
I agree. Having the tech just work and get out of the way is the ultimate situation. We're making art after all, the last thing we need is to be trying to also deal with the technical stuff at the same time.
I really think that BM are playing the long game and have set their vision to be really high and are making bold steps to get there.
Some fun facts (via wikipedia?
- DaVinci had been making colour correction systems since 1985
- Resolve was released in 2004
- BM bought DaVinci in 2009, at which time Resolve was selling with dedicated hardware solutions for $200k-800k
- 2010 they released a software-only version for $995 and the hardware version dropped to $30k
- 2011 they introduced a free version
- 2013 version 10 introduced video editing
- 2014 version 11 introduced audio mixing to complete it as a stand-alone NLE
- 2016 BM buys Fairlight and version 14 includes an integrated version of it
- 2018 version 15 includes a version of Fusion
That is a pretty spectacular timeline. In a decade it went from being $200-800K with hardware and colour only to having free, software-only versions available, and integrating world-leading colour with editing, audio, and VFX functionality.
Hardware is obviously more difficult to make those kinds of advances on, but the original BMPCC and now P4K kind of fit that description. I remember Elon Musk talking about reducing the cost of things by 90% and that idea of radical change seems to also be occurring here. Other vendors don't seem to really be dancing to the same tune.
- Kisaha, Jonesy Jones, Mako Sports and 5 others
-
 8
8
-
Matti just discovered Resolve..lol
Actually, he's been using it for years apparently, but he's just decided to tell people about it
Uh oh, here come the cinematic noobs ???
-
23 hours ago, currensheldon said:
You could just use Black Magic products from start to finish.
Judging from their moves over the last few years, I'd say that's their business strategy right there.
-
2 hours ago, fuzzynormal said:
FWIW, I like time lapse that has long shutter exposures. The motion blur is nice.
Me too. I kind of cheat by using auto-SS for exposure but depending on your setup you can dial in the right SS using aperture and NDs and still get it to auto-meter if you're doing a night/day sequence.
-
15 hours ago, Emanuel said:
LOL I have the first gimbal designed for P4K under 1 kg and a half for you! ; -)
LOL.
I guess that's in-keeping with the Pocket branding
11 hours ago, Turboguard said:I mean I would buy another camera if the formfactor was even half the size. He speaks about micro so. That would be so much fun to bring on a day of just walking around. My husband uses the LX100-2 and I’m a little jealous of how easy he has it when we take our Sunday photography strolls and I need to carry my pocket4k sigma 18-35 combo beast.
I hear you - I have the 18-35 and when I got my GH5 I considered buying an adapter but I shoot hand-held and carry the setup around for hours at a time with only one hand, and that weight was just too much, despite it being a great lens.
Depending on how you shoot maybe a couple of primes might be better?
-
1 hour ago, Emanuel said:
Well, and for everyone else... LOL
With IBIS it would be! ???
-
4 hours ago, leslie said:
main issue with modern and af lenses is the tiny amount of shutter variation between photos results in flicker. time lapses with canon are easier in some regards. you can use the lens twist method where you unlock the lens just enough so the contacts dont touch but the lens doesn't fall of the camera or you can shoot with manual focus lenses . another benefit of canons is that you have an inbuilt intervalometer with magic lantern. also ml can do day to night or night to day as well but its not exactly set and forget but ml does make it easier. you can use jpegs but sometimes you will get banding from them. if your cheap like me the easiest way is to shoot raw then convert to tiff or another lossless format virtualdub is nice and free for making the actual time lapse sequence you can also get donald degrafts deflicker plugin for virtualdub which does help with flicker. thats how i did mine. i'm cheap so i know most of the free programs i think. one day i might upgrade to lr timelapse or one of the other programs maybe.
most of my experience comes from my canon, gopros have inbuilt intervalometers as well, i think some nikons may have timelapse built in as well i'm not sure which models however. some canon point and shoot cameras can have chdk installed as well, its kinda like putting ml on a canon dslr but different
i can recommend for all your timelapse needs http://www.timescapes.org/
I thought it was shutter variation but as I read your reply I think it might have been aperture variation as the camera opens and closes the aperture for every exposure. I used a manual lens for the one I posted above and it didn't need deflickering, so that seems to back that up. The GH5 was in aperture priority mode, so I set manual ISO 100 and let it expose with the electronic shutter which it seemed to do very well.
I think if I'm recording RAW then I might underexpose a little more next time.
I've recorded other time lapses with the GoPro - it's great that you just set and forget but with my older Hero 3 it doesn't have any controls so it tends to blow out the highlights a bit much. This was a GoPro one:
I've also shot some with my iphone and there are some good apps for that too, allowing full manual control and saving images instead of just a 4K video etc.
-
1 hour ago, OliKMIA said:
I shoot a lot of timelapse. Let me know if you have any questions. I'm not too bad at it.
Wow.. great stuff!
Can you share your workflow with us, or any tips?
5 hours ago, thebrothersthre3 said:Yes it'd have to take a break for the time lapse. I do usually take them with still images, though I haven't figured out the editing workflow yet.
One thing I was going to mention - a very capable and affordable setup would be a DJI Osmo Mobile 2 and an older smartphone. I have the DJI and you can set it to the time-lapse mode, physically position the gimbal, set a waypoint, physically position the gimbal again, set another one, etc and then just hit go and it will trace the path and take a time-lapse. Normally older phones have good enough image quality when taking still images for them to be combined into a video file, so the quality doesn't matter so much, and might be good enough for your purposes? It's worth looking into as it would leave you free to use the gimbal for your video cameras.
Happy to shoot something for you if you can't find anything online or want to see what an uncompressed still from the video file looks like. I have an iPhone 8, not too old but not the latest either.
Edit: I can't remember but you might be able to record the time-lapse in a different app while the gimbal still moves it around, in which case you can get a sequence of RAW images (assuming the phone shoots RAW) which should give a lot of latitude in post.
-
14 minutes ago, kaylee said:
ok, be a biologist
edit: wait, wheres the video??
Videos in other threads are doing similar things. I think @Andrew Reid broke the forums somehow.
-
I'm not sure that anyone here uses the BM output devices..
I looked at buying one a while ago and posted a specific question on the BM forums and no-one relied there either. I suspect the people who know aren't on the forums talking about it
11 hours ago, mirekti said:If I connect HDMI port from the card to 10 bit monitor, will it be actually using 10 bit if the output is set to 4k? If I understood the tech spec it wouldn't.
So in order to use 10 bit color I should keep the Davinci output at 1080p, and only export in 4k in the Deliver page? I am trying to justify purchase of 4k reference monitor, but it makes no sense if I will be using it at 1080p.Are you delivering in 4K 10-bit?
If so then I understand your question. If not then maybe you edit in 1080/10 and then when reviewing the final project maybe switch to 4K/8 ? I have no idea how easy it is to switch, so that might not be a viable solution.
In terms of editing, I was thinking that 1080 should be sufficient, and you can always zoom in to get a temporary view of the extra pixels.
I was going to configure my setup so that the computer connected to the monitor via the DisplayPort input and the BM output device connected to the monitor via HDMI, and then I'd be able to change what the monitor did by just changing inputs. Of course, this would mean that when you've got the monitor in 4K mode being driven by the computer directly it wouldn't be colour managed by BM so the accuracy may be off.
-
Not sure what happened to your video (I watched it, it was funny!) but if you make 99 more that are all different to each other you'll be off to a good start
- Zach Goodwin2 and IronFilm
-
2
-
5 hours ago, webrunner5 said:
For what BMD program, Resolve? Resolve doesn't give a rats ass what monitor you are using. If you have the BMD SDI one I can see that but, just a HDMI one, nah. Now they make a HDMI one with breakout cables, but that is still more an audio thing than video.
You're right - Resolve doesn't give a rats ass which monitor you are using - unless you're using one of the BM output devices the official line from BM is that Resolve can't be reliably colour calibrated as the OS and other things can't be relied upon not to screw the colours up.
With their output hardware they have full control and can guarantee the reliability and quality and IIRC have the calibration integrated into Resolve.
5 hours ago, webrunner5 said:But I have never used 2 monitors at the same time in Resolve so who knows.
I've tried, but it's not a pleasant experience as it's not that flexible. Resolve lets you use two monitors but the functionality is a PITA because the way you want it setup (with one monitor as a controller and the other with the preview window on it) isn't really supported, because (you guessed it) they expect you to use one of their output devices and use that as your preview monitor.
-
5 hours ago, BTM_Pix said:
In one way they are obviously keen on "encouraging" people to swap their old vinyl for CD as it were but there will be long term benefits to making that change.
Yeah, that swap had some great long-term benefits:
- You could listen to CDs in your car
-
Plus, as a special bonus, you'd be happy with how they sounded in your car because the CDs would make your high-end hifi setup at home sound as good as the stereo in your car
-
9 minutes ago, thebrothersthre3 said:
Yeah I noticed with electronic lenses it tends to flicker. I use Vegas but am switching to premiere pro. Vegas didn't read my raw files properly. I hadn't tried comverting to DNG tho. The XT3 images definitely have a lot more dynamic range and color manipulability in RAW. I know there must be a way to batch edit photos, as editing every single one is crazy. Day-to-night time-lapses are my favorite
I'm still trying to work out the best workflow for me. Photoshop has a nice batch processing function that can convert images but it only offers JPG, PSD or TIFF. I tried the TIFFs but it turned my 23Mb RAW files into 180Mb TIFF files, so that's not practical. I haven't tried JPG yet but I'm afraid that the amount I push things around in post (considering that I often do very high DR sequences like sunsets) that the images will break under heavy grading. I tried Lightroom and the DNG images it can create are great because they have the right bit-depth but are half the size of the RAW images, but it keeps wanting to "help" me and doing random shit like moving my files to some random location on some hard drive I didn't want.
I should search for a simple utility that just converts all images in a folder to DNGs or something like that.
I just did a test with the GH5 by shooting an image in RAW + JPG and the RAW was great but the JPG had the highlights clipped. I swear, whoever thought the best way to save a JPG was to just hack the top off the dynamic range should be taken out the back and shot for crimes against humanity. Seriously, if not for the hassle it causes then for the damage to the environment for all the extra storage space required when a full-DR JPG would have been sufficient. If photoshop can include the full DR of a RAW image in a JPG then there's no excuse for deliberately programming a camera to not do it. FFS.
Here's a first cut of the sequence from last night. Lots of finicky editing - I had two copies of the same clip crossfading from one to the other so I graded one for the start and one for the peak colour, plus a bunch of tweaks to remove foreground distractions and a tricky edge-detect mask to get rid of the nasty CA on the hard edges. This was with images converted in LR so the IQ was there and Resolve handles DNG files just beautifully - thanks to RAW cameras shooting DNG sequences they even appear as a single clip in the media editor
I'm sure a skilled colourist could make this look a lot better...
-
25 minutes ago, thebrothersthre3 said:
Yes it'd have to take a break for the time lapse. I do usually take them with still images, though I haven't figured out the editing workflow yet.
What editing package are you using?
I'm still figuring out that workflow too for Resolve and the GH5. Current problem is that Resolve doesn't understand the RAW image format from the GH5, so I either convert them or shoot JPG and I haven't tested if JPG has reduced DR like it does in some cameras.
One thing I do remember is that because cameras are often not 100% accurate with their shutter speed the images might be slightly different exposures, so you have to use a de-flicker plugin in post to even it out.

")

Is Panasonic customer service terrible, or is it just me and my toaster oven?
In: Cameras
Posted
Thank goodness for that!