Leaderboard

Popular Content
Showing content with the highest reputation on 04/11/2024 in all areas
-

Panasonic S5 II (What does Panasonic have up their sleeve?)
John Matthews and one other reacted to kye for a topic
New firmware update just announced: https://www.panasonic.com/global/consumer/lumix/firmware_update.html2 points -
You're totally right, friend. That makes all the diff in the world for such a small device.1 point
-

Shooting a short
Tim Sewell reacted to eatstoomuchjam for a topic
It's great that you can reshoot! I'd also say that if the composition/angles and/or lighting are boring, moving the camera is just a crutch anyway. Fincher's stuff usually looks great/cinematic and he rarely moves the camera. That said, moving the camera can be a great addition to good composition and lighting. Anyway, it sounds like you're off to a solid start! Looking forward to seeing some wip scenes or screen grabs!1 point -
Camera overheating is pretty much incomprehensible at this point
kye reacted to eatstoomuchjam for a topic
Another factor for overheating can be the processor in the camera. The Z Cam E2 series are known for running very well even in fairly extreme conditions (though other components such as memory cards, SSD's, monitors, etc overheat). This is partly because of proper cooling/lack of IBIS, but also because a lot of image functions in the camera are done with ASIC vs the FPGA that some of the overheating cameras use. It has the drawback that Z Cam can't implement some changes (at least not without releasing a whole new controller board), but has big advantages for cooling and power use (can run for hours on an NP-F550). I guess they added a cooling fan to the new F6 Pro - so maybe they changed processors for it or they decided to cool the memory card, etc.1 point -
I guess to reply directly on to your comments, yes, the DR testing algorithms seem to be quite gullible and "hackable" which I'd agree that Apple has likely done specifically for headlines. None of the measurements in the charts really map directly to how usable I think the image would be in real projects, but I haven't read the technical documents by ImaTest, although if I was going to look into it more I think that would be a good idea so you'd know what is actually being measured.1 point
-
The more I read about DR, the less I realise I understand it. I mean, the idea is pretty simple - how much brighter is the brightest change it can detect compared to the darkest change it can detect, but that has a lot of assumptions in it when you want to apply it to the real-world. I have essentially given up on DR figures. Firstly it's because my camera choice has moved away from being based on image quality and into the quality of the final edit I can make with it, but even if I was comparing the stats I'd be looking at latitude. Specifically, I'd be looking at how many stops under still look broadly usable, and I'd also be looking at the tail of the histogram and comparing the lowest stops: how many are separate to the noise floor (where the noise in that stop doesn't touch the noise floor) how many are visible above the noise floor (but the noise in that stop touches the noise floor) how many are visible within the noise floor (the noise from the stop is visible above the noise floor) how high up is the noise floor In the real world, you will be adding a shadow rolloff, so any noise will be pretty dramatically compressed, so it really comes down to the overall level of the noise floor (which will tell you how much quantisation the file will have SOOC and how much you can push it around) and how much noise there is in the lowest regions, which will give a feel for what the shadows look like. You can always apply a subtle NR to bring it under control, and if it's chroma noise then it doesn't matter much because you're likely going to desaturate the shadows and highlights anyway. The only time you will really see those lowest stops is if you're pulling up some dark objects in the image to be visible, but this is a rare case and with more than 12 or 13 stops you're most likely still pushing down the last couple of stops into a shadow rolloff anyway, so it's just down to the tint of the overall image. Think about the latitude tests and how most cameras are fine 3-stops down, some are good further than that - how often are you going to be pulling something out of the shadows by three whole stops?? That's pretty radical! Most likely you're just grading so that a very contrasty scene can be balanced so that the higher DR fits within the 709 output, but you'd be matching highlight and shadow rolloffs in order to match the shots to the grade on the other shots, so your last few stops would still be in the shadows and can be heavily processed if required.1 point
-

Shooting a short
ac6000cw reacted to Tim Sewell for a topic
So an update, if anyone's interested. I shot the first scene, which was made up of 5 distinct shots. They came out OK. They were... competent, but only that. The lighting was good - nice contrast, nice colours, well-motivated, but that's all. Can you tell I'm dissatisfied? I was so focussed on getting everything 'right' that I didn't pay enough attention to getting it good or interesting. So I'm going to reshoot and one of the things I'm going to do is lean in to the limitations I have - first among which is that I'm doing this almost completely alone. I am both crew and talent! The biggest limitation caused by that is that camera movement while I'm on screen is not going to happen, which means that to create interest I need to make my angles and composition more interesting. Also, the lighting as I did it the other night looked, basically, like a commercial, not a movie, so now I'm happy with my ability to get decent levels etc, I'm going to really try to push the envelope with ratios and temperatures and try to have some fun with it. Once I've reshot I may post both versions for comment before I continue with the remaining scenes (it's going to take a while to complete the whole project given that I work full-time and my main set is our kitchen, which is in near-constant use as my 3 children attempt to bankrupt me purely through food costs!).1 point -
Panasonic S5 II (What does Panasonic have up their sleeve?)
John Matthews reacted to kye for a topic
I guess once it's released we'll see a new round of strange AF testing from the YT camera gaggle!1 point -
8-bit REC709 is more flexible in post than you think
John Matthews reacted to kye for a topic
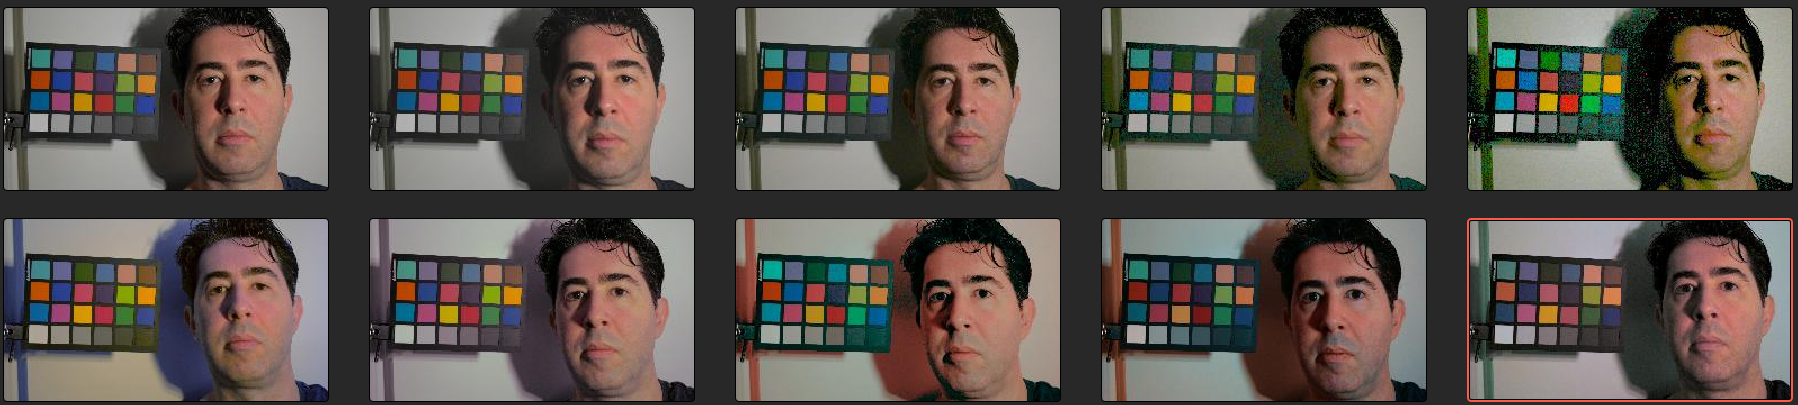
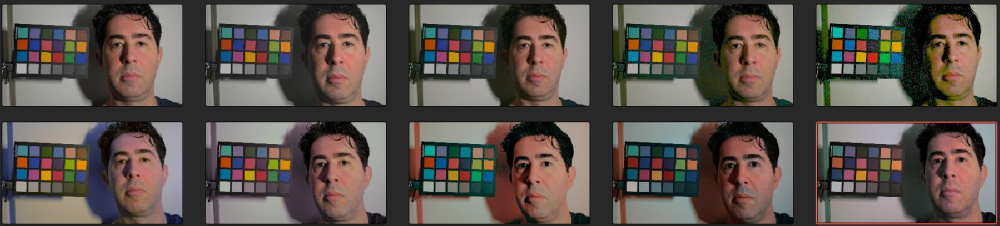
Shot a bunch of test shots, this time with skintones. I shot the usual shots gradually under-exposing, but instead of changing the WB in-camera manually to create the off-WB shots I bought a pack of flash gels and held them in front of the single LED light. Also, as @John Matthews enquired about skintones, I have just done a first attempt at grading for the skintones rather than the chart. I looked at the chart of course, but considering that people is what the audience is looking at in the image, skintones are vastly more important. So I didn't try to get the greyscale on the test chart perfect, or correct the highlights or shadows perfectly, etc. The first image is the reference. Those following that are each one-stop darker than the previous one. Then comes the gels. The gels are so strong they're essentially a stress test, not how anyone would / should / will be shooting, but it's nice to see where the limits are. The first set is using only the basic grading controls and no colour management: The results aren't perfect, but if you're shooting this horrifically then you don't deserve good images anyway! What is interesting is that some images fell straight into line and I felt like I was fighting with the controls on others, but this had no correlation with how large a correction was required. I suspect it's my inexperience and getting lucky on some shots and unlucky on others - sometimes I'd create a new version and reset and have another go and get significantly better (or worse) results than the previous one. No single technique or approach seemed reliable between images. The next set had colour management involved and grading was done in a LOG space: I also felt this set was very hit and miss in grading. This next set was a different set of tools again, and I added the Kodak 2383 Print Film Emulation LUT at the end. I did this because any serious colour grading work done in post is likely to be through a 'look' of some kind and the heavier the look is the more it obscures small differences in the source images being fed into it. Next set was a different set of tools, but keeping the 2383 LUT in the grade: ...and the final set was adding a film-like grade in addition to the Kodak 2383 LUT. I mean, no self-respecting colourist would be using a PFE LUT as the only element of their final look... right? All in all, I am pretty impressed with how much latitude is in the files, and although lots of the above results aren't the nicest images ever made, if you're shooting anywhere close to correctly then the artefacts after correction are going to be incredibly minor, and if you actually shot something that was 2 stops under and was lit by a single candle using a daylight WB then you'd be pretty freaking happy with the results because you would have been thinking that that your film was completely ruined. This is all even more true if your shots were all shot badly but using the same wrong settings, as the artefacts from neutralising the images you apply will be consistent between shots and so will have a common look. I'm also quite surprised at how the skintones seem to survive much greater abuse than the colour chart - lots of the images are missing one whole side of the colour wheel and yet the skintones just look like you decided on the bleach-bypass look for your film and you actually know what you're doing. The fact that half the colour chart is missing likely won't matter that much because the patches on the colour chart are very strongly saturated and real-life scenes mostly don't contain anything even close to those colours. I'm still working on this (and in fact am programming my own set of plugins) so there will be more on this to come, especially as now I have a good set of test images. I think I should find a series of real-world shots that only require a small adjustment so I can demo the small changes required on real projects.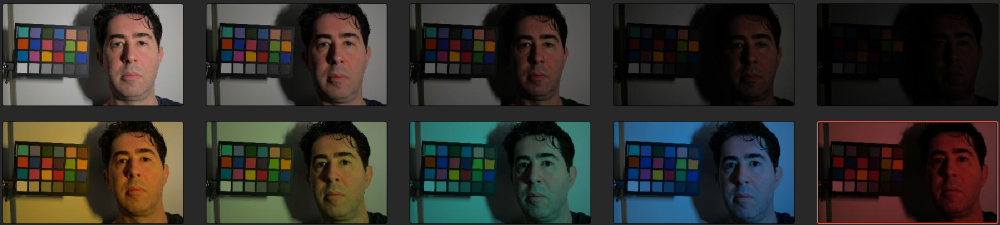


 1 point