kye
-
Posts
8,071 -
Joined
-
Last visited
Content Type
Profiles
Forums
Articles
Everything posted by kye
-
-
In terms of the GH5, it means that: the 1080p 10-bit 422 200Mbps ALL-I mode is likely to be roughly equivalent to 1080p Prores HQ which is 176Mbps the UHD 10-bit 422 400Mbps ALL-I mode is likely to be roughly equivalent to UHD Prores 422 which is 471Mbps Not bad at all.
-
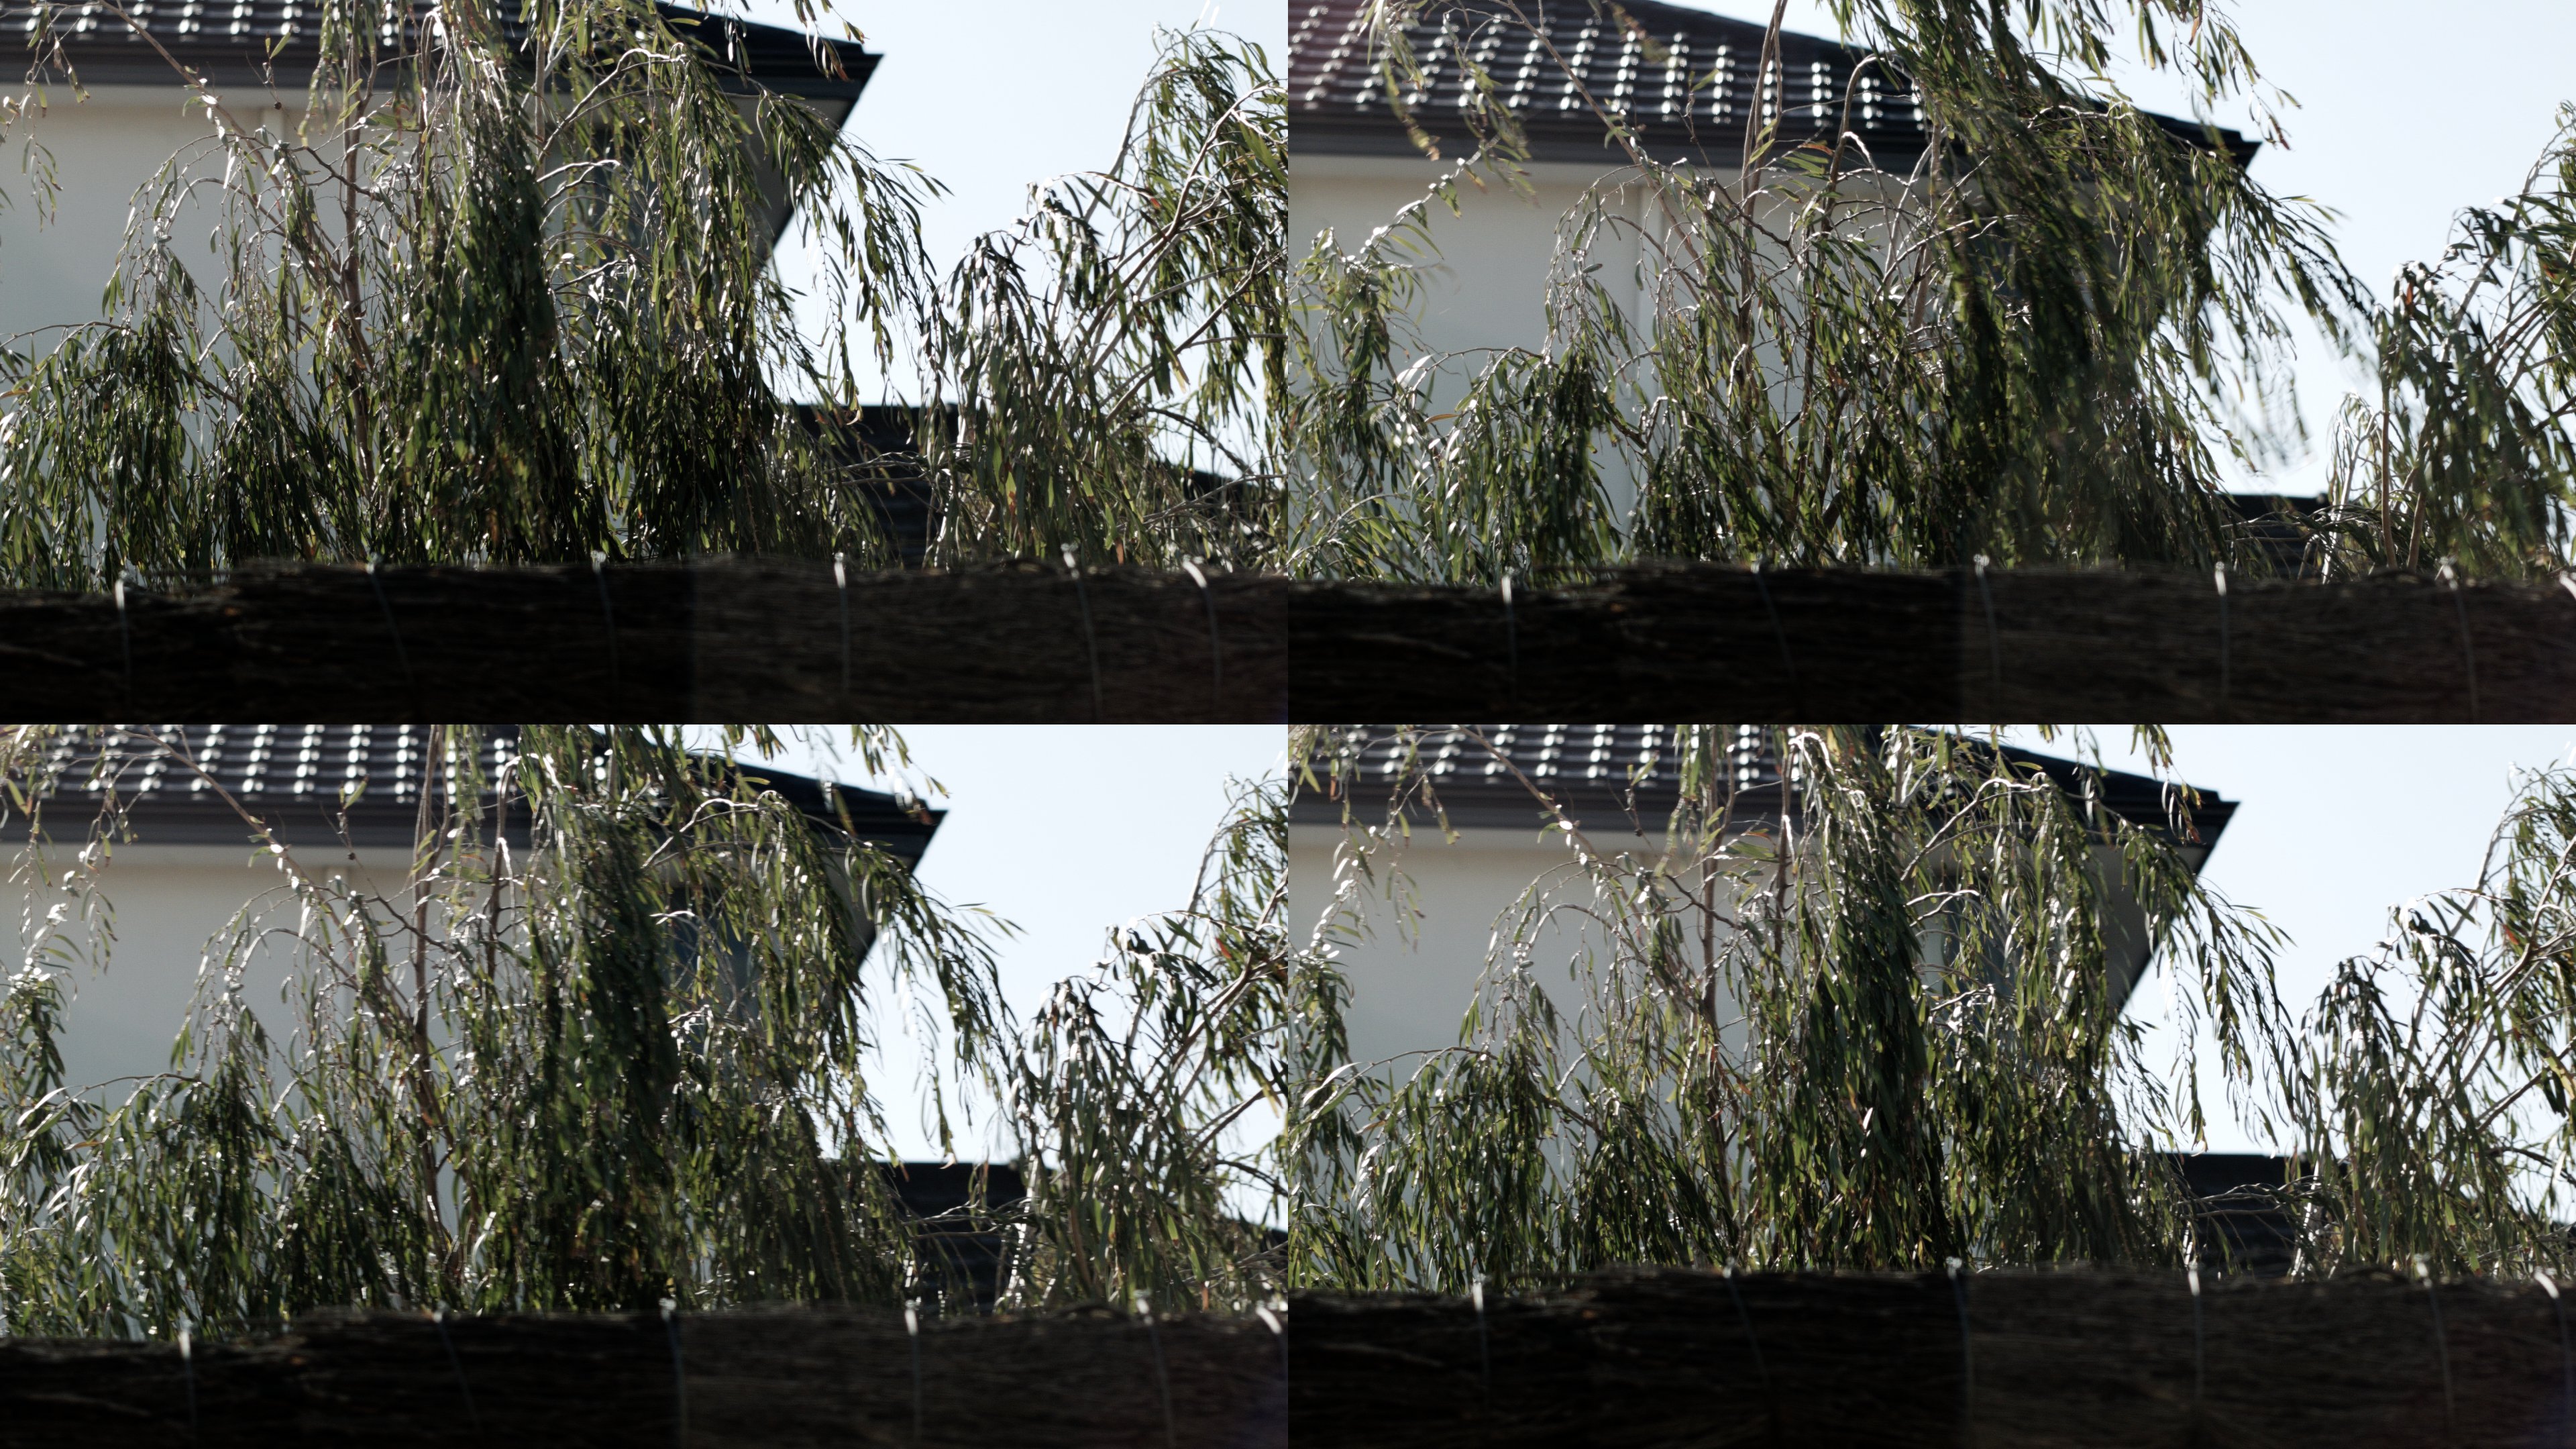
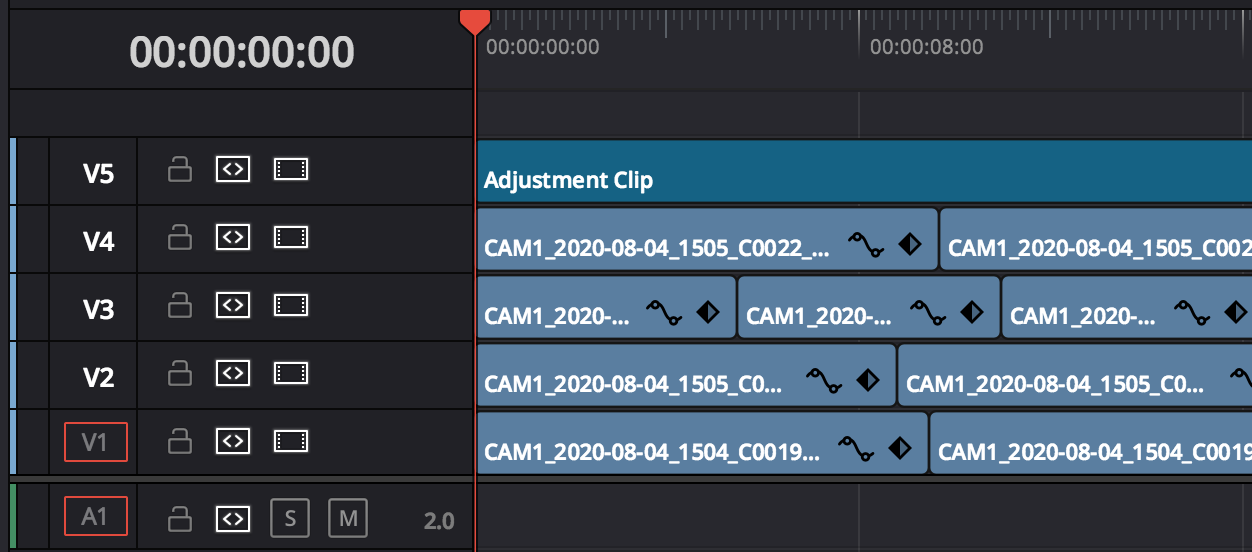
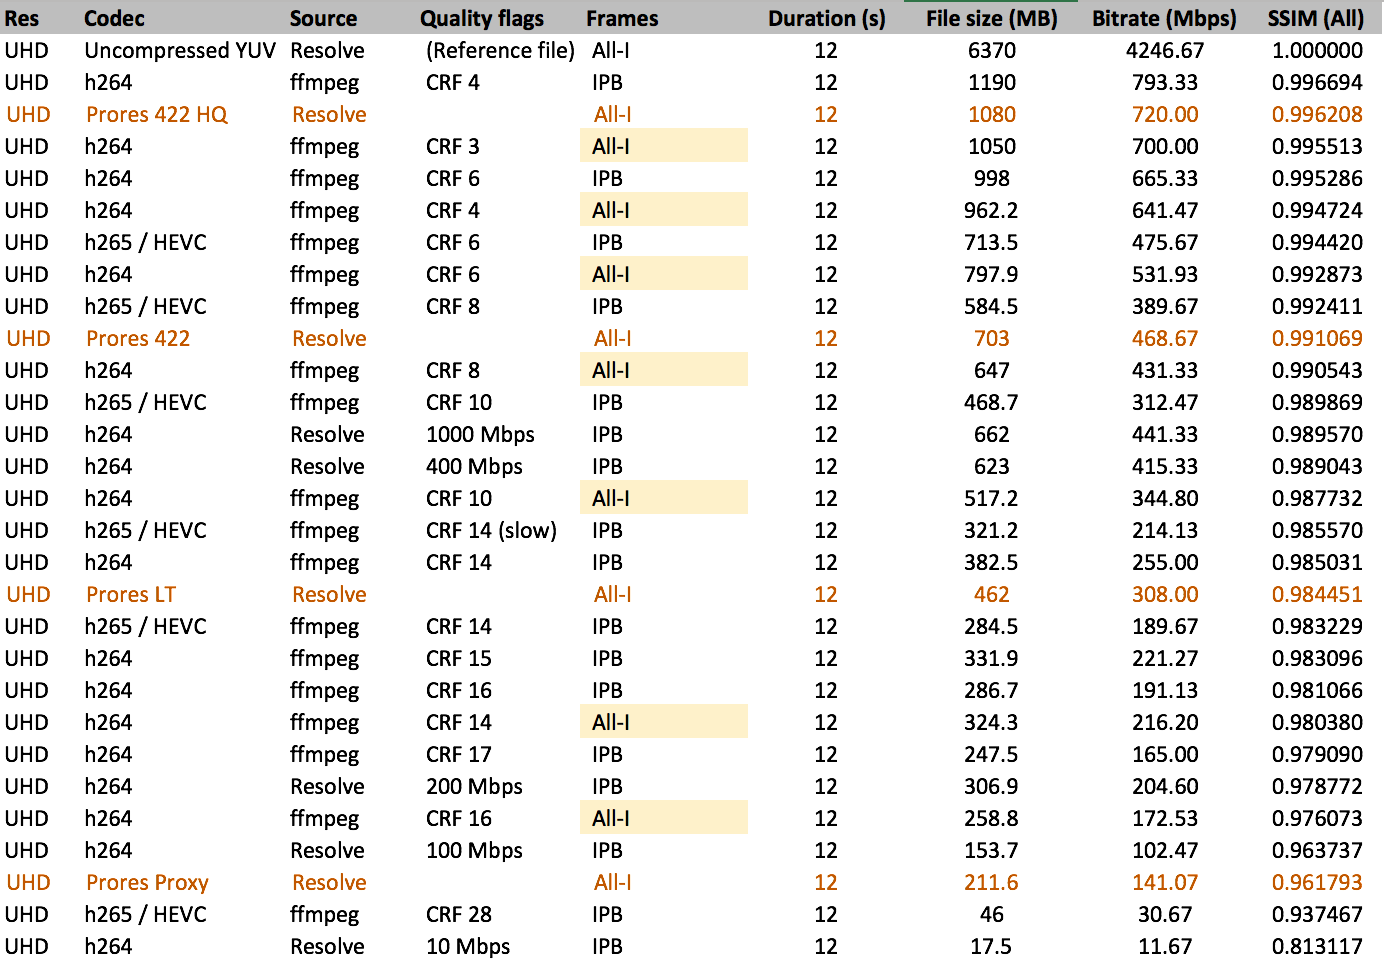
Some cameras shoot RAW and Prores, and some shoot h264 and a few shoot h265. There's lots of bitrates on offer too, 50Mbps, 100Mbps, etc. Some are ALL-I and some are IPB. But how good are they? I couldn't find any comparisons, so I did some myself. What I did was take a few shots from the BM Micro Cinema Camera shot in uncompressed RAW of a tree moving in the wind, and made a single UHD frame by putting them in each corner, like this: Also, they were of different lengths, so I just repeated each one, like this: So we have a test clip that was shot RAW (maybe compressing already compressed footage is easier? I don't know, anyway..), that includes decent movement but isn't some stupid test case that means nothing in real life, that doesn't repeat (because the clips are different lengths), and has some deliberately almost crushed blacks to test the pixelation that h264 and h265 sometimes get in the shadows. Then I exported an uncompressed 10-bit 422 YUV file to use as a reference. After some tests and seeing the file sizes and processing times, I decided to only use the first 12s of the timeline. Then I rendered a bunch of clips, either h264 from Resolve, or h264 and h265 from ffmpeg. I tried rendering h265 from Resolve but had issues, and in this test all the maximum bitrates I tried all created the same size file, so I abandoned that. Common wisdom online is that Resolves h265 export mechanism isn't the best and you should use ffmpeg anyway. Then I compared the compressed clips with the uncompressed reference file, which gives a score called SSIM, which goes from 1 (a perfect match) downwards. Here's the results so far: Here are some observations / thoughts, and some answers to some questions I'd had: In Resolve, H264 seems to top out, as I couldn't get it to export at more than about 400Mbps IPB, but ffmpeg went higher than that quite happily ALL-I h264 doesn't seem to be that different than IPB, at higher bitrates anyway - slightly lower quality and slightly higher file size, but not the 3x I've read around the place Prores isn't that much worse in terms of quality vs compression than h264 or h265, despite being an older codec (although maybe there are versions? I have no idea how prores works.. maybe that's important for this topic?) Different encoders have different levels of quality, so what's in a given camera is likely to differ from these results I guess the real question is, how much h264 do you have to have to equate to Prores? The answer seems to be "about the same bitrate, but probably a little less for an ALL-I codec, and a little less bitrate again if it's an IPB".

-
Agreed, there is something better about the image from cine cameras. We know that different compression algorithms have different levels of quality even for the same bitrate, and this is where I think that the cine cameras shine. They're bigger so can chew more power for processing and can manage the associated heat, they're more expensive so can pay for more expensive / faster / less efficient chips to encode the image, and they have an army of techs behind them tweaking things millions of times to wring every morsel of quality out of their flagship products. However there are limits and while cine cameras make a better quality image for the same bitrate, extra bitrate sure helps.
-
I think there are two kinds of film-making, each with a different set of criteria for equipment. The first is controlled situations, where for a camera the following criteria are what is important: Image Image Image How difficult it is on set to get that image How easy it is to deal with it in post The second is uncontrolled situations, where for a camera the following criteria are what is important: Can you use it at all? How good is the image in difficult situations? How good is the image inn easier situations? The BMPCC and BMMCC are designed for the first situation. People HAVE used them for the first, but they're DESIGNED for the second. We talk about cameras like it's a popularity contest, it's a beauty pageant, it's a stock portfolio, its a ticket into a club, its a fashion accessory, or it's a phallus extension. This is all crap. Cameras are ugly, expensive, fragile and fiddly and it shouldn't matter what your mates think, how much they retailed for, or what colour they are (even if they're fricking gold plated - Nikon). A camera that shoots 1080p RAW and various flavours of Prores is either worth $500 to you or it's not, and I'd suggest that if it isn't then it's either because you have a different camera that already does what you need it to do, or it wasn't designed for you.
-

EOSHD testing finds Canon EOS R5 overheating to be fake
kye replied to Andrew - EOSHD's topic in Cameras
I'm not sure if this is adding a layer of pessimism or removing one, but could this be a PR strategy? I mean, put out a camera with huge specs, then cause huge controversy due to overheating, then issue a "sorry, we've fixed it now, honest mistake!" firmware update, and watch the sales roll in..... Look at how many people are talking about the 12K Ursa vs the 8K Canon - the headline didn't last but this is keeping up the emotion and sensation. It's the best of both worlds - play the fanboys off against the Canon-bashers, and either no-one finds the cripple hammer and it pushes the cine line or someone does find it and it blows up again.... and all PR is good PR. -
Why not sell it now and move onto something that doesn't put you off? Plenty more lenses, and if you don't care for contrast and sharpness then you'd be better off choosing something else at random, because the 18-35 is amongst the sharpest and most contrasty lenses on offer!
-
My advice is this: return the GoPro and get your money back put that money into a shoe-box in your cupboard and label it "for fixing film-making problems only" go shoot a bunch of stuff with your XT3 whenever you encounter a problem with a real project you're doing, ask yourself the following questions: a) can I avoid this problem by doing more prep work? If so, do that. If not, b) can I avoid this problem by improving my knowledge and skills? If so, try and find information for free online. If you can't find it for free online then take some of your film fund and buy some training or reference materials. If it's not about skills, c) can I avoid this problem by buying new equipment? if so, so that.
-
Of course, the sector that is about to explode in the above image is the Automotive one - currently only premium cars have any cameras in them at all (reverse camera) but in a decade or so every car will have a bunch of them installed. There are all sorts of challenges with lighting too, considering that cars need to be able to see objects that are far away at night and also have to obey very strict safety requirements so can't install floodlights to light everything around them either, so low-light performance will be a large consideration. That actually gives me a lot of hope for the MFT camera market, as it will essentially have its sensor tech bankrolled by the autonomous car market, much like the video editing market has the GPU arms race being bankrolled by the video game industry. Due to size constraints I don't see FF sensors being adopted for automotive purposes, and I struggle to think of another industry that is about to explode that will bankroll FF sensor development. In terms of tech, the cine-camera and professional photography markets are nothing compared to other market segments.
-
One of the things I've realised is that 1080p is enough and it's the bit-rate and bit-depth that really matters, rather than the resolution. I am probably standardising on a 4K or 3.3K mode on my GH5, but not because I need the resolution, but because the bitrate is higher. Most consumer cameras have very poor bitrates for lower resolutions. We've spoken elsewhere in this thread about it, but long story short, when people talk about "only shooting 1080p" they're often talking about shooting with higher bitrates than most modern cameras do in any mode at all. Take the A7s2 for example - a very popular "professional" camera for events and the like. How does the image stack up? It shoots 4K!! but here's the thing - it only shoots at 100Mbps, whereas Prores HQ is almost double that for 1080p. Additionally, people often buy the A7s2 for low-light and difficult situations, but those people "only" shooting at the 176Mbps Prores typically light their scenes well as they're on a controlled set. What happens if there is a difficult shot? Well, a camera that shoots Prores is often capable of shootings RAW, so they swap over to RAW for the difficult shots. So now it's the 100Mbps A7s2 vs ~800Mbps for RAW 1080p. The resolution doesn't matter so much considering that the final image is resized to the same screen area, so in essence, a professional camera "only shooting 1080p" Prores is likely to dedicate between 2x and 8x the data to describing every eyelash, every dimple, every lip curl, every subtle skin texture, etc. Imagine how different the conversation would be if we spoke about bitrate instead of resolution...... "I'm not interested in these new modern cameras, I prefer the older less fancy modes, so because of that I'm shooting my latest feature film at only 800Mbps!". Where's the A7s2 now? I haven't yet done the comparison of h264 vs Prores in terms of image quality, but it's on my list to do soon. But the more I think about resolution, the more I think that people like the resolutions of the newer 4K cameras simply because they give you more bitrate, rather than more pixels.
-
The Promist filters are popular with the 18-35mm, for example, Chris has filmed a few recent videos with the 18-35 and Promist filters https://www.youtube.com/c/ChrisFilmmaker/videos or the other option is to process the images in post and decrease saturation and add halation or blur or whatever you want to.
-
Wow. Looks like it might be a great candidate for modification and adaptation. In this case, modifying it by taking out all the insides, sealing it up, and adapting it to be a photography-themed wine goblet!
-
Can MFT be adapted to L-Mount? I suppose that with the larger diameter of the L-mount an MFT lens could sit slightly inside the L-mount?
-
The other thing that we're ignoring is that the GoPro is a second camera, and a gimbal is not. Do you ever need to get a second angle on a shot, or shoot with two cameras at once? If so, you could use the GoPro as a second angle (obviously a wide angle!). The other other thing we're not talking about is that if you can sell the GoPro to get a gimbal, you can sell it and get anything else you like. In that case, you could get a cheaper older second-hand Fuji camera that will take the same lenses as your other camera, and could be used as a second angle, or have a different lens on it and instead of having to swap lenses quickly you could just swap cameras the way that professional stills photographers do by having one camera with a 24-70mm and a second one with 70-200mm. Or audio gear or whatever else it is you're short of. Agreed. There are rules for GoPros in Hollywood films when people use them as crash cameras. I hear that contracts with studios / Netflix / etc often have clauses for use of 'lesser' cameras like GoPros where there are clauses for maximum duration of a GoPro clip in the final edit, total number of clips, etc. My point about that is that they are actually used in big films, so for us lesser people we can make use of them if we know how to hide it. Full manual settings with NDs and proper lighting is the way to go..
-
I haven't tried the Komodo footage but I have messed with RED footage before, so it would be interesting to see how it compares. Lots of other RED sample files here from various other cameras: https://www.red.com/sample-r3d-files
-
Have a look at it and if the images aren't any good, why not try to clean it yourself? Worst case is that you'll turn something you don't use that has no value into something you don't use that has no value. My completely uneducated guess would be that there's a chance it wouldn't have much coverage. My understanding is that when they push a lens design (eg, to make it small or fast or light or whatever) then they will have to make sacrifices in some other area, and I'm guessing that a larger image circle might be one that they've built into the lens. I could be completely wrong though, so maybe a google will set us straight?
-
I've heard that BM just released a camera with a pro body and decent resolution, maybe that would do it for you? It probably has semi-decent 1080p capture... But seriously folks. I guess the other options would involve swapping ecosystems, to Sony, etc...
-
Nope. Here in Australia we call SA a 'flyover' state. (actually we don't, the east coast forgets all the land to the west). I'll also get my coat.
-
A GoPro can be made to look similar enough to the XT3 (or any other camera for that matter) to be used in the same edit, but you cannot improve the quality of its image, so it will always be inferior in things such as dynamic range and colour resolution, etc. To do this kind of matching you will have to put in a lot of effort in post and have good colour grading skills. Alternatively, the GoPro is waterproof, can fit in small locations, and has a fixed-focus wide-angle lens, which means that it never has focusing issues and can be placed to get shots you couldn't easily get from the XT3. In this sense, the GoPro is a different type of camera than the XT3, and has different strengths and weaknesses. My suggestion is to think about the work you do on the XT3 and consider what would give you the best improvement - a gimbal or a waterproof action camera. Everyone works differently and only you can really understand how these options would impact your films.
-
Great review - thanks for sharing. I have the 17.5mm and 42.5mm from the series and watching that review did not make me feel badly about the ones I have, because his comments remind me of how I feel about mine. My only criticisms of the Voigt MFT range is that (according to lens rentals) they're not made to be disassembled / serviced, so in that sense they're kind of 'disposable' if something happens to them. Having said that they're built like tanks and you'd really have to try to damage them to the point when you'd be facing that situation. My other criticism of the range is that it lacks a ~16mm equivalent, with the widest one being the 10.5mm which is equivalent to a 21mm, and it's not wide enough for my purposes (mainly architecture). Beyond that, they're just glorious. I'll also mention that in combination with the GH5 (and it's lacklustre low-light performance) these lenses are really a game changer. I've been on location and with the camera in auto-SS auto-ISO modes I've pulled up the camera to my face to be greeted with a composition in grey dull tones with gritty ISO noise. Remembering to open up the aperture I've then spun the aperture ring and watched as before my eyes the noise disappears and then in the last 2-3 stops as I went from 2.8 down to 0.95, the image colours appear and the image gets that smooth polished look with pure clean colours. The above is a true story and happened while I was shooting in available light at night in Japan, where this was one of the shots I took in the same location (taken on the 17.5mm 0.95): It's ungraded, I think I only added some contrast/sat. The GH5 really really benefits from those extra 3 stops compared to much slower lenses like the "professional" 12-35mm f2.8. With all the new cameras and discussion of prores and shooting raw I've been looking at lenses for S35 and FF and I actually find that there aren't so many great options available. I would imagine there are and it's just my lack of familiarity, but with my experience of owning and using the Voigt and with my comparative lack of knowledge of S35 and FF lenses, MFT actually seems like the mount with the best options. You missed out by watching it without sound - he really hit the swells and peaks with the soundtrack! Great stuff.
-
Until the announcement, all rumour threads are just people hanging out killing time. Is there anything that the GH6 could do to adapt quirky lenses that the GH5 couldn't do? I've got a bunch of quirky lenses and after having shot with a bunch of them for by big blind test, have no desire to find anything quirkier...
-
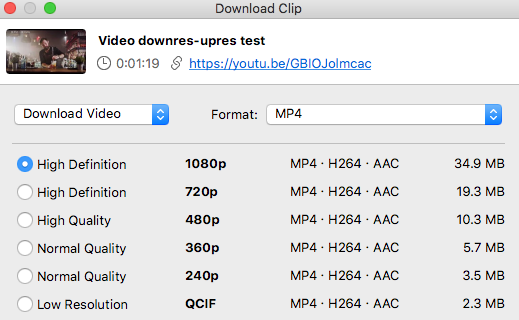
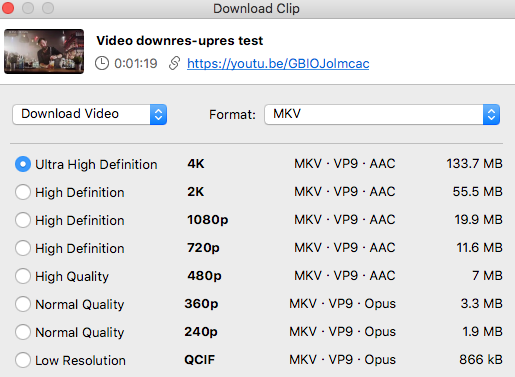
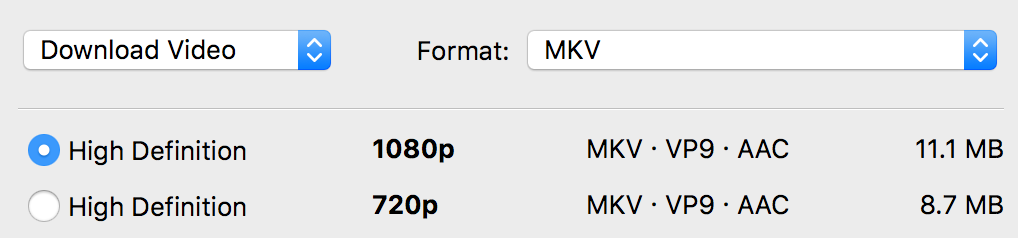
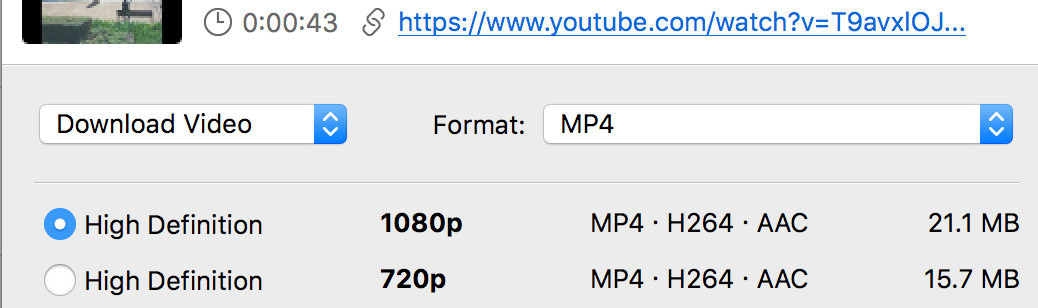
Assuming people watch the video in 4K, yes. Let's see what the numbers say. Here are the file sizes of the above 4K clip: And here for a 1080 upload: The above 4K upload has 1080p at 2Mbps MKV and 3.53Mbps for MP4, and the 1080 upload has 2.06Mbps MKV and 3.92Mbps for MP4, so looks the same to me. Due to internet limitations I once watched everything on YT in 360p, over a period of days IIRC. It was actually really very nice once I got used to it. I think it was on a laptop, so not on a huge screen where the artefacts would be dancing about all the time, but I think it was a real leveller in the sense that it didn't matter what camera people shot things with or how much sharpening they'd applied, etc. Of course, you could still see all the good stuff, like composition, DoF, colour, and of course, content. It's worth trying if anyone is curious - I recommend it. Be warned though, for people who hang out on a camera forum, the adjustment is a bit rough. See above - watching in 1080 seems to get you the same quality regardless of upload resolution. I have heard others say that though, so I suspect it might have been something they used to do. I keep wanting to talk about the bitrate of Prores and how it compares to h264 and modern cameras. I think it's time for a comparison.... Can you use an external monitor with it for something like Prores HQ? These days we've kind of skipped over Prores 4444 and gone straight to RAW. If I didn't care about IBIS then I'd be very tempted by something that shoots downscaled RAW/Prores like the P4K, P6K, or Z-Cam offerings, and just shoot 2K or 2.5K Prores downscaled from the full sensor. In a sense that gives the best of both worlds. What I found interesting, at least in YT compression, is the difference between 2K and 1080. See the above. Maybe 2K means "Pro" and so they up the bitrate for it. I should upload something in C4K and see if that bitrate kills the UHD one. True. IBIS is a pretty killer offering though, considering that if you take all of the lenses made throughout history, the percentage of those with OIS is almost zero, but IBIS gives stabilisation to every lens ever made.
-
As long as it's not a pie floater, then you'll be fine... For our American friends:
-
Which, in recent decades, and corresponding to the decline in software reliability, is broadly referred to as "alpha testing"...