hyalinejim
-
Posts
970 -
Joined
-
Last visited
Content Type
Profiles
Forums
Articles
Everything posted by hyalinejim
-
DPReview have a video review shot on R7. The footage looks lovely. However, they say 4k crop is soft, 4k non fine is soft, HD 120p is soft. Also, histogram and audio meters disappear when you hit record.
-
The answer, from looking at the manual, is no. There is an EX Tel Conv. mode but it doesn't work for video on the GH6. So there's no sweet 2x mode for HD shooters. It looks to me that the only thing that comes close for 1080p is to set a custom mode to shoot 4K pixel/pixel and then scale it 50% in post to give a clean 1.5x zoom on a HD timeline. Or you could scale it to 75% which should give you a clean 2x digital zoom. But of course, then you end up dealing with 4K files anyway which defeats the purpose of shooting HD. And also there's a bit of post work involved. And if you're aiming for the 2x then framing will be wider than what you want. The beauty of the GH5's 2x Digital Zoom for HD was you just pressed a function button and the reach of your lens doubled.
-
What do you guys think about the Freewell Vari ND magnetic kit for GH6 with DR Boost on? It splits a Vari ND into its components which means you can do this: - Mount the base ring which is one stop reduction, effectively base ISO is now 1000 - Add 2-5 Vari ND for shooting indoors - Swap it for 6-9 when shooting outdoors (9 stops, if it's actual, is enough for me even in bright light as I'm not usually looling for very narrow DOF) Looks like the colour cast is minimal but I haven't found much info on X pattern just yet. They also do solid NDs which stack and I could get a 3 and 6 or some other combo. But I think I would give up a little image quality for the convenience of fine tuning exposure with a variable system.
-
Yep, that GH6 grain is very film-like. R5C 10bit looks like there is heavy temporal NR going on which causes that unnatural shimmering, especially when you compare it to the RAW output which is noisy but doesn't shimmer.
-
Thanks for doing this! Good to hear that normal 1080 looks good. Can you control the amount of zoom in the pixel/pixel mode? On the GH5 there were two ways of doing it. One was pixel for pixel, more than 2x zoom, and was mushy. The other was exactly 2x zoom, a slightly wider crop, downsampled and with no artifacts.
-
We're probably at the risk of going on one or more tangents here but it's an interesting conversation to me so I'll go ahead. I understand that the image you posted wasn't supposed to be at the correct luminance level. Nevertheless: But the primaries for each of those colour spaces are defined, no? So there should be no variance in the RGB integers for middle grey. Correct me if I'm wrong, but my understanding that the value for middle grey (18% reflectance) in, for example, sRGB colour space is 119, 119, 119. It's not 0, 0, 0 nor is it 255, 255, 255. And in your example of 0.18 in linear light, if you transform correctly to sRGB you should end up with 119. If it's any other value then something is "incorrect" in the transformation. Just as middle grey is a constant, so are the characteristics of each colour space with defined primaries and gamma. I don't know anything about what's involved in cg-heavy film imaging pipeline, but in my experience of looking at the results of Adobe's colour engine and comparing it to colour charts I would suggest that Adobe's motivation is not to create colours that look good, but colours that look accurate. I would guess that for each new camera model they shoot a colour chart and then devise a profile that tries to match the colours of the chart as closely as possible while retaining a healthy amount of contrast (as opposed to a linear profile). The camera manufacturers, on the other hand, create colour profiles that are not as accurate but arguably look better than what Adobe offers. This is what I've noticed in relation to RAW still photography. I don't know anything about what's up with the Sigma FP 🙂
-
Even applying a simple curve to linear data will alter the hue. Perhaps the Adobe Profiles try to compensate for this so that hues stay accurate.
-
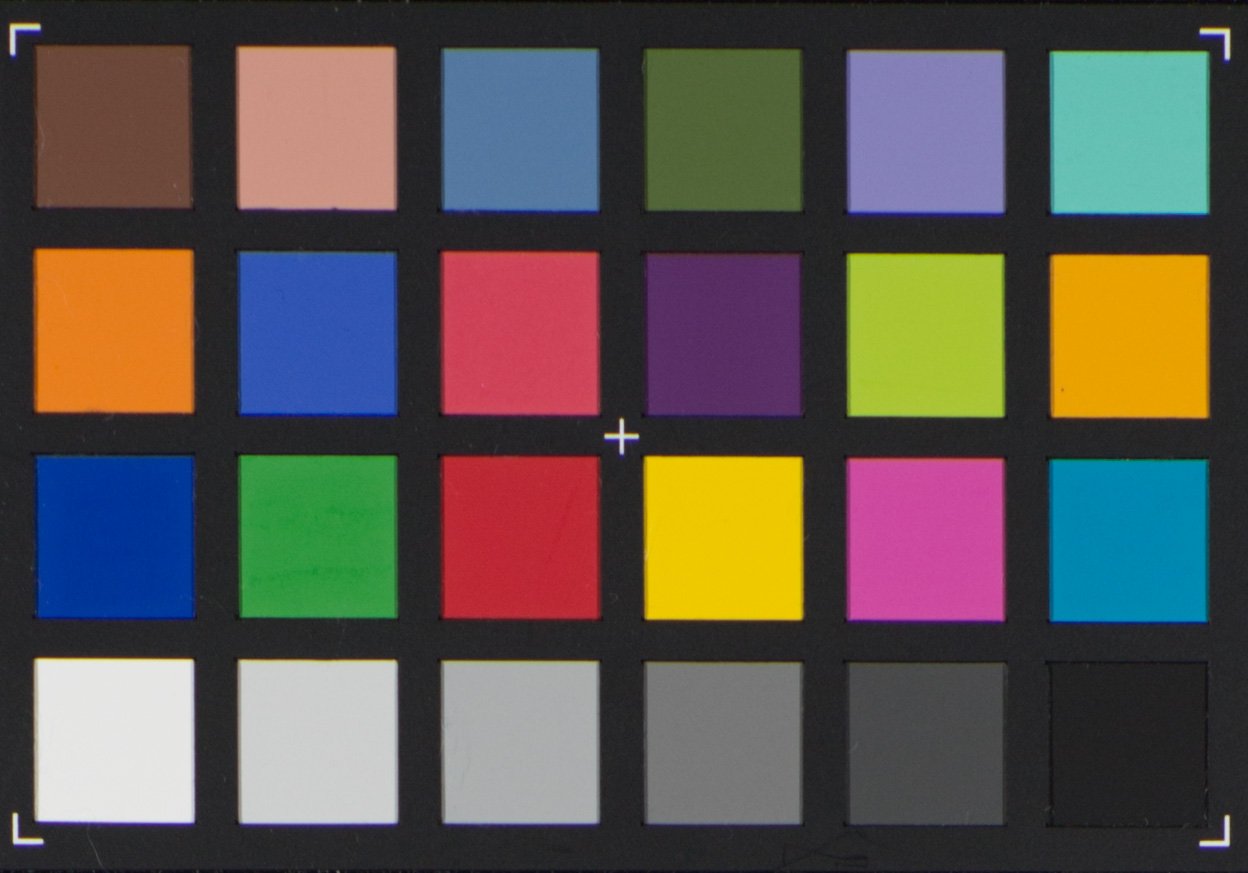
But middle grey is not (or shouldn't be) a variable. It's usually understood to represent 18% reflectivity. Why not? You totally can, and should. 18% grey is 119 in sRGB, 100 in ProPhoto, 126 in Rec709, 50 in Lab. These are known values and you can use them to check things like exposure but also the validity of your workflow. In the image you posted above, I'm pointing out that the value of middle grey is too low. So something may be "wrong" in your image pipeline. This is the whole point of a Colorchecker, to compare your results with what those values are supposed to be. If you're getting the D4 patch at 119 (actually more like 122 as it's a bit brighter than 18%) you know that your exposure is correct. If it's lower maybe the exposure was too low or you're using the wrong gamma curve.
-
In my experience the Adobe profiles (Color, Standard and Neutral - they are basically 3 different contrast levels of the same profile) are quite accurate in terms of colour for all the cameras I've looked at. If colour accuracy is the goal in Resolve then the Adobe rendering will give a good indication of what to look out for. But of course many people (myself included) think that accurate colour is not necessarily the most pleasing colour.
-
That's pretty cool, how was that chart generated? I find it hard to figure out sometimes how a Colorchecker should be represented by a given camera. Here the rendering looks a bit low contrast and darker than it should be. Patch D4 is just above 18% grey in reality so should be represented by at least 126, 126, 126 RGB in Rec709. And the brightest patch is 90% reflectance so it should be considerably brighter than shown here. This is what the spectral data provided by X-Rite looks like in a linear gamma, converted to sRGB: But of course a camera recording of this would be in a different gamma. Nevertheless, I always feel that D4 should be at whatever the middle grey values of the colour space is. Here's a photo of a Colorchecker using Adobe Standard picture profile: D4 patch is the same but highlights are lower (there's a highlight roll off rather than clipping at 100% reflectance which you would get in scene linear) and the shadows are darker. All this is to say that be wary of digital representations of colour charts for video applications. The spectral data file provided by X Rite is useful for calibrating the linear colour response of RAW camera profiles, but there are gamma issues to consider when matching actual shots to representations of charts: the gamma of the camera may not (and perhaps should not) match the gamma of the generated chart. In this case, if somebody can get the different flavours of DNG into a scene linear gamma with no highlight recovery then the middle image above is what the visual reference should be for testing which flavour has the more accurate colour

-
I haven't been following this topic very closely and don't have an FP so disregard this if it's not relevant or has been covered already. I can tell you from much experience of looking at colour charts that the colours in "OFF" are far more accurate and true to life than in "ON". The blue patch is a giveaway here as it often is when a colour gamut or matrix is being interpreted incorrectly: in the "ON" version that patch is too purple.
-
One valid reason not to ETTR on every shot is that it creates extra work in balancing exposure in post, versus exposing for middle grey where the same correction should work for each clip regardless of highlight level.
-
Absolutely. I would say the same. If you have a LUT that you like then you are 100% sorted. It's rare that I'm more than one stop over or under and I usually leave WB on Daylight unless I'm in mixed lighting. All of that is easy to correct even with Premiere's unsophisticated (for log) Lumetri controls. For quick jobs I put an adjustment layer with a lut above the clips and then tweak each clip underneath the lut.
-
+1 For fast turnaround work it's a godsend to stick a normal zoom on there and do the 2x for extra reach without having to change lens.
-
Would you have any insight on whether the 1080 modes are line skipped, aliased and mushy like some of the S series cameras, or clean and nice like the GH5? I still haven't been able to find this info anywhere online. I guess there is no love for HD in 2022 😪
-
An interesting suite of tests, but the way they count stops of dynamic range is a bit odd. Their stop number "1" (which is clipping) should be "0". If you're running a race and you're still at the starting line then you've ran exactly zero meters. You can choose to call the starting line "1 meter" but you haven't ran one meter until you've ran one meter (ie: their stop number "2"). Or, to put it another way, we should count the gaps between the lines on the waveform, not the number of lines themselves because the first of those lines represents zero dynamic range.
-
I think it's 800 but I don't know if the difference in highlight detail and/or shadow noise will be quite as noticeable in a Rec709 profile compared to log.
-
 Yes but for run and gun the difference between dealing with constant NDs and a Vari ND can be the difference between getting the shot or not. I'm not a fan of the polarisation effect of the variables at all, but the convenience can't be beat. Best of all of course would be an internal electronic ND!
 -
I've just checked my 82mm SLR Magic 6 stop Vari ND at 24mm on full frame versus shooting with no filter and can make the following observations: - there's no sharpness loss - there's a colour balance of 350 Kelvin and it is constant throughout the range - it vignettes in 3:2 but it wouldn't be an issue for 16:9 - the polarisation effect gets progressively worse as you stop down. I wouldn't notice it unless I made the comparison but it's there and it's annoying However, I do love the convenience of using a Vari ND to fine tune exposure. I wonder would the optimal solution for something like the GH6 be a constant ND to get you most of the way there and then a light Vari ND that's as free of artifacts as possible to get the rest of the way?
-
I have to say I've been really happy with the SLR Magic on speedboosted GH5 in the 24-200mm range. I've never noticed softness, major colour cast or X patterns. But I don't need very narrow DOF outdoors in bright light. Its six stops would be a bit limiting at ISO 400. If you wanted to shoot ISO 2000 (as in GH6 DR boost) and also wanted to shoot at f1.8 1/50 in bright sunlight then you'd need almost 12 stops of ND There is one vari ND on the market (Promaster Extreme) that goes to 12 stops but who knows what kinds of issues it might cause? Maybe a fixed ND plus less extreme vari ND would be better.
-
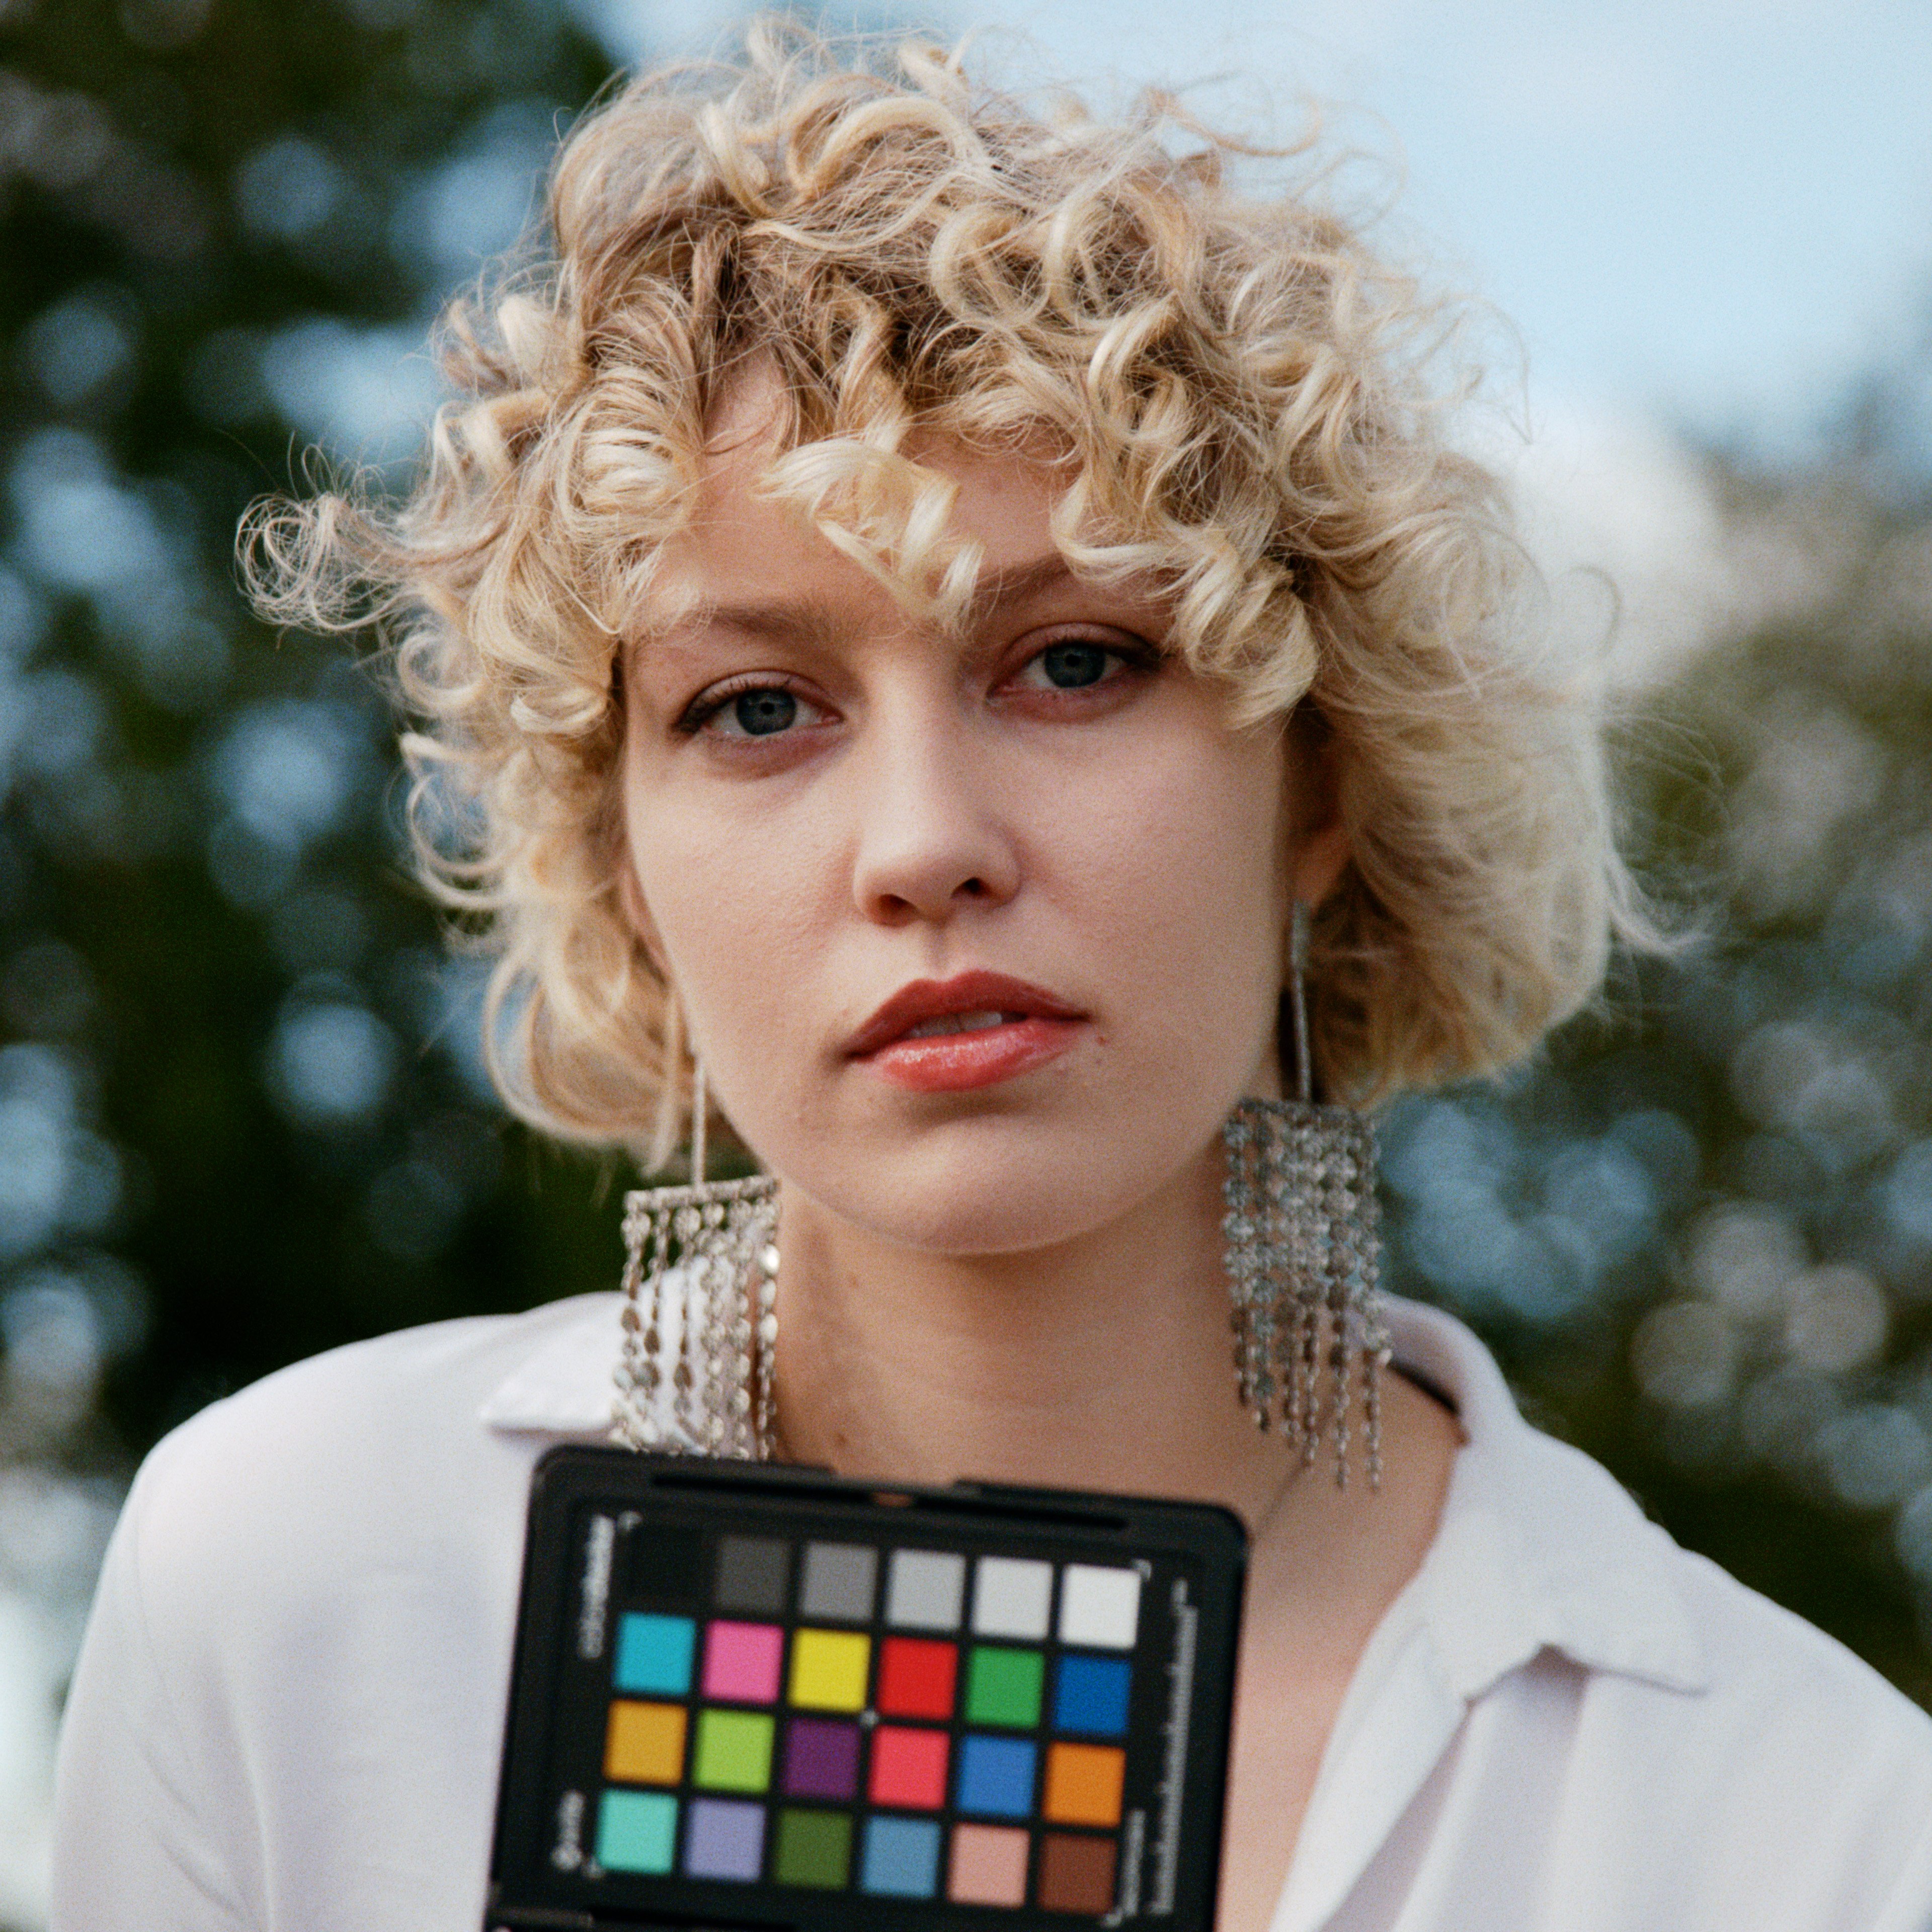
Slightly off topic and I'm not sure that it will change the results of what you're trying to find out (the range of stops you need to cover with an ND) but it's still worth pointing this out for its own sake: This is not a reliable way to arrive at a technically "correct" exposure as different cameras and picture profiles will clip at different exposure levels. And we can indeed see that your settings for full sun arrive at an exposure that is two stops brighter than what the Sunny 16 rule advises. The brightest patch on an X Rite Colorchecker is 2.5 stops above middle grey at about 90% reflectance. D4 is the middle grey patch at about 18%. You could try spot metering it to get closer to the recommended exposure, although that is pretty tough. Much easier to use a grey card angled 45 degrees towards the main light source. (However, whenever I've exposed in direct strong sunlight so that D4 is at 18% grey I've sometimes found the image to be a bit too dark for my tastes so take the idea of correct exposure as dictated by a grey card with a pinch of salt. In weaker light or in shade I've found it to be quite close.) In the below, shot in soft evening cloudy light, the fourth brightest patch (D4) is exposed at RGB 119, 119, 119 which is middle grey in sRGB (and that would be 126, 126, 126 in Rec709)
-
Well, Mr. Claff's measurements don't stretch as far back as the GH1, but he does include the GH2. Here it is versus the GH6 and, to take a selective view, at its lowest ISO setting it is actually on a par with the the GH6: https://www.photonstophotos.net/Charts/PDR.htm#Panasonic Lumix DC-GH6,Panasonic Lumix DMC-GH2
-
Both of the contributors state that they reckon the implementation of the GH6's sensor is designed to favour video rather than photography. Interceptor121 compared VLog dynamic range of GH6 to GH5M2 and found it favourable: And Bill Claff of Photons on Photos found that the dynamic range in RAW stills is pretty much bottom of the barrel
-
😭