BTM_Pix
-
Posts
6,138 -
Joined
-
Last visited
Content Type
Profiles
Forums
Articles
Everything posted by BTM_Pix
-
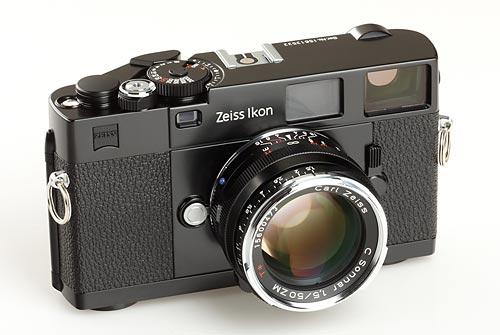
 The Zeiss Ikon ZM M mount stopped production about 5 or 6 years ago I think. Looks like this new one will be a fixed lens digital version of it like Leica have done with the Q, albeit with a 35mm instead of a 28mm. The Zeiss f2 35mm is about £1000 and the f1.4 is about £1600 so if the price quoted for this new one is right you would imagine it might be the f2 they have in it but if its the f1.4 then...well...that would be very interesting against the RX1Rii and especially the Leica Q.
-
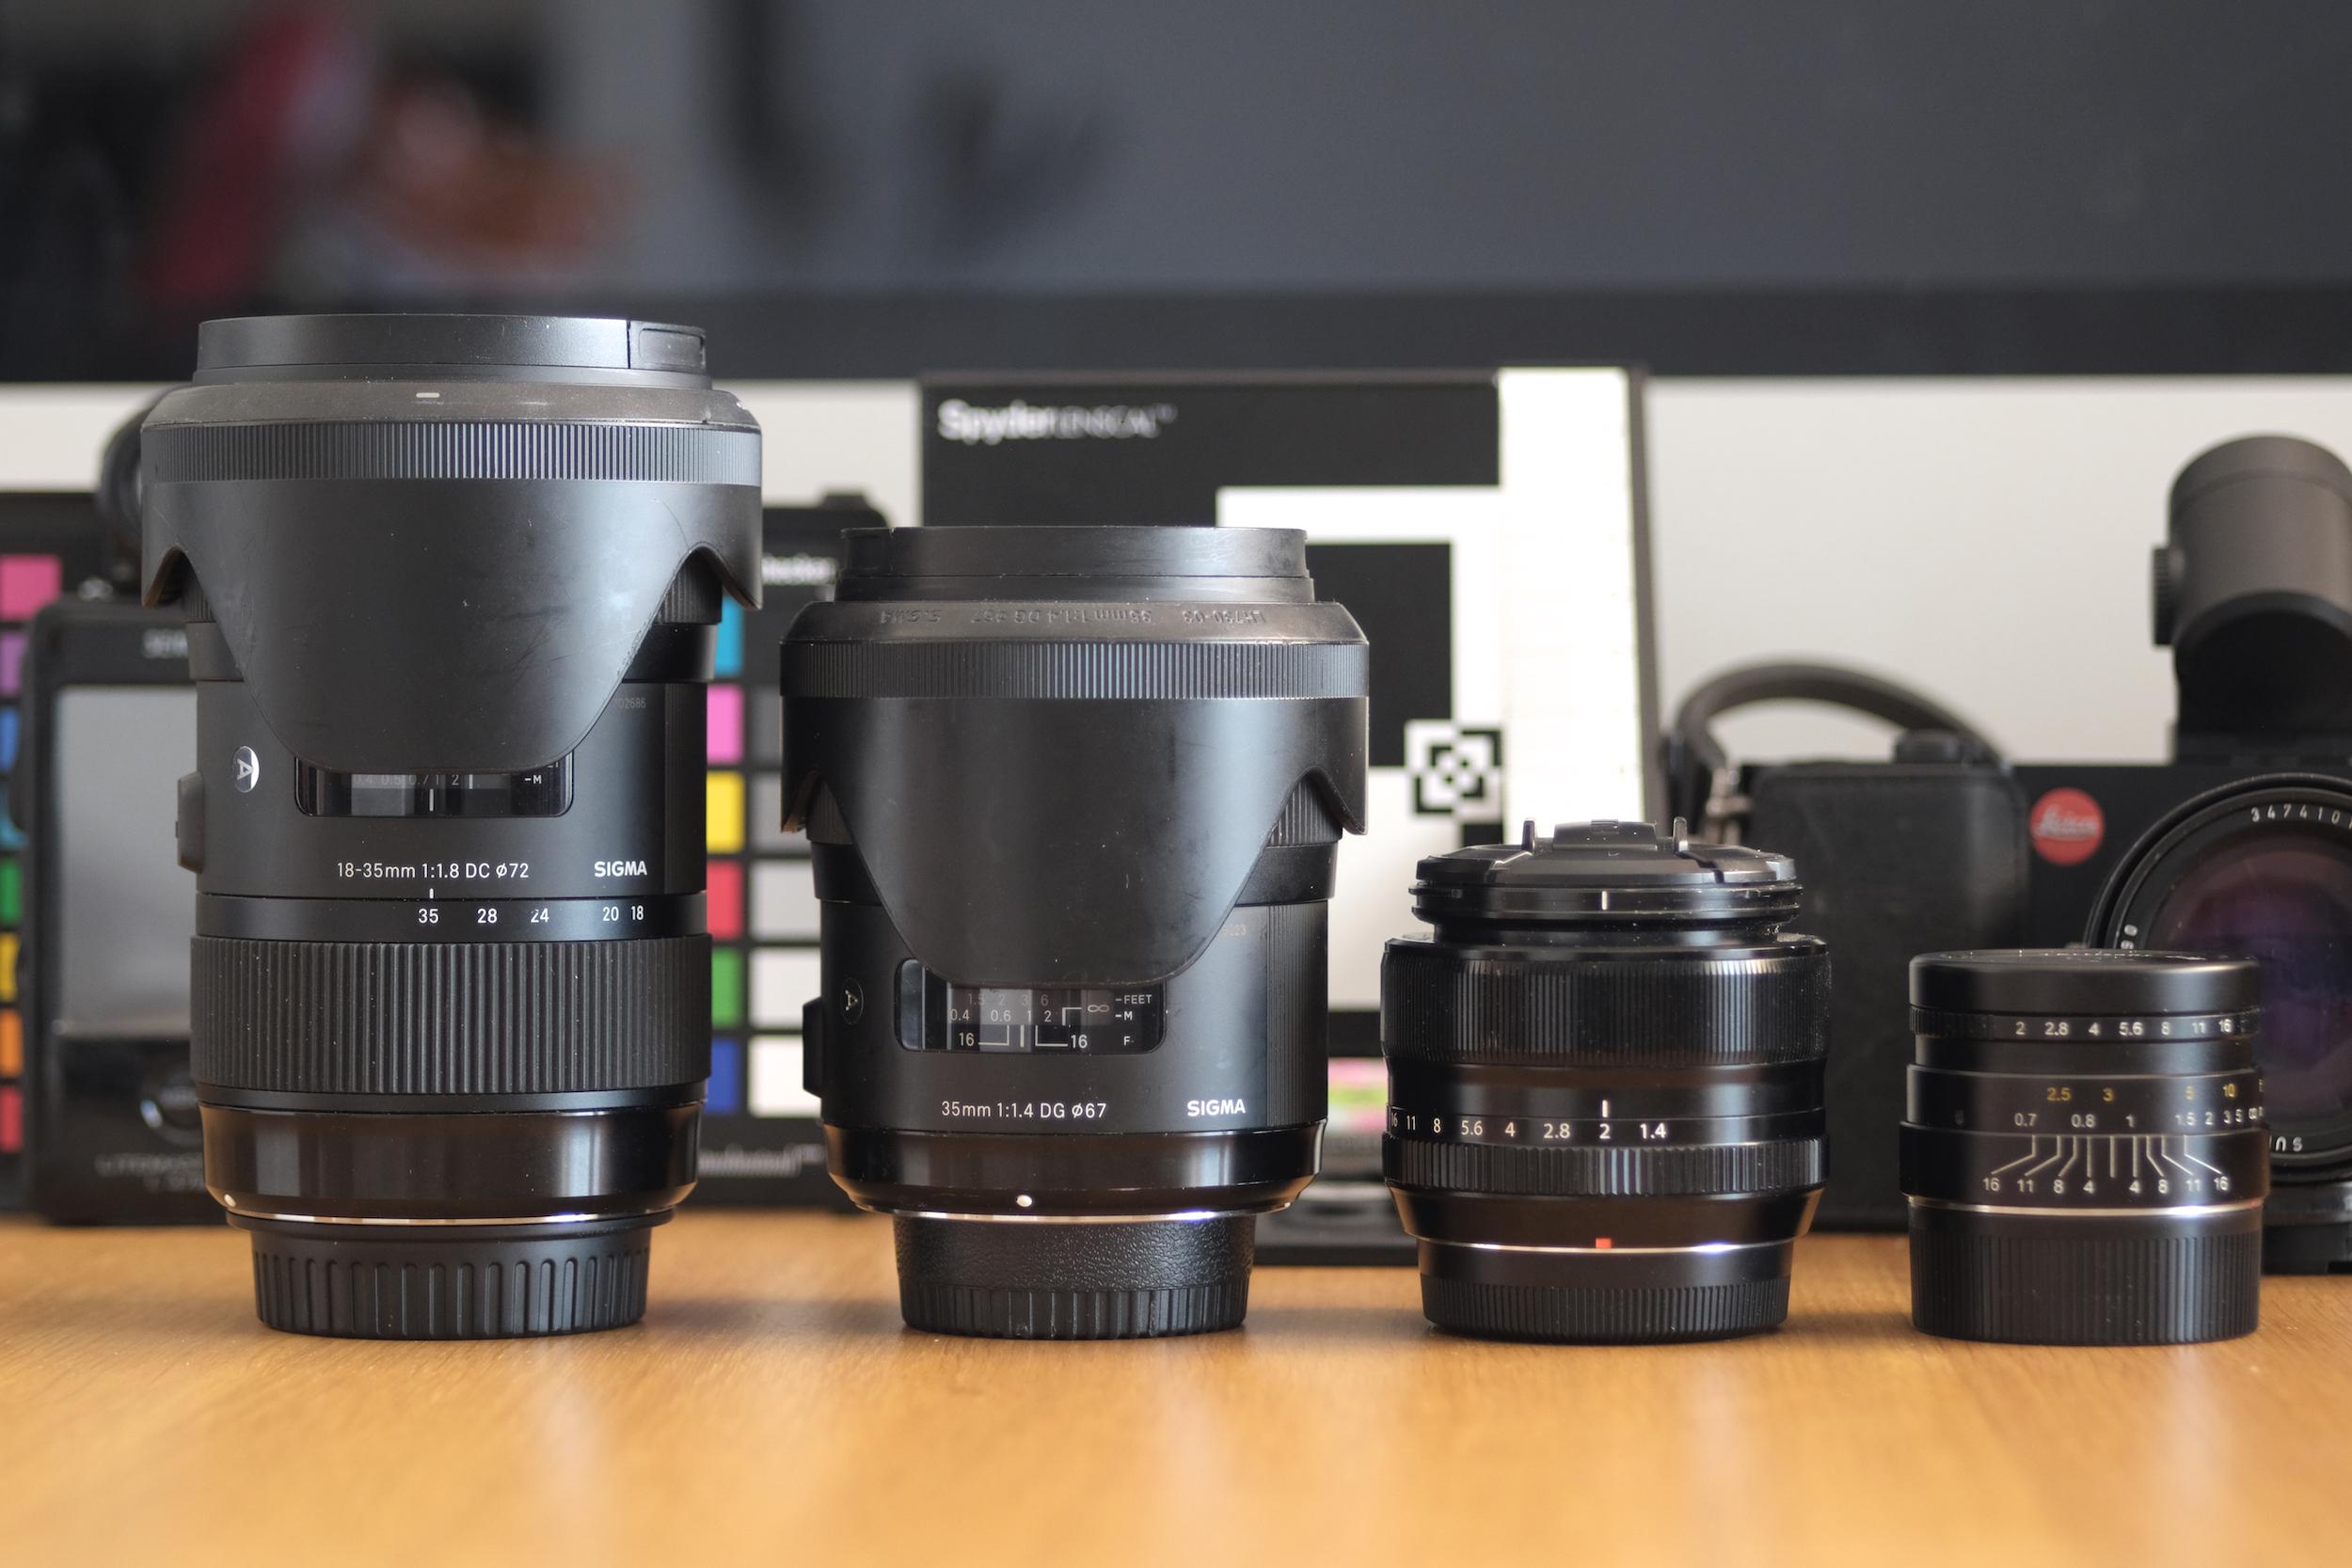
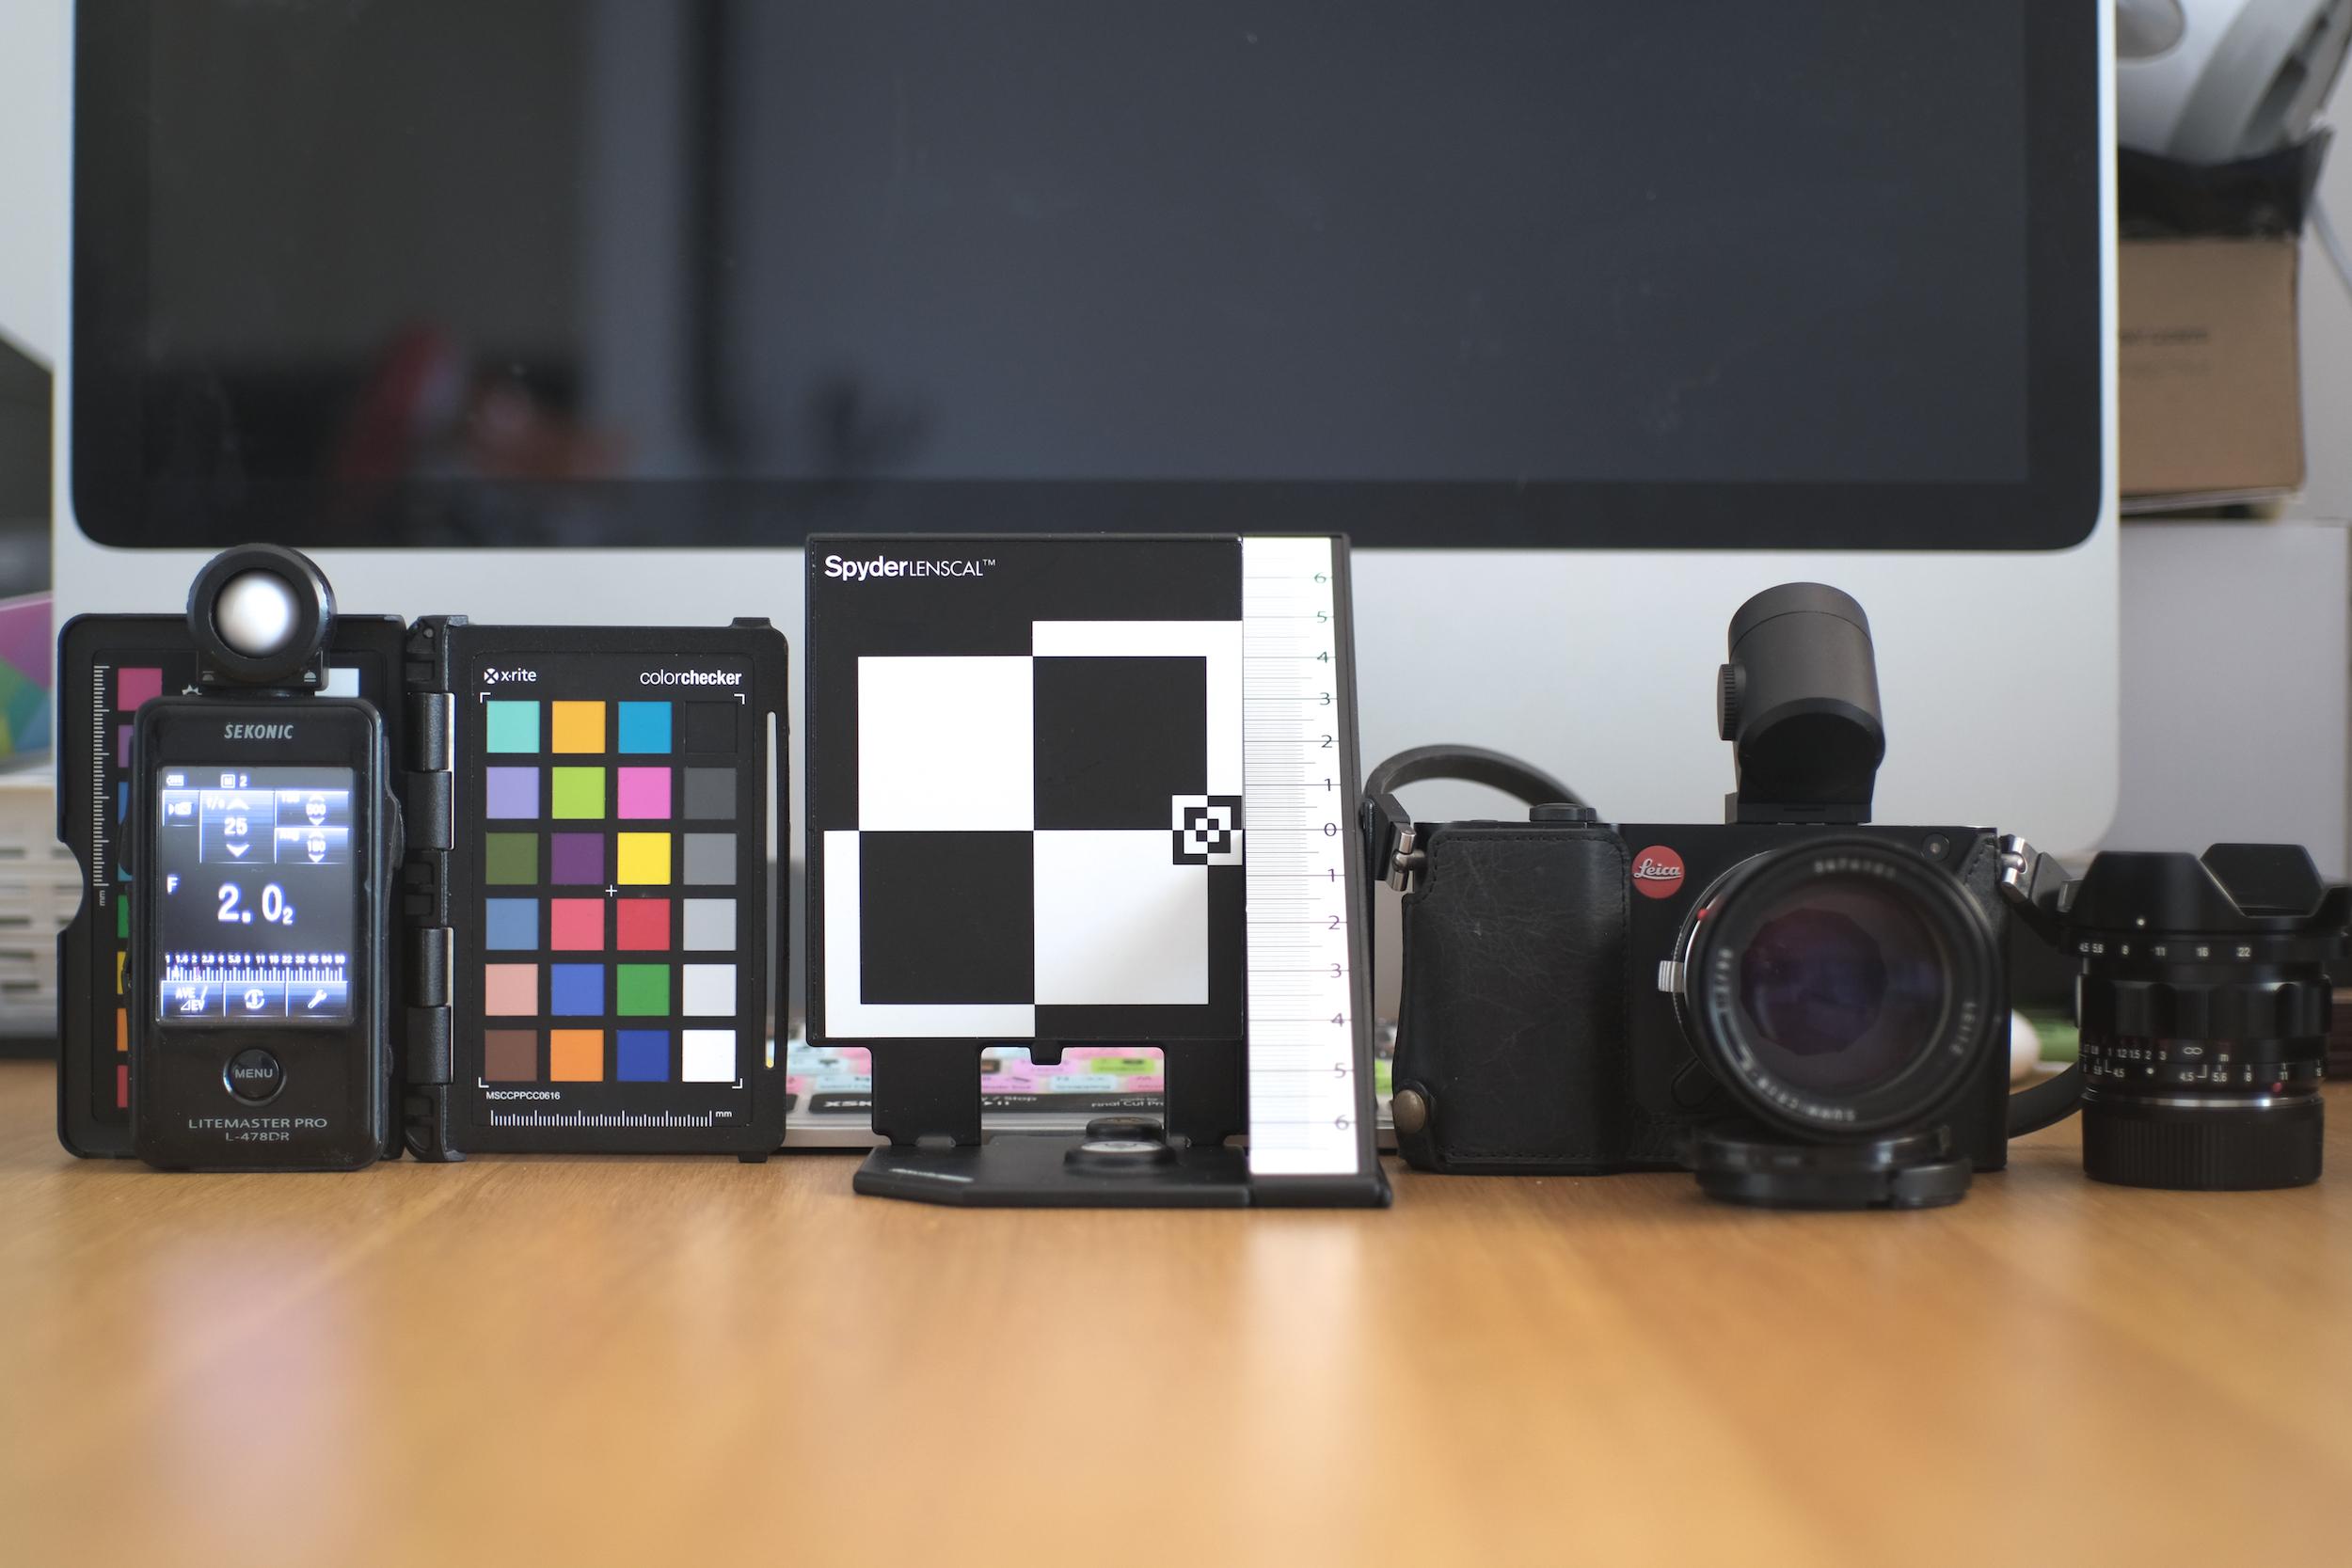
I've done a quick test for you of a prime ART against a zoom ART at the same focal length along with a couple of other 35mm lenses for comparison. I shot it on the X-T2 as it was the most universal mount as the lenses are EF, Nikon F, Fuji and Leica M mount. Lenses are : (L-R) Sigma 18-35mm f1.8 ART, Sigma 35mm f1.4 ART, Fuji 35mm f1.4 and the wildcard 7Artisans 35mm f2 M Mount. Everything was shot at f1.8 to match the 18-35mm at the same exposure with the exception of the 7Artisans which was f2 and exposure adjusted. All of them are jpeg out of the camera using the ProNeg Standard profile. The camera was locked off on a tripod so the FOV variance is due to the lens (and/or internal corrections in the case of the native Fuji lens) rather than a change of shooting position. And, yes, the backlight on the light meter did stay on longer during the Fuji and 7Artisan shots hence the reflection in the table. OK, here they are then. First up is the Sigma 18-35mm f1.8 ART Next is the Sigma 35mm f1.4 ART Next is the Fuji 35mm f1.4 And finally here is the 7Artisans 35mm f2 For reference, the current price of these lenses on Amazon in the UK is: Sigma 18-35mm f1.8 ART - £641 Sigma 35mm f1.4 ART - £649 Fuji 35mm f1.4 - £499 7Artisans 35mm f2 M Mount - £249
-
And if its not then you can always use it with the hood on.
-
I'd be thinking WOW!! if they have enough room to make a speed booster version of the adapter. Faster versions of their back catalogue of already fast primes with full AF when shooting in Super 35 mode would be a bit of an OK thing.
-
Yes @UncleBobsPhotography I have something for you to memorize 8 focus points with selectable transition speeds. It will be out shortly-ish after the BM4K camera (as it will support Panasonic/Sony/BM). Or if you switch to Leica you can have it earlier. Though that seems a bit extreme ?
-
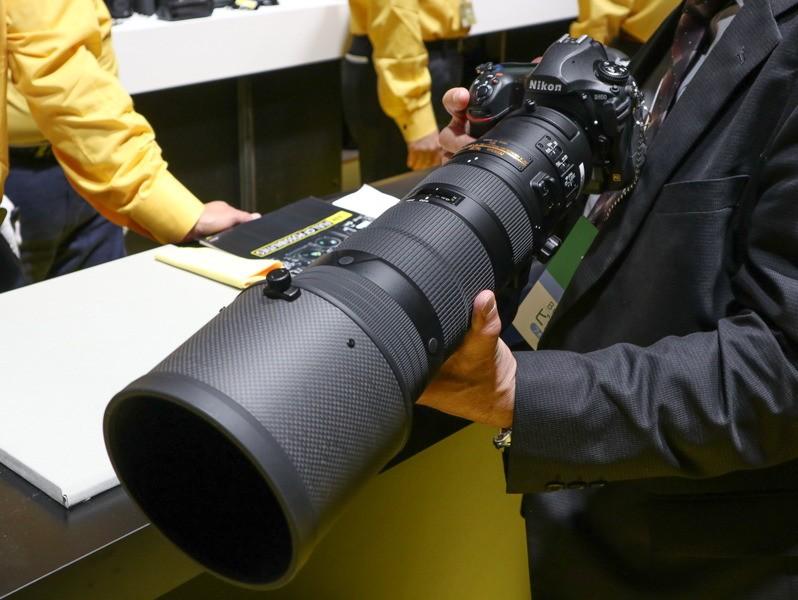
A bit more context here with it mounted on what looks like a D850 or D500 you can see how much of the rear taper behind the controls is still the lens so it suggests that the actual adapter is reasonably compact. Again though, even if it was a native mount, that is a far, far bigger lens than you would be expecting them to be illustrating the benefits of a compact mirrorless setup with Not to mention it being £11K !
-
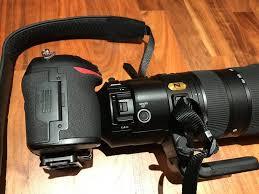
Don't be fooled by that picture. The lens is the 180-400 so what might appear to be a big clunky adapter at the rear isn't but is an integral part of that particular lens as it has an in built switchable tele converter (hence the 1x graphic) and a slot for drop in ND filters. Here it is for context on a D5
-
I think they have confused themselves about the type of difference a fresnel element will provide. I have the Nikon 300 f4 PF which has the fresnel element in it. It enabled Nikon to make it roughly a third smaller and half the weight of the previous version and it is a hell of a lens. But its still an f4. My suspicion is what they actually meant its that it can make an f1.4 lens have the weight/size that you would expect of an f1.8 just as the 300 f4 PF has the sort of weight/size that you would expect of a 300 f5.6 lens. So, fast primes that are smaller than you'd expect is the headline there rather than slower primes which are faster than you'd expect
-
If that is legit then the lack of an image lock button is surprising considering it is on every other Nikon FX and many DX cameras too. And by surprising I mean a bit daft, particularly as it not only lock the image but initiates the wireless/network transfer of it in the background so you dont have to go into a menu and can carry on shooting.
-
Try this ip address from my original post as it might be up to the same game _________ Its a bit clunky getting it going as the documentation wasn’t exactly readily available so I wasted a lot of time being unable to connect to it as an access point because the router address it uses when wireless is entirely different (and undocumented) to what it is when you are using the LAN port or it is in bridge mode.( Its 192.168.8.8 by the way ) ______________
-
A great application for it. They have something new being announced on the 21st.....
-
A bit of both. Moving towards more motion stuff like live broadcast of things around events like press conferences and build up around the stadiums pre match. Also some sports film shorts. A lot of time is going to be taken up with product development as well as soon as the Blackmagic camera is released and I've just finished a Leica version which will need some manufacturing setup etc Also some tedious corporate structure stuff as Brexit will make it too painful to be doing stuff from outside the EU. It's utterly weird that you mention Olive oil production as last night we were on a long car journey and were discussing how the hell the economics stack up regarding number of trees and stuff !!
-
Or, we could dispense with the disco lights and just look at it's on board screen It will have a guaranteed minimum of two silly design flaws unfortunately. It's how I roll. No, I don't think you're either of those for wanting that capability. Just trying to consider a way to keep that option in the scope of something compact and cheap. I have a couple of ideas that could keep it sensible that I'll look at.
-
The former.
-
If you mean visually checking as in viewing it on the device itself rather than a data integrity check against the source media then no. The scope of it is basically as a (much) cheaper alternative to something like the WD Wireless Pro without the fixed capacity and with a fast enough interface to copy the CFast cards as the WD device only supports USB2 for non SD card sources. It can support wireless access as a drive (I have a use for it in this way with non-RAW video files to use it with LumaFusion editor on the iPad n the field) so it could be used as a source for your RAW viewer of choice on a laptop but if you've got a laptop with you to do that then you don't need this anyway and might as well use the laptop.
-
USB interface so can take a regular CF/SD/MicroSD reader as well. CFast and SSD is USB3 interface so it will be fast enough to dump the card before you fill the next one. Power will be USB so capacity is variable. I already have this done for SD backups but it will need porting to different hardware to support the extra grunt needed for fast transfer of CFast
-
Is anyone interested in a small device to do in field backups of CFast cards to SSDs so you can have a couple of cheap 64gig cards (such as the Integral branded £46 ones) and cycle between them? So you'd shoot on one, pop it into the device which will automatically back it up while you shoot on the other one and then repeat and then just pull the SSD out to start editing with when you get back to base.
-
My D5 and D500 both do pinch to zoom and swipe but yeah the screens aren't landmark quality or size. The camera that the younger members of my family most respond to is my Leica T as it is the closest to matching their use expectations in that regard. Eyefi and FlashAir cards are a good workaround for sending RAWs to phones as its am always on solution so you dont have to fire up the app and far easier to action off the back of the camera as they're auto sent when you lock the image.
-
I've found in France that if you buy a local sim like Orange then its ok but if you are roaming from another country they connect you to this special version of their network....
-
We do this for some specific games and its standard practice for virtually all games for some agencies depending on the network infrastructure. A finished wired version of a picture would be circa 2mb versus sending maybe 3 or 4 camera files of 10mb each to an editor and 2mb versus 40mb can be a big difference at many events so you can end up losing the speed benefit of a remote editor. I don't particularly like it myself as I like to be responsible for my own editing but there is no question its an area where camera manufacturers could look at adding some tools to do more in camera without having to transfer the file. Basic cropping is already there in most cameras but its the addition of the caption that you can't do so a voice to text feature or even a bluetooth keyboard input would make it viable to keep the laptop out of the equation and save a lot of time. Not to mention the attrition cost of using laptops in the rain ! Its a follow on from the old motorsports "Win on Sunday, Sell on Monday" philosophy but, yeah, I wouldn't want to base my company's financial future on that holding true for photography any more. It worked in the old days with people like Bailey endorsing Olympus etc but its far more likely to be "See what Fro thinks, Click the affiliate links" these days.
-
Its not about reluctance in fairness, its about it being performing as well or better than what we currently have and doing it within part of an overall eco system. Even leaving aside that fps speed only being with the e-shutter, Sony just aren't there yet to be able to be a swap out system for Canon or Nikon. Unless you can swap it out in its entirety (and you need to consider the whole end to end process here) and carry on working seamlessly (let alone improving) then there is no motivation there. And this not just an anti-Sony thing by the way as the new Nikon system won't be adopted for the same reasons either if it doesn't have the same seamless transition.
-
Its a complete calamity and to stay on topic the UK will need a very, very large gimbal to stabilise it again
-
A lot of the change at least in the sports world will be related to controlling the image of the event as much as capturing the image of the event. Organisations like UEFA,FIFA,IOC and the Premier League etc don't want the risks associated with that number of uncontrolled lenses pointed at their events as its the unique pictures of the controversies that will make far more money for an individual photographer than the generic goal celebration ones. Of course, the controversies will be the cheating, diving, stamping, fighting, abuse of the officials, crowd disturbances etc that the organisers don't want damaging their brand. For that reason, I think exerting editorial control by selling the rights to one agency will be the next step and there are already some half way house situations happening where this is to all intents and purposes in place by managing the most favourable pitch positions and access to specific agencies. The connection that used to exist between the written press and photographic press working for the same publication has by and large fallen by the wayside as newspapers increasingly lay off their own photographic departments and use agencies so its not like the events need to fear a boycott if they only let in one agency's photographers. There is also the issue of money in terms of the photographic rights should be a saleable commodity for the organisers in the same way as the TV rights are and it does seem strange that in an era of tons of different rights packages for TV (live, delayed, internet,xyz territory) that they are paying big money for that whereas for a photographer it costs no more than their own time to go and cover the same event and distribute it worldwide. I don't think we are there yet in terms of stills extraction from live video for practical purposes (I've attempted this a few years ago shooting on the Tour de France with a RED Epic and it was abandoned after a few stages) but it will also be tricky from a rights issue. The broadcasters pay eye watering sums for the coverage so if a photographers dares take video then he will literally be escorted from the stadium and struck off the organisers accreditation system for all subsequent events. This means that it will have to be derived or sold on from the broadcaster to the agency and I'm not sure how much money would really be in it for everyone at that point. Creatively, all you would get is literally stills from the TV coverage (which in certain instances would be great because TV cameras get the best positions) but I would still maintain that the best sport photography images still stand apart as they're derived in a different way looking for individual isolated moments whereas TV images are having to convey a coherent continuous set of images. The broader point of it changing beyond the scrum situation (which, to be fair, is only really the case for trophy lifts and team shots) at some point is right though and it just remains to be seen when and how. I've already been advancing at least part of the demise of the old guard by winding down the number of shifts I've taken over the past few months and I suspect I'll be all but out completely by the end of next year.
-
You'll still be able to buy from us but just at that point we will be accepting payment in food, medicine and Levis.
-
Indeed. Even with the 256gig card, at between 10-14mb per jpeg that's well over 20,000 eggs so its a f***ing big basket