

Towd
-
Posts
117 -
Joined
-
Last visited
Content Type
Profiles
Forums
Articles
Posts posted by Towd
-
-
If you guys are into manual focus primes, I'm really impressed by the Meike 25mm t2.2, and I'd imagine their new 16mm is just as good. It's very well built, incredibly sharp, and has a beautiful out of focus rendition. Having always wanted to try some Veydra primes, I couldn't resist the chance to test out the Meike for the $330 price tag.
If you look at Veydra's performance in some MTF tests from Lens Rentals, they put some Zeiss CP.2s to shame. Even at T2.2 they look to just edge out the best Pany-Leica and Olympus pro glass stopped down to F 2.8.
Some links to compare MTF tests:
https://www.lensrentals.com/blog/2018/03/veydra-cine-mini-prime-mtf-optical-bench-tests/
https://www.lensrentals.com/blog/2018/03/finally-some-more-m43-mtf-testing-are-the-40s-fabulous/
I'm currently in the post hell of a large project I'm wrapping, and will not get a chance to really test the lens out for a while, but I've been towing my GH5 with the Meike around and shooting a few random things when I get a moment. Here's a few frame grabs from Resolve. The horse was shot around T4-5.6. The others were wide open. Everything was shot in V-log with a quickie color grade so I could see what I was looking at. No sharpening in camera or post.
Based on how happy I am with the Meike, I might end up collecting a few of these if Veydra doesn't make a return to producing lenses.

- kye, JordanWright, webrunner5 and 2 others
-
 5
5
-
I don't know man. You're in the GH5 thread arguing about the Z6 with features that aren't even out yet. It'll be interesting to look at when it's available, but hypotheticals don't help with anything people want to shoot today.
1 hour ago, Skip77 said:And what video camera can you get for 2k that shoots 10 bit full frame 4k 30fps with no crop?
A lot of people don't want to shoot full frame-- been there and done that. It's a pain in the ass to keep everything in focus. Actors drift off a mark and blow a shot. It requires more prep to get right, and more takes nail a shot. In documentaries I find it distracting when the environment is too blown out into to mushy bokeh as well. In my opinion, there's a nice level of defocus necessary to help direct the viewer's eye, but too much can be annoying. Micro four thirds hits a great balance for that in my opinion and packs into a very small package. If you need extreme bokeh in a scene, throw on a speed booster, long lens, or shoot with one of the many f.95 lenses out there.
I totally get why people want to do full frame shooting for some projects. And it's certainly fun to experiment with different styles and looks. And I can even see why bloggers would want it since they often don't have interesting backgrounds and their style resembles the realm of portraiture with their self interested subject matter.
But the GH5 fits all your requirements if you don't care about shooting Vista Vision...
In regards to the rig you posted, I might as well grab a Red camera and shoot with that. Used ones are not even that expensive anymore. Or grab a Z-Cam, or the black magic pocket you posted. The point of the GH5 for my purposes is 10 bit log capture in a small camera body. The only other camera I'm aware of that can do that is the X-T3 and it lacks internal stabilization.
The conversation started because you came here posting that GH5 users were somehow misleading new buyers into buying an outdated system that wasn't as good as the Z6 or S1. I'm saying it's still more than relevant today. Different tools for different problems.
-
9 hours ago, Skip77 said:
You argument destroys the concept that Arri color is preferred over the RED or that Canon has great color or that good color matters at all. Since when did good or great color become something to disagree with? Good color is the goal of every camera maker and cinematographer. The last video I posted was straight out of the Z6 and as flat as I wanted to shot.
Good color is subjective and a matter of opinion. You can't jump through logic hoops while stating opinion as fact. Also, I'm happy to debate cameras, but please leave out the personal attacks. @kye is one of my favorite posters on this board and if his posts are not in the spirit of the board, I don't want to be here.
Personally, after shooting in 10 bit internal for a couple years, I think it's a requirement for any camera in 2019.
If you have to slap an external monitor onto the camera to get 10 bit, then I think you'd be better served just getting a full video camera and rigging it out. If hybrid is your thing, then again, I ask who wants to deal with an external monitor while shooting photos and video?
To me all the blustering about who has the best color is opinion and irrelevant unless the camera shoots 10 bit. It's not that you can't get great results with 8 bit, the problem is the 1-2% of the shots where banding appears in the sky, or when you have to save a shot that wasn't exposed with perfect settings, or some extreme grading breaks the image, or a multitude of other gotchas where a save in post is necessary-- that's where 10 bit shines. Raw adds even more flexibility because it opens up more extreme exposure and white balance adjustments in post.
You can get great results in 8 bit, but a lot of the time pro cameras are about saving mistakes made on the set, or at a location that can't be easily repeated.
...and until the Z6 actually shoots raw, its vaporware and irrelevant. It's so tiresome to debate what camera will be best in the future after X spec is added... ?
-
I thought this was a nice breakdown of the S1 with some comparisons against the GH5 and a7 iii. It looks like it would pair up well with a GH5 in a multi camera shoot.
-
8 minutes ago, Skip77 said:
For some reason telling someone that the GH5 is great for the money and the newer full frame cameras aren't any better is flat out not true. And that kind of comment will lead to someone buying the Gh5 in 2019, investing in m4/3 glass and making a mistake in the process. The BMP4K is better then the GH5 but that's not discussed either. Be a GH5 fan boy but don't point people in the wrong direction.
The Nikon doesn't shoot 10 bit internally or have even half of the video features of the GH5, and it currently doesn't have raw shooting and if and when it comes, you'll need an external recorder.
The S1 also doesn't offer half of the shooting modes of the GH5 and I believe only offers one 10 bit internal record mode right now. It'll be more interesting to people when the V-log update becomes available. But that'll be then.
The GH5 has been a workhorse for over two years with a proven set of features that are available right now. People shoot professional work with it now and have established workflows with it. They know what to expect from it and how to get their best work from it. In addition it still has almost no competition in the unique video features it packs into the body.. and yeah, it's over two years old. At its current price, it is still a great buy if you want to record 10 bit internal video with a built in stabilizer.
Personally, I'm playing "wait and see" to observe what happens after the raw and v-log updates show up, but personally I'm more interested in seeing what the GH6 may offer. Not everyone needs or cares about shooting video in Vista Vision / full frame. And just because it's a flavor of the moment, doesn't mean it's actually necessary or better than micro four thirds. And the general observation by the community is that the smaller sensors like APSC and m43 get the cooler video features earlier than full frame competitors due to heat and sensor read times.
Also, some of us REALLY hate rolling shutter and it's a more pronounced issue on full frame bodies. I could see possibly picking up a full frame and using it mostly in crop mode, but then I end up asking myself why bother when the camera I've owned for two years has more video modes and features. And in another year or so, there will be some new camera like the GH6 to grab our interest.
I see you bought a Nikon Z6. It's a great camera-- go enjoy it. Pretty much every camera out there can deliver excellent results. But different people have different needs. I don't know why you are on this crusade to troll the GH5 thread and convince us that we need to sell our cameras.
I'll end by just saying, if I was in the market for a new camera and buying into a new system, the Z6 and S1 would be very tempting and both look to be really exciting systems for someone new to the market. You really can't make a bad choice. For me, I have years of prior work experience going back to 10 bit Cineon files from the scanned film days. It's something I'm used to and really appreciate.... so I'd probably be much more drawn to a camera that recorded 10 bit internally. When I saw the GH5 was going to offer 10 bit log, Panasonic won me over, and I took a chance and bought it on day one. I've now come to love all the cool features it offers that I didn't even know I was missing, but now wouldn't want to do without them. Yeah, the color doesn't perfectly match an Alexa, and an Alexa doesn't perfectly match scanned film. But there are so many great choices out there we're spoiled with great options. ?
- webrunner5 and arson519
-
2
-
7 minutes ago, Skip77 said:
GH5 owners have said that GH5 colors were good and nothing wrong with them. The S1 does have great color and no amount of features in a camera will make up for bad color. The GH5 has better color then the A7III and A7RIII. And while were on Sony the A9 has better color then the A7 line up.
Yeah, I think GH5 colors were a big improvement over GH4 colors. Before the GH5, I only really liked Canon and Nikon colors in the DSLR segment. But the GH5 is good enough, and 10 bit internal recording helps a lot with grading. There's a whole thread here devoted to an Alexa LUT for mixing GH5 with Alexa footage. I know a lot of people mix GH5 with Red footage as well including myself.
So yeah, I don't think its best in the business, but the GH5 can get the job done, and it's crammed with video modes that still are not matched by anyone else except maybe Fuji. Fuji's latest stuff looks great too, but I have not worked with it, and it came after the GH5. Sony's color has been improving, but not as fast as Panasonic of late, IMO.
14 minutes ago, Skip77 said:What's a 20 stop organic sensor? The Z6 has that same "organic sensor". Organic a seems to be the flavor of the month.
Does the S1 have the very sought after "light meter" for video and other GH5 video controls? Asking for a friend.
A side note: If the S1 proves to be better at video then my Z6 then I will gladly sell my Z6 to purchase the S1.
Oh, I was referencing this organic sensor Panasonic has been teasing: https://***URL removed***/news/1440456457/panasonic-unveils-industry-first-8k-organic-image-sensor-with-global-shutter
It's supposed to have like 16 or 20 stops of dynamic range. I'm just being a bit facetious since the wedding video above had some beautiful skin tones, but heavily clipped highlights in the windows.
Everything is organic these days, it gets a bit confusing! ?
I can't comment on the S1 in detail though. I've only watched some Youtubes on it, but I like how it looks. I don't think I'm going to bite though. I don't really need full frame recording and it's not enough of an improvement over the GH5 for me to dump my kit and switch formats. I am watching it and the Z6 to see how they evolve though. They are the most interesting full frames at the moment for me.
4 minutes ago, buggz said:Seems like the only thing holding me back is the lens mount.
I just have an extensive amount of adapted lens, and many Canon lens in EOS mount, some very special rare glass too, sigh...
Yeah, watching the weird incompatibility play out between Sigma and Leica feels weird. It's too bad there is not an open m43 equivalent for full frame.
-
I have to say, the colors in each succeeding Panasonic model in the last few years have seen a dramatic improvement in color. From GH4 to GH5 to GH5s, and now a big jump with the S1.
Really beautiful images coming off this camera. Wish it had just a touch more dynamic range.
Stop teasing us with that 20 stop organic sensor Panasonic and stick it in the GH6 with your new color science/ processing/ mojo /magic!!?
-
This would actually be pretty slick. I really like the open m43 standard.
I'm kind of hoping we'll see this sensor in an m43 format. If not in a GH camera, maybe in a full on video camera.
-
1 hour ago, androidlad said:
Let's all marvel at this particular piece of cutting edge engineering. It's the one sensor to rule them all.
There's 8K 30P, 6K 60P, 4K 90P, 3K 120P, 2K 240P.
4K 90P
I dunno. This isn't what I was hoping for in a next generation sensor. Even with triple the read out speed, I think I'm more interested in a lower megapixel version. For me it's less about the frame rates, and more to do with managing rolling shutter though, so maybe Sony will surprise there.
In the end though this will be great for stills while also recording good video, so I'm sure it'll make a lot of people happy.
If you find the specs for the lower resolution version, I'd be interested in seeing that.
-
-
-
9 hours ago, androidlad said:
4K RGB 4:4:4 readout mode:
2 hours ago, androidlad said:There are various 2x2, 3x3, 6x6 binning modes optimised for speed, quality or a compromise between the two.
Very cool! Interesting to see how they are sampling the bayer pattern for the 4:4:4 color. Some pretty extensive binning going on. With this level of sampling, the speed optimized binning may still produce a really nice image with just a tad more noise. It'll be interesting to see the final results.
-
Color aware binning that doesn't throw out data. Sounds cool. Would love to read the white paper on how they bin the data without throwing anything away.
In the meantime my point stands that a lower megapixel sensor with the same capabilities would be more useful.
-
2 hours ago, androidlad said:
What's the obsession with per-pixel FWC? Don't forget the pixels sit on a 36x24mm sensor, smaller pixels don't collect any less light, it's just there are more of them doing the same thing.
Yeah, but in the spec you posted it says it does 6k readout through pixel binning/sub sampling. So it's throwing away data that could have been preserved.
It just looks more like a chip designed by a marketing department than something to serve the needs of filmmakers. Granted it's for consumer devices and megapixels sell cameras, so it's not like I'm surprised.
My experience has been that engineers have very little experience with end user needs, and that was my point.
-
16 hours ago, androidlad said:
Sony has some of the most talented sensor architects, how much do you know?
I know that Sony's sensor architects don't deliver movies. But I can see some value to a 100mpix sensor for stills.
I have to agree with @Nikkor though, I'd love to see them continue to improve dynamic range and rolling shutter in their consumer line more than resolution.
-
1 hour ago, Anaconda_ said:
Braw Adjustments - Colour - Sharpen - NR
You typically want to put any finishing/sharpening a the very end after of your processing. Typically just before running it out. How strong you make the sharpening and the radius you use will just depend on the final look you are going for and how soft your original footage is. Depending on the sharpening filter you are using there is typically a strength and a radius value.
As part of your finishing process, you may also want to add grain into the image. Opinions on whether you add the grain before or after the sharpening can vary, but I find that if I'm dealing with an image that needs a lot of sharpening, I'll add the grain last so I'm not heavily sharpening my grain. Conversely if I'm doing a composite and matching grain between elements, the grain will come earlier in the pipeline. But in that case, any sharpening I'm adding back in is very minimal to just restore any detail loss due to encoding.
If you want to dial in some specific values for minimal sharpening to make up for re-encoding your original source to whatever your final format is, you can run a "wedge" and try a variety of values then compare the detail you see with various sharpness settings of your output video against your raw source and pick one that matches most closely. Depending on what your source material is and what your delivery format is, this can vary wildly. In cases where I'm working from a high res (6k-4k) source and delivering at 2k, I may not even use sharpening.
Finally, opinions also vary about where to put any degraining, but I prefer to put it near or at the very beginning of my color pipeline. If your degrainer is expecting something in rec 709 though, do your color transform into video space and then run your degrainer. A little testing with your camera's source footage will go a long way here as well. But, I find that especially when I'm working with 8 bit source material, it can add some pseudo bit depth to the images before I begin pulling on the color.
So, I'd typically do:
- .Raw adjustments to set color balance and exposure. (if working with raw footage)
- Degrain/NR
- Color
- sharpen/grain
- kye and heart0less
-
2
-
20 minutes ago, thebrothersthre3 said:
Sounds like a good workflow. My bigger issue is just not really knowing what proper color looks like to judge skintone or really anything in the shot.
I once worked with a really good compositor at a large VFX house who admitted to me once that he was totally colorblind. His trick was that he just matched everything by reading the code values from his color picker tool and matching the parts of his composite purely from the values he sampled.
I've always remembered that when I feel I can't trust my eyes, or something is not working for me. You can color grade just by making sure everything is neutral and balanced. Later, as you become more comfortable with the process and gain more experience you can start creating looks or an affected grade.
Generally to start you want to get your white balance correct. Find something in your shot that you know should be neutral or white. A wall, a t-shirt, a piece of paper, or anything else that should be white or gray. After that, check your blacks and make sure they are neutral, then double check your whites. Finally, check your skin tones and make sure they are correct. You can do this by using the vectorscope and just getting them on the skin tone line. Somewhere in this process you'll want to set your exposure. I generally just make a rough exposure adjustment at the beginning so I can see everything, then dial it in once my balance is set.
One thing I do a lot when studying how a film I like is graded is to take screen captures from a Netflix stream or other source and pull them into a project to compare the color values on it. Then you'll have a roadmap for for what you are trying to match.
-
1 minute ago, thebrothersthre3 said:
Not sure if I have that in my adobe package.
It's a separate piece of software you run along side of After Effects. It looks like they still offer an evaluation version, so you can try it out.
After effects will load a sequence using your raw settings. LR timelapse takes care of the exposure variations. It's been years since I've done it, so I don't remember the exact workflow, but it's something along those lines. ?Also, never did it this way, but I imagine, you could run out a clip using a Photoshop timeline. After Effects is just nice because you get its workflow with things like Lumetri color adjustments you can layer on top of your raw grade if you want to tweak things.
-
1 hour ago, kye said:
What editing package are you using?
One thing I do remember is that because cameras are often not 100% accurate with their shutter speed the images might be slightly different exposures, so you have to use a de-flicker plugin in post to even it out.
I used to process a lot of time lapse footage for an old job. The standard we used was LR Timelapse. My memory is sketchy, but I think the process involved grading one raw image for the look you wanted and then running the sequence through the LR Timelapse software and it would calculate exposure variations for you and try to correct for them. You would then export that exposure data into After Effects and run out the sequence using your raw settings.
Overall, it produced very nice results even if there was a lot of flickering in the original sequence. It used to offer a trial version for testing if you wanted to give it a try.
-
Here's my take on this footage:
First one is my neutral grade... but with the exposure pushed way down just to add drama and get the image to pop... at least to me. Also, threw a power window over the right pillar, so it competed less as the subject of the shot.
Second one is my crack at a grade for a ghost story (since Kye is looking for themes?). In this story our little friend here is selling haunted curiosities.
-
You know @kye, when I was reviewing the 2 Gems Media stuff, I got generally a similar impression. His newer stuff is better than some of his early stuff.
I also, suspect he may just shoot the "standard" color profile on the GH5 and white balance off a wall in the room he's in. (Or off a card.)
His post process may not be much more than degraining, tweaking exposure, adding glow, and adjusting skin tones (if that). That would explain the clipped highlights. Plus the standard (non-log, Cine-D) profiles can deliver really nice results with minimal work.
This way he can just crank out videos with minimal effort. Whatever he's doing, it's still a nice enough end product that it seems to be keeping him busy.
-
7 hours ago, Mark Romero 2 said:
Thanks for all the work you did on this. i really appreciate it.
Yes, your images look a lot closer to what I was hoping to accomplish. But now you have to tell me EXACTLY what your recipe was
At least, let me ask you how you added the glow to the highlights?
Also, your grade seems to avoid some of the nasty color mashups on the walls (where in my video there seems to be kind of a purplish / greenish collision... don't know how else to describe it).
And yeah, since this is sony footage, you have to protect the highlights, because if you don't protect highlights with sony 8-bit... well...
Hey Mark, I'm really glad you found it helpful! It was kind of fun to take a crack at this type of grading since it's not a look I normally do, but it's nice and certainly has some utility.
I don't know if you use Resolve, but I'll attach the powergrade that you are free to use. Otherwise, I'll go through my basic approach and thought process on this. Finding a general system that works for me, helps me compartmentalize what I'm doing. Overall though, I try to keep things simple and generally avoid secondaries or masks unless I'm trying to fix problems in footage.
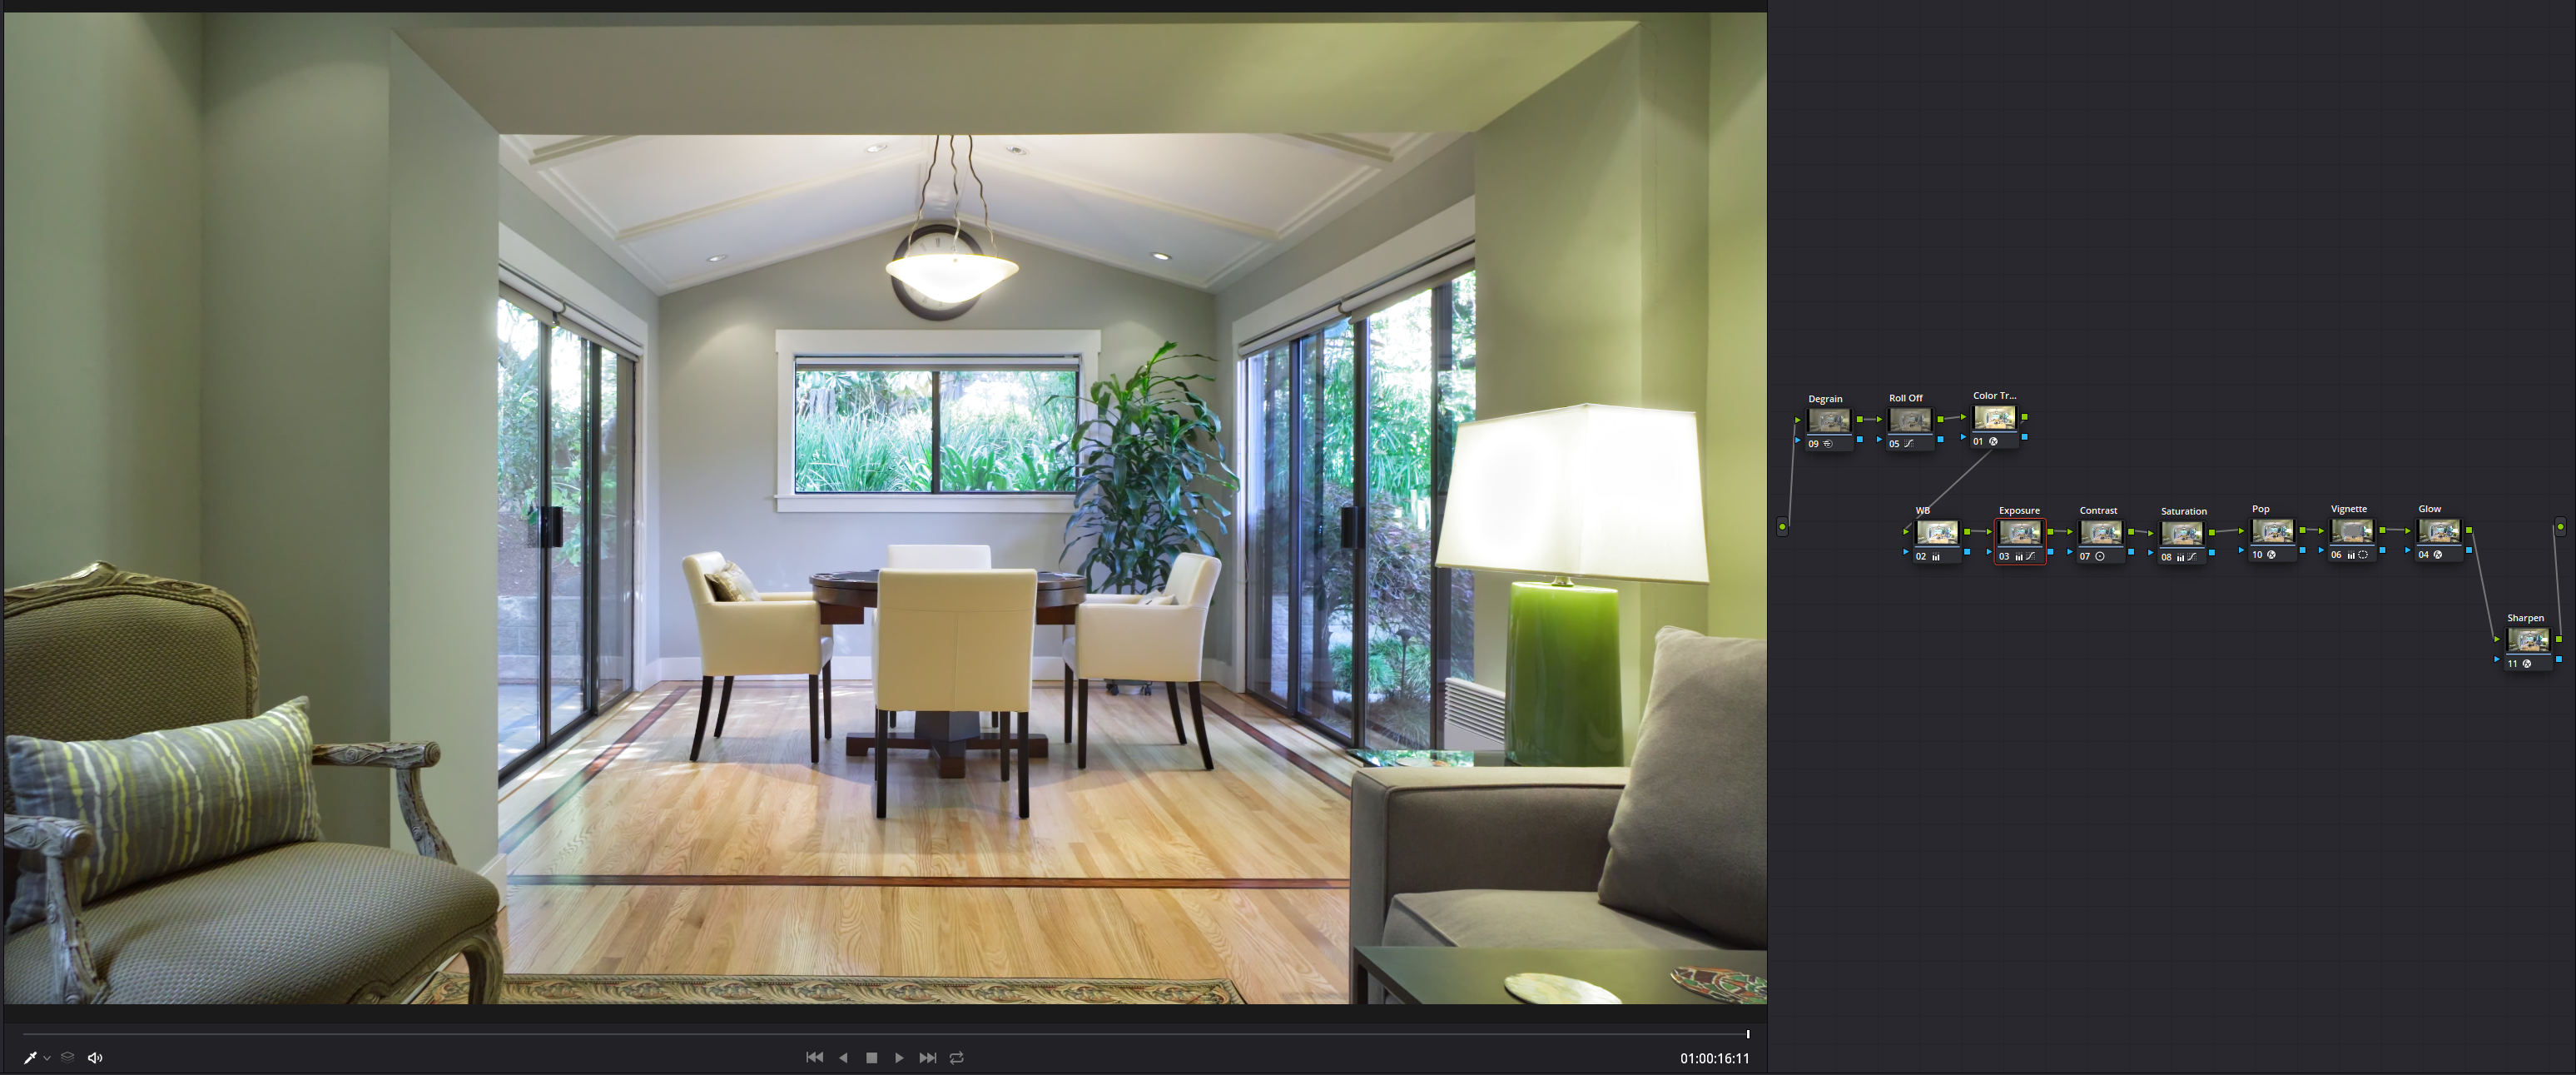
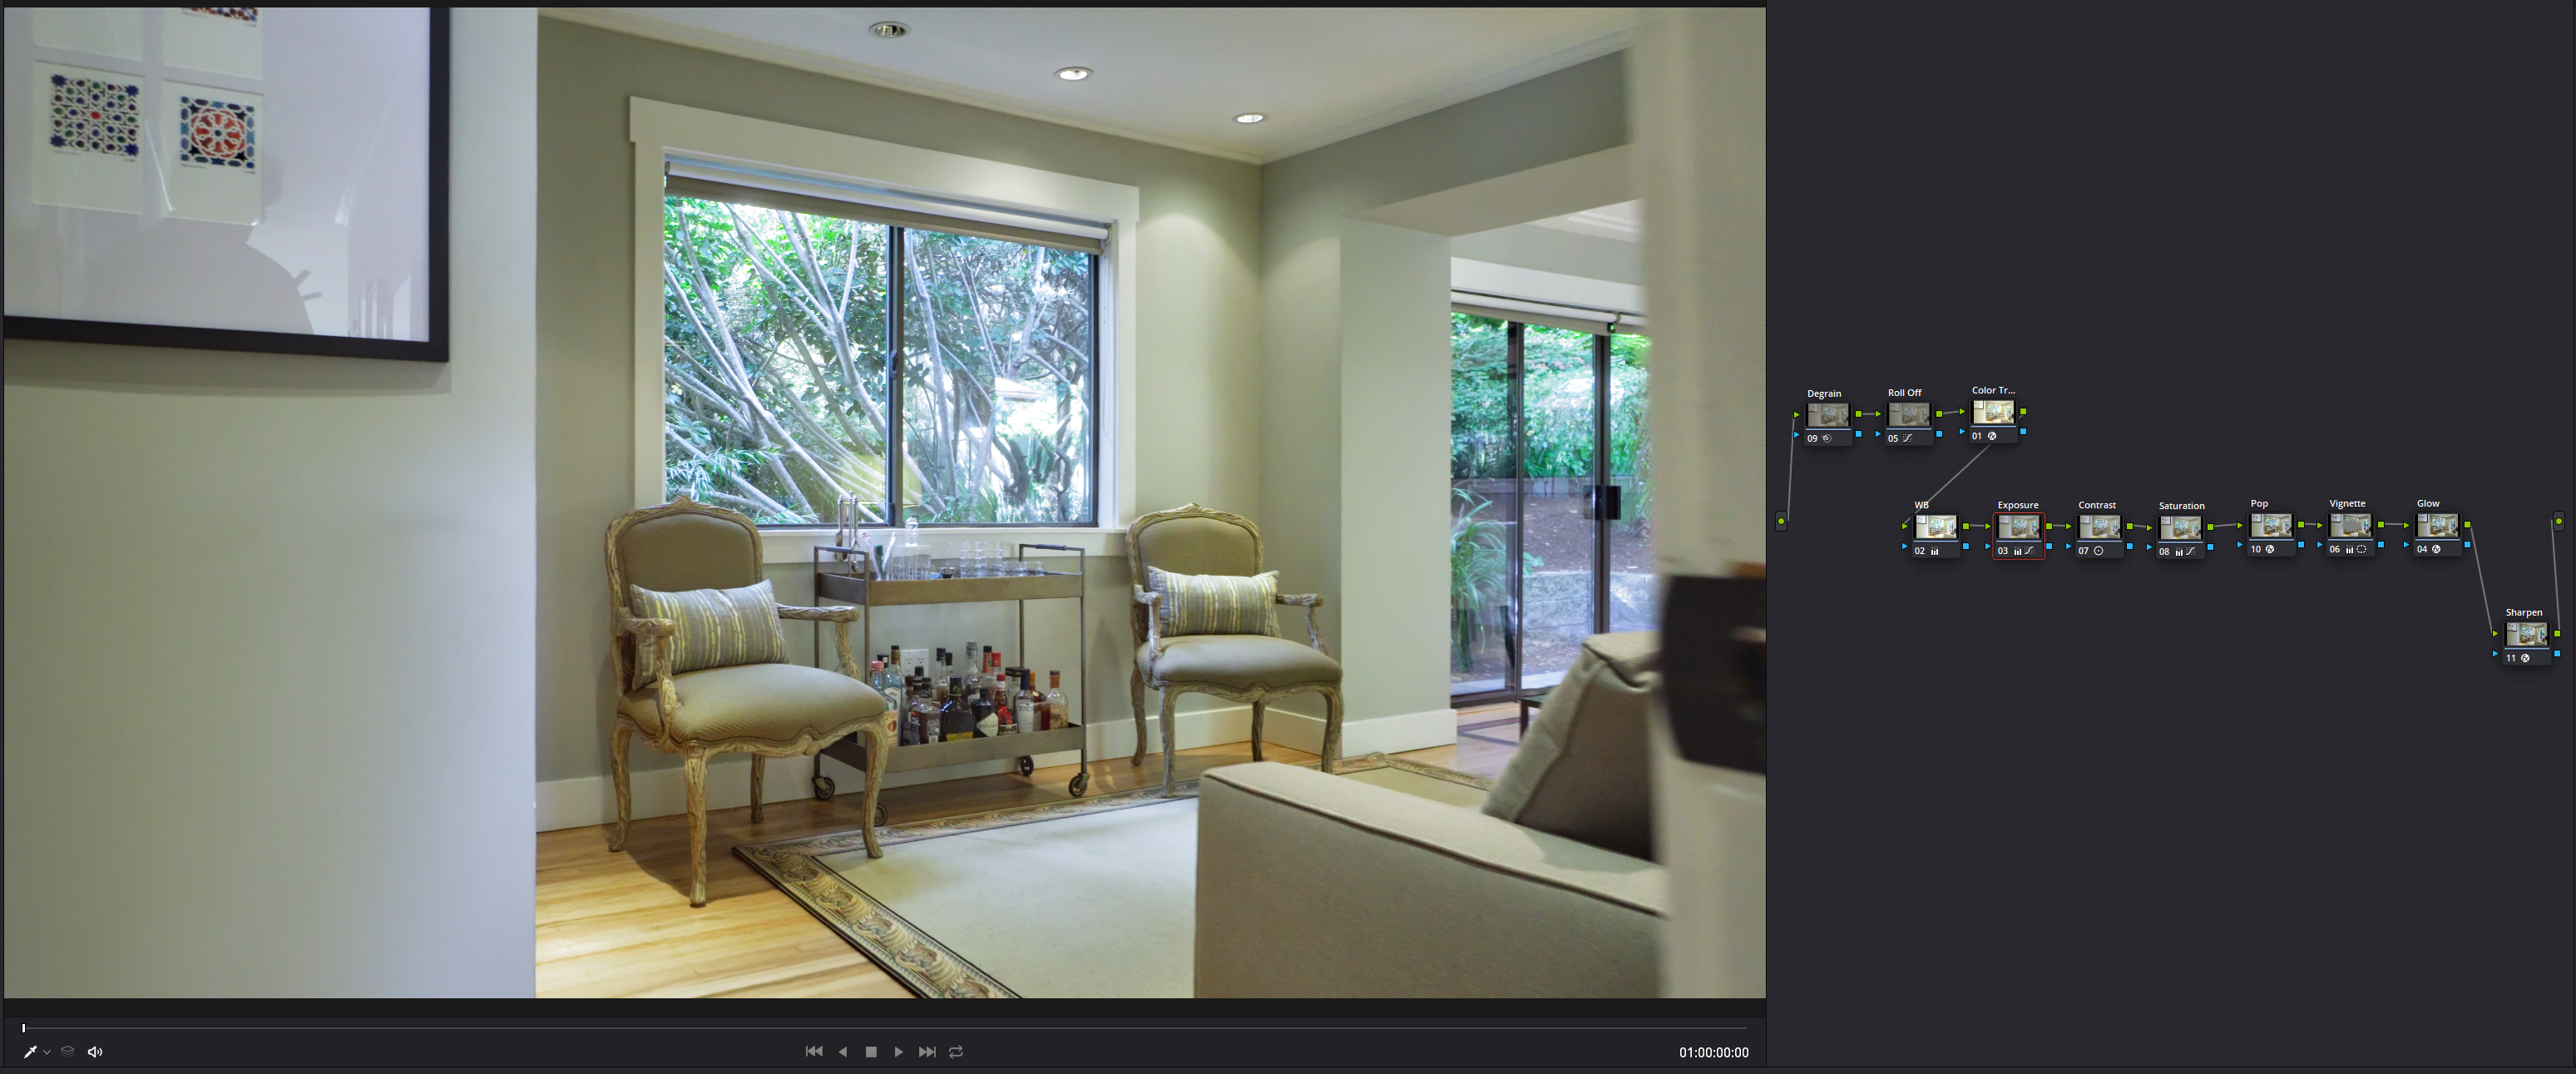
I laid everything out sequentially because I'm not sure what package you use, but this is my general order of operations. If you are using Resolve, you could potentially combine the WB(White Balance), Exposure, Contrast, and Saturation nodes into a parallel operation. I think everything else depends on the previous, although it's all personal preference. You could potentially throw the contrast pop, vignette, and glow into one huge parallel operation with the other ones. But, I kind of like working in serial though. So here's the steps and a brief explanation:
- Degrain
- Roll Off - This is just a curve I use to roll off highlights before converting to my working color space, so I could preserve a little more detail. I start dropping highlights from 50% increasing to 100%. A bit like forcing high dynamic range into an image.
- Color Transform - This gets me into my timeline's color space as soon as possible where I prefer to work. In this case, I set it to sRGB.
- White Balance - Used the eyedropper on something I want white in the scene. Then tweak a little. Sometimes take multiple samples and average between them.
- Exposure - Just gain control until my mids are where I want them. Then go back and tweak my Roll Off if I want to save more highlights.
- Contrast - Just a small amount of Contrast since the ref video was pretty contrasty. Could use an S-Curve here.
- Saturation - Dial in sat after setting contrast or gamma.
- Contrast Pop - I like to put a touch of this in when it works. It's a different kind of contrast. If you've used Nik tools, this is pretty much the same thing as Tonal Contrast. Can look weird if dialed too high.
- Vignette
- Glow - this is just the glow effect filter in Davinci. I set the threshold to 1 since I was pushing highlights out of range, so it added some glow to anything out of legal range. Gives a soft edge. Very low spread. By default it's really large.
- Sharpen optional. Did a micro amount.
- Grain would go last, but I didn't use any on this.
One note about the power grade: I think contrast pop, degrain, color space transform, and maybe glow are only in the full version of resolve. You can probably find equivalents or leave them out. An slog2 LUT could potentially replace the Color Space Transform since I'm compressing highlights before it anyway.
BTW, IMO the Sony you shot your test footage with is pretty nice. By degraining at the beginning, it smooths out the 8 bitness of the image and it had more dynamic range than I could use. I'm sure if I worked with it regularly and graded a variety of shots with it, I'd develop a more robust pipeline to take care of any quirks it might have. No idea how skins look in it though.
Still, the Z6 has me curious. But I'm waiting to see if they add internal raw at some point..
-
So, I watched the 2Gems Media's video a few times and some of their other videos on their channel. It's an interesting modern style that he's obviously using to much success. I wouldn't call it a cinematic style. He's not afraid to let his whites clip and it looks like he degrains his footage and doesn't add any back, but just leaves it very clean.
The most important thing he does is get a nice neutral white balance. Also, he seem to push overall exposure into the upper range. I'm not saying he lifts blacks, but his middle exposure area feels higher than normal. Conversely, for a cinema look, I'd push everything much darker. I'm sure this is to make a home feel warm and inviting.
I also noticed he seems to put a soft glow around his highlights-- or he has a filter that does it. In any case, I put a little glow at the very top of the exposure range.
Didn't use any secondaries or keys, or animate any values. So, I just let the beginning remain a bit green since it's getting the bounce off the walls anyway. It is a bit of a challenging shot with the mix of light sources and colors, so I just aimed for a fairly neutral white balance that I just tweaked a tad after pulling a white sample off the back window frame.
Anyway, here's my interpretation of his style. Let me know if you think I got close. I included my node graph for the order I did stuff. Only one operation per node. Just posting last and first frames. Last frame first, since I looked at that the most for the hero look. I feel I could lift the exposure even a quarter to half stop more, but it bugs the hell out of me to be this bright already, and I did try to protect highlights a little more than I think the 2gems guy does. Must... protect... highlights.... ?
- mercer, IronFilm and Mark Romero 2
-
3
-
2 hours ago, kye said:
I used to use those Pre-Clip and Post-Clip groups, but I got a bit frustrated with them because you couldn't have clips in multiple groups. Resolve has now gone one better and has Shared Nodes, which means you can combine treatments in any way that you feel you might want to.
I always think of the example of shooting two scenes with two cameras. You obviously want to grade the cameras differently to match them so you want all the shots from each camera to share the same processing. Now they all have the same kind of look, you want to apply a creative grade to them, and you actually want to grade the two scenes differently as they have different dramatic content. Previously you could use the grouping to combine the processing of either the cameras, or the scenes, but not both. Now with the shared nodes you can mix and match them however you like.
Yes, shared nodes are really useful for making a scene adjustment ripple across all shots in a scene. It's something more useful to me in the main grade after I get everything in my timeline's color space.
For me, what I like about pre and post-clips is that I typically have 2 or 3 nodes in my pre grade and the purpose of my pre-clip is just to prepare footage for my main grade. For example, a team I work with frequently really likes slightly lifted shadow detail, so I'll give a little bump to shadow detail then run the color space transform in my pre-clip. If one camera is set up really badly one day and I need two different pre-clips for that camera, I'll just make multiple incrementing numbered groups for that camera, so I've never had a reason to put a shot in multiple groups. The other thing, I really like about groups is that you get a little colored visual icon of all shots in a current group that appear on the thumbnails in the timeline. This makes for a nice visual sanity check when I'm scanning through a ton of footage on a long project. Usually, the camera used is fairly obvious from A cams, to drones, to body cams by the thumbnail on the timeline so the visual reference of thumbnail and colored group icon is a nice check that I've prepped all my footage correctly.
I know there is some extra flexibility in putting grading nodes before or after a color space transform, but for me on a large project, my main purpose in the pre-clip is to just get things close and into the proper color space. If I really need to do more adjustments that have to be done pre-color space transform, I'll flip around color spaces in my main grade. But my goal is to do all my shot to shot and scene balancing in my main grade with everything in my delivery color space. Keeps things sorted for me. ?
Ultimately, it all depends on the type of work you are doing. If I was doing feature work that is all shot on one camera type my system wouldn't be very useful. But I do a lot of doc work, and outdoorsy adventure stuff that are typically shot on all types of cameras and conditions, so it can be really useful for keeping things organized.
One last trick with the groups is that if I'm also mixing 6k, 4k, and 2k footage, I can throw a little sharpening or blurring into the post-clip section to match up visual detail between cameras. Then use the timeline grade to do any overall finishing if needed.
Ultimately, Davinci is just a wonderfully flexible system for developing custom workflows that works for you. I love that their are so many ways to organize and sort through the color process. ?

")
Panasonic GH5 - all is revealed!
In: Cameras
Posted
Yeah, as nice as the Meike I have feels, and weighs I wouldn't want to see if it would survive a drop onto concrete. For the price, "disposable lens" is probably an apt description. But who knows... maybe it's a tank when abused. I really can't tell from holding it.
If I had a huge youtube channel, I'd buy two and run a physical torture test on one to see how it survives.