bunk
-
Posts
234 -
Joined
-
Last visited
Content Type
Profiles
Forums
Articles
Everything posted by bunk
-
I would love it to be a conversation starter in that case it would help if you separated the text from the movie. You have a cool way of filming and a lovely looking talent that attracts the eyes. Soon as I follow her, the text is al over the place, soon as I concentrate on the text your film becomes a blur. I'm used to subtitles but this is just too much for my taste.
-
The crop factor of an MFT sensor is 2. Since the G7 only uses part of the sensor you have to calculated that difference as well. Nevertheless I stand corrected. I was under the impression the G7 didn’t do pixel binning in UHD. Turns out it uses a 4120x2318 crop from the sensor to create UHD. 4592/4120=1,1145 so that’s an extra 1.1 to add to the equation. So it becomes 1,58 instead of 1,44 (or the 1.72 as I suggested). http://www.cameralabs.com/reviews/Panasonic_Lumix_G7/ just after 3/4 of the page is a nice picture that shows the use of the sensor in UHD.
-
Add another 1.2 to the equation as you only use part of the sensor when filming in UHD (4592/3840)... So it becomes XXmm x 2 x 0.72 x 1.2 or XXmm x 1.72
-
Ahha ...well it must be a 'force' thingy, as I -not even for a little bit- get how the job of the brother is related to 'ILM/Lucas' being the creative force behind Photoshop. [snip] Fortunately for the future of digital imaging, this wasn't a long-term deal, and John soon returned to Adobe to drum up more interest.[snip] Don't you think John is a little bit unfaithfull in this part of the article. There we have our beloved Lucas being a creative force and all and before you know it, this little weasel John visits Adobe to sell Lucas out. And some ten years later Lucas even makes John his Visual Effects Supervisor on the new starwars films. I don't think Lucas has ever realised how mean John has treated him back in those days.
-
How's that? Because Thomas his brother worked at ILM? And AE... someone told them the force is with them? Intrigued!
-
That is basically what I tried to say, yes.
-
I don't think so. The spray can coloring in no way respects the drawings, in my opinion it even fights it. Some pages even became completely unreadable ... Bollands coloring might be boring at places but at least I can read the drawings ...and that should be the number one focus of any colorist. An other reason I don't like Higgens coloring is the use of the airbrush ...if you want to color with a graphical approach, don't be a wimp and use an airbrush, instead show the world you know your lighting and shadow borders and use a pen and bucket to prove it.
-
Each and every color that lives in the 8 bit file lives in the 10 bit file as well. If you create a tiff file with a white background and two red pixels in 8 bit. Why would the 10 bit turn them into some shade of green or blue or even red? Those two pixels stay the exact same color red in 10 bit just as the background stays pure white.
-
I like it very much. No doubt I would have given the same answer if I had choosen the VA or the Q7+ as it's my first recorder ever. They all record 10 bit prores up to HQ and beyond (E5/E7 (4444XQ), 7Q+(raw)). I'm planning to combine my footage with my 3D work, hence I choose for a recorder that can deliver 4K in 10 bit Prores ...but for anything else I would be happy with the 'UHD Down Convert' from the GH4 ...it's that good and saves a lot of space . Talking about space I really like the concept of the mSata speed drives on the Pix-E's, they are great, no hassle what so ever, just like a normal usb thumb drive, only faster. Oh and you don't have to use the monitor, you can just use it as a recorder. The Pix-E's let you create and save profiles. I made one with a black screen. Attache a luggage strap to one of the mounts and hang it around your neck/shoulder like a bag. HDMI cable to the camera and no one notices the differences ...for low profile shooting. Btw 1080 straight from the GH4 to any recorder is not a good idea, very soft compared to 4K or UHD DownConvert.
-
You won't see any difference between 'UHD DownCovert' and scaling UHD to 1080 in post unless you look at it at around 400 to 800% ...and even than at most you will see the differences but you won't be able to tell wich is wich if someone shuffled the files, unless you do it for a living and know what to look for. The same way you won't see any difference between 'UHD DownCovert' and the VA downscaling via SDI (I take, it's up to par to what the GH4 can do). So there is no need for a down scaling recorder when you own a GH4. The GH4 can do this for you. You can't load a preview LUT on the VA so that might be a reason not to buy one ...but I have the PIX-E5H which can load preview LUT's but never use it while recording as I don't like it.
-
Leica SL hands-on first impressions review from a video perspective
bunk replied to Andrew - EOSHD's topic in Cameras
+1 ...also the YCbCr macroblocking smearing thing is way less ...and that with only half the data. -
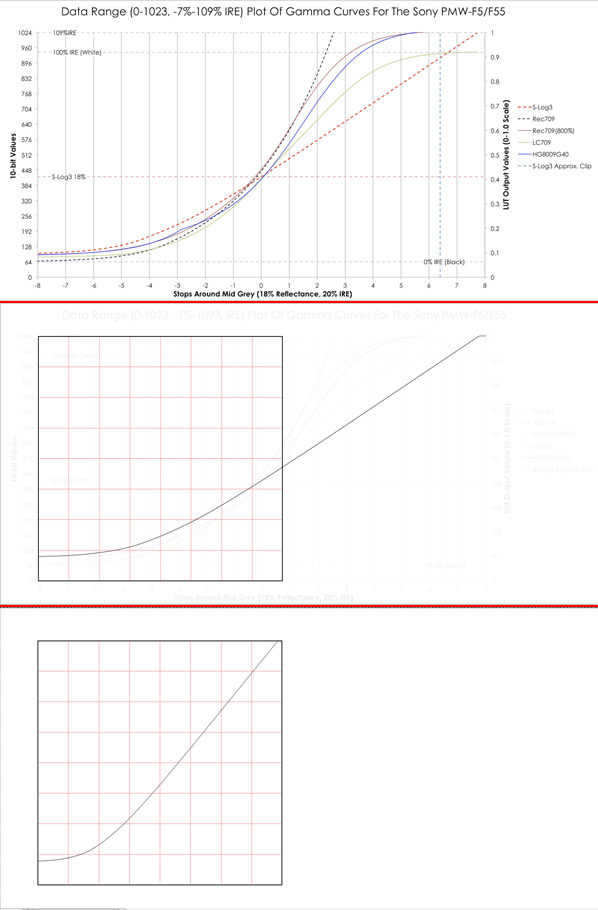
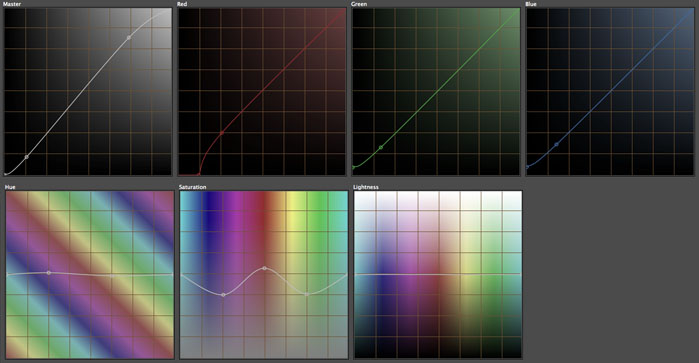
Yesterday I discovered something I kind of knew in the back of my head but never checked out. I was doing a grade on the neutral grade I did earlier on the S-log3 footage Andrew was so kind to share with us. All looked fine, but the part of the couple near the pedestrian crossing. .The colours in the girls face felt apart. I reset the effect I was applying …and this time I only used the master curve, to get the two skin tones -which were falling apart- to match as close as possible. When I finished I had basically drawn a squeezed S-log3 curve. Next I Googled for the biggest pictures I could find for S-log and V-log. I opened them in Photoshop and traced the curves. In a separate layer I created a square divided in 8 rows and columns, just like the background of my master curve looks like. Next selected the ‘traced curve’ and with the transformation tool forced the x-dimension inside the square. Flattened the image, imported it in my NLE and with three points recreated the curve in the master curve window. Bingo! Saved the the curve to an .acv format for later use. ….And that is al there is to de-logging a 1D-LUT or spline. It’s easy to create, something you can do yourself. So how does that work in practice. I can tell how I do it and think something alike should be possible in all NLE’s I work in AE and use Color Finesse. I think it was at some point in time distributed for free with AE in the states. Not so in Europe, I had to pay the full price …but I really like the plugin and have no regrets. The plugin is added as an effect to the footage. Under curves the ‘Log curve’ is loaded. Under Levels the input levels are adjusted (leave the grayscale handle as is, that’s why you created the LogCurve) and output if necessary. The changes are applied. Brightness and contrast are now adjusted, no color adjustment is done. Basicly what the C300 gives as a preview option for it’s log. Next an Adjustment layer is added to the timeline. ColorFinesse is applied to the Adjustment Layer and under HSL Saturation under Shadow and Midtones is set from 100 to 133,33, Highlights left for what it is. My guess is that when 33,33 % saturation is added to each channel, you would get full Saturation. But that is just a guess. You now have a ‘basic color corrected de-logged file’. To grade further let you imaginations go wild… In the linked mov with Andrews footage I adjusted the curves like so. By banding the red curve downward you add a slight red cast to the footage as the curve to the top is no longer straight. Doing the opposite with green curve amplifies it. Blue curve is kept as straight as possible while adding blue to the shadows. HSL curves speak for themselves. Alas the girls skin still falls apart, so there must be something wrong with the footage With above methode I’m less plagued by the YCbCr macro blocking on GH4 footage as with my other custom methode. Will have to do some more testing. I thought I share my findings as maybe it’s of some use to others as it makes Log grading kind of simple.

-
Probably a complete stupid question ...but do you get the same macroblocking artifacts without the polarizer?
-
Simple grade done, on the couple near the traffic light in AE with the ColorFinesse plugin. Same grade applied to the other parts.
-
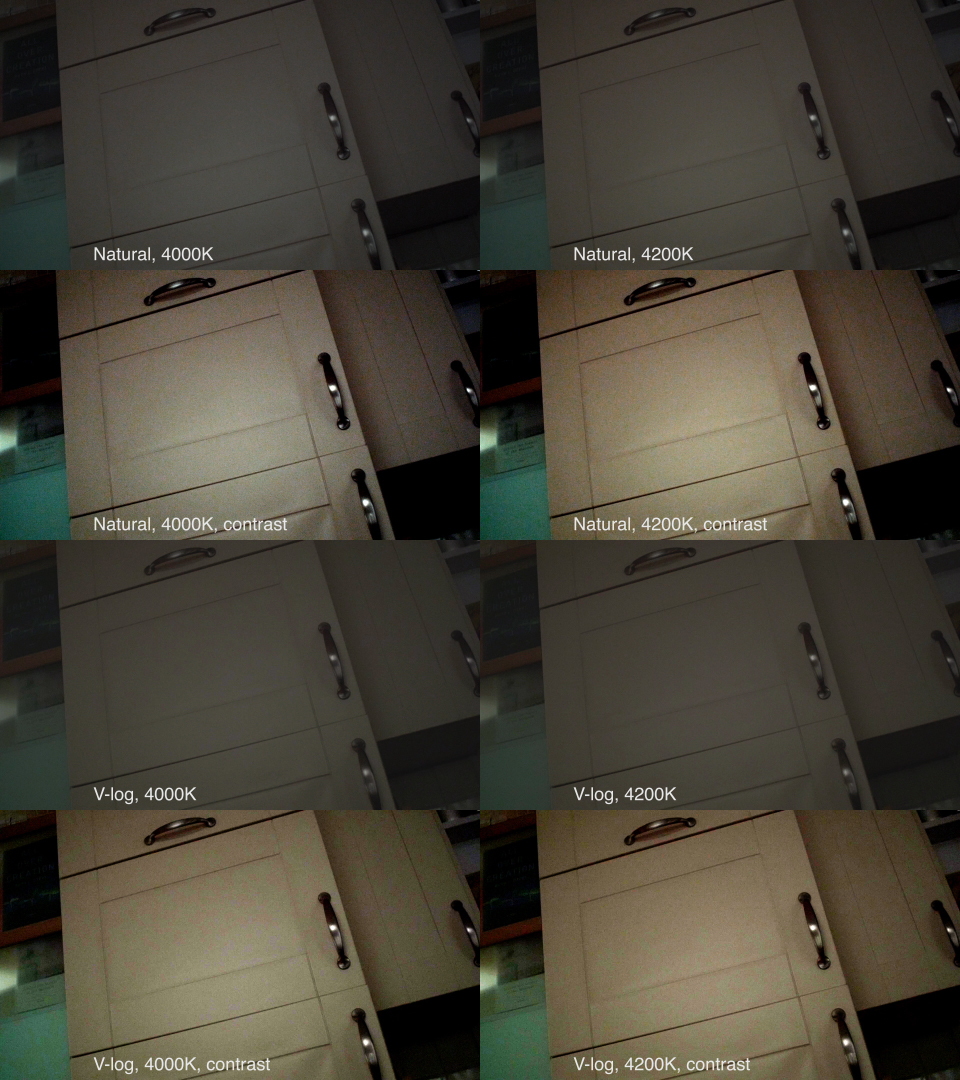
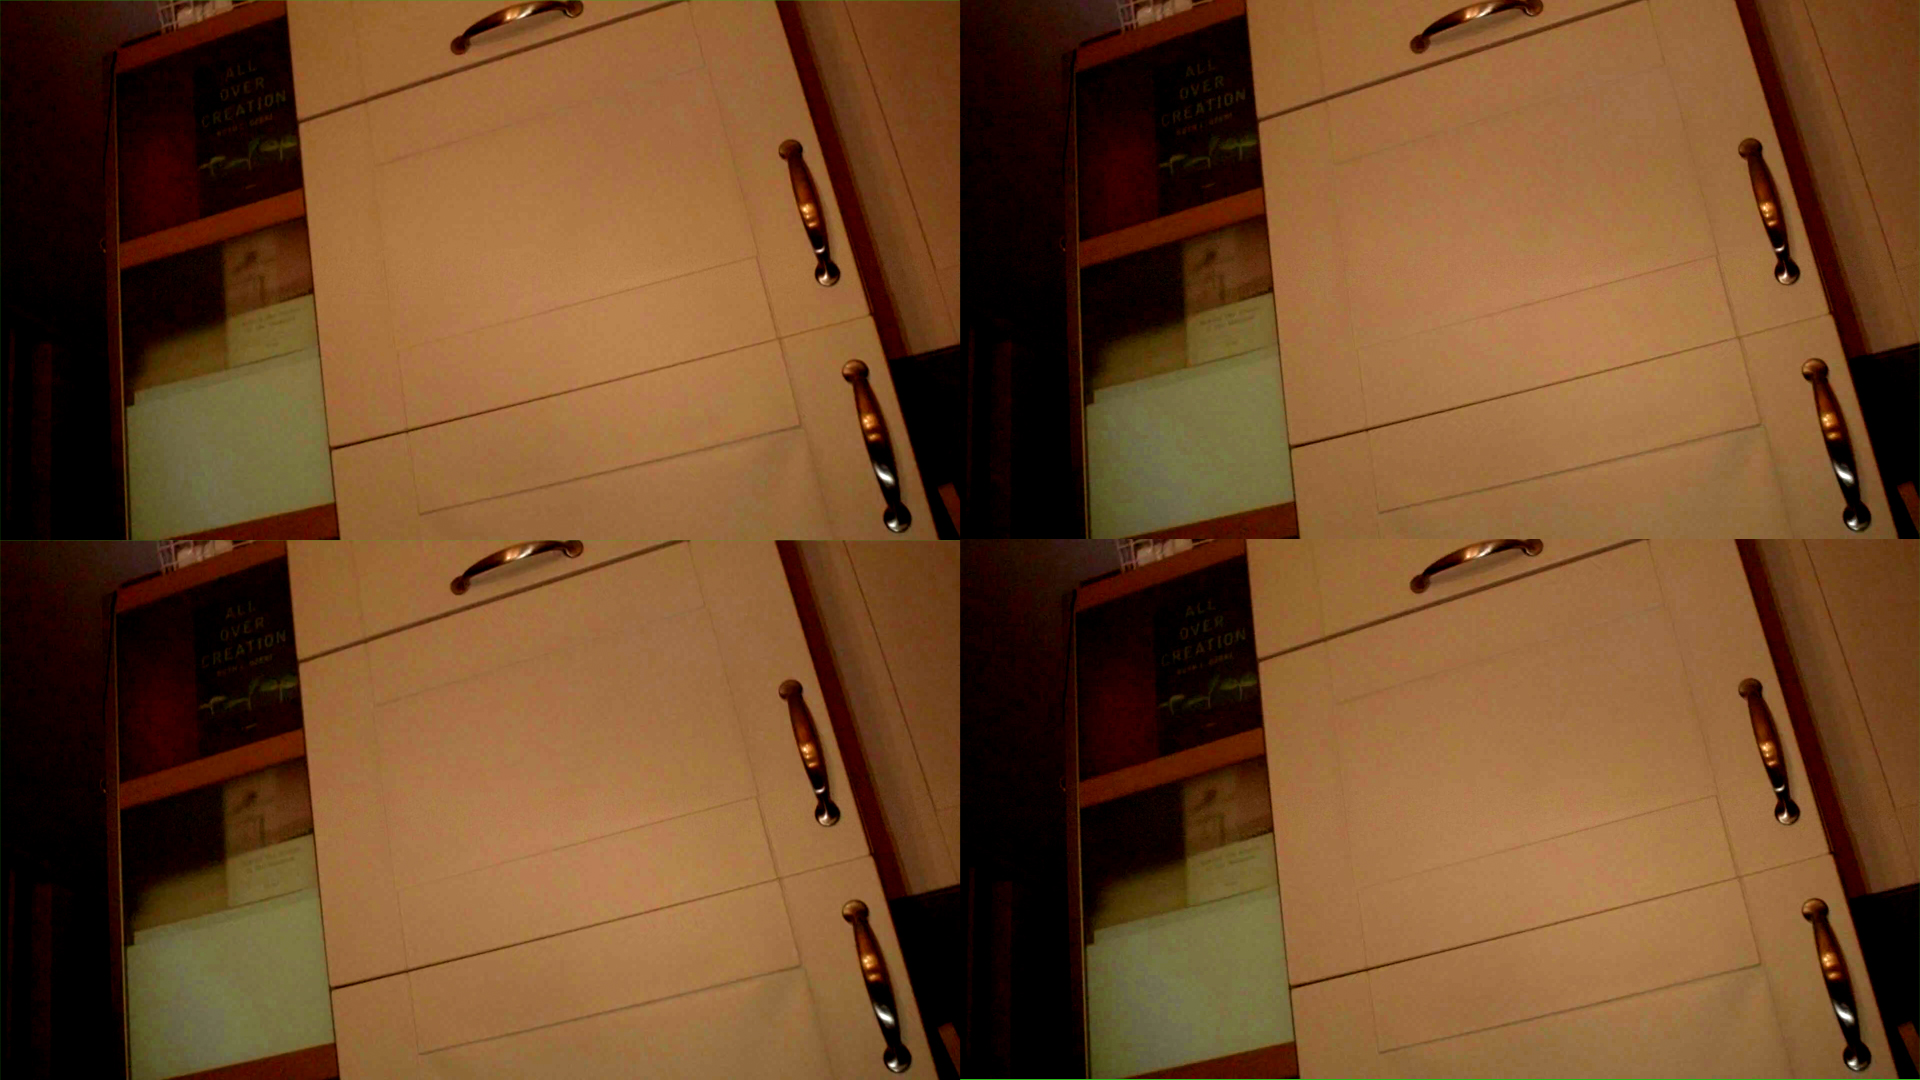
So far I have heard no mentioning of WB in combination with V-log …it has a huge influence and I actually suspect there is a bug related to WB an V-log causing the macro blocking artifacts. I did some tests with the following settings: WB 4000K and 4200K, Natural vs V-log, Shutterspeed 30, ND 1.2, Exposure 6400, everything in All-I 25fps 1080. Shots where 2 stops underexposed. I used V-log to custom (own brew) on the Vlog clips. As you hopefully can see in the picture, the noise pattern of the Natural clips is identical in both 4000K and 4200K. The only difference is the color. The noise patterns (macro-blocking) of the V-log clips are completely different for each Kelvin value. Only when you reach the top values (±9000 and up) the patterns become more identical. It is as if the WB adds ad-random posterization to V-Log clips as if the white balance is part of "V-log space". I do not know enough about WB and how it works or should work but to me this looks and feel like a bug. If it's not a bug …I would like to know how to set the WB because even Custom has a a different noise distribution each and every time you set one. The second picture shows this. Each of the four custom settings give different noise patterns, even though the conditions were the same at the time of creation. The two at the bottom look quite similar but that is luck. To be clear these are not four frames out of the same clip. The macro block islands change shape but stay where the are …and their position and number are completely random as far as I can tell. Hope someone can either confirm it's a bug or tell me how to use WB properly. Thanks.
-
You can upgrade to 2.4 without worries
-
I really doubt the Histogram is not working. Looks more like a way a coder would implement it versus the way a beta tester likes to have it. Currently the zebra stops working above 80%. That is because there is nothing to protect above 80%, you reached the end. At least it makes you aware there is nothing above it while you tried to get your stripes back. For the Histogram they choose IRE 42 to be smack in the middle. If you then decide that IRE 80 is all the way to the right and want to keep the histogram proportional correct it explains why black isn't all the way to the left. If the Histogram is going to change it might mean IRE 50 is going to be smack in the middle again. Not sure I would like that, as it would also mean the Histograms reading stops around 80 ...waste of space on both sides of the Histogram. Come think of it, probably didn't work with external monitors... Any how I don't think the new version will solve noise in any way
-
It's called Video-Camera blind test, you're not supposed to peak!
-
Mobile phone with Cinema4K
-
Driftwood V-Log L Samples - V709 & Arri Alexa LUT Comparisons
bunk replied to Zak Forsman's topic in Cameras
Why not make your own grade, not based on a exciting LUT. It has a couple of advantages the first being it’s your own grade, the second being that if you adjust it you adjust the grade and not add an adjustment after the LUT (deteriorating your footage even further) and third you learn a little more about grading or at least your grading software. I tried to recreate the ArriRec709Lut image I found on Driftwoods twitter page of the woman in the close up. Took a day or so …and later I found more efficient ways to do the same thing and eventually made my own version. Applied that same setting to the other footage as well and it seems to hold up just fine.
-
She is not looking down on it, she just doesn't want to be the extension of some male chauvinist pig and instead live her own life... good for her.Very nice and intimate portrait. Beautiful footage ...grading wise, the blues are a bit too heavy on the blacks for my taste.
-
Editing software, 25fps timeline, 5 jpg's of your choice. Drop the 5 jpg's on the timeline. Depending on your settings each jpg will last a couple of frames. Make sure each jpg has a duration of 5 frames. Drop the jpg's one after another.Play your movie, it has a duration of 1 second.There are only 5 jpg's.The timeline is a 25fps timeline. The jpg's are not duplicated instead they are on a hold for five frames each. Same effect, different more efficient code as the frame only has to be calculated once. Whatever is happening in camera - duplication or the "hold code". One thing is not happening and that is that you have an exposure of 1/5 th of a second per frame in a 25 fps timeline ...unless maybe you are a time traveler.
-
Here is how I see it... A camera lets you record at a certain frame rate per second.Let's assume (for the sake of argument) the exposure time of that camera is equal to 1/ the frame rate. In principle the amount of frames per second is only limited by hardware.The playback speed is independent of the record speed. If you conform footage that is recorded with 120 fps to a playback speed of 120 fps it plays back in 'realtime'.If you conform that same footage to a playback speed of 25 fps it looks like slowmotion. (this is what the gh4 (up to a frame rate of 96 fps) and the sony (up to 120?) do for you already) If you conform footage that is recorded at 5fps to a playback speed of 5 fps it plays back 'realtime'. ( this is what the sony does already, within a 25 fps container)If you conform that same footage to a playback speed of 25 fps it looks like sped up motion. (this is what the GH4 does for you already) So the GH4 interprets each frame as one frame at the chosen fps (24,25,30) and calls it 'variable frame rate' the variable being the record speed, not the playback speed. The Sony interprets it 2 ways. Higher framerates are interpreted the same as with the GH4 (as far as I know). Lower frame rates via an other setting (bulb mode) are interpreted according to there record time (within a 24, 25, 30 fps container) and playback in 'realtime'. Apart from how the camera handles it, the footage in the end is nothing more or less than an image sequence and it's really up to you to decide what you do with it. In AE for instance you can choose how the footage should be interpreted before you drop it in a timeline. No doubt other software can do something similar. Add exposure time in the mix and you really can go wild.
-
There has been some devellopment since then without telling you, apparently. ftp://ftp.panasonic.com/camera/dmcgh4/dmc-gh4_en_advanced_om.pdf#page215