

HockeyFan12
-
Posts
887 -
Joined
-
Last visited
Content Type
Profiles
Forums
Articles
Posts posted by HockeyFan12
-
-
3 hours ago, barefoot_dp said:
I think this is my biggest gripe with these types of charts: They actually end up putting opposites together in some cases. Eg, if one filter is an equal balance between high contrast and high resolution, and another is an equal balance between low contrast and low resolution, then they would both be mapped in exactly the same spot (ie halfway between the contrast and resolution corners) even though they do the exact opposite of each other.
This is why I always find these charts so confusing! But hey, they look pretty!The chart isn't great imo, but in general "contrast" means "low contrast." So anything in that corner is reducing contrast. Nothing is adding more contrast, everything reduces it somewhat. But filters with black dots reduce it less, Ultra Contrast introduces a controlled flare and reduces it more.
I do think the difference between Digital Diffusion FX and HDTV FX is stronger than the chart would indicate, but it probably depends on the strength of the filer.
-
Yeah that sounds about right.
Find a cheap Ultra Contrast filter on eBay or Amazon and try it out.
I directly compared a Digital Diffusion FX 1 and HDTVFX 1 a while back. They looked similarly, the difference was HDTV FX had milky shadows. I have the files somewhere but I didn't label them so I doubt I can find them quickly. Years ago I tried out a bunch of Ultra Contrast filters alone and it wasn't what I wanted.
I was watching an explanation of MTF on YouTube and the idea is at different frequencies of resolution you get different amounts of contrast. You could probably model diffusion filters as MTF functions.
You can definitely mix and match to get an interesting look. Spielberg's DP used a lot of diffusion filters but he also used bleach bypass and ENR processes that increased contrast so it was a balancing act between adding and subtracting contrast and getting the right ISO and contrast ratio. He typically used modern lenses, though.
Also the MTF function of film stocks rises above 100% and then dips down slowly. Digital stays around 100% until extinction. Normally digital sharpening looks bad to me, but I think the Alexa has a strong diffusion filter that slowly smooths out fine detail but Alexa ProRes has built-in sharpening that actually looks good because it's a wider radius of sharpening. Like unsharp mask with a radius of 2-3 pixels instead of 1, for instance, but I'm just guessing. There are little sharpening halos in 2k Alexa footage.
I sort of lost interest when it got so complicated. But I own vintage lenses and a few Classic Soft filters and I did like the look of Digital Diffusion FX but it was a very subtle difference.
-
-
27 minutes ago, barefoot_dp said:
I can never understand these types of charts haha.
The Ultra contrast and Low contrast filters are right next to each other in the contrast corner, so what does that mean? Shouldn't the low contrast be mapped as far away from that corner as possible? And do the "resolution" and "contrast" corners mean "your image will remain sharp/contrasty with this filter" or do they mean "this filter will effect your resolution/contrast so it will be soft/milky"
Filters are confusing haha.Contrast filters lift the black levels across the frame, resolution filters have a small-radius bloom or simply reduce the sharpness of the image without reducing the contrast, halation is a wider-radius bloom that reduces contrast locally but doesn't necessarily wash out the entire frame. Reference the chart on the Scatter webpage. I imagine Ultra Contrast would look like somewhat like a light gray solid if it were on that chart.
-
2 hours ago, kye said:
On first review the Digital Diffusion, HDTV FX, Black Satin and Smoque were of the most interest, with the filters in the halation corner seeming to push the image too far very quickly, whereas the others seemed to add a certain something but then not fall off a cliff when the filter was stronger.
My criteria was whatever makes the unfiltered one look cheapest / most video / most digital, but without looking like the image quality has gone funny.
I'm particularly interested in the contrast corner as it increases the effective DR of your camera, which is something that we'd almost all appreciate.
Of those three, I've used Digital Diffusion FX, HDTV FX, and Smoque.
Smoque looks to me like it's simulating filling a room with haze. Imo it's probably not what you're after.
I think HDTV FX is a combination of Digital Diffusion FX and Ultra Contrast. Or it seems that way to me, at least.
Ultra Contrast on its own is sort of like having a dirty UV filter or using a lens with light haze. It lifts the black levels like a controlled flare would when hit by light. This isn't so different from just using vintage lenses with older coatings (and internal haze and dust from age and lack of servicing), but for whatever reason I don't really like Ultra Contrast as much as I like vintage lenses. Ultra Contrast feels more all or nothing to me, a little unsubtle, or maybe I should have just used a weaker strength of it than I tried out.
Digital Diffusion FX looks to me exactly like it does in Tiffen's video series and is the closest look to whatever the Alexa has that smooths the image out. I was recently comparing Alexa and C100 footage and the Alexa has a bit of in-camera sharpening I think and also a strong, smooth OLPF. The Alexa footage looks softer when you zoom in, but maybe sharper from a distance I think? Fwiw Red Dragon also has a strong OLPF. Black Magic imo is technically great but the 6K is a little too sharp for my preferences.
https://www.youtube.com/watch?v=ryPILshPAFI
https://www.youtube.com/watch?v=AIIg2opcab0
Download the sample files there if you're curious what I mean.
Another issue is that when you have diffusion behind the lens, the size of the rear element is usually pretty consistent so you can keep the same strength approximately. But in front of the lens you might want a stronger filter for wider lenses to get the same amount of diffusion or halation or smoothness as a weaker strength provides on longer lenses.
I like the look of Classic Soft and black nets and you can sort of use them as a shortcut to get a good look. But they look like you're using diffusion. I think Soderbergh and Spielberg and Richardson use them as it allows them to light a bit more sloppily and impressionistically than say, Deakins might.
But if you can light for it, you can get a good look with anything. Anyway if I were shooting with a P4K or C100 or something I would probably use vintage lenses and Classic Soft, but I would shoot Classic Soft on film or Alexa, too, because I like it. Absent Classic Soft, if I were just going for a smoother look, I think Digital Diffusion FX and vintage lenses would do it. Not sure what strength. Almost all my lenses are single coated or have primitive multi-coatings. (On digital because I like it, on film, because I can't afford Ultra 16s. I do have one modern Canon zoom, but even it is a bit washed out at the long end I believe.)
Edit: even if you don't want to use the Scatter software, look at the chart of familiar filters. Very useful to get an idea of what each does.
-
http://www.dvxuser.com/V6/showthread.php?369550-C100-(-650)
It should be cheap since AVCHD is bad and external recording is good, but what you get for the money is unparalleled.
Add in some inexpensive lenses, Cowboy Studio shoulder rig, and an MKE600 and you've got a capable kit. And then maybe add in a light or two.
-
14 minutes ago, Llaasseerr said:
X-T3
I have never personally needed to deal with red footage in Nuke. The footage goes through the ingest department at E-Film or wherever and we got EXR plates.
I assume Arri ProRes is also delivered as EXRs? EXRs are high dynamic range 32 bit linear files, correct?
When the colorist is grading and there's a sequence involving both vfx shots and regular footage, are they grading EXRs as linear files to match Log C or do they transform the EXRs into Log C somehow before grading? How do they get them back to Log C to match the non-vfx shots?
-
39 minutes ago, Llaasseerr said:
If you think about it, with subsampled chroma even that fucks with the noise (grain) regardless of disabling a camera's nasty internal NR methods. It makes it more blocky. You need to do away with both chroma subsampling and NR to see if the sensor has a nice noise profile.
I tried shooting 10 bit log 4:2:0 ALL-I 400mb compressed for a personal creative project, and although the image looks nice straight out of camera it just fell apart really quickly in post. Lots of blocky artifacts when doing a power window or an aggressive film LUT. If you convert the colourspace to YCbCr and look at the chroma channels they are just appalling garbage. They look like a highly jpeg compressed screengrab from an 80's Atari game. It's for delivery not acquisition.
10 bit log from what camera?
I'm confused because the Alexa Mini shoots 200fps at 2k (if I remember right), which correlates with a 5ms rolling shutter. 8ms makes sense for a 120fps sensor.
How do you deal with Red raw footage in Nuke?
-
1 hour ago, Llaasseerr said:
Thanks, I should download some footage from this cam and take a look. And I definitely like the highlight recovery tool, I've used it on DNG frames back in the day.
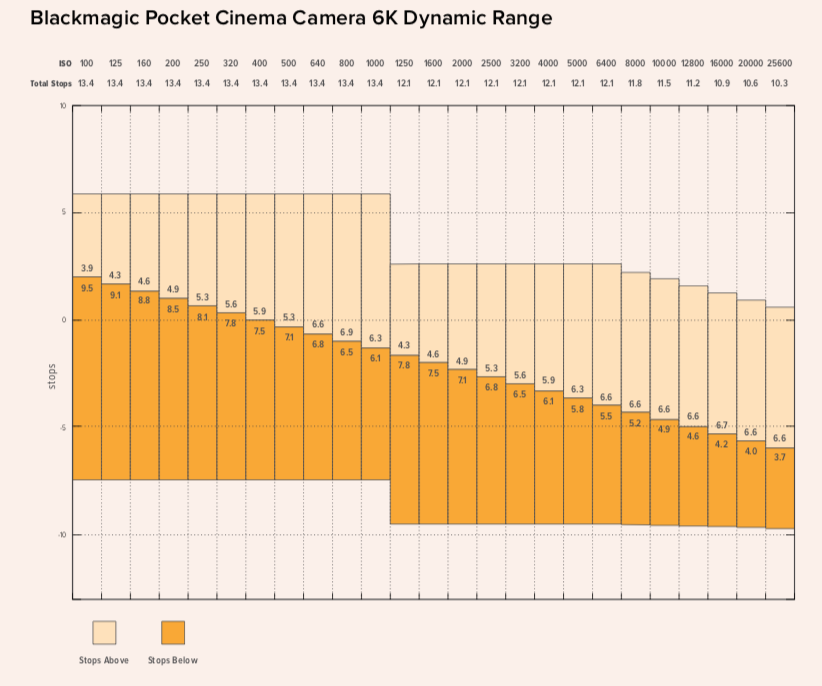
What you seem to be suggesting is pushing the DR by +1 stop to protect highlights, ie. push native 400 to 800, which I definitely do with an ND quite often. Noisier, but manageable shadows ("texture"). But then if you were fair and did that with an Alexa, which is totally doable, it would be back to the same margin of difference between the cameras.
Overall, as I stated I'm most hopeful about the current Sony sensor. Where it beats the P6K is rolling shutter performance, by a fair amount. But it's still about 4x slower than the Alexa.
At 800 ISO, the Alexa only has 0.1 stops more shadow detail than P6K, so underexposing the Alexa an additional stop isn't really a fair comparison.
I don't own a P6K, and agree the A7SIII sensor looks much more interesting (not even sure rolling shutter is much worse than Alexa LF Mini), but it's a really impressive camera.
-
46 minutes ago, Llaasseerr said:
Unless I'm misunderstanding you, I'm not sure how to quantify that it has more shadow and highlight information, but less dynamic range because basically it's the same thing. If you have some comparison frames in BRaw or log, I'd be interested to take a look. I guess it's important to state that there's DR above and below middle grey, and ask what's the camera's emphasis. For example practically every affordable camera is more about stops below middle grey, whereas the Alexa is more about stops above middle grey. But also the noise it produces in the shadows has a nice filmic look, up to a point.
Again, the FX3 raw output should be unmolested but that most likely involves attaching the Ninja V. Yeah, maybe they're adding the FX6 ability to disable NR for internal recording.

It doesn't much matter, but at 800 ISO the Alexa and P6k have similar over/under.
I think Black Magic recommends rating the camera at 400 ISO, in which case, without highlight recovery enabled, you would get 1.5-2 stops less highlight detail (as you mention), but it's clean enough at 800 ISO and with highlight detail recovery enabled actually surpasses the Alexa in real world use. Black Magic's highlight detail recovery works remarkably well. I've never seen a weird result from it, which is remarkable. But you're right not to rely on it too much, and I also find Cined's Komodo results suspicious because color is missing entirely on the top three highlight stops.
There are plenty of other factors beyond highlight dynamic range, but prosumer cameras are approaching (and in this one very specific case surpassing) the current generation Alexa. The P6k is really good!
-
3 hours ago, Llaasseerr said:
Re: The Pocket 6K, there's no way it can get more DR than the Alexa with highlight recovery if they are both exposed the same. As you say, highlight recovery is also just a synthesis by copying information from one channel to the other two clipped channels. BMD cameras just don't hold up. You can link me to the files if you want, and I'll take a look.
-
I've had a similar experience.
Can you send me your C-Log + BT709-WideDR LUT? Wide range to narrow. I downloaded one but am not sure it's the real deal.
Canon's colors have changed over time and I still prefer the original C100 and C300 to their newer cameras. But the R6 might be ballpark.
-
On 1/18/2021 at 2:10 PM, BjornT said:
Anyone on here using S1 and S5 together as A and B cam? Pics below had identical camera settings and grade (the tighter shot is the S5 with the Lumix 85mm 1.8 and the wider shot the S1 with the lumix pro 24-70 2.8 at 70mm). Both are shot in Vlog and running latest firmware.
S5 is bluer and a tad brighter overall. I know lens makes a bit of difference but am quite surprised to see such differences considering it is supposedly the same sensor. One can make them match fairly easily in post at least but curious to hear if other people on this forum have noticed as I find very little online.
What firmware versions do you have and have you double checked white balance settings and followed up on this?
The S1 and S1H I always found too magenta (by a lot) with V Log so it would be a welcome relief if the newer firmware has a greener tint, as the below image does.
-
Step printing?
-
Arri had a film matrix (page 9 I think) that allowed for colorists to intercut between film and Alexa footage more easily:
https://www.samys.com/images/pdf/ALEXA-Color-Processing-White-Paper.pdf
But they discontinued it. I've heard it's difficult to work with, but I think over time the digital look has become more standard anyway. The F35, C300, and Alexa all felt like different imitations of film to me, whereas today everything feels more like Alexa or an imitation of Alexa. Which makes sense. You imitate the contemporaneous standard format.
There are technical difficulties from a sensor design perspective, but I don't really understand them. Full well capacity is a physical limitation (think of each photo site as a bucket collecting drops of light) that dictates highlight dynamic range (once the bucket fills, the highlight clip). Bigger pixels mean a greater full well capacity, but so do improved sensor designs. It's no coincidence that the Alexa has the lowest resolution and the most highlight detail. With film it's sort of the opposite: Kodak added smaller grains of film to get two stops more highlight detail in with 5219 500T film stock than with the prior generation.
But if you like the look of S16... why not shoot S16? It is definitely the cool thing to do now.
- Mark Romero 2, IronFilm and Matins 2
-
 1
1
-
 2
2
-
I usually work with Alexa footage that's shot at one of three presets (3200K, 4300K, 5600K). Sage’s LUTs work really well, but getting the best match requires white balancing both the S1 and Alexa to neutral white before converting. Alexa white balance presets are not neutral–they're orange/green.
I wanted equivalent white balance presets I could use (5600k, 4300K, 3200K) with the S1, where I could shoot V Log, apply Sage's LUT, and get a ballpark match to Alexa presets–even if it might be a little less precise than doing this the right way.
I lit a white card with a Luxli RGBW light at 3200K, 4300K, and 5600K and then shot Alexa footage shot at 3200K, 4300K, and 5600K presets.
Then I shot the same with an S1 and and applied Sage’s Log C conversion LUT. I adjusted the white balance settings manually until I got a good match.
I've only tried out the 5600K preset so far in the field but it matches pretty well.
K1: 5600K A: 6 G: 9 (should be G: 10, but it doesn't go that far) – apply Daylight Log C conversion
K2: 4300K A: 6 G: 6 – apply 4200K Log C conversion
K3: 3200K: A7: G: 4 – apply Tungsten Log C conversion
Beyond that, a bit of extra noise and a bit of unsharp mask after downscaling S1 4k to Alexa 2k/3.2k (amount 24, radius 3) also helps make S1 footage look more like Alexa footage.
If this isn’t for you, ignore this post. It's not as precise as doing things the right way but for my needs is much more convenient.
- Sage, TomTheDP and zerocool22
-
2
-
1
-
This is true.
The more green you spend:
The more green you get.
-
Does anyone have any sample ProRes Raw files from the S1H they can share with me? In native ProRes Raw format. Thanks.
Also–does ProRes Raw extend highlight dynamic range?
-
Does your LUT convert V Log to Log C or V Log to Log C converted to rec709 with the default Arri LUT?
I have some Arri Log C Luts I want to use on Panasonic S1 footage.
How different are there results from LutCalc:
-
11 hours ago, PannySVHS said:
@HockeyFan12 Darn, what luscious green. Such luxerous rich colour! Beautiful shots, esp. the first one knocks me off my socks. Would love some footage of a person in that setting.
Thanks! The secret is wet foliage I think. But the S1 also has nice colors.
Congrats on the V Log upgrade btw. I remember when I first installed it how blown away I was by the added dynamic range. The S1 is such a capable camera!
-
2 hours ago, Sage said:
@HockeyFan12 It makes sense now why they retired that one.. I suppose they calculated a matrix with a single triad and put it out there (film is quite non linear to boot)
I asked around because it seemed to be a poor man's cinny LUT (which perhaps film convert nitrate already is and with more options) and no one liked it at all.
But I think there is more to it than that, you can read the white paper here where Arri discusses how it is meant to emulate a color negative image instead of a typical digital or reversal image:
https://www.samys.com/images/pdf/ALEXA-Color-Processing-White-Paper.pdf
So there might be more to it, but it's apparently pretty useless anyway.
Did you notice aliasing with the S1?
-
16 hours ago, Sage said:
I found the Arri film matrix numbers, and used the Matrix drx printer code to inject them into DaVinci. I'm not sure what to make of it.. it is a lot more saturated for sure. Here are the numbers and the lut/powergrade:
1.271103 -0.284279 0.013176
-0.127165 1.436429 -0.309264
-0.129927 -0.510286 1.640214
It lives! The Sony a7s III conversion is now complete as well.
Thanks... weird...
Well it certainly is green.
-
8 minutes ago, jack jin said:
The linny lut is not strictly accurate, because you don't know what display prep they based the original emulation on. It's a emulation of a scan of a print of a negative. There is so many variables that could change the colors drastically within their pipeline. What if the color timing was off during the printing process? Did they print the negative optically or through laser? Did the negative or print went through Digital Intermediate before the print or scan? What was the machine that scanned the print? Where as the filmconvert nitrate is just simply a conversion to the filmstock's cineon colors. Not to mention the linny lut is ridiclously expensive, with only one stock, where as filmconvert nitrate got 19 stocks, with options for grain emulation for 1/5th the price. And the cinny lut only includes one stock, which filmconvert has, while costing 395 bucks for one lut. It's absolute insanity how much they think they can charge for their luts.
Yeah, it's not cheap. Arri also had a similar mode on the Alexa that they discontinued, it was used when the Alexa was to be intercut with film.
Anyway, thanks for the info on the cineon mode. Very cool.
-
30 minutes ago, jack jin said:
Three nodes, third node you input the status m density rgb matrix shown here:
into davinci resolve, set the saturation to 60. On the second node you first put in filmconvert nitrate, select camera profile (must be log for cineon to show up), and then put print film emulation to 0, then you go into the white balance tab to adjust the white balance until it looks neutral, these matrix mess with the white balance so the image might look very magenta and warm, this is where you fix it. I like to use the classic rgb matrix, it gives me the best skintones. Going back to the third node, I just simply manually adjust the gamma/curve to my liking, by setting the black level and then applying a slight s curve to the footage, or I use CST to conform the gamma from cineon log to rec709 with luminance mapping turned on.
Interesting. That particular workflow is a bit over my head, but the cineon conversion reminds me of the cinny LUT here:
https://www.thebrim.pictures/sucomo.html
Seems really useful.
Older camera comparisons and thoughts:
In: Cameras
Posted
I've returned to older cameras. I don't need 4k for personal projects and don't really think it looks better, either.
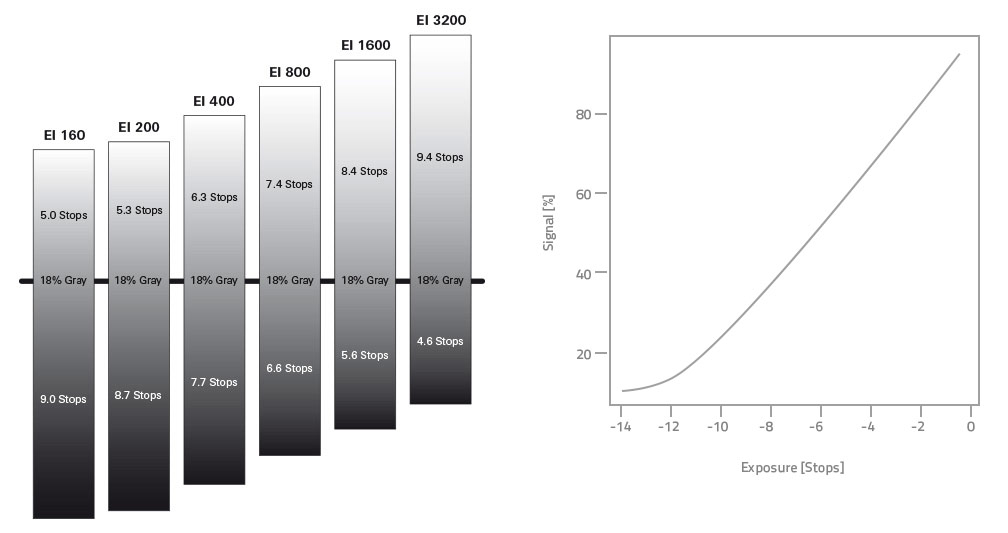
I've always liked the image from both the C100 and GH5. I think V Log has +4 stops of highlight detail above 18% gray and Canon Log has 5.3 but then the shadows get a bit muddy and you have to watch your 100+ IRE super whites and recover them in post. With an external recorder, the C100's image I think is really great. But it does fall apart bit with macro blocking on leaves and flat surfaces, so I wouldn't use it for green screening necessarily. The Mk II might be better.
But after going through a bunch of newer cameras I also found the older stuff familiar and lighter in post, which I appreciate.