
Hans Punk
-
Posts
632 -
Joined
-
Last visited
Content Type
Profiles
Forums
Articles
Everything posted by Hans Punk
-
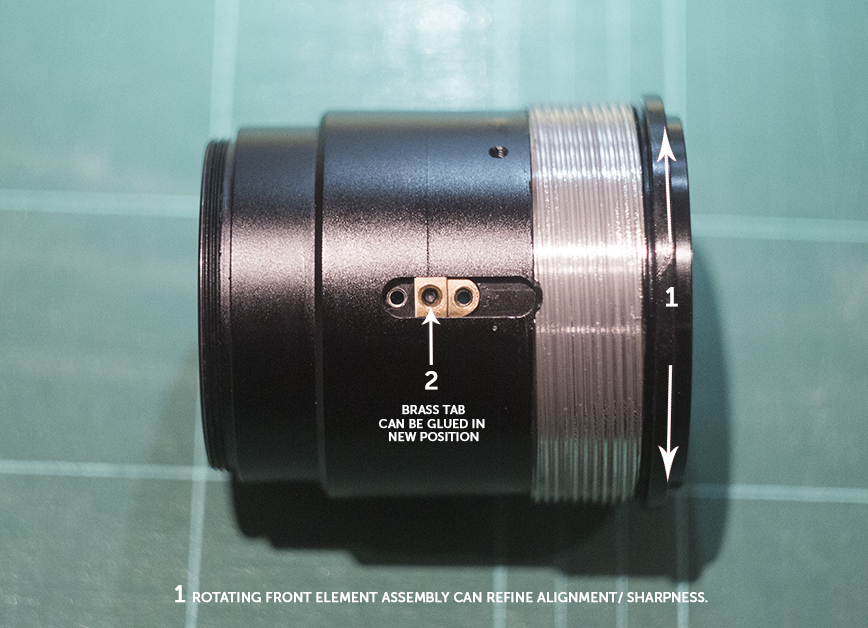
It's ok to be afraid!...it is a mod that is probably not worth attempting for most anyway. I would not recommend anyone to mess with or dismantle ANY lens unless they were very sure how to put it back together - or had a lens in such a bad condition there would be little to lose if it all went wrong. Like I said in opening post, I had a Kowa that I could afford to mess with...so I had nothing to lose. As for the sharpening/alignment tweaks, yes - it is best to unscrew/remove all brass tabs first, freehand focus front Kowa assembly at an object at infinity focus whilst at maximum zoom on evf or monitor...tweak rotation until sharpest image is reached, then look at the screw holes left by the removed brass tabs, if they are not perfectly central to the new position you have set, it indicates that re-seating the tabs into the new position would increase sharpness. From my limited experience, 3 Kowa B&H's out of the 4 that I've owned have benefited from this modification, so it's completely possible a few owners out there already have a perfectly aligned lens.
-
Anyone tried rear mounting a UV filter to a MC 54 or similar? I had good success in boosting the flare sensitivity from a MC Cinelux that way.
-
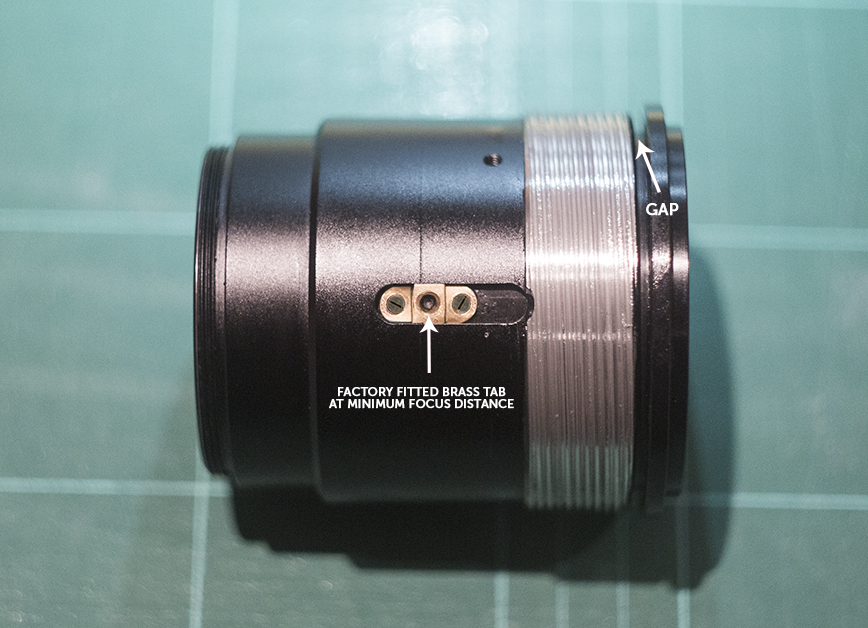
lining up the distance markers takes a bit of time to get right, like you say it is a case of finding the correct starting point on the helicoid to end up hitting the hard stop at infinity mark. Obviously with a new minimum focus travel - the minimum marker won't line up. On the factory standard throw, the minimum focus hard stop goes just beyond the 5 foot marker anyway. Shortening the tabs simply squeezes out more travel for minimum focus. I don't think cutting the body is a wise idea IMO, as getting a clean cut on that helicoid (without ruining the the start points) would be very difficult. You would also run out of helicoid throw to get the lens to infinity I expect. Note: If you ever wanted to return the lens to factory min-max focus throw, simply altinate one or two of the cut tabs 180 degrees - allowing the uncut half of the tab to hit minimum stop again.
-
Originally I cut all 3 tabs to get close focus to its maximum, but still using one of the original screw holes (instead of two) to re-attach tabs. This is to simply allow maximum travel of lens. Yes the longer tab controls the distance limit, but that can be cut down along with the other two tabs to get a new distance. Best thing to do is unscrew the tabs and remove them to have a play with manually setting minimum focus and alignment (before committing to any cutting). If you push the two optics as close together as possible, you'll see that without the tabs in place, a new position is possible. By cutting /shortening the tabs and re-installing them again, you will have kept alignment as before, but increased minimum focus. unscrewing all tabs and repositioning by hand is a good way to test if the new minimum focus distance is worth shortening the tabs for you, if not - simply screw tabs back on.
-
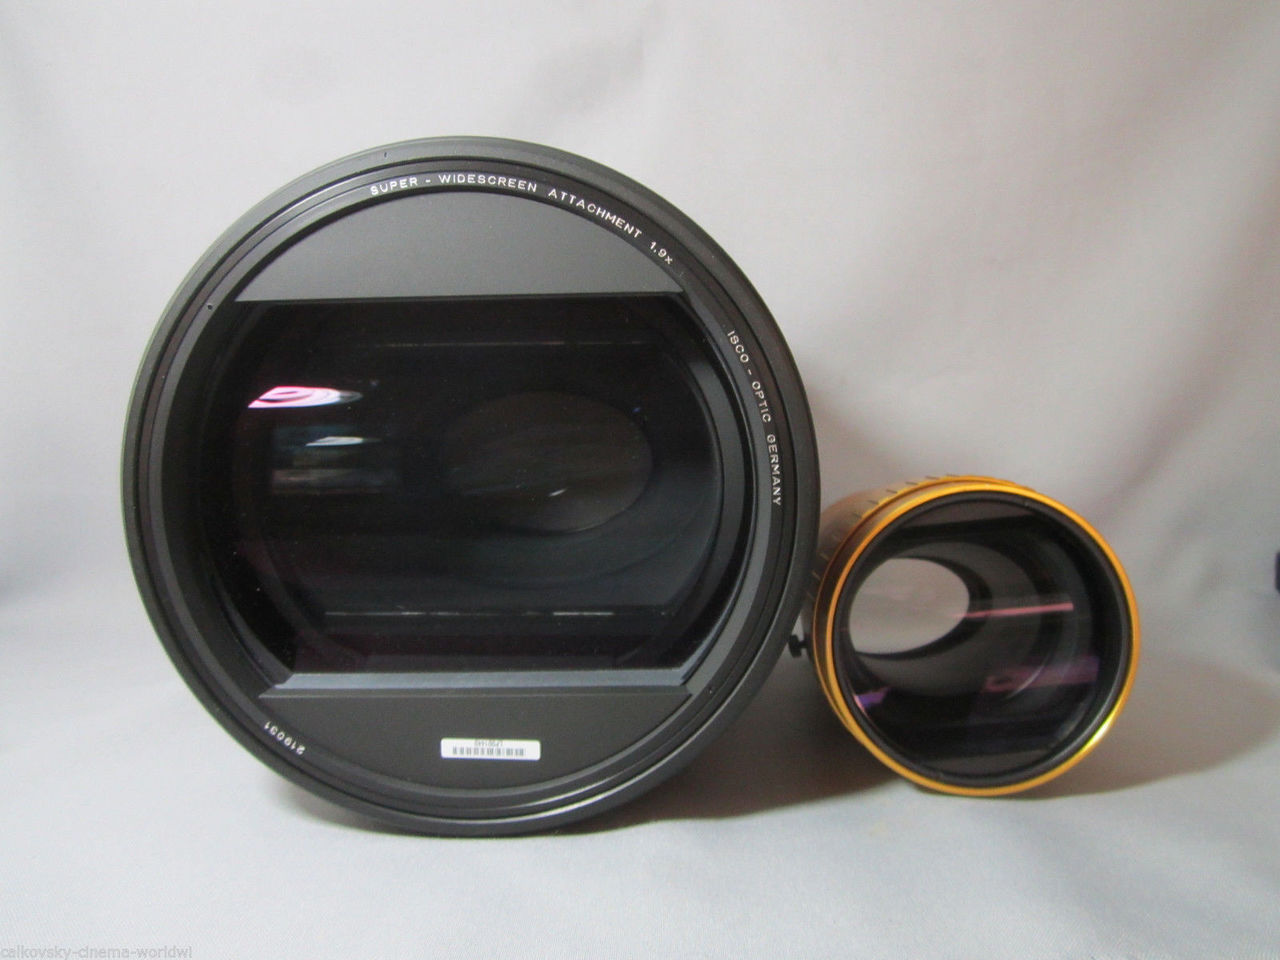
There is a 1.9x big mutha version out there that is for DLP use, bit too big and heavy for practical use on camera though! Cricriprod's 1.33x Isco looks far more camera friendly

-
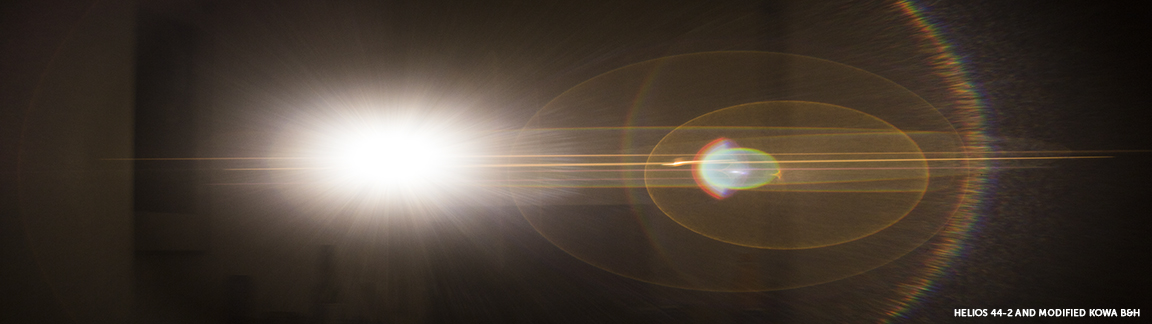
I made a video a while back about how to disassemble the Kowa to fit inside the FM lens which shows disassembly. https://vimeo.com/115331343 In the video you can see how to access the brass tabs. I'd recommend unscrewing and removing the tabs first, then play with rotating the front assembly by hand to see if you can gain any sharpness. It only takes a very tiny amount of rotation to obtain maximum sharpness, people may find that the tabs were already in the correct position on their lenses. Out of the four Kowa B&H's I have owned, all but one of them needed a slight adjustment to get to maximum sharpness. If you want to add closer focus, cut the 3 tabs shorter and fix into its new alignment position, as explained in the opening post. Ps: Before opening the lens up, it is worth doing a visual check of alignment, using the horizontal flare from the lens. Level your camera on a tripod in a dark room and align the lens using a light source to flare the lens. Pan the camera left and right to check That you see all the horizontal line streaks in the flare are perfectly parallel to each other. If any of the line\streak look off axis, the lens won't be aligned as well as it could be and the lens might be worth adjusting.
-
You could cut together a short 'taster' or sample scene that is a good representation of the film as a whole, then upload to vimeo with password link. Then use that (along with covering email) to contact whoever you want. For what it's worth, here are some things I've learn't over the years from working freelance in post production, and from friends who are resident at well known vfx/post facilities. These are just general thoughts on low/no budget work, maybe something of use in there somewhere... Generally, if approaching professional colorist or any post house about low/no budget work - they appreciate 100% honesty when considering any indy projects. Many people in post (especially colourists and visual effects artists) are creatives at heart. In my experience the words 'Low budget' or 'Zero budget' should never be the opening sentence when approaching most creative people, professional or not. It instantly creates an impression of low quality and the expectations of your project to be as equally low. It especially sends a cold chill down most facility owners spine when asking them to provide a service to you that they'ed normally charge hundreds of dollars per hour for. Instead it is better to be totally upfront early on about not having very much (or any) money, but for that to not be the focus of getting a 'freebie' service, but rather a pitch for a collaboration. it is that term 'collaboration' that is likely to get you noticed from anyone, regardless of how jaded by the business they may have become. If you can get other people excited about your project and how good you know it can be, people start to take notice. If it's self-funded film,tell them that - If it is a passion project...even better. What they don't need to know though are the names of all the beautiful people who already gave up their time for free and that they should somehow be 'expected' to follow .The amount of bullshit stories and promises people in post hear about possibly getting a deferred payment from distribution and dreamy plans to do the festival circuit etc etc.These things may well be true, but they deal with clients everyday who are always trying to screw them over hollow promises. Always best to keep it straight and honest. The simple fact of the matter is, if you have an interesting project that someone likes - and they have the time, there is a good chance people will be willing to help. Become a magnet of enthusiasm, that always attracts the best creative people for collaboration, professional or not. All the top facilities and artists out there are always going to be busy, but sometimes they have a drop in workload or have a trainee that would benefit from having a project to refine their skills on. Sometimes the bigger post houses are quite open to that idea, if it fits into their schedule. The best thing to do is contact and then visit a few post facilities and talk to someone face to face (post production manager or equiv). If they can't help directly, ask them for advice. It is often incredible how helpful people can be, if you ask nicely and you take donuts with you. As the saying goes ' If you don't ask, you don't get'.
-
-
You might be surprised from approaching an established post company or a professional colorist directly. Sometimes at post houses people get trained up on Baselight or Resolve by taking on lower budget/ indy projects to get more real-world project experience. No harm in asking nicely, you may get lucky. I've seen it work before, some post companies are grateful if they can use it as a test project in their down time for a trainee or if it is an uncommon file format/camera for them to usually expect, sometimes it is good for them to test. I worked on a project a few years back where Technicolor did the Di for free, simply because they wanted to test how far lowlight 5Dmk2 footage could be manipulated (or not). Pretty hilarious that a virtually zero budget short film could put 'color by Technicolor' on it's credits. A quality grade is almost as important as getting a good sound mix IMHO. There are some great looking films online that people can do in their bedroom now with a free version of Resolve, but very few will be using correctly calibrated monitors or have properly learnt the craft. If they had, they'd be working in the 'biz' already. Just my two cents.
-
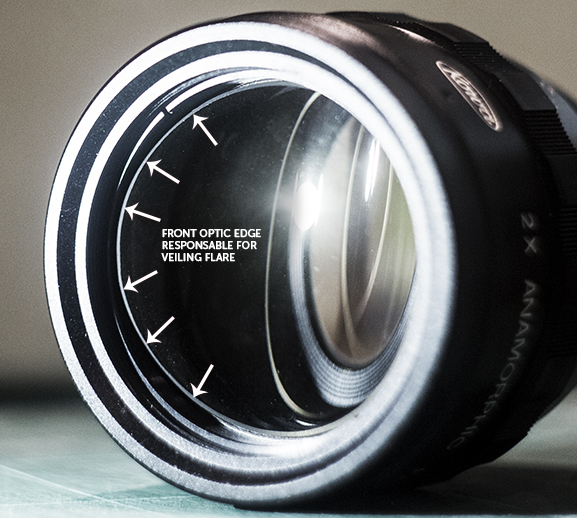
The blackening is applied to the front optic outside edge, without having to remove or unscrew it. The optic is concave, so it catches light from off-axis (not just front) - this is what causes the heavy glow/ veiling flare. To apply blackening, carefully apply black marker pen or matte black paint with a fine brush to the frosted optic edge only.
-
+1 for vintage and for Helios 44-2 recommendation...it is a perfect pairing for so many anamorphics. Nikkor's can be good (older non Ai versions) as most have warm, non MC coatings that compliment warm flaring lenses such as iscomorphot s8/16 - iscorama - kowa B&H etc. Downside is that when stopped down most Nikkor's have hexagonal aperture, cutting into the oval bokeh shape caused by the anamorphic up front. Helios 44 has a nice round aperture throughout stops due to blade shape/number (usually 8, or 13 on early silver versions)
-
Cool. To really get it as sharp as you can, and once you have your step ring/ helios set up - lock your camera down on tripod or flat level surface and point at a light source to flare the lens. Pan left and right on a level horizontal axis to check all horizontal streaks are parallel to each other. Also you can aim at an object at infinity (or at least a decent distance away). Use zoom magnification to punch in as much as you can, rotate front element until object is as sharp as you can get. Stopping down on taking lens can help judge the finite adjustment to get things nice and crisp.
-
The nice thing is that you can blacken the edge on this Kowa type without having to open the lens at all. The edge is accessible from the front as is. Other lenses can be treated the same way, but some may require disassembly first to get access to the optic edge...be very sure to check how to reassemble properly before attempting though.
-
Yep that is misaligned to hell. Good way of getting it corrected is to flare the lens in a dark room while attached to camera, and rotate front element until all lines are parallel in the streak group. I've since sold my Isco S8 and can't remember offhand the best way to disassemble, I think it is by detaching/unscrewing the front, then rotating it again to align. Bioskop is very knowledgeable, he might know by looking at the body of his lens as to the likely way of opening that front. I seem to remember the rear element is seated firmly in the body design, so accessing and adjusting the front element rotation is the way to go.
-
Actual close focus mod brings minimum focus to 2 feet 8 inches (I was being a bit conservative before). With added Tokina +0.4 it comes down to 2 feet. Not having a problem with sharpness at minimum focus at all, just under 3 feet minimum focus without diopter is better (for me). Not having to add additional optics to the pathway for closer focus can only be a good thing. The stretch ratio is always going to be 2x at infinity, giving plenty of defocus separation from foreground at minimum focus - even if it is not resolving full compression value up close.
-
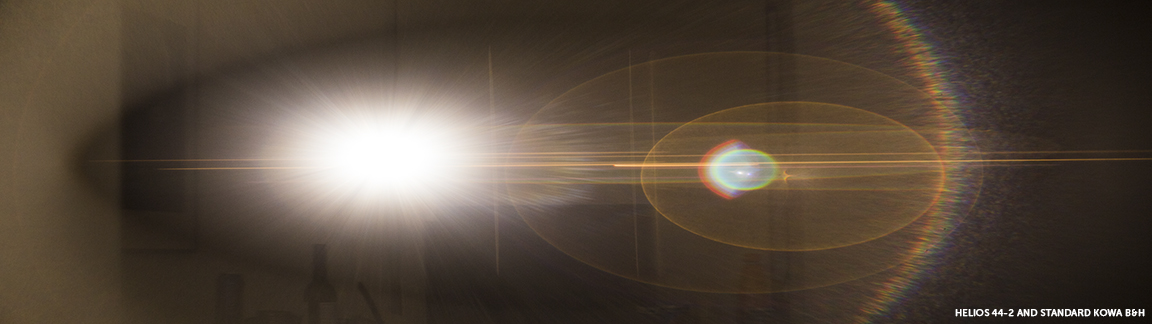
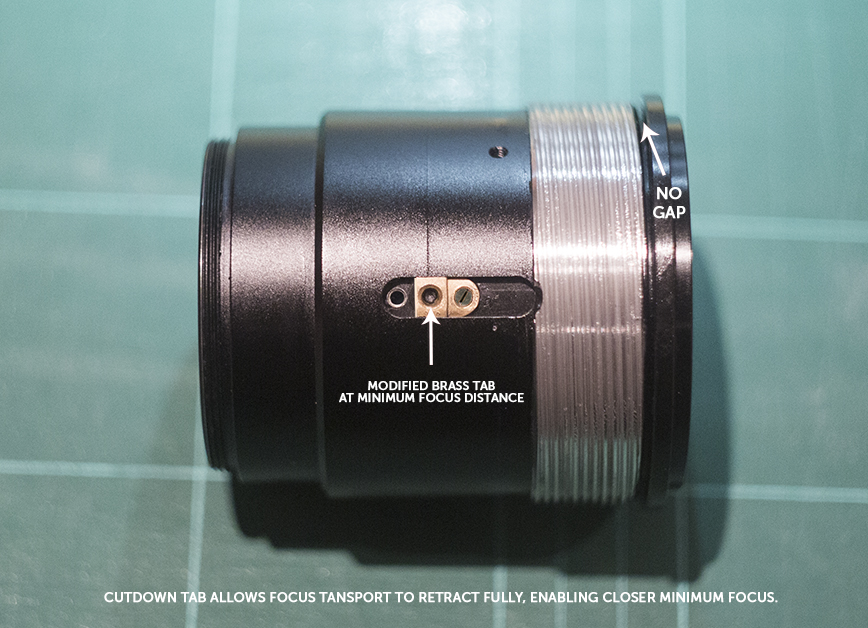
Kowa B&H Close Focus Mod & other 'Tweaks' Recently I picked up a very cheap Kowa B&H that needed a lot of internal cleaning and a fresh re-lube. Since it was my 'Spare' Kowa, I have a chance to illustrate/share my findings on some simple modifications that I discovered a couple of years ago on another lens. Since I already have a 'Standard' Kowa to compare with, it should prove easier to illustrate the difference in performance before & after modifying such a lens. These principles will work on many lenses of this type that share a similar construction. Following these steps are at your own risk. The modifications allow: * Minimum focus to be reduced from 5 feet down to 3 feet. * Reduction/elimination of 'Veiling Flare/ Barrel Glow' that is common with Kowa lens types. * Overall sharpness improvement. Close Focus: To achieve closer focus from the 5 foot factory standard is pretty easy.The focus mechanism transport is done by a helicoid pushing/pulling the front element that is seated within a tube, guided by brass tabs/stoppers within slots in the housing.These brass tabs/stoppers ensure that the linear travel is straight and true (ensuring correct alignment with rear optic). By cutting these tabs to be shorter, the travel of the front optic assembly is allowed to seat closer to the body - allowing closer distance between front and rear optic. This allows an increase in optic proximity to be achieved. This modification effectively allows the focus ring to turn to it's maximum close focus position, and not restricted by factory limits. Veiling Flare/ Barrel Glow - Reduction: A common artefact of Kowa lenses in bright light situations seems to be a strong Veiling glare. It is similar to a strong vignette of light that happens when the front optic is hit with off-axis light. Although this can be a desirable artefact, often it is too overpowering to the image when purposely flashing the lens to pop a flare for effect. A simple solution I found is to blacken the edge of the front optic - this is the edge that gets hit by light and pools the image with a 'Barrel glow'. Taking a fine tipped marker pen does the job well (without needing to disassemble lens) - even better would be black paint and a fine brush and a steady hand if you wanted to eliminate glow completely. I personally tried the marker pen method, as you can carefully remove or thin the ink with a tiny amount of lighter fluid on a brush - creating a reduction/dulling effect, rather than remove the glow effect completely. At least it is good to know how to minimize the glow effect, especially when shooting in bright sunlight without a mattebox and you don't want everything to be washed out all the time. Overall Sharpness Improvement: This came from a few year back when playing on another Kowa lens and is the nicest find I've discovered so far (about most projection anamorphic lenses). I found that when removing the brass tabs that are used for alignment, you can separate the front and rear optic assembly for cleaning etc. But If you do not re-install the tabs into the pre-set positions (using the screw holes aligned in the factory) - you can often tweak the alignment and fine focus to be even sharper. As a pure guess, I can only presume that back in the day when most of these lenses were made the tolerances for alignment were only considered for image projection, rather than image acquisition (iscorama/bolex types an exception) I found that by freehand rotating the front optic assembly (when attached to camera) - It is possible to achieve more finite sharpness from the alignment. Using high magnification on my camera and additional magnification on my EVF + focus peaking at a reference at infinity - it was possible to rotate the front element assembly to what is probably fractions of a millimetre from the factory alignment, then glue the brass tabs into a very slightly new position. Glue works well, as it does not require additional holes to be drilled to re-seat the brass tabs, or forever alter the lens. The glue does not bear any load of consequence, mealy seats the tabs to prevent rotation. The lens can be easily returned to its original alignment by dissolving the glue with solvent and returning the tabs to factory position. I’ve found that the very slightest tweak to factory alignment in 3 out of the 4 of these Kowa lens types I've owned, improves the sharpness noticeably.
-
Pretty cool : http://www.newsshooter.com/2015/10/05/sony-fs7-to-get-2k-center-crop-interval-recording-and-noise-suppression-in-cine-ei-mode/
-
If you could take a still or even better upload a short video clip of the lens making a streak flare like my rough example pic, I may be able to asses for you.
-
Attached is a rough example using optical flares to illustrate. Basically if you can see any lines in the streak/ horizontal flare that are noticeably not parallel to one another - there is an alignment issue. To obtain sharpness, the optics should be perfectly aligned causing a nice parallel grouping of lines in the flare. Sometimes a very tiny misalignment can cause an anamorphic to not resolve it's true sharpness.
-
The Iscomorphot is a 'Fixed focus' or 'Focus-through' type, meaning that all focusing is done via the taking lens. The trade off is that you will need to be stopped down to get sharpness throughout the 4 meters - infinity focus range, but it can be done with experimenting on various taking lenses at various stops. A thing worth double checking is the horizontal flare - if the the streak flare has a line within it that is not parallel, that would indicate that the lens has been opened up and messed with and front and rear optics not aligned back correctly...causing the lens to not resolve sharpness. From what you say though, it sounds like it is perfectly normal - stopping down on an alternative to your Voigtlander should solve the issues you mention. Helios 44 is a safer bet to use as a taking lens on GH4.
-
It's a great little fixed focus lens and really starts producing great images when stopped down on taking lens. When used with Tokina and/or cheaper single element diopters, it is one of the nicest portrait lenses out there...really lovely image. As it is fixed focus, you will find that it won't get sharp on its own until around 4 meters and further. Stopping down on the taking lens can reduce this distance slightly, and will start to sharpen things up much more. Try f5.6 on taking lens at subject further than 4meters, and you should have better luck. Using diopters for closer distances make this lens really sing though. as for non-vignette on GH4, that you may have to experiment with.
-
Love it man, great relaxed tempo - complimentary to subject and soundtrack. Visuals look really great.
-
Remember hearing ipad colour accuracy was pretty darn good - This article is a good read (and a few years old) https://www.fxphd.com/blog/just-how-good-is-the-ipads-color/ Definitely good enough as a mobile client review method to showcase corrected rushes and temp grades.
-
-
That's the BM Ursa viewfinder


_1.jpg.7ef4ab3808bd3bf2462f36694819803f.jpg)