

OleB
-
Posts
132 -
Joined
-
Last visited
Content Type
Profiles
Forums
Articles
Posts posted by OleB
-
-
39 minutes ago, MrSMW said:
That's the set I was looking at, but then the tests and reviews I saw suggested the Meike had a bit of an edge when it came to outright image quality and are near 1/2 the price (the S35's anyway) and both of those factors swung it for me, so went for just the single Meike 50mm.
I might still get the 75 because there are times when I need longer, but wider I have covered with the rest of my lenses, so for those rare occasions when I do need wider than '75', I'll just use one of those.
In fact I did the other day for the last hour of the wedding and dancing when I used the Sigma 20mm f2 as a '30'. And got back AF and the AF actually works quite well for dancing stuff as there is a lot of contrast!
Guess those Meikes are also extremely good. We have so many great choices nowadays. 🙂 If I would build the set today, because that DC crop mode of the fp works so perfectly, I most likely would go for 25mm, 50mm and 100mm...Cover what is in between with the crop mode.
-
4 hours ago, MrSMW said:
Ditto the DZO Vespid’s that were initially my first choice being somewhere between the two (Meike and Sigma) on price but the smallest and lightest, but tests seem to suggest the Meike produced the better image.
I am using the Vespid primes. 35/50/75mm with my fp and I love them. Sort of a little vintage rendering, sharp enough for what I like and colors are gorgeous and consistent between them. T2.1 also is good enough for my liking on FF. 🙂
Size is still okay, they have a 77mm filter thread which was perfect, because I did not have to buy NDs, Tiffen BPM etc. again had them laying around from my photo equipment.
-
59 minutes ago, webrunner5 said:
Yeah, but when I look at a scene and the blacks are suppressed I think either the camera is shit for DR or the guy or girl shooting it doesn't know what he she is doing. Even a blue sky has dark areas in it if it has clouds. I can see erroring toward the bright area but that is a sketchy approach. Plus like you said that may be for only a few frames than what?
Valid approach of course. So you would prefer keeping as much shadow detail in it as possible? I mean there is most likely a reason why usually with sky you try to keep the sun and what is close to it out of the frame?
What I would think could help indoors to avoid blacks crushing is haze. So would add that to push them up. But then again this is also limited, because not for all scenes you can put in huge amounts. If it fits the story...If not fill lights.
Guess we can agree that "the" film look might be only possible only when DR of the camera permits to keep both shadows and highlights.
Always a pleasure to read through all of your experiences here, lots of knowledge to soak up. 🙂
-
14 minutes ago, webrunner5 said:
From my experience ETTR Only works for photography not video. YMMV. For video you have to think 0 to 100, and you Have to stay in between those values. You are screwed if you go above or below those figures. You really can't be near the limit at either value to be honest. You would have to have 18 stops or more to use it all.
Understand that with video you have to pay more attention as well to the series of shots. So that they look as similar as possible. ETTR for each and everything might not be desirable.
Let us assume the following if that camera has 12.5 stops and we refer to the exposure values (https://en.wikipedia.org/wiki/Exposure_value) all scenes with more DR than the camera can capture would need a sacrifice. In my opinion, and this is very personal, I would rather try to get all highlights in which matter, like clouds and sky outdoors, and let the rest be black below the DR range of the camera. That feels cinematic to me. If I now would underexpose even further the highlights will go darker and even more in the shadows comes black. So nothing to win here unless I misunderstand something.
Sure on a big set you can light up the blacks, or indoors you might decide to let go of a window or parts of it to have more light on the rest but that is a creative decision rather than technical I suppose.
-
2 hours ago, Llaasseerr said:
Are you referring to my idea of using the built-in exposure compensation? Of course, without having the camera I'm making assumptions about how it would work and if it would work at all. But I think broadly speaking, I was thinking that the sensor clips too early in the highlights, but that the shadows were very clean. So the whole range could probably be pushed easily by +3 stops. So say, shooting 800 for 100 which is what you say it does anyway.
But that could be pushed further. Beyond the fact its internally pushing 100 to 800, I'm saying maybe shoot with -3 ND and compensate for that in the light meter reading and the exposure compensation on the camera, so that it displays the image at +3 so middle grey looks correct. Again, assumptions.
What this could synergistically offer is that if you can toggle exposure comp off then you could see the highlights without them clipping, then toggle it back on on and see the image exposed correctly for middle grey.
Given the quirks of the camera, I don't know if this workflow is possible fully internally, or if a Ninja V or an external monitor and a separate LUT would need to be applied. Theoretically, outputting an underexposed image via HDMI could then allow a LUT to do the exposure difference and roll off the highlights that would otherwise be visually clipped while shooting.
Yes PR Raw should absolutely be linear raw. I noticed the way it looks on the Mac can be interpreted as log or some other thing, but that's to do with metadata tags that are non-destructive. The underlying data in unclipped linear raw. I'm not sure about ISO invariance though. I'm taking a stab and saying that it only looks different based on whether the camera is using one or the other of the base ISOs, and then the "intended" ISO is just metadata.
The overall idea is that I'm proposing shifting the highlight range beyond what Sigma recommends with their ISO/DR chart via a fixed underexposure (not ETTR with a histogram on a per-shot basis), to the point where you're still just about comfortable with the raised noise floor - and even then you can consider pushing it past that and applying a bit of denoising with Neat Video.
Thank you for this extensive and comprehensive write-up.
In regards to push DR like you have described. My understanding in regards to the overall dynamic range is that you measure stops above the point where nothing is anymore distinguishable from the noise floor of the camera. So if the fp has 12.5 stops that means above the black noise floor. So if you do not push the upper limit into the white clouds and underexpose them, what happens then?
-
@Llaasseerr would you mind explaining this ISO / DR and middle grey combination for me? I am not able to grab this.
Have tried today with my incident meter to check if my exposure table is correct. ISO 800 (is proven ISO 100 as per meter) and 3200 (ISO 640) with closed down aperture to compensate looks exactly the same. No shift in DR can be seen whatsoever.
Could it be that ProRes RAW is distributing the DR linear? So nothing changes no matter the ISO value? As long as you are not clipping the sensor all is good it seems.
For more than one light source my approach is now the following, dial in the exposure needed for example to not blow a window which I would like to see through. (with NDs and/or aperture) and measure the exposure for the talents skin with either false color or with my incident meter and the correct ISO value as per my table. Adjust the second light source accordingly to match cameras settings.
Confusion... Feedback highly appreciated 🙂
-
30 minutes ago, Llaasseerr said:
Okay, that is really weird. So visually, as you dialed up the ISO the image got +1 stop brighter on the Ninja V but the false color was still monitoring the underlying base ISO?
Exactly this! When you are increasing ISO from 100 upwards (no matter what monitor mode you use, even Rec709) the preview picture increases exposure, but the false colors remain the same until ISO 800, only from that you see a change in the clipping point and the exposure of the preview. 😄
-
13 minutes ago, Llaasseerr said:
That makes some sense, thanks. I saw this dpreview post recently (possibly this is old info here, not sure) and I wasn't sure if it was just applicable to photo mode. I'm referring to the spreadsheet in the first post:
https://www.dpreview.com/forums/thread/4556012
I haven't cross checked it with what you posted before, but this seems like a legit source from Photons to Photos.
I came to this because one year ago I was wondering why the false colors of the Ninja V are not working correctly above ISO 100. My expectation was that once you dial up the ISO (let us say in full steps) that the clipping should occur one stop earlier simultaneously. But I saw that false colors did not change at all until ISO 800 and only afterwards the behavior started which I was expecting.
Next thing I checked was if there is headroom (pulled the files in FCPX) over the clipping point when doing that, there is nearly none if you dial in the exposure to the border of clipping as per false colors. So far so good.
Then I built a lighting setup where I exposed for the practicals just so that they do not clip. Think that was on ISO 3200 setting in that first trial. I took my incident meter to dial in my key (of course setting that thing to ISO 3200) and guess what...key totally under. Confusion started and I was wondering if I am too stupid to understand the camera somewhat. Should at that stage better used the false colors to check skin color...
But instead giving up I was investigating further and in the end figured out what in the end led to the conversion table. Now I can use my incident meter again for setting the lights, contrast rations etc. and last but not least, the false color screen is now confirming that I am ending in the correct exposure range doing so.
-
20 minutes ago, Llaasseerr said:
Do you mean the exposure looks the same on the Ninja V screen? because I understand that 800 image is shot at ISO 100, but in my mind it's pushed +3 stops right? I guess I would understand if it was in front of me.
False color aside:
My observation about the clipping point of ISO 100 being around 3.5-5 is based on looking at the DNGs, so I was thinking that it would be applicable to the Ninja V recording too - but perhaps not, maybe that is (sadly) apples to oranges. Basically if I pushed an ISO 100 DNG by +3 stops to emulate what you're talking about with ISO 800, the highlights would clip much higher as I mentioned. But this is all theoretical until I have the camera.
If you ask me the best explanation would be that for true RAW, via Ninja V, the ISO values of the camera are incorrectly transferred/named. The best hint we have is that manual from Sigma. The real ISO values of both channels are 100 and 640. So it seems for the cine mode they have decided to name them differently.
So basically you have to dial in ISO 800 and get ISO 100 and so on, as in my table which I have mentioned way above. Comparing those "real" ISO values with an incident meter gives a match between false colors and the meter.
Do not ask my why they have done this...
-
5 minutes ago, Llaasseerr said:
Ok, thanks for confirming that. The difference then would be the PQ vs native for the monitoring mode, but I assume that would not affect the image anyway. For some reason the file I downloaded is saying that the intermediate log curve (oetf) and gamut are Vlog/Vgamut. But ultimately, I think the image is linear gamma/sensor native gamut, because the Vlog reference is just in the metadata.
So in that case, assuming accuracy the highlights are clipping at 10.2 as a linear value at ISO 800, which from what I understand form what you said, is ISO 100 pushed 3 stops. So this is only a bit lower than where Sony cams typically clip with Slog3 recordings (11.7).
Theoretically, if the highlights clipped at at ~3.5 to 5 as a linear value in an ISO 100 image, then if you pushed it +3 stops then the max value would be somewhere between ~28-40. So I'm not sure if it would be better to try and manually cheat with a -3 ND and shoot at ISO 100 instead. Just thinking out loud though.
Actually the result for ISO 100 and ISO 800 settings is exactly the same. False colors are not changing at all so if you expose as per that, all is identical. They first do so if you go one step higher than ISO 800. Only thing you have to consider in FCPX is that if you directly shoot in ISO 100 you can leave everything as it is, if you shoot in ISO 800 and want to bring back the picture, because in FCPX it will look blown of course (being as you said ISO 100 pushed 3 stops), you can either select manual ISO 100 or just dial down the highlights. By now I prefer the later way.
I decided to take the ISO 800 and upwards approach, because there the false colors are accurate and additionally the screen preview is at least workable.
-
27 minutes ago, Llaasseerr said:
So I took a look at this, and it does look promising as far as where the highlights have been placed in the Ninja V recording. I noticed in the metadata that the gamut and log curve have been set to Vlog/Vgamut, and the monitoring mode is set to PQ. Now I don't know if any of that is destructive, because what I can see is that the underlying image file is still linear raw. But it does affect the way it's displayed in different software.
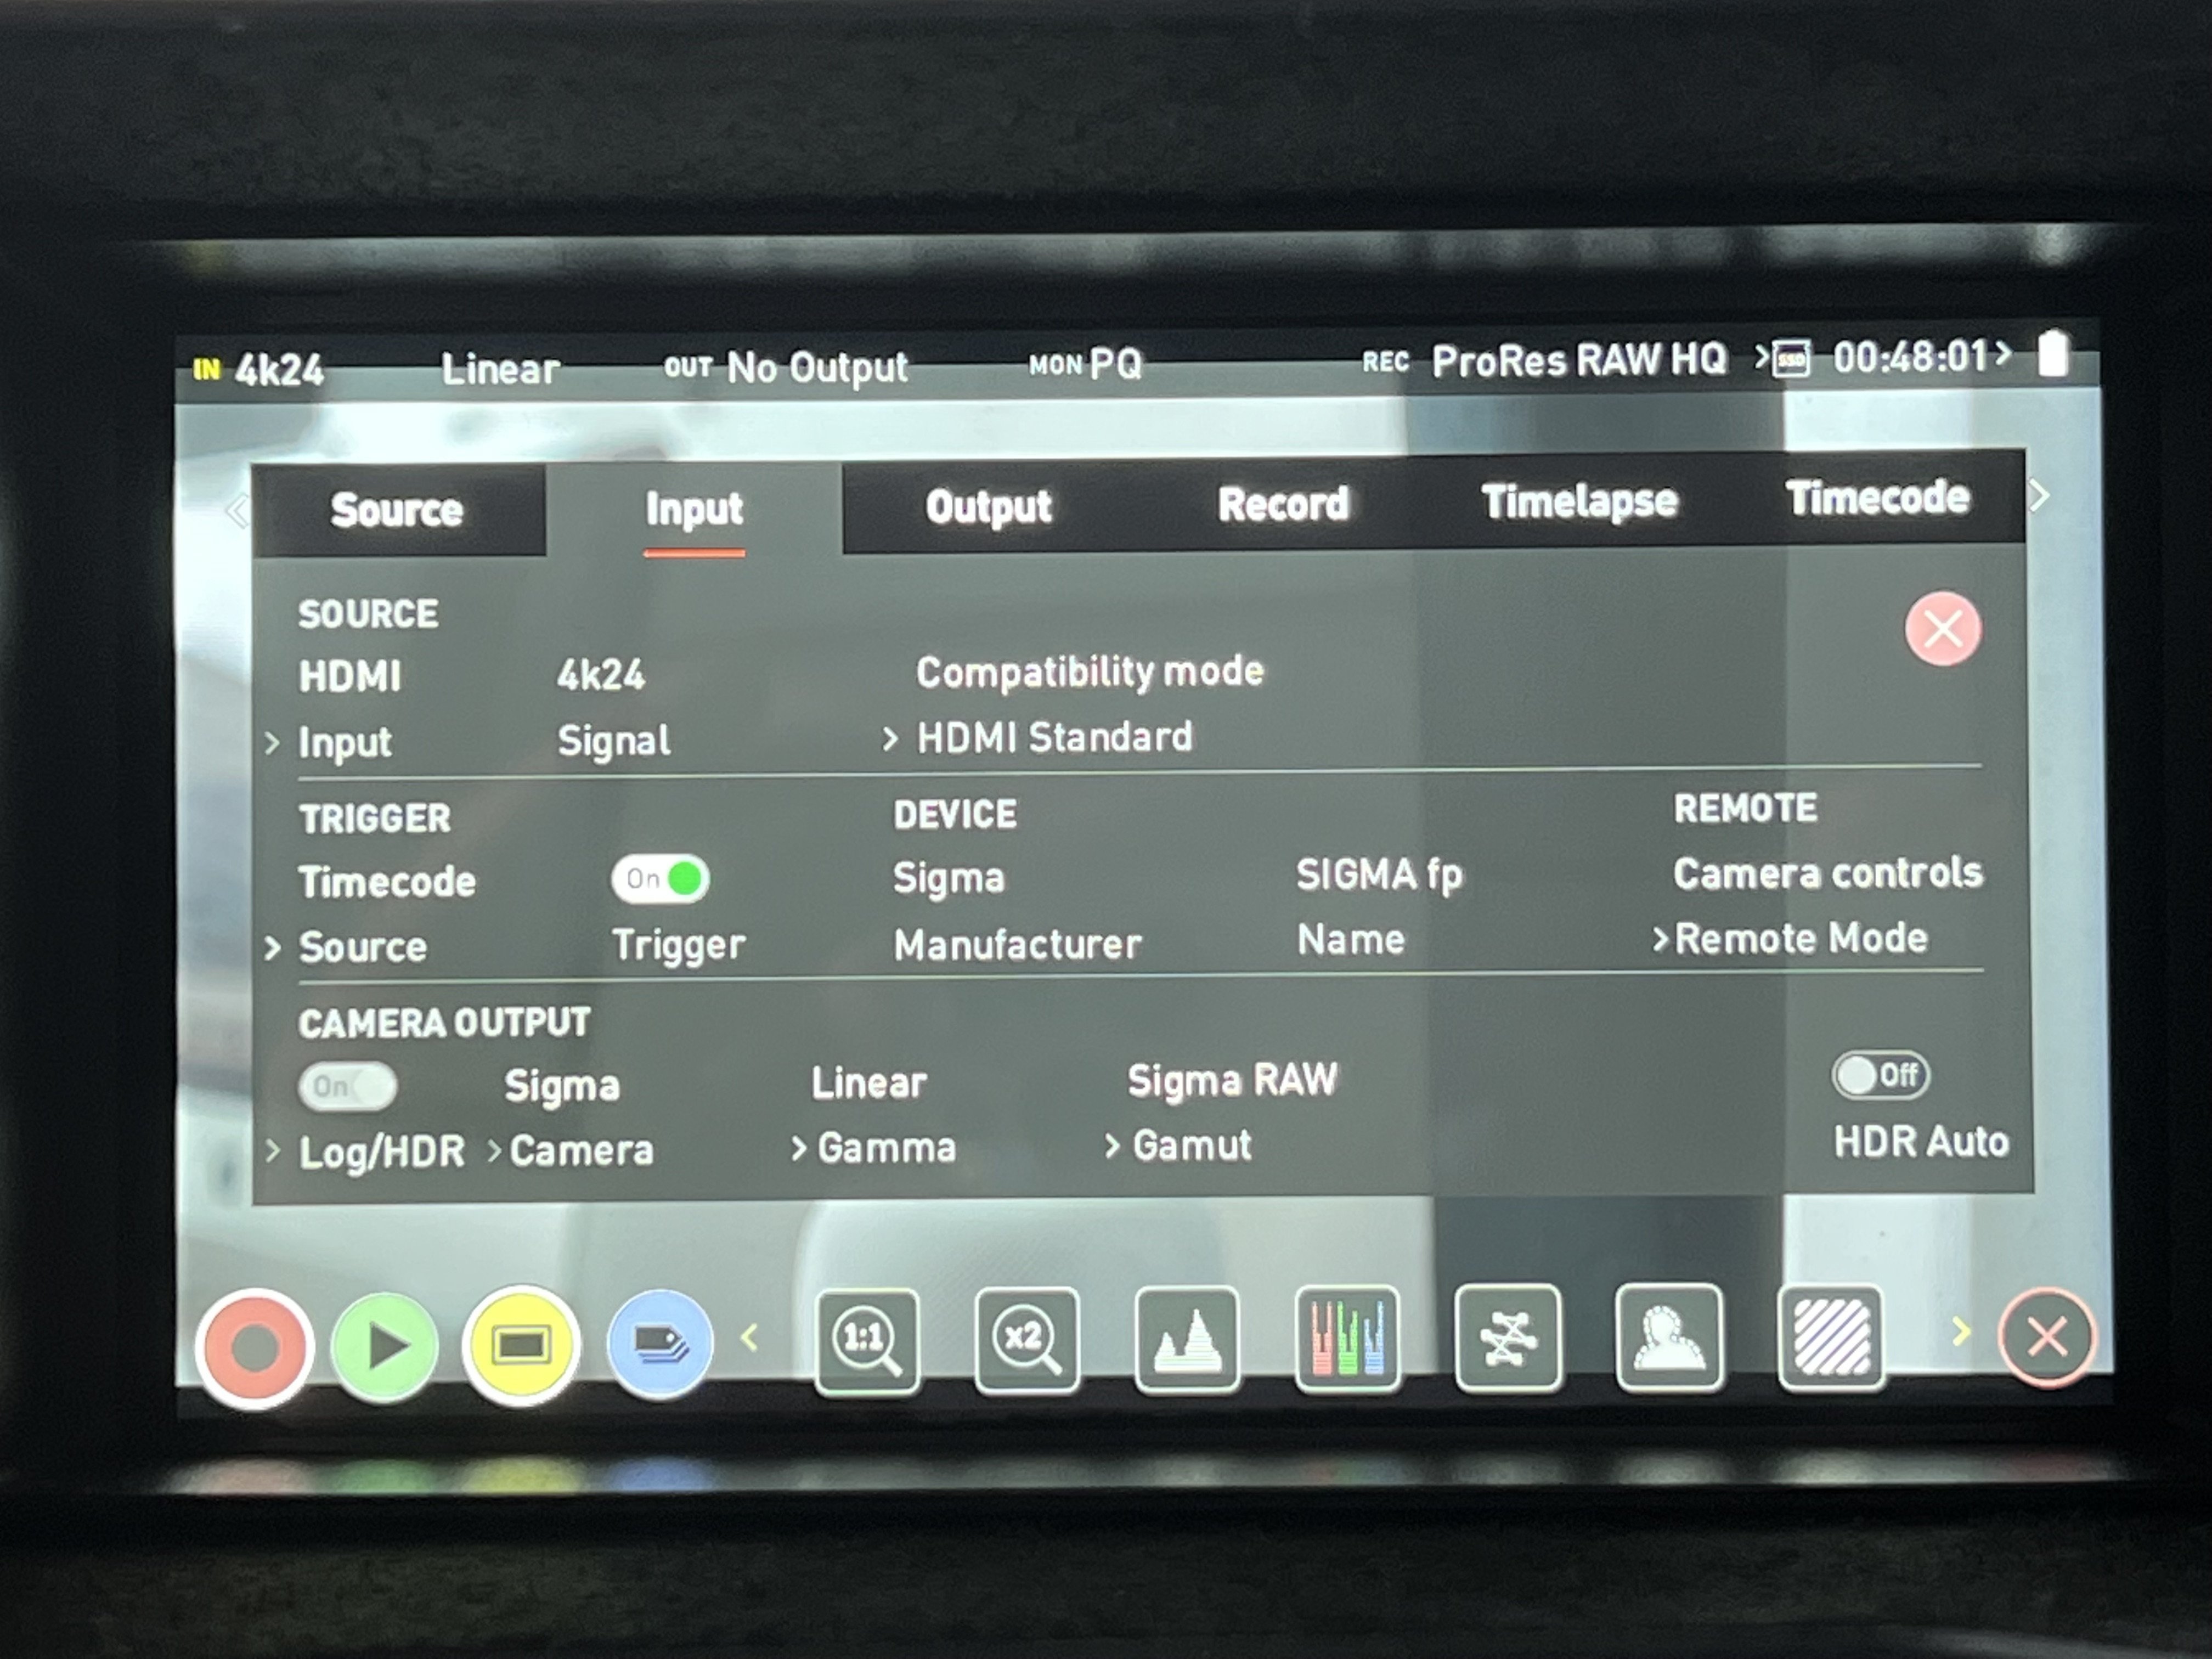
So is it possible to cut out any variables and record a clip similar to this (especially with the clipping due to the sun hitting the window frame), but set to the Atomos recommended settings of linear/Sigma gamut for the camera output gamma/gamut on the Ninja V, and with the monitoring mode set to native? I've queued up the relevant part in the video below.
What is also not clear to me is, were you able to monitor the image in Vlog/Vgamut by choosing that on the Ninja V? In which case, why also choose to add PQ as monitoring mode on top of that? Having said that, my understanding is that it's not possible to monitor the Sigma fp PRR image in another camera's log format, only in some HDR formats like PQ. So maybe you can only monitor in PQ, but can save with vlog/vgamut embedded for when opening on your Mac.
Actually you cannot change the settings at all, in the Atomos they look like this.
Native monitoring looks a lot like LOG, but false colors are not working. However a RAW record should always be the same, no matter what you choose to monitor the picture with.

-
9 hours ago, Llaasseerr said:
Seriously, whatever you have is good! I just want to check out the ProRes Raw linear gamma /sigma gamut output. An outdoor scene as you describe would be interesting!
By exposing for the clouds so they aren't clipped you are probably underexposing middle grey, so it's just a variant on what I'm talking about. I'm just looking at a more fixed method of shifting the entire highlight DR more towards an Alexa by pushing up the noise floor, so I would shoot with a -3 stop ND for example. It would allow me to "always" expose for middle grey like shooting an Alexa or film, if I assume a +3 exposure compensation in post. I would also try +4 or +5 and see where it breaks. The highlights just clip way too early in this camera, so it could be a solution.
Wish is granted. 🙂 Here we go: https://www.dropbox.com/sh/cgm80q9w682oc19/AADWHieOS-Wka9JuD-GnXerca?dl=0
Same clip I have used for my YouTube video posted above. Recorded at ISO 800 => so ISO 100 in reality. Just so, that the sky highlights would not clip. For obvious reasons I could not prevent the sun from blowing, but thought it would be a good idea to have it in the frame as the ultimate highlight.
Maybe I will do another clip with ISO 3200 in complete darkness soon, will also publish it here.
-
6 hours ago, Llaasseerr said:
@OleB is there any chance you can upload a 4k DCI ProRes Raw clip? Preferably one with clipped highlights shot at what you think is the best ISO.
I'd be interested to try developing it in Assimilate Play Pro which, in my experience, is able to handle ProRes Raw import as well as Resolve can handle DNGs.
I saw this test on youtube shot at ISO 3200 with PRR and I must say, it looks super clean which suggests that the exposure could really be pushed with an ND.
Sure, that should be possible. Can you be a little more precise what would be of help? In regards to ISO, I usually use 800 and 3200 for the both native ISO values and try to avoid what is in between if possible.
For the 3200 value I suppose lighting up a match in completely dark room would be an amazing test to see if there is noise, no?
Am not sure if I get your approach quite right yet with underexposing to have more highlights. Take this example, bright blue sky, white clouds. I expose with the false colors so that the white clouds retain details and are not clipping the sensor. What would be the benefit of underexposing them? Without clipping all details are already present, or do I miss something?
-
15 minutes ago, Llaasseerr said:
Thanks for the distinction there with the inconsistency between internal vs ProRes RAW. I'm kind of wondering what the value proposition is of using the Ninja V if you don't need DCI 4k and can deal with the larger file sizes internally. But I'd still like to mess around with both of them if I do end up getting the camera.
It does though seem like you've got a bit of a system there with the PQ workaround to check the highlights on the Ninja V. It's a shame Sigma have not thought things through more carefully and have a more consistent solution without unknowns. I mean I noticed on their blog they have guest writers offering their own ad-hoc solutions as to how to develop the DNGs in Resolve, so it seems like they don't even really know what they're doing. That doesn't mean it's impossible though.
I was hoping maybe the linear image on the Ninja V without the PQ setting, but as per the Atomos setup video, would display the highlights in a flat-ish image like the "none" profile, but it appears not.
Inconsistent truly is the word for this...You can use the native preview, it will indeed show correct highlights, BUT false colors are not working and you would need to set the zebras for every ISO value to something different...not exactly an easy workflow.
My goal was to have a workflow which gives me reproducible results and I am glad I have found one. Form factor etc and building a nice rig out of the camera with high quality parts (like the Sigma PL mount adapter and its shimming options) and all is perfect. Software connectivity between Sigma and Atomos is not...
Maybe they get this right in a future firmware release if the word spreads.
-
1 minute ago, Ryan Earl said:
No, it's accurate across the ISO range.
The camera's exposure meter too along with the auto white balance, it's one of the reasons why I like using the camera. Next to the aperture number on the rear lcd screen you get a +/- exposure indicator and it's very good if you don't have time to use false color. You can then place a gray card in the scene if you have time or use a skin tone for false color measurements.
I can only speak for the ProRes RAW workflow. And for that this is not the case. Assume that CDNG works exactly the same, there a plenty of YouTube videos about this topic on how to dial in exposure, including how many stops you can open up the aperture after setting the exposure and it still being captured while the camera already shows it as clipping.
Only the false color screen on the Ninja V seems to be truly correct, at least for that workflow. It shows exactly the clipping points of the sensor for the mentioned ISO values. Preview picture, at least as good as it gets, is fitting the false colors only in PQ (Rec709 you are getting correct clipping values in false color but overblown picture, same as in camera). My assumption is that like Llaasseerr said, the camera is not doing anything in Rec709 to push the on top dynamic range into the picture, there is no log. That said only PQ seems to be quite close in resembling the dynamic range of the camera.
To be precise following example. You expose in ISO 100 to the exact clipping point via Ninja V false colors, you can increase up to ISO 800 without any change to the false color clipping limits. The camera preview meanwhile looks totally over, while in reality it is not. It stays in its dynamic range. Guess that has to do with the ISO invariance of the sensor per each its two native ISOs. But there I am not an expert.
Feel free to test this yourself if you have the chance to get hold of a Ninja V for ProRes RAW. However I have to say you could also use the camera your way of course. The image quality still is great if you go after what the camera says (and the Sigma manual) but in my opinion you are throwing away an even better image.
-
19 minutes ago, Llaasseerr said:
Okay, if I understand you correctly then that makes sense in that I was expecting the highlights to be clipped on the internal display (unfortunately). My evaluation of the "none" picture mode on the camera is that it's the raw image with a Rec709 curve applied, and then anything above 1.0 is clipped because there's no rolloff applied - since it has no image processing beyond the Rec709 adjustment. Where in reality, a log curve is required to keep everything normalized to the display space of 0-1.
But I had surmised that assuming a decent exposure, it would probably be accurate for checking a middle grey card across the ISO range. Is that a fair assumption?
I am not too sure about middle grey either. Maybe that could be something you could try out, because I was focussing more on highlight protection and sensor clipping in my approach.
When using my ISO conversion table the middle grey as shown in the Ninja V on PQ was matching what my incident meter said it should have been at the converted ISO value. Did not try this for internal metering in camera though. Can only assume that middle grey behaves like Sigma described in their manual.
-
47 minutes ago, Llaasseerr said:
So when working with just the naked camera the false color preview in the new firmware 4.0 is only accurate when set to ISO 100?
Yes, I am afraid that is the case. At least if you consider sensor clipping as the point which it should be at its maximum.
-
10 hours ago, Llaasseerr said:
Gotcha. I appreciate your work translating the scaled ISO values. It does seem crazy the inconsistency with internal vs external recording, and I would need to try both to fully get it.
My first impulse is that I would probably not apply PQ personally, but instead choose Native and create a custom LUT. But that is based on the assumption that the linear image as displayed by the Ninja V appeared to be the similar to the "None" profile on the camera, ie, flat-ish but not log. So in other words, they've scaled the linear image for display, because an actual linear image is super contrasty and clipped on a Rec709 monitor.
I'm basing that on watching the Atomos Sigma fp setup video on youtube. The LUT approach may not be a good idea if the highlights are getting clipped in the default Ninja V display, whereas with PQ they will be fully present and rolling off according to the PQ spec. But the overall appearance of PQ would not match my intended final image, so it's a trade-off.
Unfortunately in native the false colors of the Ninja V are not showing correct clipping values either. Tried that as well. All summed up left me with PQ. Agree it is not 100% a direct preview of how a potential Rec709 picture could look like. But at least it is a way to come closer to WYSIWYG compared to all other options available.
Sorry for not being clear with the false color, only the ones from the Ninja V are correct in PQ with the mentioned ISO conversation. Internal is only working for ISO 100…
-
4 minutes ago, Llaasseerr said:
Also I recently got a Ninja V, so it would be interesting to try out ProRes Raw and seeing if a more accurate monitoring LUT can be applied, despite the fact that it somewhat negates the size advantage of the camera. It could be cool to mount the Ninja V underneath the camera instead.
Yeah, give it a shot. It is working already nicely if you consider ISO 800 as ISO 100 and upwards and select monitoring: PQ. False colors from the Ninja V are accurate then. Giving you exactly the clipping point of the sensor. 🙂
-
18 minutes ago, Owlgreen said:
I just have the histogram. I saw a video where a guy showed you can pull back around two and half stops of highlights relative to the clip point on the histogram. So if the histogram is unclipped I can increase the exposure by about two stops knowing I can pull it back later. I'm still finding my way around this thing.
Given that chart you posted a few days back, would it make sense for me to shoot ISO 800 most of the time, given that I would like to protect the highlights at all costs? I think the noise characteristics of this camera look great, so I don't mind trading noise for more highlight latititude.
Should I be using false color?
Understand that you do not have a Ninja V available. So yes, I would try to use ISO 800 like Sigma intended. For the scenario you described, easily and ugly highlight clipping, they will recommend using ISO 800. Internal false color screen should help on setting exposure correctly.
Have attached the additional fp manual from the developer, which tells you what ISO to use and when, including the chart.
Keep in mind this is only true when you are using the in camera options including record to an external SSD. When recording ProRes RAW or most likely as well BRAW with an external recorder, you have to choose the approach which I have posted earlier to get the best quality.
Hope that helps 🙂
-
31 minutes ago, Owlgreen said:
I'm feeling very frustrated by this camera. I might be spoiled by the BMPCC 6K, but I'm finding it very hard to get anything other than ugly highlight rolloff. This is a matter of taste, I know, but it seems my tastes aren't aligning with this aspect of the camera. Half of the time, in addition to the ugly rolloff, I get a weird pink grid just below the clipping point. This is all in Resolve, however. In Capture One, processing a single frame, it looks better. Even then, the highlights blowout sooner than I'd like. I've tried all the possible Camera Raw options with and without CSTs. So far I like using the BMD colorspace the best. It seems to be the only way I can avoid having a yellow ring around my blown highlights. The noise floor is impressively low, I'll give it that. I guess the only way I'll be happy is to underexpose everything, and never let anything clip. I'm not sure how practical this is. I watched a video comparing the stills capabilities of the FP with a Sony A7something. The FP blew out the highlights earlier and more abruptly, but was less noisy when underexposed. So, I guess you could say they had similar DR, but the FP was kind of shifted to favor the shadows. Maybe by underexposing I can shift it the other way. Until the highlights blow, the camera does look pretty damn good.
May I ask how you determine the correct exposure? Because as stated earlier, all regular tools, including in camera metering, are only working for ISO 100. That ISO value tends to clip highlights indeed very quickly.
-
4 hours ago, kye said:
I saw another FP video yesterday, and even though I think the person didn't do a great job on the grade, you could see immediately from the footage that the camera isn't overpowered by high-contrast scenes, but seems to render them quite neutrally without it being a "stretch".
This is perfect as it gives a really solid base for your grade and if you are wanting to really push/pull the footage then it gives you extra leeway to push/pull it further from neutral before the image starts to suffer.
The more I see images from this the more I like what I see.
I wish CineD would revise their DR tests, as the one they did was on the first firmware version and had some odd qualities to it that I think might have been improved upon in subsequent updates.
Can anyone comment on the DR and image quality in V4 vs V1 firmware??
Agree! Unfortunately I came in too late for the V1 party. Bought the camera very well with V2 on it. Took me well over a year to figure out the correct settings, because of this misleading ISO behavior and combination with the Ninja V. But now I am extremely happy and even in direct sunlight find the DR not lacking at all. Most of the times I will even add more contrast back in the grade.
-
Hi all,
have uploaded a small video file to YouTube for you to check. It was recorded the way which I have described above. Think the dynamic range of the fp is great. 🙂
- kye and webrunner5
-
 2
2
-
20 hours ago, BTM_Pix said:
Its the catch-up version for the FP of the new features added in the FP-L recently so the two biggest inclusions for me personally are the false colour metering and the selectable parameters function when switching between stills and cine.
I've installed it and had a quick look at the false colour monitoring and as expected its a pretty big new function to have.
Interestingly, you have to assign it to a function button on the camera (I've put it on the right button of the control wheel) and unless I'm missing something (quite possible) it is a momentary switch rather than a toggle so it overlays on screen only for as long as you have the assigned button pressed in. I tried it being assigned to the AE-L button to make sure its not a quirk of assigning it to the control wheel but its the same performance.
I actually prefer it being momentary rather than a toggle in most scenarios but I would definitely prefer to have the toggle option too.
On the upside, if you hold down the assigned key, it doesn't block any other controls so you can simultaneously use the aperture and shutter controls and dynamically see the effect.
I haven't got time at the moment to look into whether this provides a solution to the "quirky" RAW exposure in video aspect so hopefully someone else can have a look at it and report back.
It is available from here
https://www.sigma-global.com/en/cameras/fp/?tab=support&local=firmware
Full release notes :
Ver.4.00
2022.04.20
* 1 Only for compatible lenses.
* 2 To use this function, it is necessary to update the firmware of the compatible lens to the latest version.* The following settings are affected: Shooting Mode, Shutter Speed, Aperture, Exposure Compensation, ISO Sensitivity.
・It adds the “False color” function where the exposure status on the screen is displayed in different colors, allowing users to easily see the exposure status of any part of the frame.
・It adds the “Focus Ring Control” function that allows users to change the movement of the focus ring to either linear or nonlinear.
・It adds the “STILL / CINE Link Settings” function that allows users to select whether or not they want to link key exposure settings between STILL and CINE modes.
・It allows the “Screenshot” and “False color” functions to be assigned to “Custom button functions”.
・It changes the specification so that the countdown before a shot in self-timer mode (2 seconds and 10 seconds), and the exposure time for long exposures (bulb shooting and exposures of 1 second or longer) are displayed on screen.
・It adds a function available in STILL mode where information from the attached lens (focal length and shooting distance) can be displayed on screen.
・It adds a “Clip Numbering” function in CINE mode that allows users to change the clip numbering of the “File name / Number” in the “SYSTEM” menu.
【For Blackmagic Design Video Assist 12G Series users】
Blackmagic RAW recording using the HDMI output of SIGMA fp updated to Ver.4.00 may not perform correctly without updating the Video Assist firmware. This issue has been corrected in the “Video Assist 3.5.2 Update” released by Blackmagic Design Pty Ltd on February 16, 2022, so please update your software accordingly.
Exposure metering is exactly the same quirky one as before... 😞 See other thread here for more details.

1.jpg.05e720c193b8e979f8100b8a54ab9b6e.jpg)
2.jpg.ec5118c58239e8e0eb56ee605394b1ad.jpg)
3.jpg.0089234816d86a560d8c19d290971855.jpg)
4.jpg.6718c552de45fe3f1ee5e374d7458038.jpg)
5.jpg.9a5925674ae0adec4a4795344482a12d.jpg)
SIGMA FP with ProRes RAW and BRAW !
In: Cameras
Posted
Took some time today to create a few clips to test noise of the different ISO settings. Found me a clear light bulb...@Llaasseerr so you can have a look in regards to the highlight clipping.
You can download the files here: https://www.dropbox.com/sh/cgm80q9w682oc19/AADWHieOS-Wka9JuD-GnXerca?dl=0
All ProRes RAW. Starting with ISO 100 up to ISO 12800 (keep in mind the metadata will tell you it is ISO 800 upwards)
Have fun playing around 🙂