kye
-
Posts
8,227 -
Joined
-
Last visited
Content Type
Profiles
Forums
Articles
Everything posted by kye
-
Mother: What do you want to do when you leave school? Kid: I think I want to study medicine and become a doctor. Mother: Well, that's great and all, and it's important to have dreams, but have you considered a career in IT? Kid: But I like helping people, like when grandma was sick.. Mother: You father and I have done the sums, and we know that doctors get paid very well but if you worked for Adobe, over the decades the family discount actually makes it a more sensible option....
-
True. When I was buying a 4K display I couldn't decide between 32" and 42" and as I planned on watching TV/Movies on it I looked up the THX and Dolby(?) specs on viewing angle for cinema screens. IIRC each gave a viewing angle range (which obviously varies depending on how far you sit from the screen) and I picked a monitor size appropriate to those viewing angles. That calculation resulted in me getting a 32" display, which fit both specifications for viewing angle when viewed at my viewing distance, which was defined by me reclining back on my chair and putting my feet up on a footrest such that my feet were almost under the display. I haven't done a test, but at that distance you probably wouldn't be able to tell the difference between 4K 4:4:4 and 1080 4:4:4, but you sure can tell the difference between a YT clip in 4K vs the same clip in 1080! The fact that we shoot 4K25 at 400Mbps is 1.3 bits-per-pixel and 1080p120 at 100Mbps is 0.4 bits-per-pixel just further exaggerates the issue.
-
Yes, HLG. Too many advantages to remember all in one go! Mine is also stuck in this mode. C1 and C2 are both these settings except different pre-set focal lengths ???
-
Those paintings after "The Event" are truly remarkable. Wow!
-
It is. The 6K mode is technically 5K but it's really nice.. it's 4:3 so you can re-frame in post, it's h265 200Mbit which is equivalent to about 400Mbps h264 in terms of IQ and the 200Mbps doesn't require the super-expensive UHSII SD cards so it's cheaper, it has less/no sharpening added and looks really nice IMHO.
-
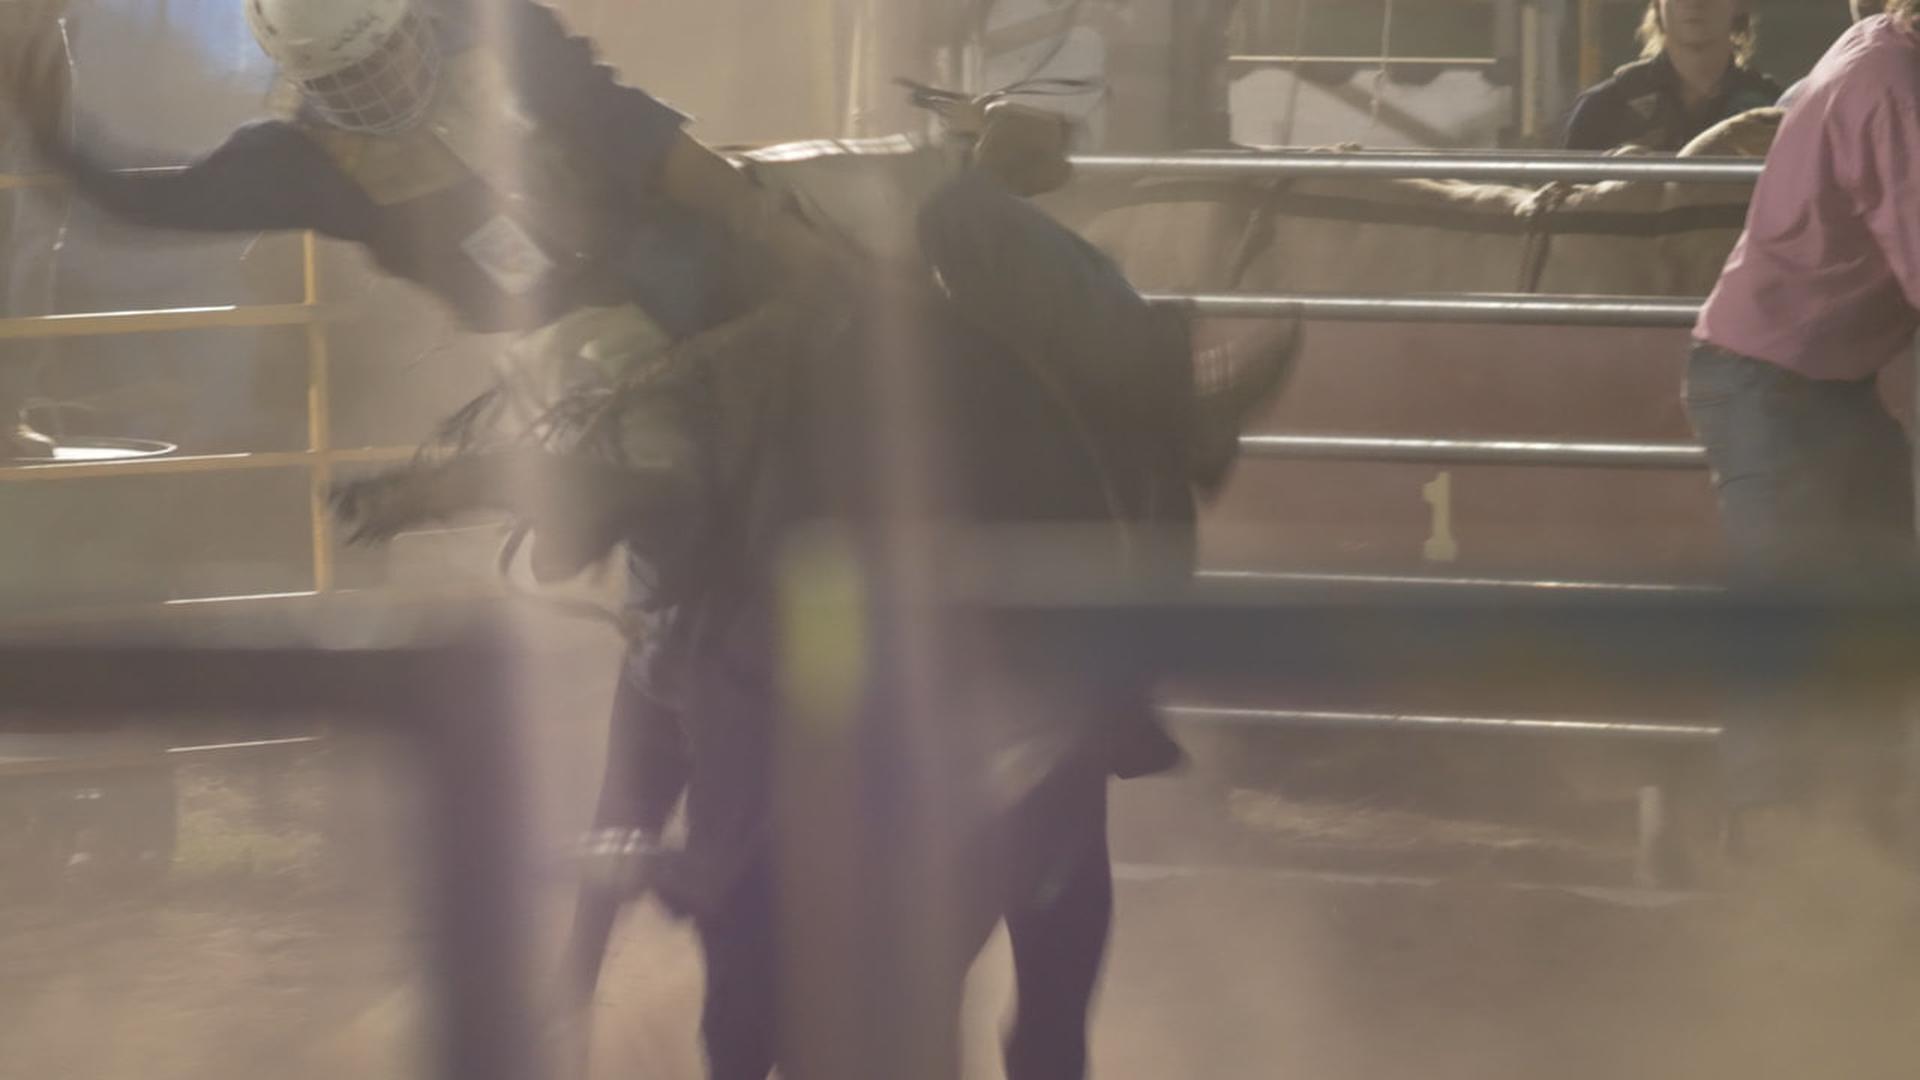
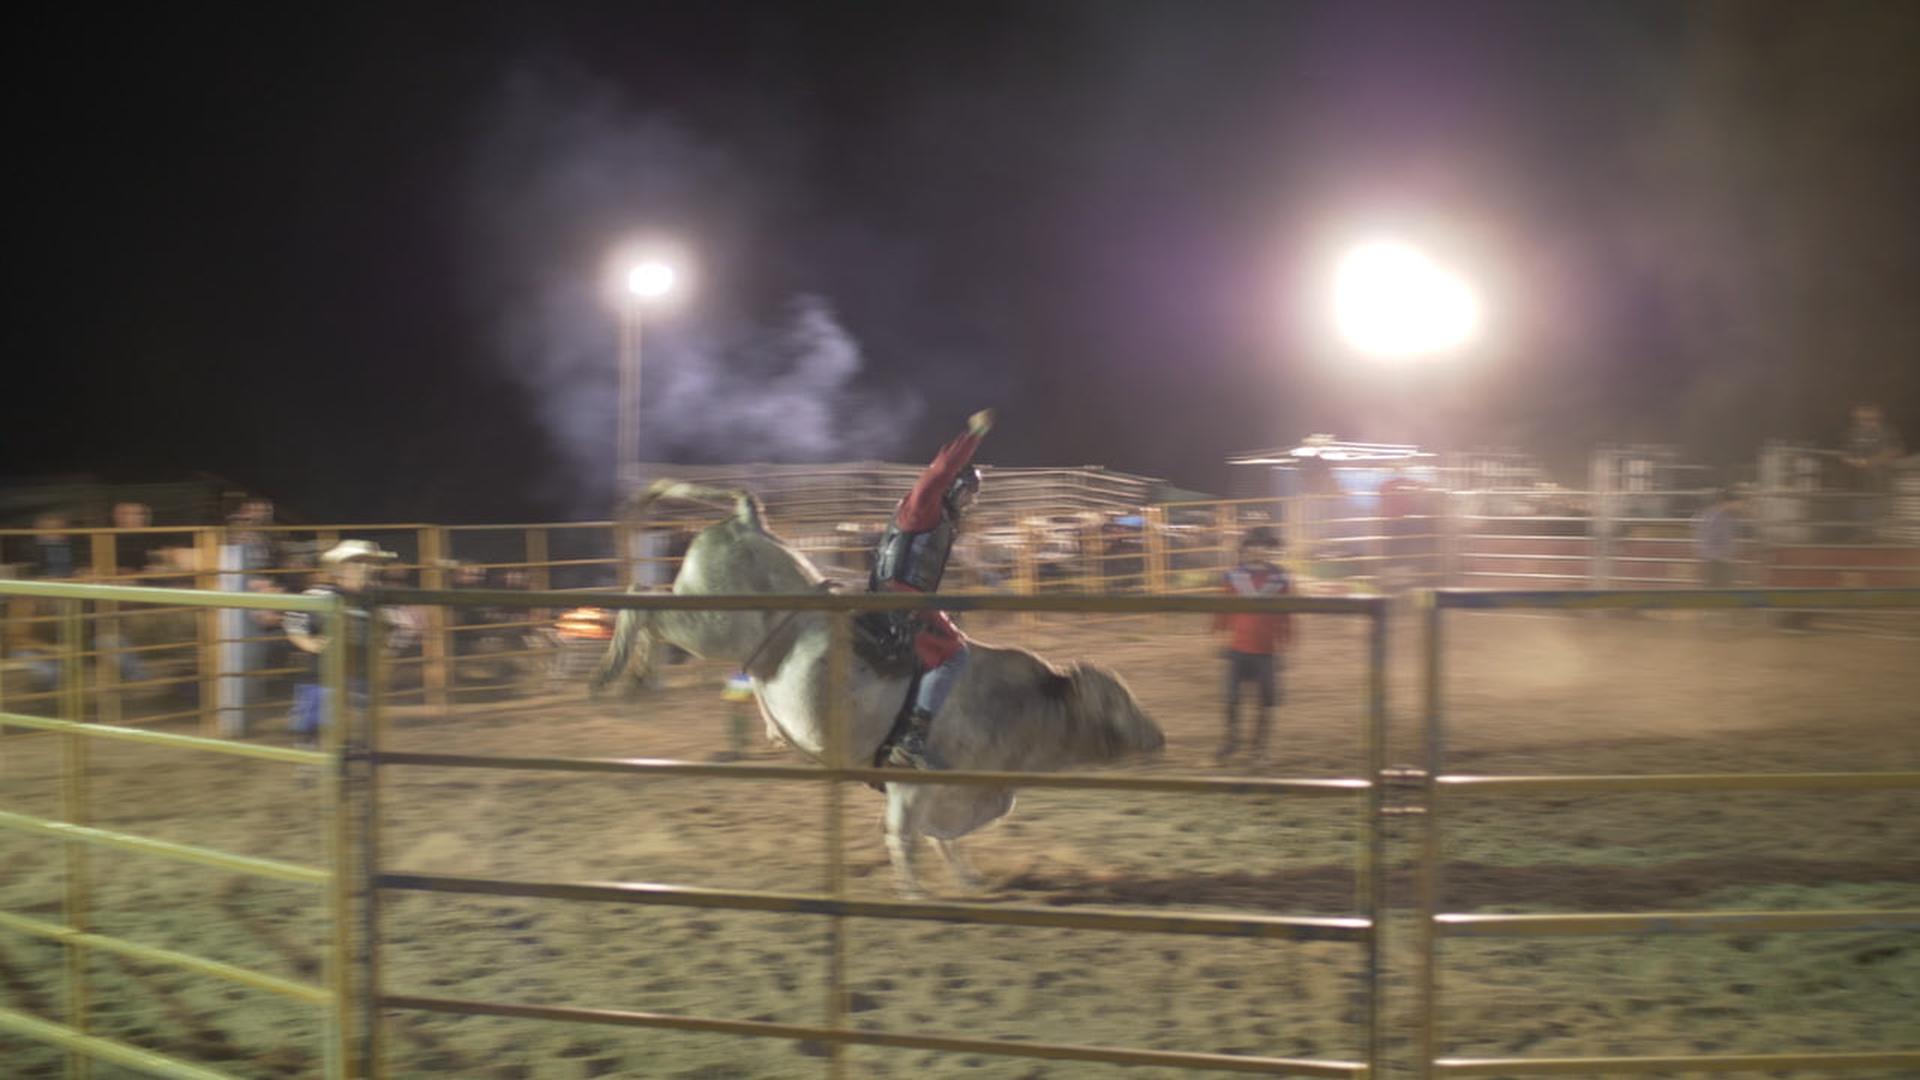
In other news, the bull riding footage I shot on the weekend from the city-slickers-visit-the-country-yee-ha trip is falling into place using the new Cut page in Resolve 16. A few problems: I got 'out of sync' where I either double-pressed the shutter or didn't press it, and ended up recording the bits in-between the action and not the action itself I blame the mic placement because I didn't have my eye pressed right up to the eyepiece, which means you can't see the edges of the frame and thus the blinking red record light. I also need to be more careful as I've done that before with other cameras without the same excuse. I got the really important shots, and I'm only making a highlights video for fun so I still have plenty of footage, so it's all good, just.... *facepalm* I was shooting straight-into a floodlight, so the vintage Minolta 135mm 2.8 flares like an absolute @#$!$#% so my contrast is all shot to hell, and because I was recording in 4k50 8-bit Cine-D I don't have the advantage of the 10-bit to save the day, plus the ISO was probably riding up a bit and it was only 150Mbps too, so the image leaves a little to be desired. I'll have to work out how heavily I push the image to try and recover a normal amount of contrast. The car was really full, so I only took one bag, and due to this restriction I only took two lenses - the 17.5mm f0.95 for people / low-light and the 135mm f2.8 for closeups. I almost took the Helios 58mm and I really wish I had because the 135mm was a bit too zoomed in to catch the rider and the bull in the same frame. I partially blame the camera insert I use as it doesn't have many pockets so I might need to look at a new insert or new bag. Here's a couple of frame grabs just for fun. The first is out of the flare range and has a bit of contrast added, but the second is unedited and shows the levels and the flare. The third is the 17.5mm. They are from my 720p proxy files so don't judge the image quality.

-
Interesting about streaming. I kind of thought that you'd have two scenarios, the first where it was a truly live stream so you'd need the entire pipeline to function without hiccups, and the second where you had time to edit it before uploading it for distribution. I guess I read 'stream' and thought 'live stream' lol. I think I agree with you that if it's within the budget, having a hardware switcher and then editing it later on the PC would probably be my go-to as well. Especially when you're in hostile environments without proper cooling etc. Sports and money is an interesting topic. Reminds me of the Last Week Tonight show about stadiums ???
-
+1 for what @thebrothersthre3 said. Think of them as different types of cameras. That's why they sold them as part of the same range, the GH5s didn't replace the GH5.
-
Silly question, but I just went to do something and it wasn't there in 16b1. I went to the media pool, right-clicked on a Timeline, and was expecting to see Duplicate Timeline in that menu (or from one of the sub-menus) but I couldn't find it. I went straight from v14 to 16b1 so maybe they moved it before and I didn't see it? Or am I just crazy? I haven't edited anything in a while. I got around it by copying the timeline and pasting in a folder, but Duplicate Timeline would have been easier.
-
Sorry to hear about that. RIP Hildy. Great video because it's meaningful.
-
My completely uneducated impression was that professional photographers normally had a clause in their contract about being able to use footage for promotional purposes, which is how we get showreels and the like, but I guess if you're employed or have a different contractual arrangement then that might not be the case. It would be great though Cool tripod! At that height you're well into fake-drone-shot territory Anything computer based has the potential for less reliability, but I'm guessing it's a cheaper setup? Back before all the cool music software was available there was a free program called Buzz that provided a virtual studio where everything was modular as it was emulated in software, and anyone could write modules for it. I was really into it because the next cheapest option for that amount of equipment was probably $20k or something ridiculous. Anyway, because anyone could write a module for it, some of them had bugs and it would just crash, but when it crashed it would put out full volume white noise straight out of the computer. Because any sensible person is making a mix at quite a bit lower than that level when it crashed it would be extremely loud and would scare the living cr*p out of you. I still remember when someone posted a picture of themselves on the forums playing it live in front of a 2000+ person crowd at a New Years event, and I still remember the other people who were just gobsmacked that they would risk such a thing. With the size and power of a PA like that if it had crashed (which it didn't) it would have caused real damage!
-
Went to a rodeo over the weekend and rendered proxy media when I got home, then this morning I started cutting it in the new Edit page. I must say that the mode where it puts all your clips together in a long stream is very handy for cutting quickly. Just moving around with J K L, in and out points with I and O, and then doing an insert with Command-P (which I had mapped previously) means you can basically edit one-handed with no mouse usage. Doing an initial assembly used to be an exercise in frustration with shortcut keys and navigation really getting in the way, but..... no longer! ???
-
Great stuff. If you have some stuff online I'd love to see it Just a thought, if you're after a better head for the tripod, can you lock that head down and just mount a better one on top with the QR plate? I'm not sure if it would be stable enough for you, but adding height doesn't seem to be an issue for you. Are you being streamed live, probably via a switcher of some kind, or are you doing a multi-cam edit in post? or both? Workflows are interesting, and (should) inform the choice of equipment, so I'm curious.
-
Interesting. So, you shoot slow-motion by default, instead of shooting normal by default. That gives me food for thought as my videos are mostly highlight reels without a lot of dialogue, so I tend to use sound as ambience, unless there's a joke or funny moment in there which works in the edit. I also remembered that the GH5 has some nice 1080 modes, so I'll have to try the FHD 1080p50 10-bit 422 mode and see how I like it, as it might suit how I push and pull the footage in post. I only deliver in 1080 normally anyway, although I'm not above scaling it up if I start uploading in 4K. It's all about compromise and what you prioritise. I really liked the XC10 but I just felt too restricted in the fixed lens and the slow-motion (which was 1080p low bitrate only and in C-Log with difficult lighting was just awful to work with). With the GH5 I can always put on a slow zoom and get the equivalent of a fixed lens, or I can go for faster primes for low light, crazy long focal lengths for sports, etc. But, there's a reason that the kit zooms and one of the Holy Trinity of lenses is 24-70, that's where most of the keeper shots are for the average general photographer. That 'burst' slow motion sounds like a great feature. I remember back in the day using pocket cameras and wishing there was a shutter button for still images and a separate one for video, instead of having to go into the menus and change modes then use the shutter button because you missed shots. Having one button to record normal speed and another that records in slow motion would be great. I wonder how assignable the GH5s buttons are, maybe I can emulate a record-in-24p and a record-in-1080p120 button
-
The Nikon has the focus ring backwards, so that rules it out for me, but the idea is interesting - I didn't know 2.8 zooms could be had so economically. I'd prefer a fully manual lens, but assuming a smart adapter isn't that expensive I could also go that route and map a dial on the GH5. How good are these likely to be compared to my Minolta 135/2.8 or 200/4? I don't really know what point in lens history the zooms overtook the older primes Plus there is the advantage that the crop factor on the GH5 means that the camera can't see the lens issues at the edges of the image circle that a FF camera would see.
-
I've been toying with the idea of a monopod for some time now through my travel film-making, but it never quite got over the line, but it makes all kinds of sense for this. For my situation right now I think I'd go a slightly different approach and get a tiny monopod and just use it without a fluid-head and just on my lap, as I can adjust the height to suit. I wonder what the cheapest monopod available is, I suspect I might find out very soon. Thank you! That might work, although I do like the additional point of contact that the eyepiece / my forehead provides. I just worked out that I have enough adapters to play cinematography legos and create this, which might work: I'd trim down the flash bracket (I have several) but it sure gets the mic out of the way. I've spent so much time in the mindset of hand-held travel where less is more to the point that as little as possible is almost everything, I'd forgotten that at football my camera is so large that making it larger won't really have any downsides except as it applies to my using it. That is seriously impressive! WOW!! Great stuff How do you decide which shots to get in 4k24 and 1080p120? I have battled with the quality of 4K vs the lack of quality with slow-mo for the last two cameras I've owned and haven't really gotten a good rationale on when to use what. I normally shoot 4k25 10-bit on the GH5 but this morning I shot 4k50 8-bit so we'll see how that goes when I come to edit/grade it. I also went to my first rodeo last night, which was an absolute blast, and I shot that in 4k50 8-bit too, at night under flood-lights, so we'll see how that turns out. The 135mm was looking straight into a floodlight and being vintage it raised the black levels a heap, so we'll see how I get around grading an ultra-low contrast 8-bit image. The riders should look pretty good in slow-motion though, and I'm pretty sure I got some really nice shots. There was some serious action - rodeos are no joke!
-
It makes a pretty speedy proxy resolution! I'm all for it!!
-
So: What cameras support NDI, and which do you think might be likely to via firmware updates? What kind of resolutions / frame rates is this likely to support? Latency? Can we buy a device that converts HDMI in to NDI out? Could this be the first step to having your phone as an external recorder? (for cameras that only shoot 4K externally for example, like the original RX0, or just other cameras in general?). These are probably basic questions, but I'm not familiar with this side of the tech. If this was able to provide a way to effectively get RAW shooting, even if it was just 1080p24/25/30, then that would be spectacular.
-
I think you nailed it, but indirectly. @Zach Goodwin2 Film school does provide you with a great network, and film is definitely about who you know, but the other thing film school gives you is..... Motivation to actually do the things that the internet will tell you. I can tell you to make lots of little films and learn from them (in fact, I did, because that's what the D4Darious video I posted above says to do), and I can tell you to pick a film and to analyse it shot by shot, noticing the structure and working out if it's three acts or not, noticing which shots are wides / mediums / closeups, and what relationship they have to the plot, and the use of colour, symbolism, the communication of the passage of time, then camera angles, lighting analysis, camera movement, blocking, sound design, sound effects, blah blah blah... but you won't do it. and you won't do it because it's not 25% of your mark, due by Tuesday at 4pm, and you lose 20% for every day it's late! You just won't do it. The only advice worth anything is advice that you take. A huge number of them. Google will tell you all about it. Also, there is a ton of people who say that photography get them through a difficult time in their lives (people dying, sickness, divorce, loneliness, etc) and many say that it saved their lives by giving them an outlet. BTW, it doesn't really matter what you ask - the answer to the question "how many people who like <insert random thing here> struggle with mental conditions" is the same - it's huge. The struggle is real but you're not alone.
-
 Fark me is that funny.... every second shot you're thinking "OMG they've used <household item> for that.... hahahah.... actually, it's not that far from the real movie" This thread could also be serious, and be called "The importance of production design in your movie" or "Buy production design not a new camera" ???
 -
I think 8K will be worth the tradeoff... oh, hang on.
-
The rig is nice. what I liked best is that he made a video that had great editing, showing the important things but not wasting any more time on long-winded tangents like most reviewers
-
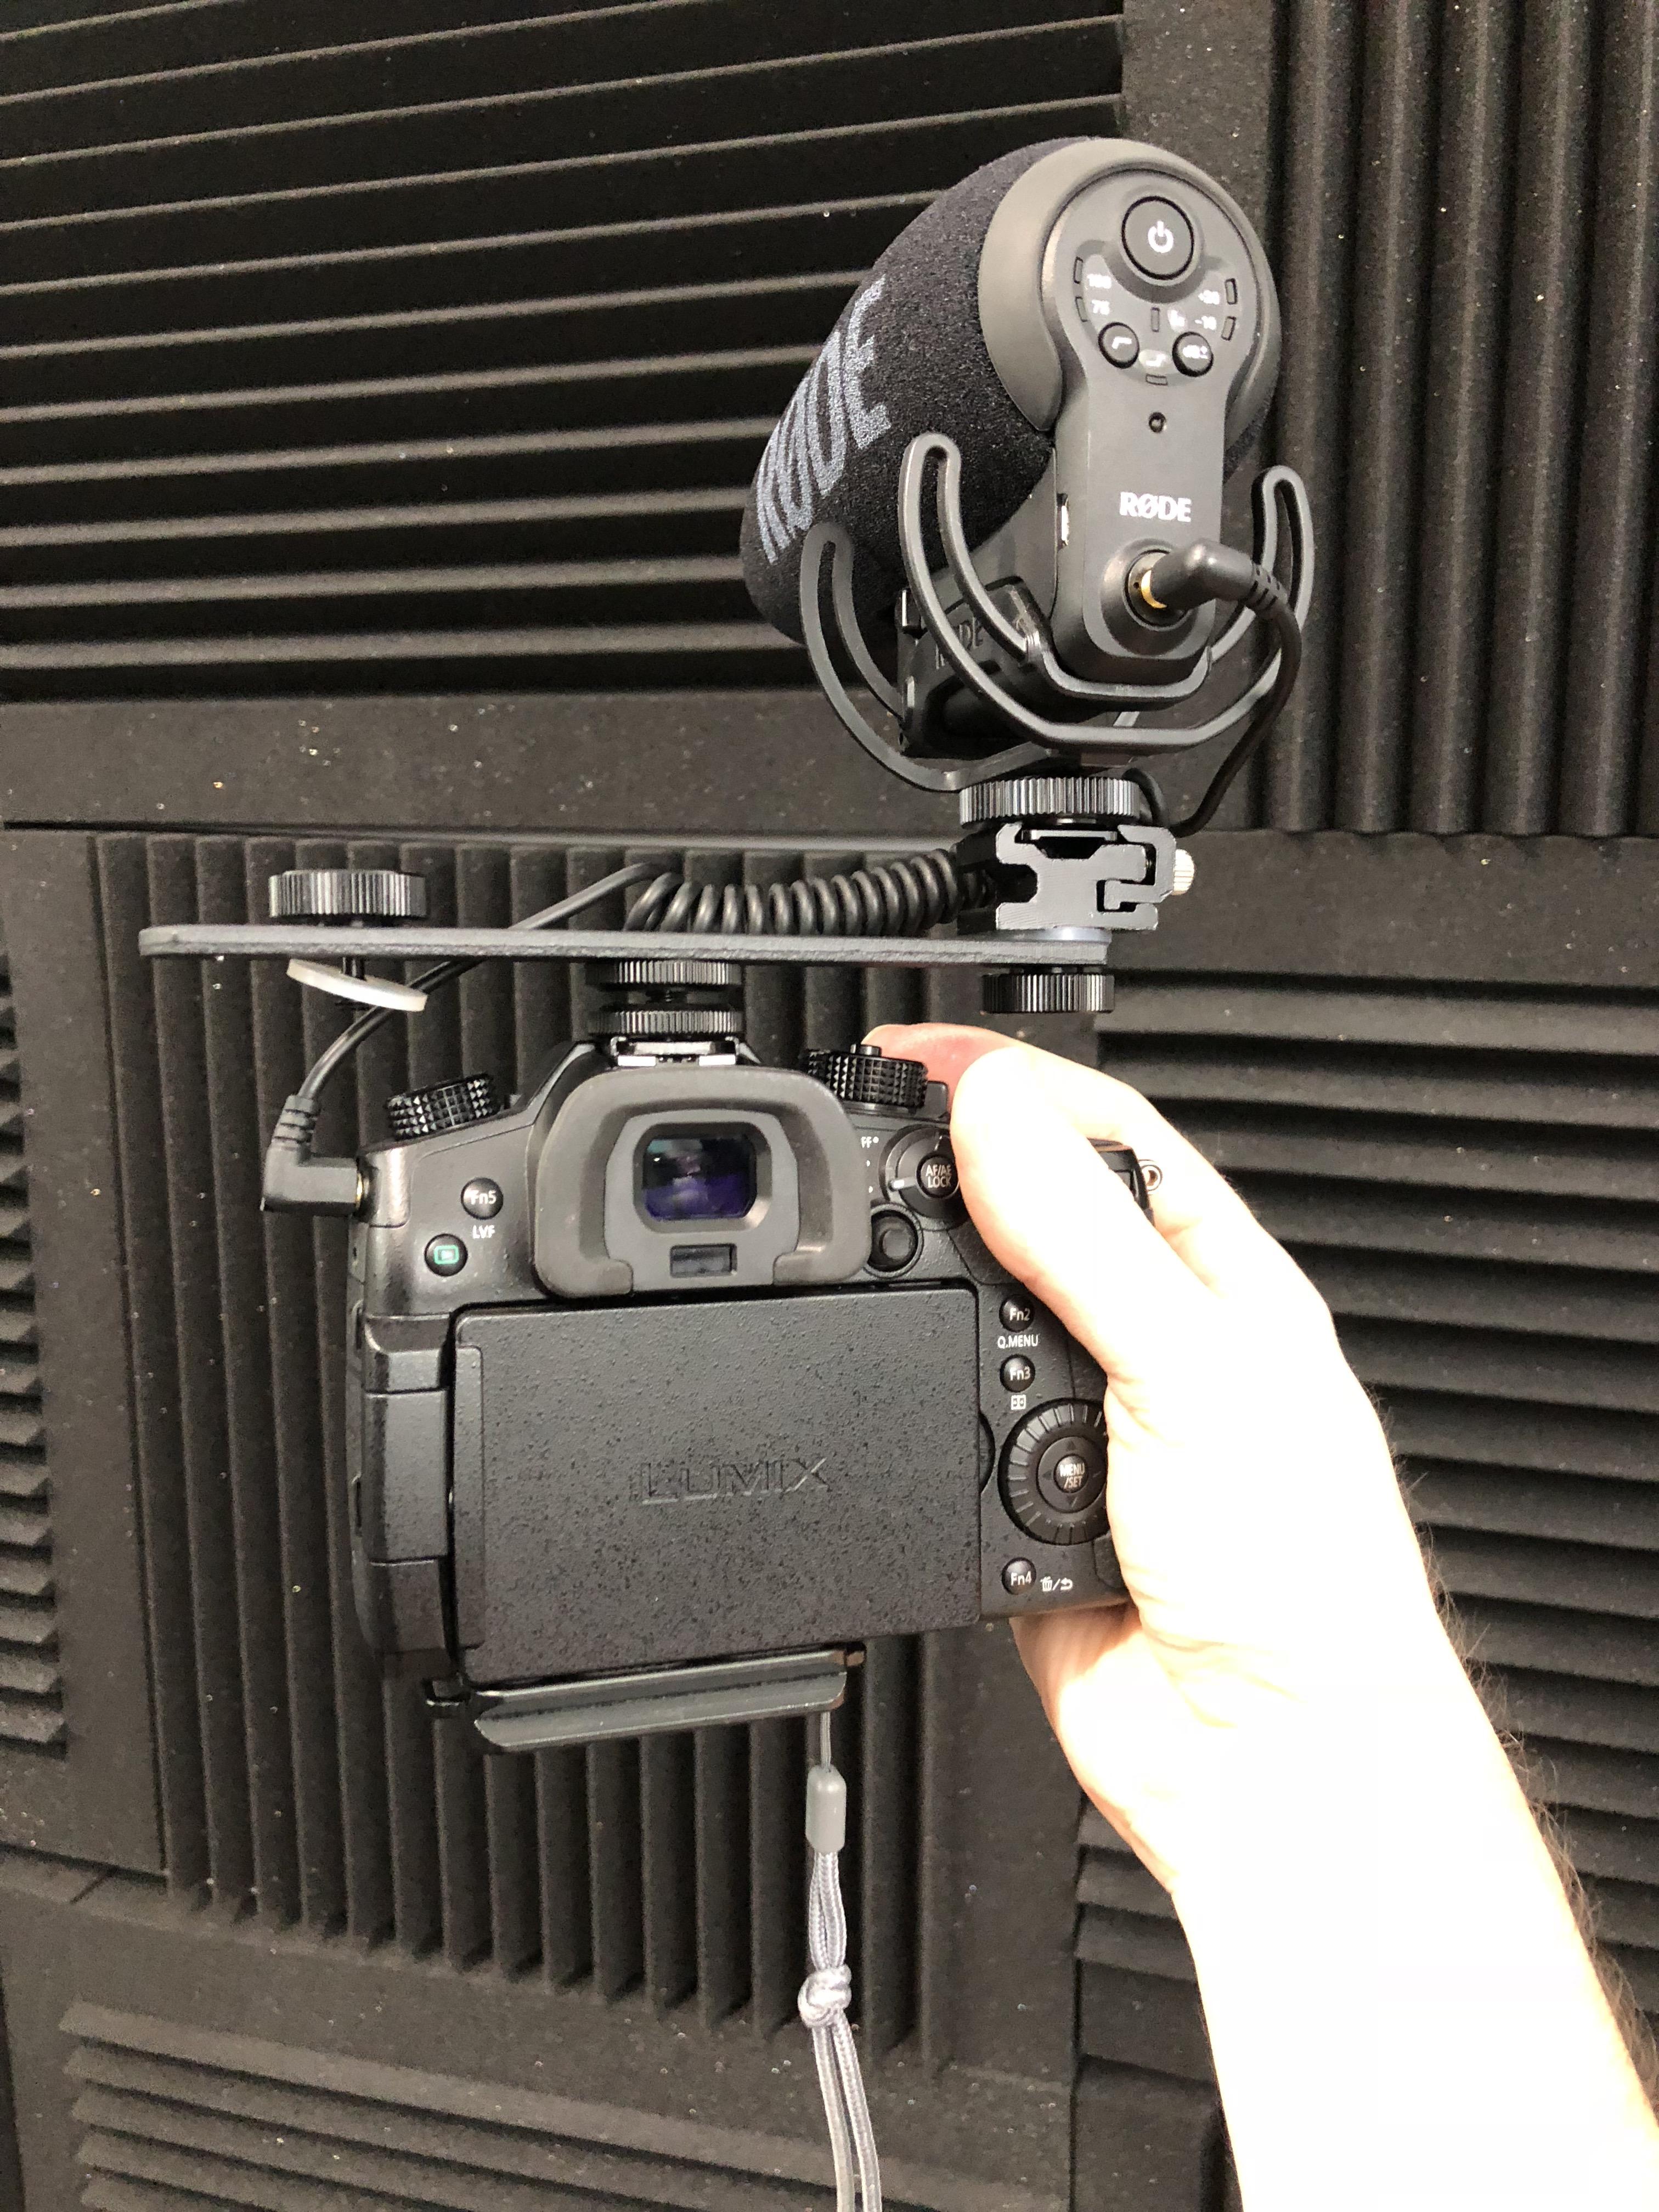
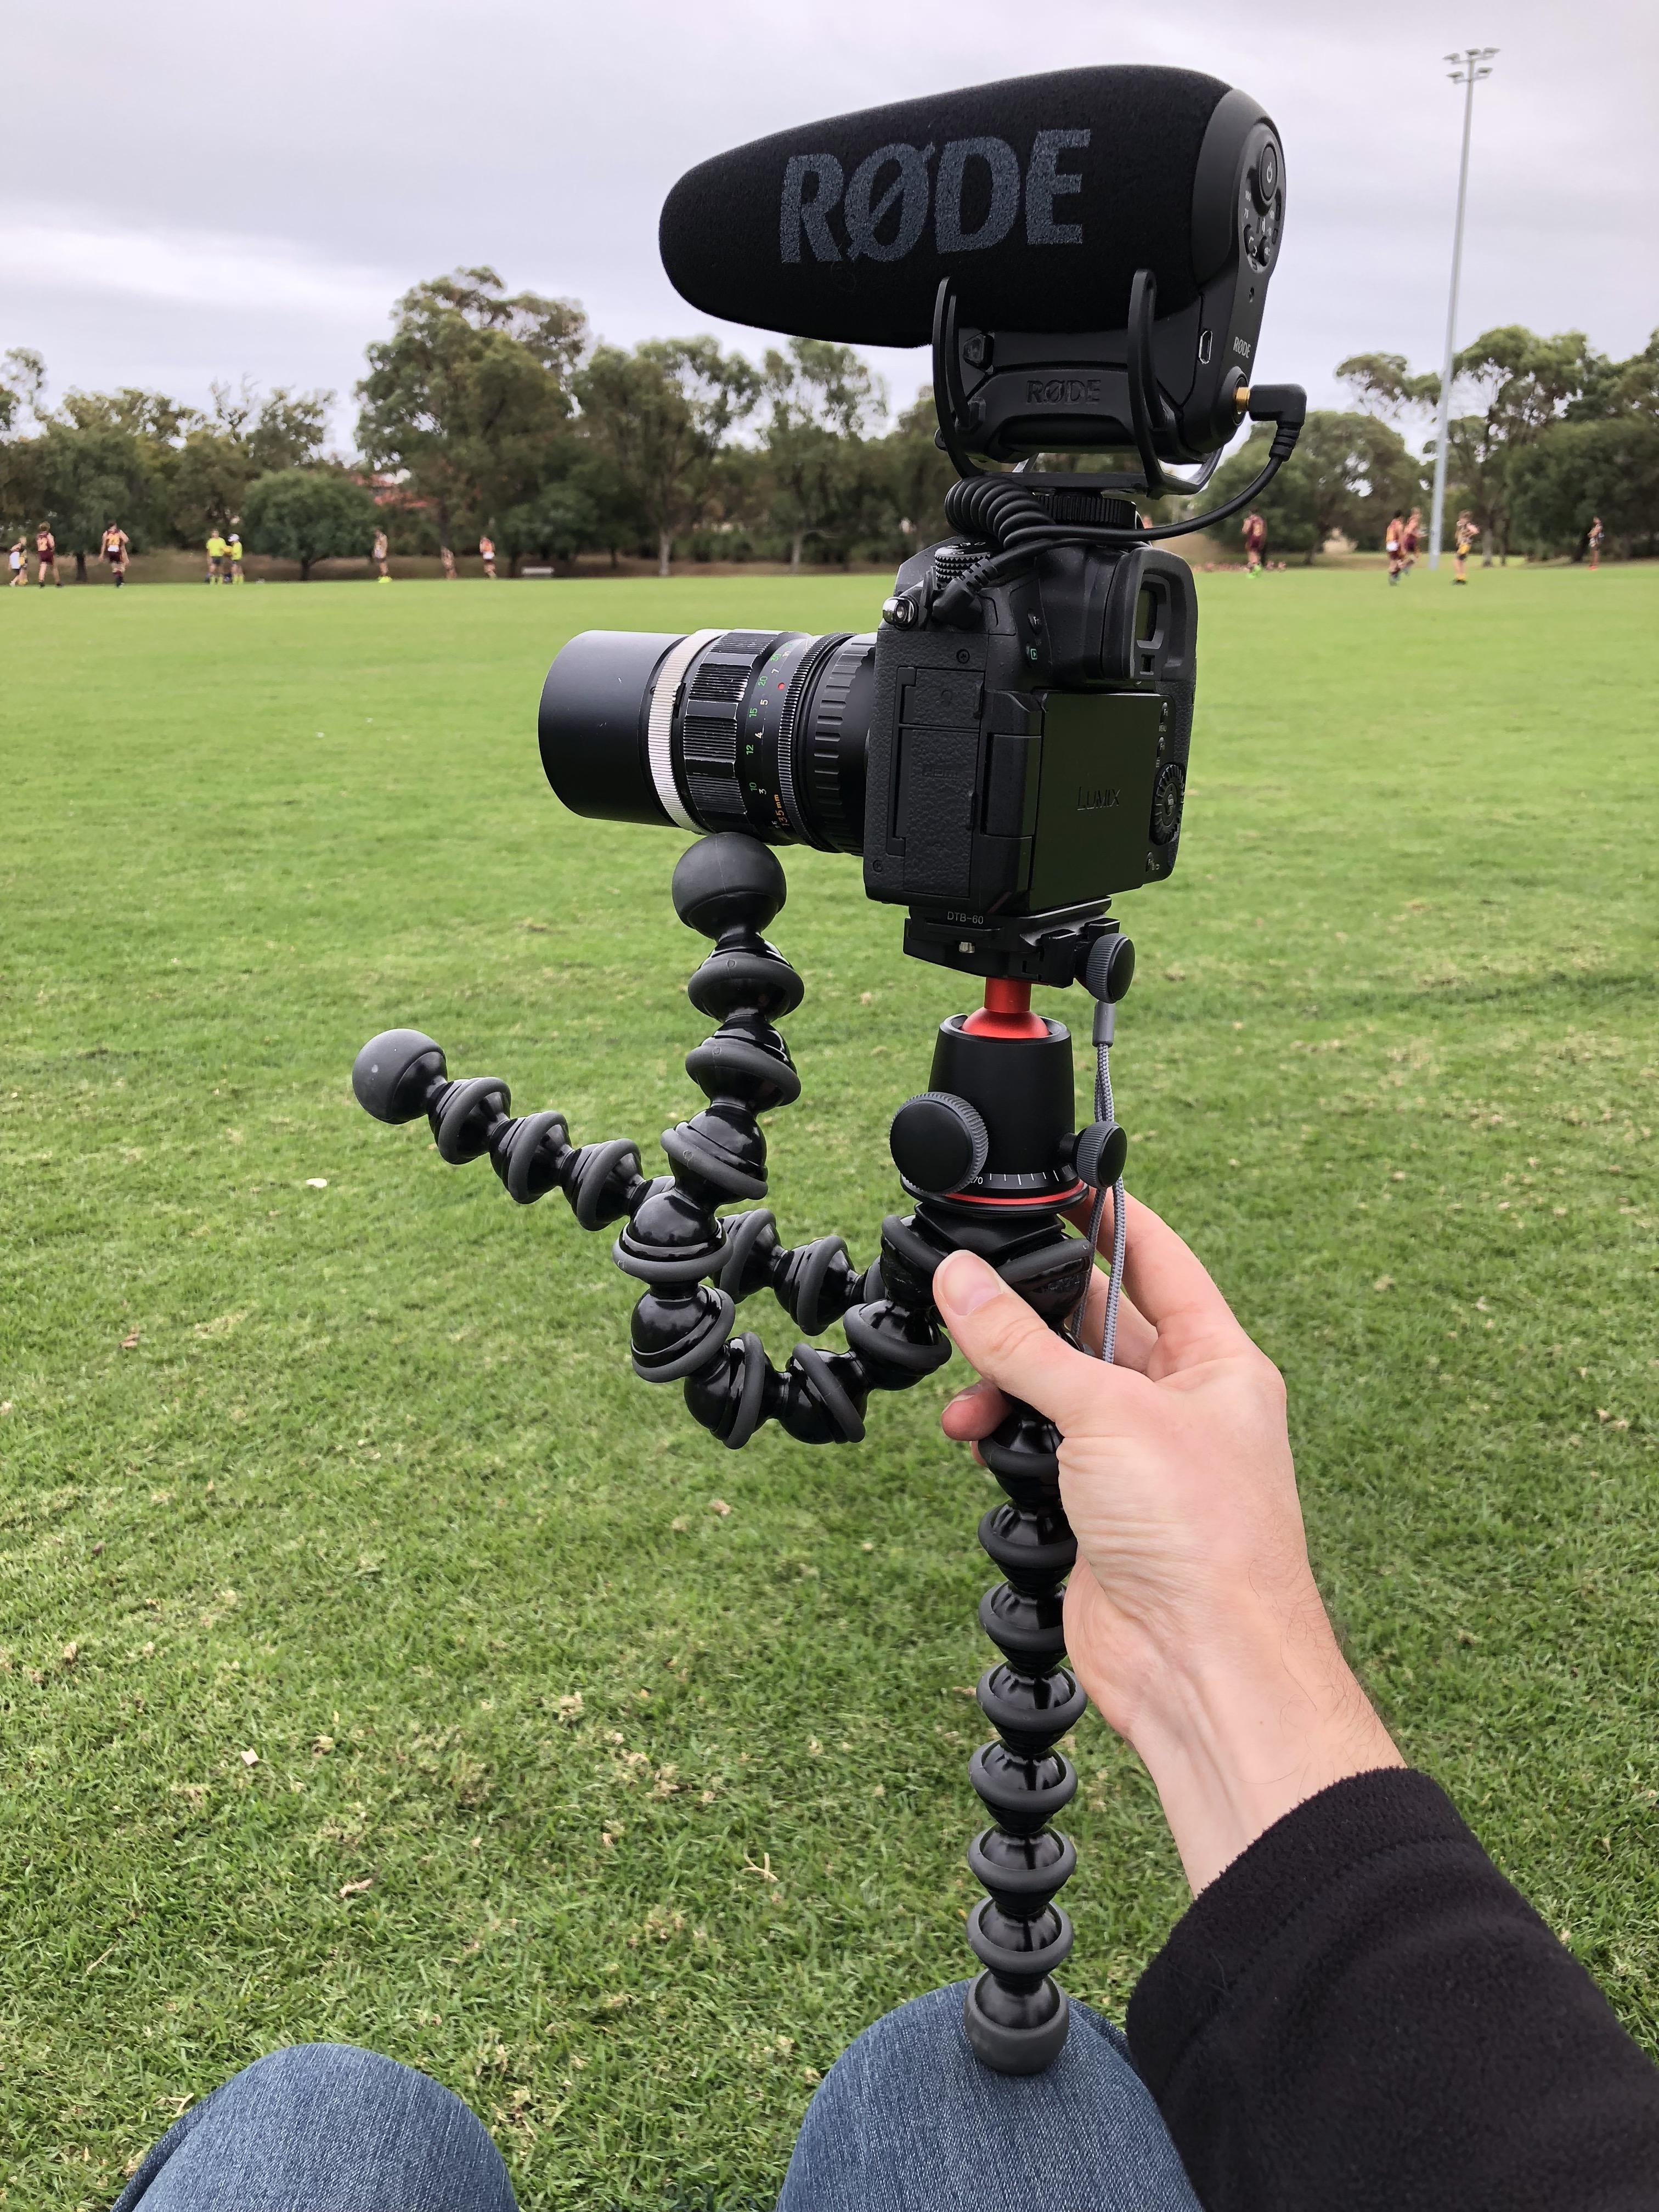
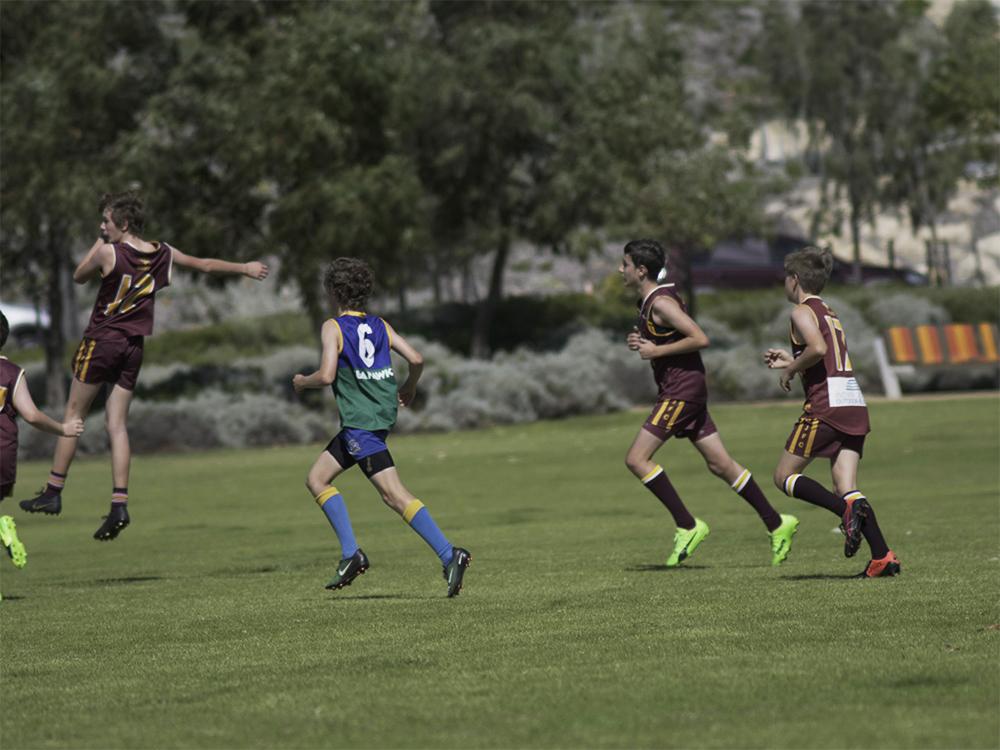
I video my kids sports games, and have figured out a few things but have questions too. I figure we can share our experiences and learn some stuff? Here's the rig I have developed so far: It is GH5, Rode Video Mic Pro+, Gorillapod 5K, Minolta 135mm f2.8, QR plate with wrist-strap attached to it. I also use the Minolta 200mm f4 lens for extra reach as our football fields are quite large. I sit beside the field on a chair, and I film highlights of my kid, not the whole match or anything. Things that work well: Bending Gorillapod to have single leg as support allows smooth rotations while resting on my lap, and other leg bent to form a handle that I can use to steady the rig and also still manually focus Viewfinder is great in bright conditions 135mm and 200mm on crop sensor IBIS on those focal lengths is just great, it's not perfect, but you're moving the camera around so much tracking the action that small hand-shake doesn't really show that much Manual focus + focus peaking works pretty good Rig is light, very portable, and pretty cheap Things that don't work well or I'd appreciate advice on: 135mm and 200mm are good but it's not fast to change lenses so I'm tempted by a zoom, something like a 70-200 would be great. However, I don't want to sacrifice IQ in the ways that vintage zooms were never as good as vintage primes, and I can't afford a modern fully manual zoom lens. Unless there's a lens I'm unaware of? I spend the whole game with the audio jack from the Rode mic sticking into my forehead trying to use the viewfinder. Help? It's not quite tall enough on my lap - is there some easy way to extend it up maybe 10-20cm (4-8in) that anyone can think of? Or should I just put the mic on a flash bracket or something off to the side? I'd rather not get a cage for it, as I use the GH5 handheld quite a bit for non-sports situations and want to keep the weight and bulk down. Or maybe for football I just use the Rode Video Micro that I have that isn't as large. The 200mm gives nice profile shots as people run on or off or as things get closer, but is still reasonably good at the far end of the field. Here's a random and relatively non-identifying pic from the 200mm with the kids at the other end of the field: Do you shoot sports? What is your setup? What have you learned?
-
I am a bit confused about these Dell monitors. I have a Dell UP3216Q - is it the same line as the one you reference? With mine I can calibrate it fine with sRGB but haven't been able to get it to calibrate with any wider colour space. I'm using a Datacolour Spyder 4 Pro and a MBP and it just won't finish the calibration, so I abandoned using it as a HDR display. I did a bunch of googling and apart from buying another calibration device I couldn't find any useful information on it. Models of monitors and calibration devices cycle so fast that no real amount of knowledge is actually available online about anything besides the manufacturers claims. It might be a mis-match, it might be a scam, we'd never know because the tech moves on too fast.
-
Interesting. I'm on that plan and haven't seen any emails from them about a change in pricing, although if they're changing the price for new subscribers then it's probably not too far away. I can see the logic of doing them with a gap in-between. Step one: change pricing for new customers, existing customers don't get a price change and so don't care. Step two: existing customers get the price hike, but because there's been a delay, it seems like less of a big deal, and new customers have been paying that for some time and they didn't raise it because of "the loyalty to existing customers" blah blah blah.. Crabs don't scream if you put them in cold water and gradually heat it until they boil alive! Additionally: I posted a few things in the Feature requests for Resolve v17 thread on BM forums and there were people in there asking for ability to process RAW stills and have a gallery with ratings and metadata like Lightroom....