Bold
-
Posts
219 -
Joined
-
Last visited
Content Type
Profiles
Forums
Articles
Everything posted by Bold
-
Check out the listing for Sankor 16D in the Lens-cyclopedia for info. If you search these forums for 'Sankor 16D' you will no doubt find a lot of useful info! Redstan is an option, excellent quality but pricey, Jim Chang just posted about his new Rapido Technology products, and I myself have been playing around with finderscope rings. Normally used for telescopes, less precision, but sturdy and affordable if you dig around for a good deal.
-
I echo that sentiment, fantastic product! And nice collection of anamorphics!
-
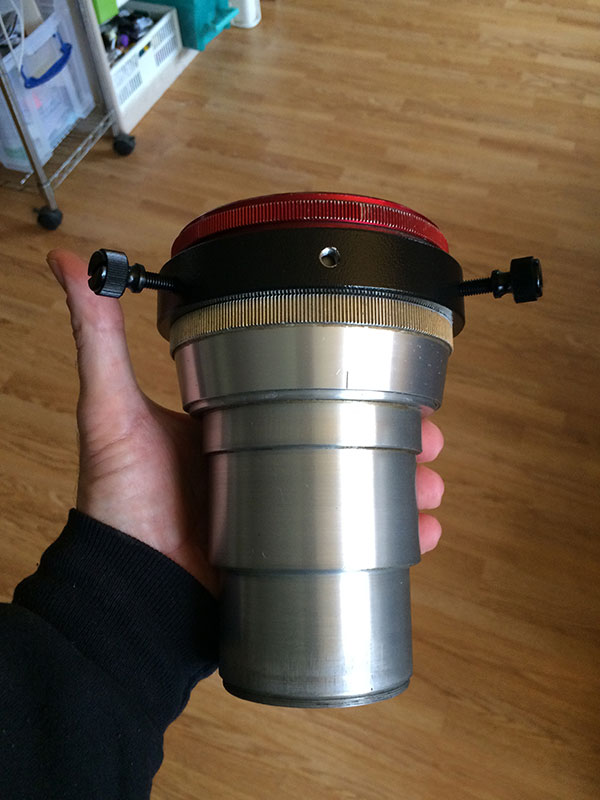
My mistake. Somewhere I read this lens was 4.4kg which is incorrect — It's not even 4.4lb. I put it on a digital scale and it weighs in at a dainty or 3.56lb, or 1,627g. Feels like 8 pounds though
-
Exactly — either ordering a focus chart (expensive) or finding one online and printing it (free). I'm considering a middle option: Making a high res image, and taking the file to a local print shop to have it printed on large paper (2' x 3' or larger maybe) and mounting it on poster board. I'll probably overlay a grid or have one printed on the other side for gauging barrel distortion, like this person did with wide angle adapters (bottom of the page). Yep, weight is often a drawback when using projection lenses. But the setup looks good! I'm not aware of any 'projection-lens shaming' on the forums. Making the most with the tools available to you — there's nothing wrong with that! Please post back if you discovery any useful tips or observations, and best of luck with the shoot!
-
Francois, to my untrained eye, the footage looks good! What resolution are you shooting? Instead of expanding footage horizontally, have you tried squashing footage vertically to compare results? Are particular prime lenses more troublesome than others? How do you have your Schneider mounted? This is my approach: Build a dedicated 15mm rail platform for each anamorphic lensTest (and re-test) alignment & focus for each platform in a controlled environment using a high-detail test patternMark the positions on the anamorphic & its platform for future reference, and lock everything downDifferent positions/markings may be required for each taking lensKeep in mind I am a novice, and others out there almost certainly have better methods (and will hopefully share them in this post). I must be really annoying folks with all my posts, then I've watched a lot of test footage, some using film anamorphics which resulted in mediocre footage, some using projection anamorphics which resulted in fantastic footage. What counts is the final image, it doesn't matter how you achieve it in my opinion. Hope this helps, and keep on shooting! Cheers, |. . | .|
-
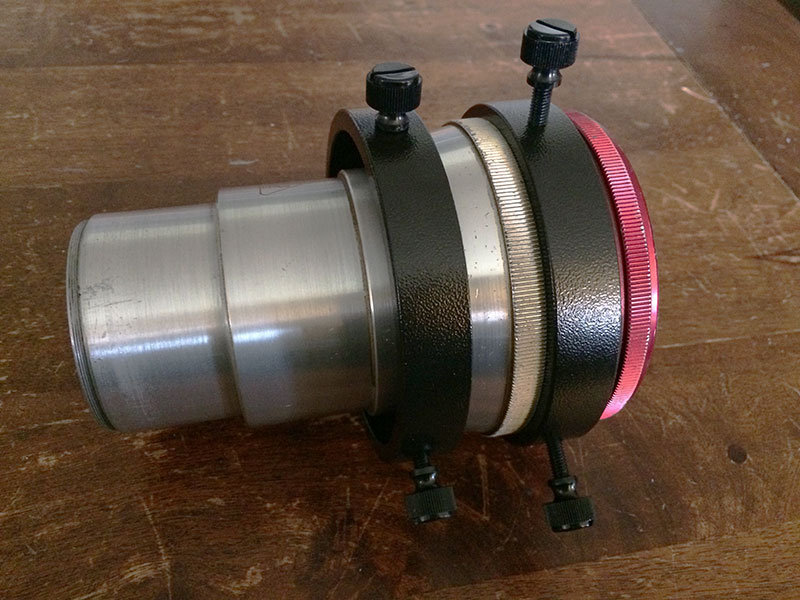
Not bad results with just the Orion ring, it's pretty sturdy: Still need a collar or second anchor point though. More to follow...

-
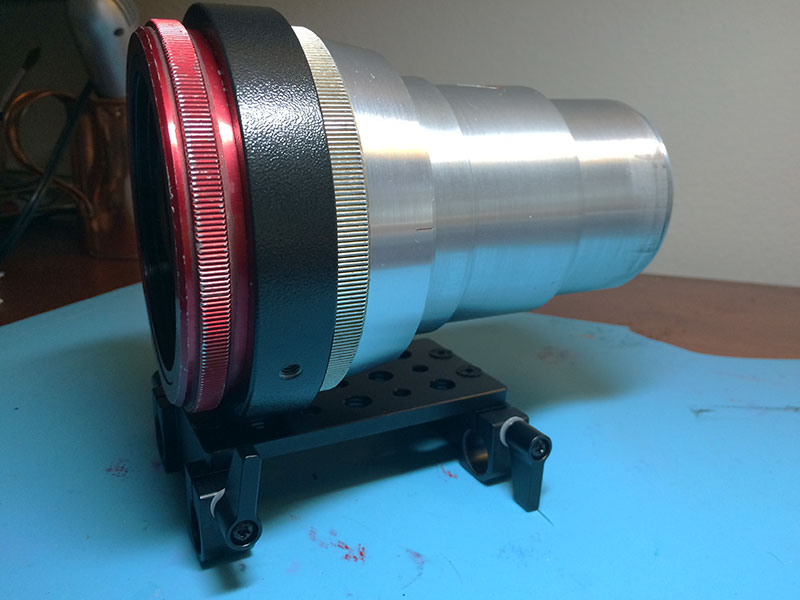
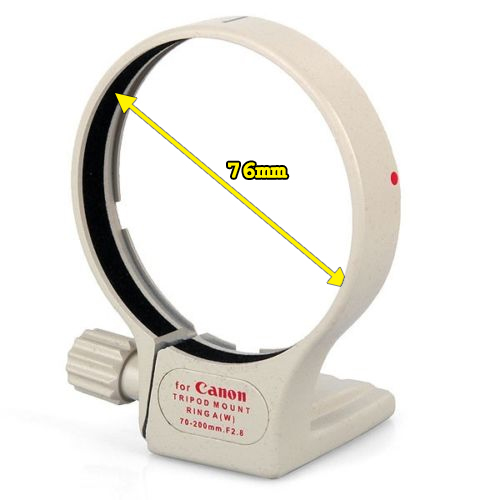
My Orion clamps arrived today. I was worried that they might be a little too small. I removed the red B&L ring and slid one over and it fits snugly between the retaining ring and the focus ring. So snugly in fact nylon screws may not even be necessary. I noticed when I slid the red retaining ring back on & tightened it (until it locked with the focus ring), I was able to turn the focus well past the minimum 50ft distance mark. A couple posts above you can see the focus marks on both the black and silver models. In the picture above I've screwed the focus so far down that it completely covers all the focus markings. I'm curious to see what the resulting min. focus distance will be. I wanted to attach the second Orion ring to the 77.35mm section (see measurements picture in previous post) but the nylon screws are about 1.5mm too short to get a solid purchase. I can probably do a little sanding at the base of each screws to get the rest of the way, or try to find longer screws. Alternately, I could attach the second ring to the 85.10mm section of the barrel: But I want the stabilization points to be farther apart along the body of the lens. So I ordered a cheap lens collar: Which should give the perfect fit. Then I can fasten the Orion ring & the Canon collar to a 15mm baseplate, and it will be good to go. Once my Xetron XA arrives I'll probably use the 2nd Orion ring (and pick up another Canon collar and 15mm baseplate) for that, so that each lens has its own dedicated support. If you need a support solution a big honking anamorphic lens, you should consider the Orion clamps. They'll fit anything from 105mm down to 80mm in diameter. They are heavy duty and inexpensive. Cheers, |. . | .|
-
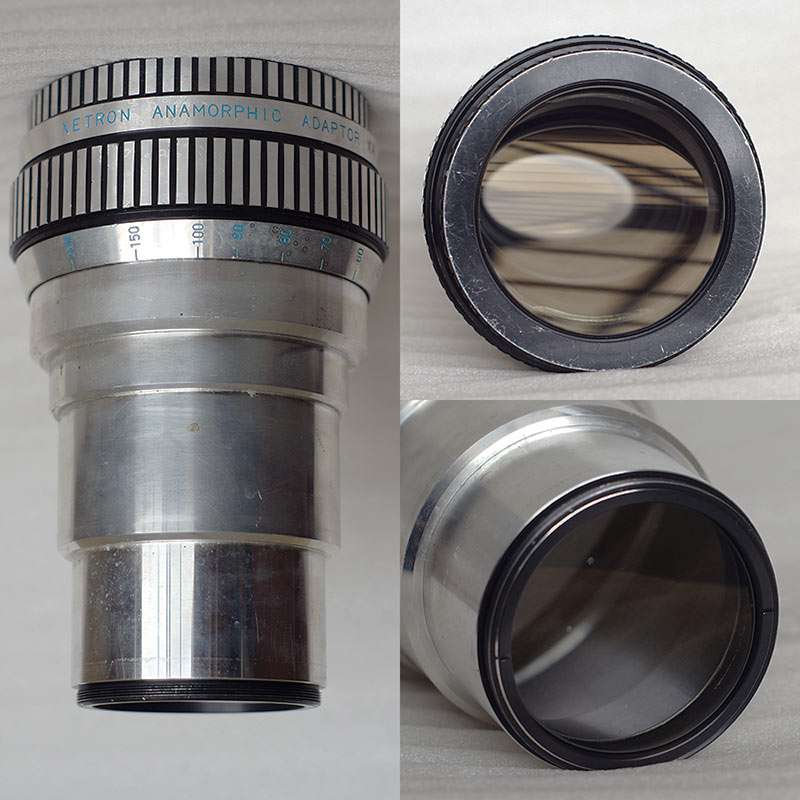
Anybody familiar with this beast? Looks like it will have similar size/weight/performance specs to the big 35mm Bausch & Lomb or Kowa Prominar projection lenses. Rear element size: reported to be ~68mmLength: ~9inWeight: reported to be 1.5kg (I'm skeptical...I suspect it's heavier)Manufactured in JapanI have found nothing else on the intertubes about it. Perhaps manufactured by another company, and rebranded for Xetron. The support I'm building for my B&L should fit this lens as well, so that I'll be able to take some Xetron footage and possibly add a new entry to the Lens-cyclopedia.
-
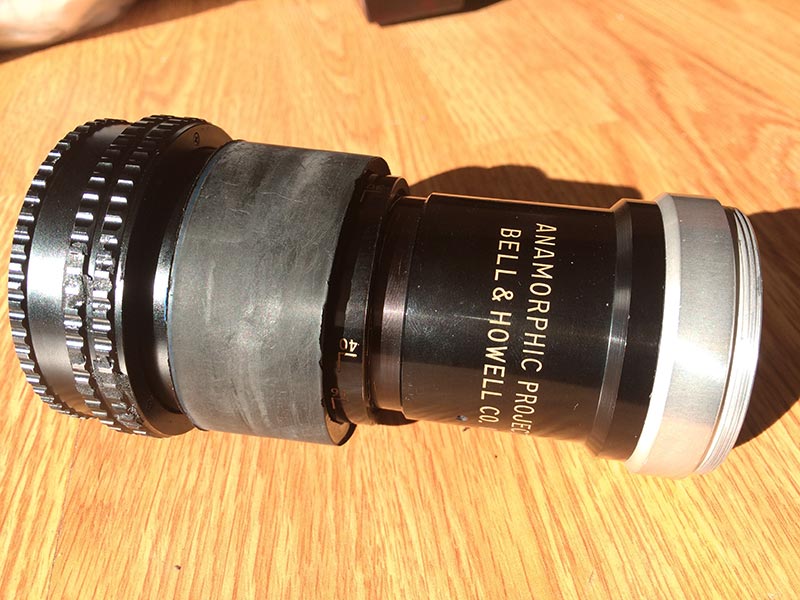
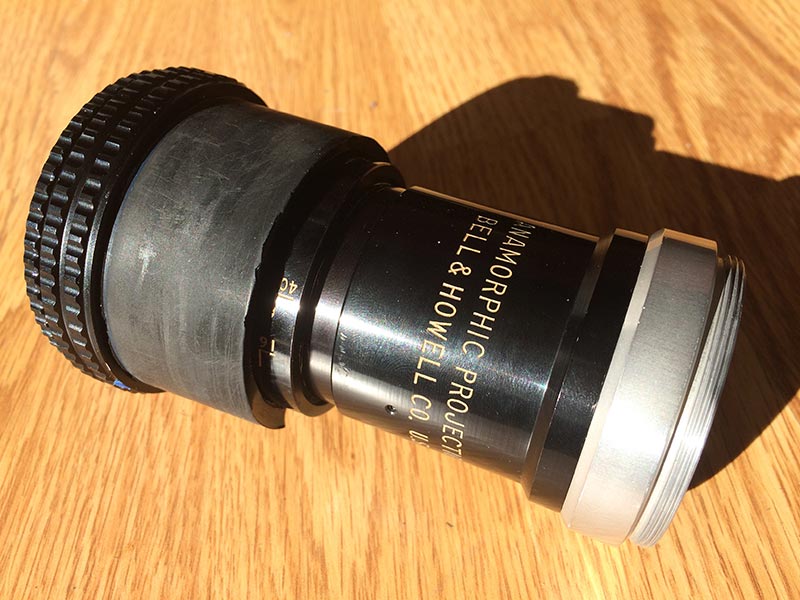
Removing the front element to paint target areas on the front housing is a great solution for other anamorphics too (my B&H 16mm projection lens has barrel glow issue also). Good ol' Testors flat black and an accurate, good quality brush. Though if your anamorphic's front element has painted sides as part of the manufacture process, you run the risk of the paint flaking off by removing it.
-
Lens-cyclopedia has been updated with a reference to this thread
-
Awesome stuff man! Kudos for doing all this research and sharing your findings!
-
In Nick's post, he said his (slightly different) modification could focus to about 40 feet, later in that thread John Barlow said he fixed this using a cemented 2-element negative achromat (BTW, if anyone knows which achromat he's talking about, please let us know). Earlier in this thread Rich posted an screencap @ infinity with his helicoid mod, it seemed fine. I measured the focus travel distance of the unmodded B&H...the front element moves approximately 4mm when you focus from closest to farthest. The helicoid has a travel distance of approximately 14mm, so there's a lot more play with the modded focus. Based on this & Rich's test photo, my guess is yes, the modded version of the B&H should be able to focus to infinity. Once my mod is done I will test & confirm.
-
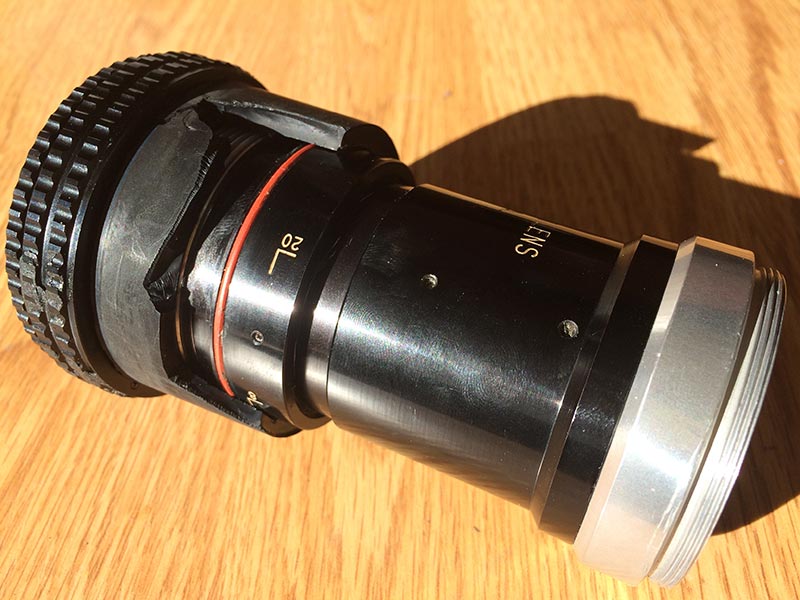
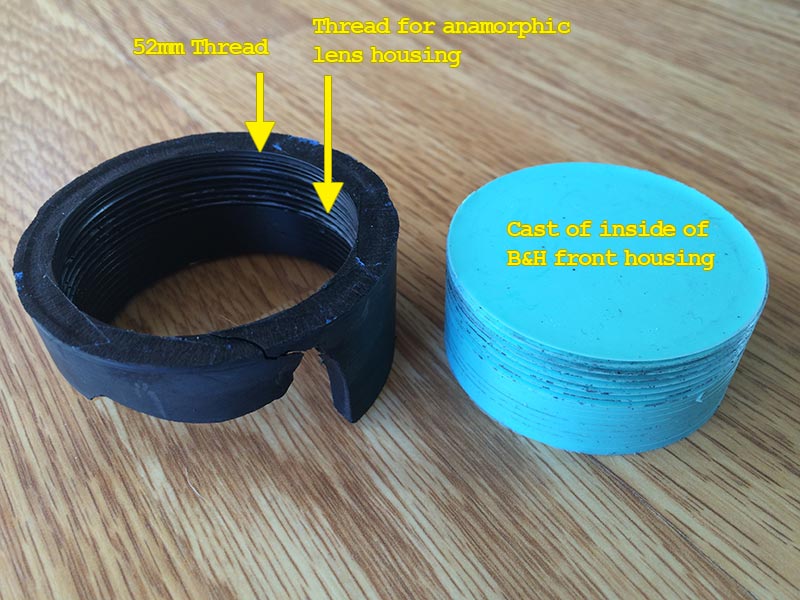
More adventures in novice polyurethane casting: Another attempt to create a polyurethane housing looked promising, but the 52mm threads are too fine for the material. The resulting thread impressions were too delicate, and screwing in the M52 helicoid tore up the polyurethane threading. However, I realize a slightly different approach to casting directly onto the helicoid will result in a very tight seal with the 52mm threads, creating a permanent solution But I must be more methodical and precise, otherwise the polyurethane will leak during casting, and gum-up the internal helicoid threads. So no joy yet, but I feel a successful solution is getting closer.
-
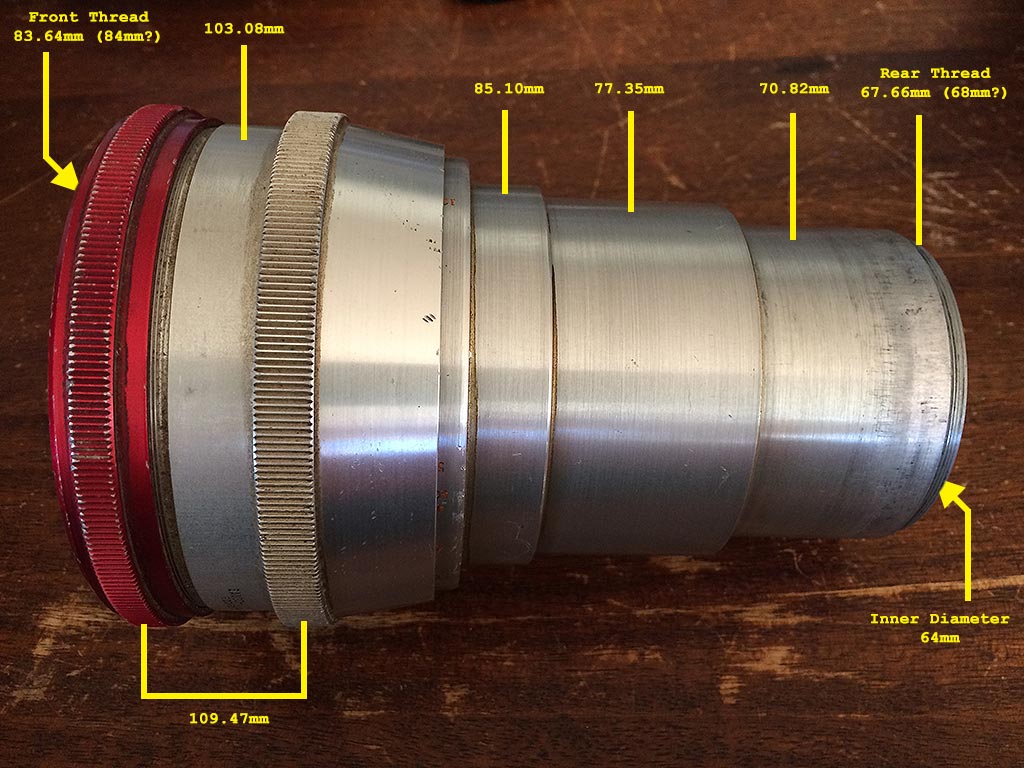
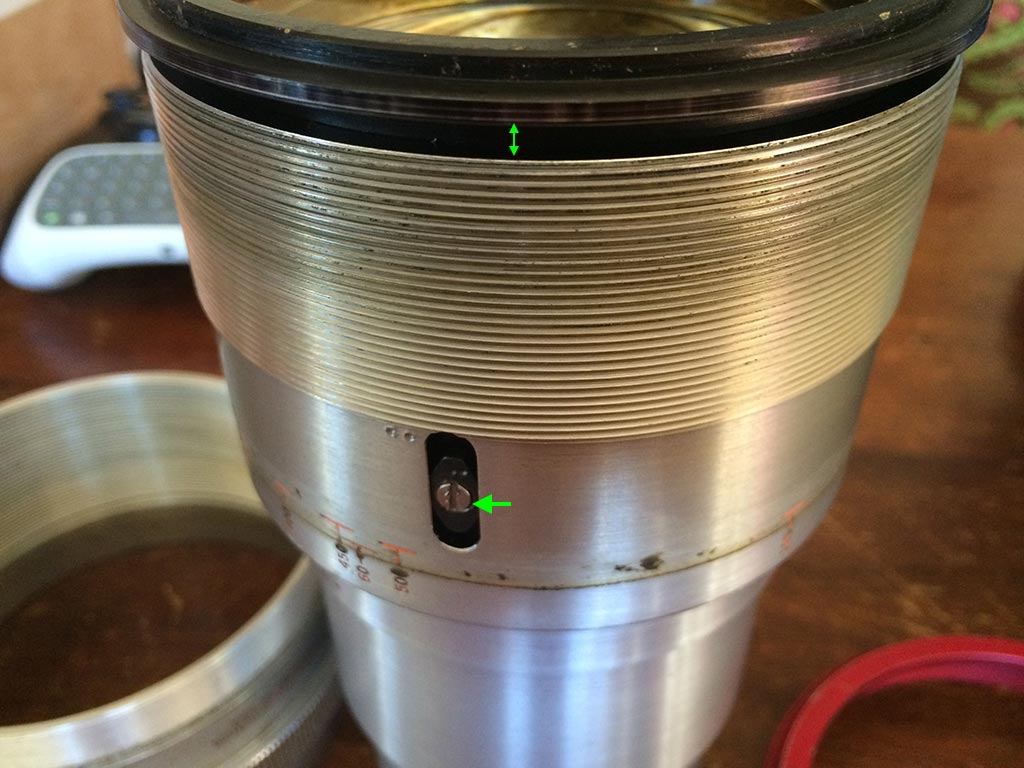
I had a chance to unpack my recently-acquired Bausch & Lomb and poke at it. Here are my caliper measurements of diameters, accurate to within +/- 0.1mm Here I've unscrewed the focus ring (note the the looooooooong barrel thread): At the top you can see there's some space between the lip of the front element housing and the main housing (green arrow). I'm wonder if loosening the screw (other green arrow) allows the front housing to be pushed down. From the Anamorphic Lens-cyclopedia: The lens can be set to closer than the minimum focus of 50 feet by turning it past this setting and pushing the front element housing down to its maximum depth within the lens body. [source]. With luck this may allow focusing closer than 12ft, which is the lens' reported minimum focus distance. It's also reported that it the B&L can use lenses as wide as 35mm on a micro 4/3 sensor without vignetting. Once I have all the support pieces assembled, I'm looking forward to testing the minimum focus & vignetting with my MIR 1B 37mm. The B&L's weight is reported as approximately 8 pounds...by far the heaviest in the Lens-cyclopedia. So for support I'm going fasten these finderscope rings to a DSLR mounting plate, then affix the B&L, and put it on rails (basically my variation of the Tecnoir support rig, which doesn't appear to be available anymore). More info to come. Cheers, |. . | .|
-
Yep, found out today the original entries for these were made a long long time ago using the template for the Isco 54. I'll clear out the data, and update it if new data comes in.
-
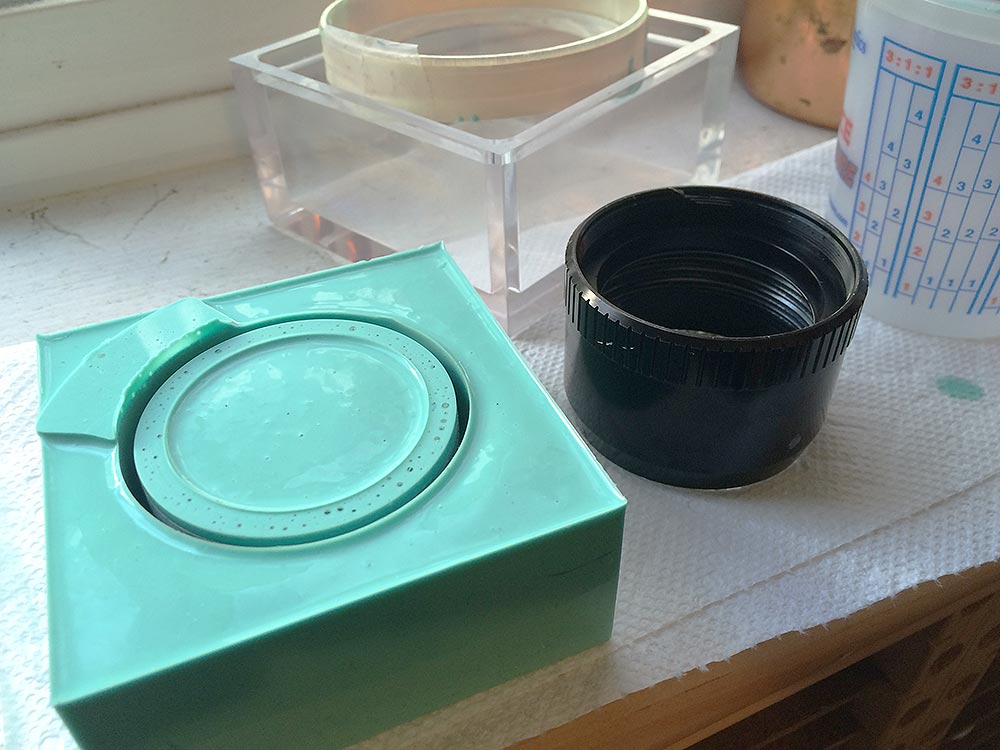
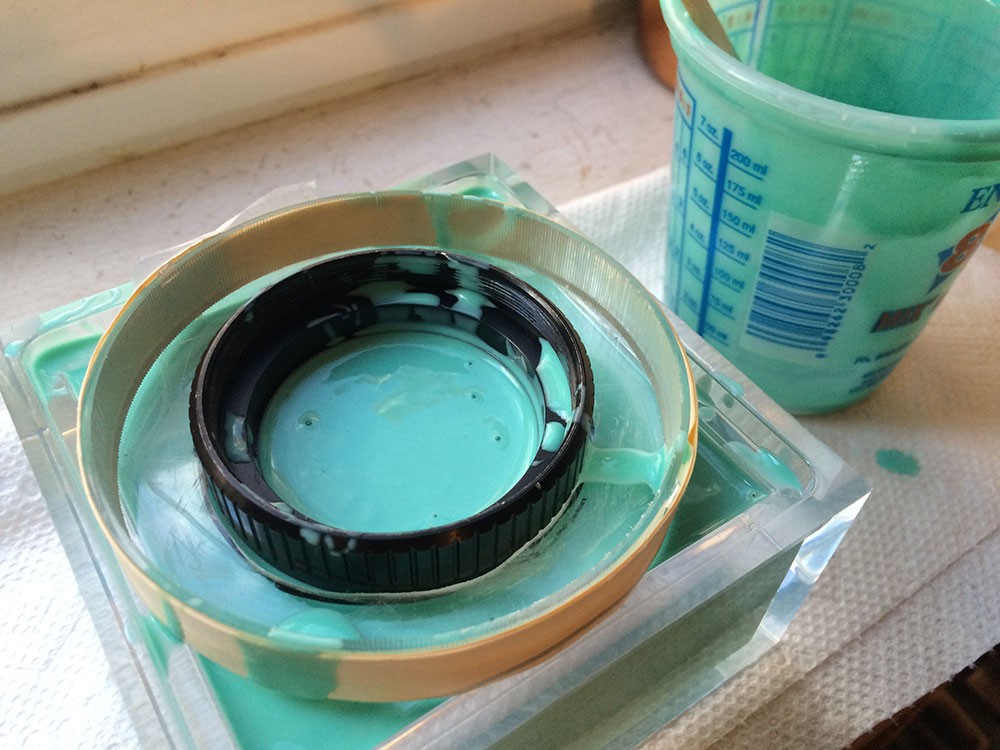
First attempt at casting polyurethane: When the label on the polyurethane mixture says working time is 1 minute, they ain't kidding. I took way too long mixing & pouring, and the mixture lost viscosity so I was unable to fill the mold completely.Also, there was too much suction from the silicone rubber, getting the cast polyurethane out was really difficultSecond attempt at casting polyurethane: Tried a new mold to create the adapter in one piece instead of two. Polyurethane mixture was poured quickly, and was really viscous. So much that there was some leaking through small cracks in the mold. I'll have to make the next mold completely airtight.Next time I really need to go overboard with the release agent (a spray that keeps the polyurethane from sticking to the mold). Still a lot of difficulty getting the cast out of the mold - especially the M52 helicoid thread. I finally had to crack the polyurethane to get it off.But I tried the broken prototype screwed in smoothly: If I turn it over it looks much better And it held firm when I rotated the helicoid If I glue the broken pieces together I'd probably be good to go, but I'm determined to perfect this so I get a successful one-piece casting. I'm also determined to create a mold that is a little more refined in its measurements, and a mold sturdy enough that I can produce multiple copies,
-
Excellent - never heard of it, would love to know more! Perhaps down the road, though I don't have bandwidth for that at the moment. If anyone wants to compile such a list though, I'd be happy to publish it
-
Cool, I hope you find the information you're looking for! This got me thinking I should clarify everyone's expectations so there's no confusion later on: In the future I *may* start more lens threads and add Lens-yclopedia info on anamorphics I own or are otherwise interested in. I am *not* offering to sift through other people's threads and collate the lens information for them. What I *am* offering is to add any lens info to the database provided 1) that lens info is sent to me and 2) that lens info is labeled according to the fields in the template, so I know where to place it: Lens NameManufacturerAlso Known AsAnamorphic StretchWeightLengthFront Element SizeFilter Thread SizeRear Element SizeRear Thread SizeYears ProducedFocus MethodMin. Focus DistanceTaking Lens Minimum Focal LengthFull FrameASP-CMicro Four ThirdsProsConsMounting SolutionsTo FilterTo Taking LensLens SupportObservations & Empirical DataGallery PhotosScreen Caps / Links to Footage CHeers, |. . | .|
-
Looks great! Oh how I miss Pink's....
-
Getting the housing out without tearing the mold was tedious. I must be more generous with the mold-release spray next time, or at least use a toothbrush to get the release agent into the threads more thoroughly. But it worked.
-
Do you mean Mitchell BNC mount? You could always start a thread "Seeking info about BNC mount anamorphic lenses" and combine that with a little internet research. I'd be happy to add anything you find to the database
-
B&H modification plan: Remove front element from B&H front housingMake a partial cast of the front housing using RTV silicone rubberMake a black polyurethane cast from the RTV mold. Polyurethane is rated Shore D 75 (same rigidity & strength as a hard hat)Get a M52 helicoidMake a partial cast of the M52 helicoidMake a polyurethane cast of the helicoid from the RTV moldMeasure, file, and sand both polyurethane parts, bond them together to create new front housingAdd B&H front element to M52 helicoid using rubber o-rings, screw helicoid into new front housingScrew the final product into the B&H anamorphic housing. Pray that it works Steps 1, 2, and 4 are complete. Will attempt step 3 once the mold has set.
-
Hello all, Tito has kindly allowed me to do some streamlining of the Lens-yclopedia database: I have templatized all the entries so key information is in the same location when you cycle through the pages.The template improves overall readability of the information.I've broken up Mounting Solutions into To Filter, To Taking Lens, and Lens SupportI’ve changed the Index to a spreadsheet that provides key stats for easy ‘comparison shopping’I’ve removed a couple lens entries that had no (or next to no) information.I've added a few bits of info on various lenses as I went through, particularly links to example footage.I’ve made significant updates to the B&H and B&L entries based on the info I gathered from EOSHD, as well as other locations. I'll keep adding to them as I embark on modding/using my lenses.Check out the updated Lens-yclopedia here. A great big huge thanks to Tito for allowing me to build on his great work. And to all the folks who have responded to my info-seeking posts. The information people have provided here has been invaluable for a newcomer like me. I was surprised at how much info I was able to find on the B&L, I cited sources in the Lens-yclopedia entry where I could - I would love to see all entries given source/reference links. I know people’s time is limited, but even just a morsel of info here & there would really help re-invigorate the database and make it more robust. A little crowd-sourcing can go a long way! I am considering periodically starting ‘Seeking Info About X Lens” threads to build up the other lens entries in the Lens-cyclopedia. If this is something you would like to see (or help me with), please chime in. If you want to send info my way (corrections, answers to red question marks, Lens-yclopedia functionality, etc), I will find time to update the database appropriately. Cheers, |. . | .|
-
It's the scene where MacReady is outside and approaches the tarped helicopter, and the wind causes the tarp to billow, giving it a life of its own -- very eerie.... It's easy to quote clips from all the gory/crazy parts of this film, but it's the deliberate, measured pacing of these quiet scenes that charge up those moments with impact.
-
Couldn't find the scene I wanted on Youtube, this one will do. Part of the eerie build-up before all breaks loose, John Carpenter at the top of his game with The Thing: