
Hans Punk
-
Posts
632 -
Joined
-
Last visited
Content Type
Profiles
Forums
Articles
Everything posted by Hans Punk
-
It is very common for the pre-36 to have these ‘square rainbow’ flares on the edge of the frame. They are caused by the rear element not having edge blackening, so it will catch the light and cause these flares when used with most ‘non factory’ taking lenses. The Isco taking lens that would have originally come with the iscorama has an internal baffle ring to eliminate this effect, so that there is the most basic solution to eliminate these particular flares...by using the factory taking lens. The other solution is to use a thin nitrile rubber O-ring that can be installed to the rear of the iscorama to slightly ‘choke’ the light from hitting the rear optic edge that creates the flare. I have found this to be the best solution to use...as it also provides a thin rubber ‘bumper’ to the rear optic as a bit of protection when swapping out taking lenses. The thin rubber ring is simply attached to the optic rear edge with a small strip of electrical tape holding it in place from the outside edge (away from optic). The rubber ring - when correct size and thickness, will not introduce any noticeable image vignette, as it will only block out the light from hitting the very edge extremities of the rear optic...and therefore eliminating the ‘square rainbow’ or diagonal line flares.
-
 Great stuff as always Ian!
 -
@PepperJay If it indeed was the lovable Irish man then it sounds like he tried everything to get that lens open (and technically succeeded) - must have been seized really bad to resort to those methods. He sure knows what he’s doing, probably the best/most experienced lens tech still around for such work. Now you have the lens opened, he will properly be able to do his magic (if the optics are not a total right-off that is). If you unsure about going any further yourself, he’s the guy to call again IMHO. Once optics are cleaned and alignment all ship-shape, you could then invest in the really impressive ‘proxiscope’ front rehousing mod that @redimp has devised...a metal replacement front for your pre-36 with integrated gear that has close focus hard stops built in. It is non-destructive and requires no permanent modification to your lens. Advantage is that is a heck of a lot lighter than the VD full rehousing and since it is an easy DIY kit - it won’t require you to send your lens away and wait hundreds of days for it’s return.
-
Who was the ‘well-known specialist for servicing’? - applying oil anywhere near the internals of an iscorama does not sound right at all, let alone damaging the retainer ring to gain access.
-
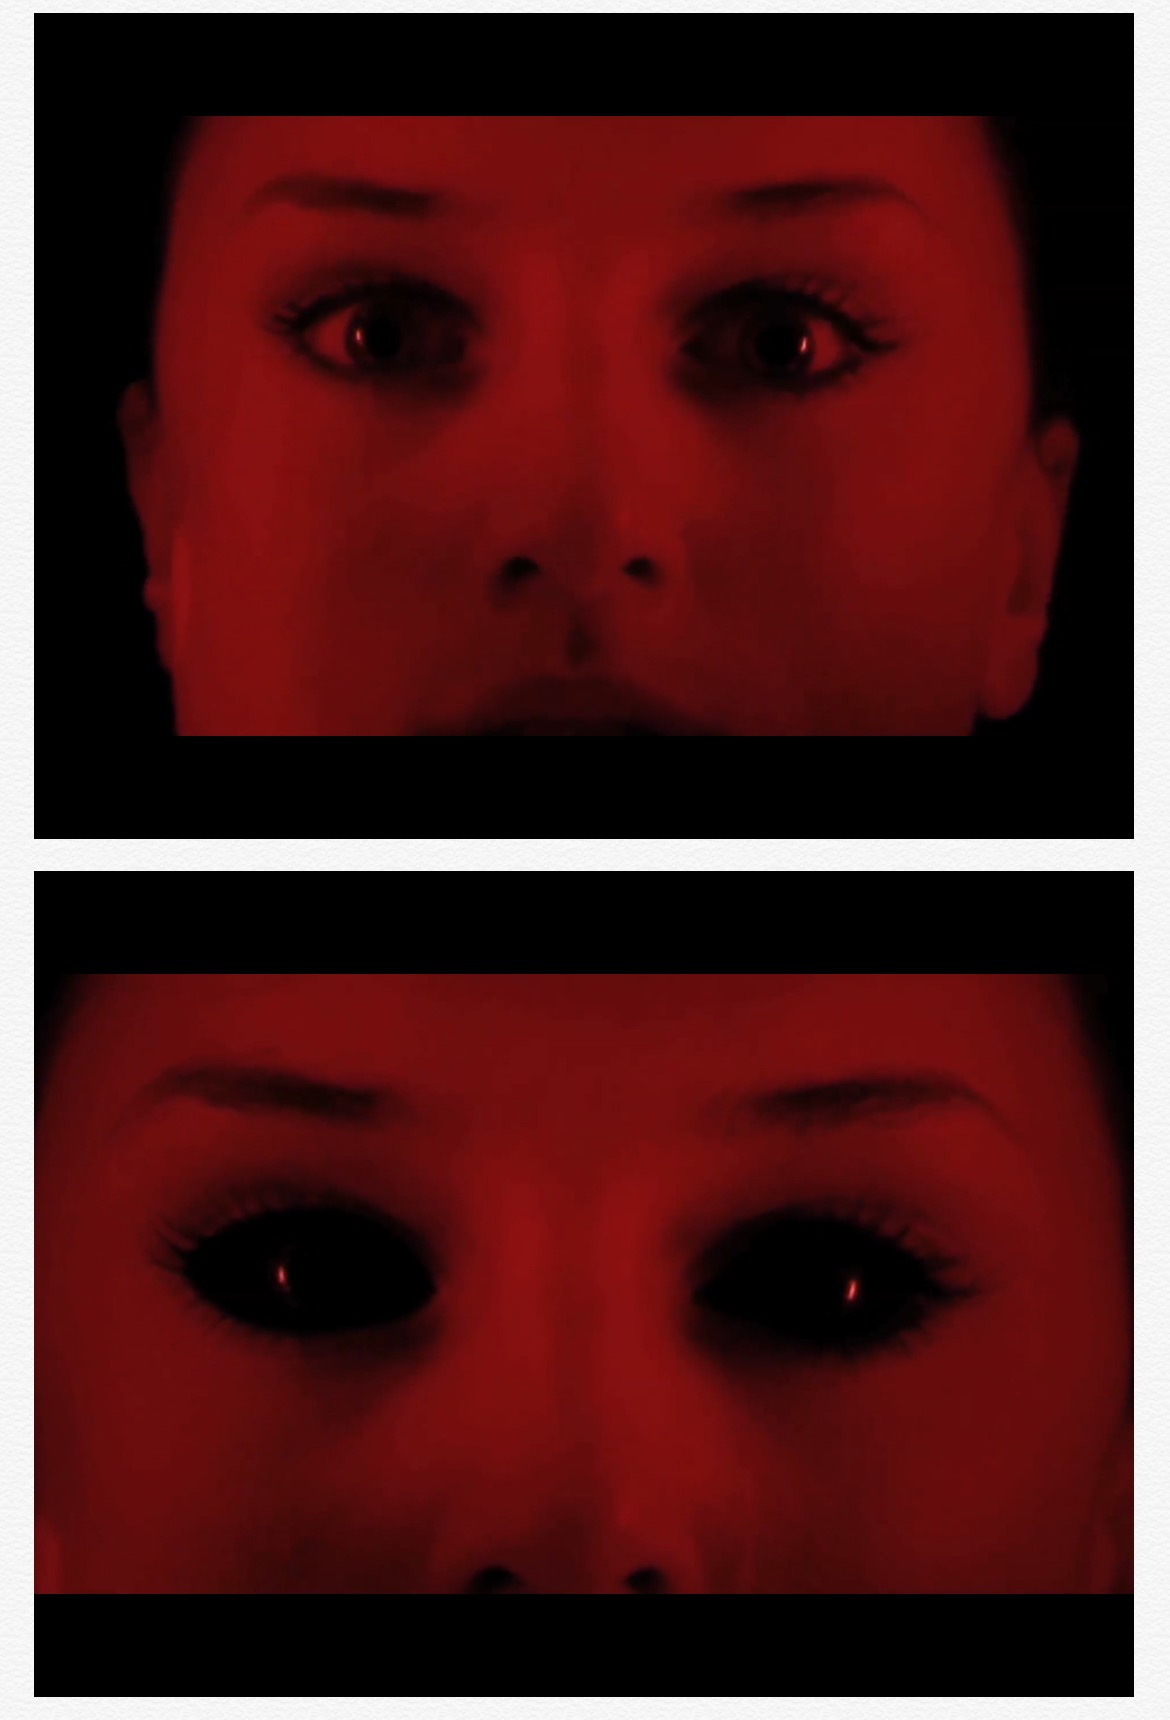
Not Dr Who this time...but a 6 part Sci-Fi comedy series that I don't think ever aired. It was totally crap, but the effects were decent ? Here is the shot I was talking about, screen capture is terrible quality though (from good old Digibeta days. The camera tracks into girls face as here body is 'possessed' by evil computer implant, transforming her eyes black by 'bleeding' black goo from the pupil. This was done the way you said, keying real highlights from eyes onto roto black shapes to mask her real eyes. This worked as her eye colour was brown and the scene was dimly lit (enabling an easy key of highlight). A similar shot years later (that I can't seem to find images from) was done with the shiny black ball method - I remember that looked way better, since that scene was lit much brighter, and the camera was much closer...plus the reflections in he real black ball plate had a load of highlight details in there that would have been extreamly difficult to replicate without going down the route of capturing a spherical reflection map - which there was no time for. It is amazing what the human eye can reflect - especially when up close. Depending on the lighting and proximity of camera, I'd say try to capture a real reflection whenever possible. But if that is not practical - tracked roto and keyed real highlights is a good method to try.

-
Worth trying...I was only recalling what worked for me (When doing a similar shot a few years back on a sci-fi TV show). I'm all for the simple approach, so whatever works...having a real reference of a similar black glossy object certainly won't hurt, even if replicating from scratch in AE - it will act as perfect reference to what your black levels should be, where the light source orientation is in your scene etc etc. keying the catchlight from the live action plate is doable, but often results in shrinking highlights and eliminating any subtle falloff.
-
@TwoScoops has the right idea...as it's best to get an accurate reference of the material surface in the same lighting as your actors face. Best practice is to indeed use a dark or black glossy ball or marble (whatever you can find or make to emulate the glossy black eyeball) - then shoot a few frames of that object as close to your actors real eye area as possible....one reference per eye as the highlight pings will be slightly different - This will act as your reference plate. In post, you will have to roto the actors eyes and effectively replace with the reference still of the glossy black sphere. if your actor is turning their head - the highlight ping should stay at a constant point, relative to the lights in the scene....so additional roto and tracking of that area of the real photographic plate may be required if your lighting is more dynamic. It is easy to see what to replicate by looking as the real highlight ping reflection from the original live action plate of your actors real eyes. the other way of doings this is to shoot a 360 degree spherical HDRI map of your environment, then use that as an IBL or reflection map to a CG sphere that is tracked and rendered into your live action plate. That is more of an involved process, and would be the 'proper' way to do it...but the comp method mentioned above can work perfectly well for many setups like you have described.
-
The lens has very pronounced CA on edges of image due to no blackening on large front optic edge and very thin element and coating. The focusing mechanism is (at least on my copy) a very simplistic locking screw that meant that the body separates the two halves and user can twist, extend or contract the lens for focus, then the locking screw is tightened to keep that distance set. It was never meant for constant adjustment - rather for 'setup and leave' on a projector. The large front element size of the Magnum prohibits its use with current vari-diopter offerings, so is not a very practical lens for filming with...saying that, it could be made to work as a focus-through type lens on a smaller sensor that could have large diopters attached for closeup subjects. The lens is basically a scaled up version of the 'Palamorphot' or 'Zenascope' type that I think we're all made for or sold by the Widescreen Center London. All share same simplistic focusing method and general image quality. Streak flare is a very nice light blue colour, but the mechanical simplistic focus adjustment/ medium to poor image quality (CA on edges) and large size front optic don't really make it practical for filmmaking use IMHO.
-
I've found that if using ML build 123 for 5D3 (that supports external monitor non-mirrored) - you can use the choppy camera LCD live view for framing and composition, and use the external monitor for focus since the feed to the external monitor is punched in considerably (but real-time). Not ideal at all, but it can work ok for many scenarios when shooting 3.5k centre crop mode.
-
I admit I was being a little facetious with my clickbatey topic title...but perhaps no worse than 'guess the camera' posts I should have opened up the topic more, to ask people to post their favourite drone shot...and why. I often am left cold by drone shots, but this is the first one that somehow engaged me. I do think this example is valid, (even though it is not from a commercial or film) since it has an interesting narrative idea that could be expanded upon. Using a soundscape/ audio clips from relevant events from the location seems to act as a clever companion to the cameras journey...giving a visual overview combined with audio echo's from the past. Funky distortion is no doubt introduced from Reelsteady software...but it seems to produce results far better than Adobe's inbuilt warp stabiliser from what I've seen online. Check the second video (making of) to see the original footage, it is pretty darn impressive what the software has corrected.
-
It should be fine, 83mm would be the largest I'd recommend though. Apparently from the press release of the Hardcore DNA, there is now more material on the rear section to accommodate people who want to mod with a lathe, yet maintain strength in the aluminium. Maybe take a 77mm step ring and something that is 83mm diameter with you to the machine shop and see what the guy/girl feels more comfortable in doing to try and preserve the nylon screw holes. (Sure thing, show them my pictures if it helps). Machinists like to measure everything themselves so if you have part 'A' (your anamorphot) and part 'B' (your HCDNA) they can use proper precision calipers and work out exactly the best method and final diameter. That will probably be the easiest and clearest way to explain things...with both parts in hand so you can say 'I need this to fit inside this, until it hits here'.
-
Normally would totally agree, but these FPV type drones are so damn small and lightweight that they are less likely to cause damage when flying at lower speeds...they often don't break their own propeller blades after considerable impact. It could be argued that the line of sight safety is less of an issue when plugged into headset that gives such an accurate onboard view (and best if you use a spotter to warn of objects outside your view). These things can hit crazy speeds which is obviously where they become dangerous around people, but for relative slow and precise moves from a skilled operator, the results are totally amazing and dynamic....way better than the average boring footage from mid-sized drones IMHO. Here is the same guy taking footage in and out of his apartment...totally reminds me of the CG flying photogrammetry camera shots in Fight Club. https://vimeo.com/208621970
-
I'm sure this is up there with some of the most impressive single take drone shots I've seen for a while, carried out by a very talented pilot using a micro FPV drone and great use of Reelsteady software. Use of reverse playback and sound design makes it even more impressive... making of...
-
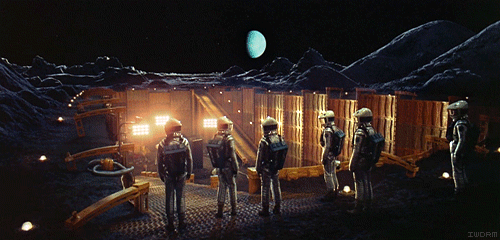
That 1Dc is rigged on a motion control rig for the environment miniature shots. (so for stills not video) LAN Cable probably for Dragon frame control. Being able to shoot in a vari-stop motion way enables aperture to be closed down - increasing DOF to sell the scale in a miniature. Motion and camera are synced through series of still exposures to create real-time moves when conformed to 24fps. Impressive stills and compact form factor is what allows this camera to still be used on movies for animation and miniature effects...its a very common setup for studios like Aardman since those cameras are bulletproof when used for animation and easy to integrate into motion control setups as pictured in the Bladerunner 2049 setup.
-
Just found this guy who makes adaptor ring for DNA front and rear use...quite decent designs, but still does not address vignette issues or allow larger lenses to be attached easily.
-
I don't have experience with that specific lens, but most lenses of this type are almost always accessible by removing the focus ring. Use the correct sized precision screwdriver to unscrew how the focus ring is attached. Once unscrewed it should then slide to the rear of the lens out of the way to reveal the helicoid. You then should be able to acces the seized helicoid to remove the old dried grease..do this by applying damp Q-tips with lighter fluid. If stuck very firmly, it may require a few attempts for it to become unlocked. Re-attach focus ring and slowly work the focus to become smooth again. If you want to replace the old grease, it is best to remove any traces of the old, then replace with modern white lithium grease (better for larger lenses like that).
-
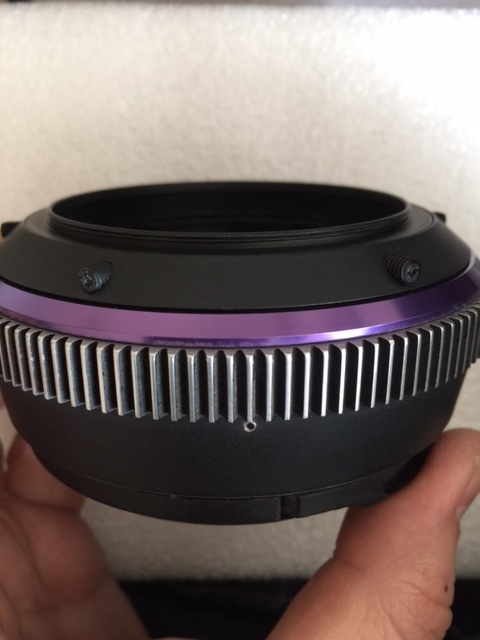
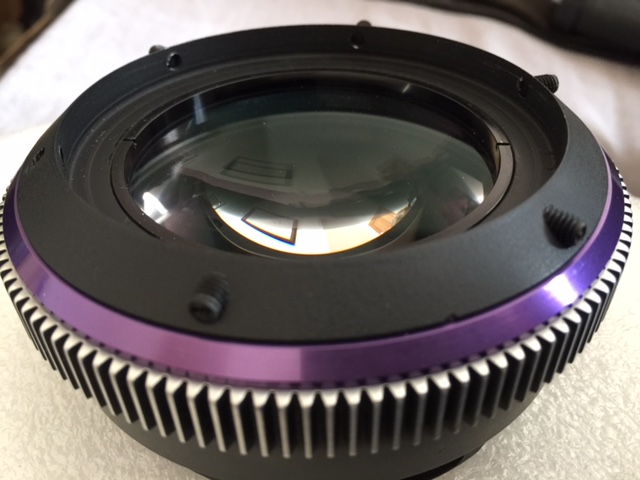
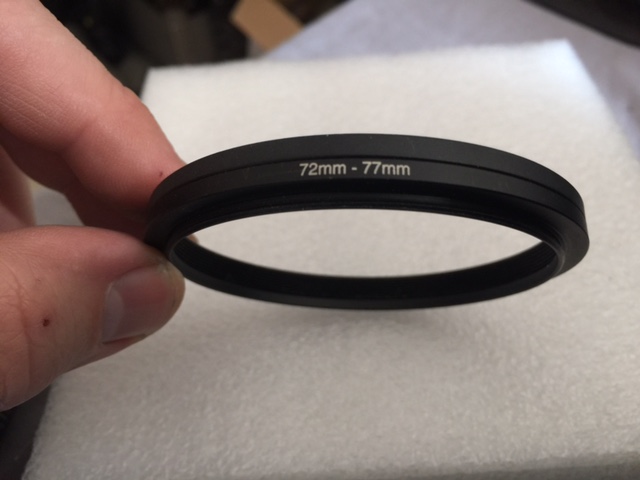
Taking the DNA apart is easy, there are instructions that are supplied when you receive it. You just need a cheap precision screwdriver set to get the small screws out without damaging them and a small hex key to unlock the focus ring. Or whatever the hardcore version needs to open it up (may be slightly different from original DNA design). I did the work myself, but if you have no experience with a lathe, I strongly advise you find a local metal/machine shop to do it for you. Once you disassemble the lens, removing the rear optic is easy and you are left with the rear section of the DNA body that just needs the rear opening to be enlarged. If you supply the machinist with a 77mm step ring and basically say ' I want this ring to snugly fit inside this hole' - they cannot really go wrong. The only thing they need to be sure of is not to go any deeper than where the housing diameter steps down to where the retainer ring is to hold the rear optic in place - once you have the part in your hand, it is very obvious where the lathe needs to stop removing material. If you look at my first example picture, you can see that the metal is removed right up to the point that the housing has an internal thread - to allow rear optic to be screwed in with a retainer ring. Once lathe work is complete, spray the area with some acid-etch black primer spray paint to give a hard wearing matte black finish to cover the bare metal...this will eliminate any unwanted reflections to the rear optic and make the lathe job look 'factory'. You may not need to lathe the rear diameter if you clamp 2 x 72mm empty rings with 77-72mm ring (to effectively give DNA 77mm male rear thread), but you may find that the optic distance and vignette might be too much for your needs, in which case, the lathe method is the way to go...especially when wanting to use DNA on larger lenses.
-
Yes, I used a lathe to open up the rear diameter a few mm's (enough to push a 77mm step ring inside snugly)...and the result? - no useless 75mm rear thread on the DNA anymore. In these pics you can see the mod I did on my DNA (original model) - I expect the Hardcore DNA has the same rear diameter as mine did before I enlarged the rear. Now you can see how I can just drop a 77mm with 72mm step down ring for 72mm lenses...or just keep 77mm step ring for 77mm lenses. The step rings just drop into the new recess, then clamp in tight with the nylon screws. The larger opening (without step rings installed) now allows me to use the DNA on my larger Kowa inflight 1.75x lens and get the optics way closer than the original design..
-
From memory, that will work (with 72mm rings). I have since machined out the rear of my Core DNA to accept two 77mm step rings to be clamped into the rear, works very well...the outer rear 77mm thread is now in the ideal position.
-
First use a 77-72mm step down ring, then add one or two 72mm uv filters with glass removed...making a shallow hood, giving enough thickness for the Core DNA to firmly clamp on the outside diameter of the 72mm step rings (as if it was a lens front).
-
That looks good to me, very similar to what the Wiggle expression does when dialled down to low parameters in After effects. It is perhaps not a traditional side to side 'Gate Weave' look, but definitely gives a physicality to the locked off shots that look quite natural. The rhythm to that movement is similar to operator breathing whilst holding a heavier camera as steady as they can...so it is not distracting IMHO. The advantage of adding post moves like this - is that is can (as in your example) make the camera appear to have added weight, and that its nodal point to be further back...like a physically larger and heavier camera. This little visual cue can often give the viewer the impression that it has been shot on a 'movie camera', rather than a super light weight dslr. I often apply stabilisation to my footage (even for tripod pans) at a very low setting. This gives a similar effect of a larger camera being used, since it dampens the camera moves to appear to be a bit softer. you could even go a bit more subtle for the longer takes - the nice thing is it that these subtle moves work great when very little movement is introduced...just enough to break the staticness of a locked of tripod shot (if that is the intended look).
-
The trickle down effect from 8k cinema to consumer model cameras will inevitably happen, where horrible colours and in-camera sharpening and compression will no doubt be employed. Codec support and media will be slow to catch up and be supported as a standard...much like happened with 4K. Marketing will indeed by hyped, clients will assume more resolution is better etc...it's the same story each time. I wouldn't be too concerned though, it's a long way off until existing HD and 4K is properly implimented yet. Many broadcasters and web platforms are still yet to catch up. The distribution and processing of high bandwidth data is always going to be the bottleneck...it takes time for the price point of many factors to converge for these things to become economically viable enough to implement for mass consumption. 8k camera acquisition gives amazing options for filmmakers to implement for 4K/2k delivery but 8k as a resolution for consumer presentation and delivery...is a long way off (and mostly pointless in many cases for traditional projection viewing). If a wedding client specifically asks for an 8k delivery anytime soon, then they either have a suitable budget to give you for the job, or are completely clueless. Good colour science and dynamic range is what most camera manufacturers know is what makes good pictures, resolution boost is a bonus if it does not complicate workflow too much. But as happened with HD/4K buzz when it was new...you will initially have a load of crap coming out so it can wear that 8k badge on its side. I suspect that s35 will be less of a standard with these bigger sensors becoming more common. The Red helium 8k VV looks like the way things are heading...camera-wise at least. That camera in particular is the first thing produced by Red that I think delivers on their braggy-jock rockstar attitude that they used to throw around.
-
...saying that, the example video does look a bit distracting, mainly because the detail is being combined with very deep depth of field, causing a bit of 'sensory overload' - especially when subjects have vivid colour. I'm also not sure how many actors and actresses will appreciate every pour of their skin being revealed in a closeup at 8k, they complain enough as it is at 4K which is why digital makeup has become a very common thing these days. My guess is that by the time affordable 8k consumer cameras become common place, I suspect the actual resolving resolution will be closer to 4K after broadcast/streaming compression takes its toll, not to mention whatever tricks the camera is doing at source to quickly write to compact media. For now, Red seem to be getting it working pretty well. Mark Toia seems to describe the advantages of 8k as a capture format quite nicely (even though it's a bit of a sales pitch)..
-
Shooting 8k is not too much. 8k and beyond has/will become more and more necessary for movies that involve heavy visual effects. Being able to work with high resolution plates that have the headroom to allow re-positions and the overall detail boost for blue/green screen work is a huge advantage. When 8k live action is inter-cut with CG characters, the 8k footage (often down-scaled considerably) now matches the resolved detail that CG characters and environments can have (because they do not have to be 'captured' photographically). Traditional techniques of lightly degrading/softening the CG image to match the live action plates is becoming less of a thing when shooting higher resolution 'cleaner' live action elements. 8k is also a no-brainier when it comes to being an attractive acquisition format for archive purposes, it will have a longer shelf life in regards to being compatible with ever-evolving displays and projection systems whenever the 'negative' needs to be revisited. All of the above has a recent real-world example....Guardians of the Galaxy Vol. 2 Back in the day, Vista Vision format was often employed for effects shots that required optical compositing and many passes through the printer would cause generation loss. Once the larger format of Vista Vision optical composite was down-scaled and printed to 35mm, the grain was effectively reduced to a regular size (or smaller) and the generation loss of detail was no longer apparent since the reduction to 35mm was effectively returning full resolution to that smaller format. ILM were the most famous users of this technique and that is why they became the best in the business...providing the best quality optical composites for effects shots in films. Although we no longer have optical compositing generation loss to deal with, shooting larger format at 8k+ still has many of the advantages that these old optical tricks gave. The effect of reduction/downscale alone to a lower resolution gives a massive improvement to perceived sharpness, as well as huge reduction in noise - since any noise artifacts are literally shrunk. I remember when people were asking if upgrading to HD cameras was overkill...how quickly we forget. 4K down-scaled for HD/2K delivery works great, since compression and noise artifacts from footage is visually reduced, So 8k down-scaled to 4/2k projection makes particular sense in this regard. Consumer 4k cameras often have so much in-camera compression applied to get to that resolution, that the image suffers until down-scaled to HD anyway, which is why a solid HD camera with good picture and colour, often trumps a 4k camera, in terms of delivering a pleasing image. So, shooting cat videos in 8k at home might be too much (unless it is really cute) , but there is an increasing need out there for 8 -16k cameras out there for film production that require visual effect integration...last time I checked, that accounts for most Hollywood releases for the past 25-30 years.