Search the Community
Showing results for tags 'Light'.
Found 8 results
-
How To Film In Natural Light Not enough light: Move the subject closer to the light source, bring the camera closer to the subject, angle the camera to create a silhouette, use a lower f/stop. Try to focus on how the subject is lighted not the background. Possibility: Use a slower shutter speed if there is less movement going on. If you can decrease the frames per second, and maybe try using a time-lapse. Better yet, for wide-shots use a wide angle lens with a low f/stop. Controversial Hint: Despite the criticism on this subject, do not focus on noise/grain. Try to use On-Camera lighting well. Too much light: Move the subject farther away from the light source, bring the camera farther from the subject, angle the camera to create a clean background, use a higher f/stop. Possibility: Use a faster shutter speed if there is less movement going on. If you can increase the frames per second, and maybe even try using slow motion shots where there are lots of fast movement. Better yet, for close-ups use a telephoto lens with a high f/stop. Controversial Hint: Despite the criticism on this subject, do not focus too much on highlight loss. Thoughts on All of This: Do not try to add any reflectors, add more lights, get people to help you out unless you have figured out how to light the scene naturally. It can be expensive.
-
Hey guys, hope this is okay! We're the Aputure Lighting team and have been working on a lot of educational tutorials lately on how to shoot on-location and in different settings. This week we did an episode at a Jail Set and did recreations of famous jail scenes. The idea is to break down quick and simple lighting setups and start getting the online creator community to think a little outside the box of 3-point lighting. Would love to hear what you think. Happy to answer any questions. And if you like the episode, we're always happy to take requests for episodes or other tutorials you'd like to see. - Nerris from the A-Team
-
- 1
-

-
- lighting
- jail scenes
- (and 10 more)
-
Hello, I am new to this forum (first post) and beginner filmaker and I will need advice ... Last June I started shooting for my documentary project on the local natural heritage, for now with my own money, so my gear is rather light... I'm shooting with a Canon Eos 70D DSLR, outdoor, and i'm shooting the natural spaces of a valley (along a river). At the start I wanted to film in RAW with Magic Lantern, but with my 70D i'm stuck in 720p (for a continuous recording), so finally i've shot in a compressed way, Mpeg-4 All-I 8bit 4:2:0 @1080p 29.97fps with a picture style (EOSHD C-LOG (0,-4,-4,2)) + Vari ND Filter, hoping to get myself out of it even in post-prod ... But here the quality of the images, in a context of shooting outdoors in shaded places very contrasted (...), do not satisfy me ! So I would like to have advice to achieve a higher quality outdoor shots (natural light)? To illustrate my purpose you can see these few shots that I graded in Resolve + corrections in After Effects: https://vimeo.com/alexandrewebercom/riviereardeche The third shot is particularly ugly ... - Have I "pushed" the mpeg-4 too far by color grading it or is it simply the limitations of this compression? - How do I do with hyper contrast scenes (it was about 14h when shooting)? - Am I condemned to film in RAW whatever the chosen camera (to be able to uncork the blacks or to recover in the whites in post-prod)? - Is it better that I under-expose or over-expose this type of scene? - Can you suggest gear/ configuration more suitable for my use: Camera, Raw / Prores, Log, external recording ... ? Thanks a lot !
-
I was curious why daylight and tungsten was easier to deal with, especially for skin tones. Looking at the spectral distribution of light, tungsten and real daylight provide a continuous spectrum of light, while fluorescent/CFL produce highly spiked light- not continuous. The good news is that the latest LED lights come very close to tungsten/daylight for continuous spectral light. I've got some low-cost CFLs in 2x3 and 2x2 light rigs: I'm going to replace the CFLs with LED bulbs at around 5000K (probably Cree- thanks for the tip FilmMan!) to match the other ~5000K LED lights I use (currently Z96, YN300, YN600, and F&V R-300). An LED spot in a clamp-on work light will also be handy. http://www.cs.cmu.edu/~zhuxj/astro/html/spectrometer.html http://www.popularmechanics.com/technology/gadgets/tests/incandescent-vs-compact-fluorescent-vs-led-ultimate-light-bulb-test#slide-1 (see the spectral charts) (CFL can work OK, but I had to use a tuned camera color profile and make sure WB was set carefully, otherwise trying to fix in post was time consuming).
-
If you would buy a light which should be portable, strong enough to light a set with a few people and doesn't get too hot. Which creates together with natural light and a reflector a three point lighting. Which light would you buy?
-
https://vimeo.com/59642343 Used Equipment: Canon C100 Zeiss CP2 18mm/35mm/85mm “A human being is only breath and shadow.†– Sophocles This quote from Sophocles inspired me to shoot this short film. It was a really nice experience to work with Canon C100. I pushed the ISO up to 4000 because i wanted to see how much noise will be generated. Of course there is some grain in the picture but the low light ability of the Canon C100 is still amazing. Working with the Compact Prime Lenses was uncomplicated. The Magnifier Button, which operates also during recording is an amazing tool. The form factor of the C100 is very handy and you are able to make your shots in a quick and comfortable way.
-
This is my short film 'Light' I've been making over the last month using a Canon 600d with Pentax lenses. http://vimeo.com/69428988 It's a short (90 second) simple story about a lighthouse getting through the night, and features lots of experiments in cinematography - all done on my kitchen table with reversed and macro lenses and a lot of ice! We used a Canon 600D (with Pentax adapter for my lenses) for the film itself as the manual control on this camera, the full HD digital zoom ability and swivel screen made it very useful for those tiny close ups! The film is all shot "live" in 25 frames per second, it's not animated. We used a Pentax-A 50mm f1.2 and a Sigma 24mm superwide II f2.8 mounted in reverse for super-close ups, and a Pentax-A 100mm f4 macro for the widest shots - none of which had an area bigger than, say, a post-it note - and some of the extreme close ups were over an area the size of a fingernail or smaller at around 2:1 to 4:1 scale. For the reversed lenses we used a Canon to Pentax adapter, then a Pentax reversing ring (52mm filter thread for both lenses), then the lens! Note, if you want to use a lens in reverse for close ups you need to use one with an aperture ring, which means most modern digital lenses won't give you any aperture control. We needed a lot of light for shooting down to f16 at 1/50 at ISO 160 in extreme macro where you get several more stops of light falloff, and so we had a big hot 800W light. For some shots it was around a foot (30 cm) from the ice, causing severe melting problems! So we needed to be fast and accurate with focus to a millimetre level on a disintegrating, slippery set all of which was too small to position without completely ruining composition! Most of the time it was a fun challenge but was occasionally frustrating! The ice variety was achieved by chipping it in different ways, letting it melt for different times, freezing larger volumes of water (mug sized) and smashing the ice with a hammer to get particularly clear stuff, or ice cube size to get the cloudier stuff. Some of it had a small amount of blue food colouring too. We edited in Premiere Pro CS6 and After Effects CS6, where we added the lighthouse light and did a little colour correction. The film was made for the Depict short film competition in the UK. I hope you like the film, happy to explain any techniques and looking forward to hearing your thoughts.
-
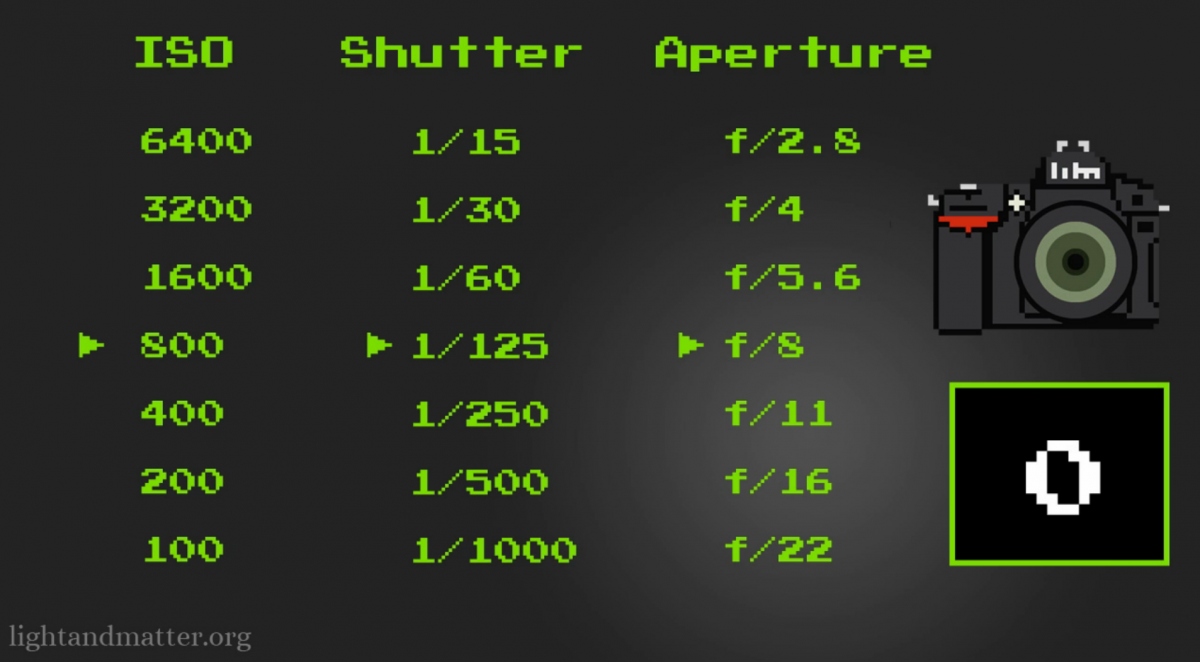
I learned a lot lately about shooting with a DSLR but one thing is still confusing me - the frame rate versus the light. Maybe this forum can help me (again) on this one? A - As a new be on DSLR shooting I was recently thought that when choosing shutter speed I should use twice the frame rate I'm using. Especially when filming indoors with artificial lightning - avoiding the flickering effect. So when shooting at a frame rate of 24 fps I use 1/50 shutter speed and when shooting 50 fps I use 1/100 shutter speed. B - But on the other hand there are the rules of light. The aperture, the shutter speed and the ISO settings which help you control your light. I red about the stops and how I can compensate them. And I red about the White Balance - all methods to adjust your lightning. My questions are: 1. - How in earth do these - A rules where I should double my frame rate to set the correct shutter speed work with the light rules - B? I won't have much space to adjust my shutter speed ... 2. - And what is the rule of thumb when setting your lightning - go from adjusting first your aperture, then to shutter speed and then ISO? 3. - And what if you want to freeze (speeding up the shutter speed) or blur your image (lowering shutter speed)? Or is there no rule of thumb? It would be awesome if I could finally return to creating visual stories instead of learning all about the technics :P