OleB
-
Posts
132 -
Joined
-
Last visited
Content Type
Profiles
Forums
Articles
Everything posted by OleB
-
Really eager to see if this might be the Foveon sensor which is (finally) coming, or indeed something even more into the cinema direction. 😁
-
@llasseerr Have run a couple more tests and am pretty happy with the consistency by now. But one thing could improve the workflow a tad more. Have the feeling that the Atomos is as well not using the correct gamut, so could the step which I have described with the Panasonic LUTs reduced to one LUT? Am talking about the 2 step conversion from RAW gamut to V gamut and afterwards V gamut to Rec709. That is certainly way beyond my skill level, so if you have an idea if that is achievable to have that step in one LUT to upload onto the Ninja that would be awesome. Cheers
-
V-log yes. You choose that one in the info panel, but the gamut needs to be converted from RAW. They are not providing a LUT which does everything in one step. Instead they wrote this manual: https://av.jpn.support.panasonic.com/support/global/cs/dsc/download/lut/s1h_raw_lut/index.html This is what I have applied and it works a charm. Even if you add one further LUT and replace the step v-log to Rec709 with v-log to Arri LogC and afterwards the Arri LUT 709. Capable little camera and now a consistent workflow without manual knob turning. 🙂
-
Okay here comes the result. Fiddling with the saturation knob is not correct at this stage. I seem to have missed one important step, which I have now found after reading through Panasonic website. The PRR RAW file needs to be brought into the V-Gamut first before selecting the Rec709 LUT. They have a technical LUT for this to download. Steps: 1. RAW to LOG convert in FCPX info tab set it to Panasonic V-LOG 2. Add 2 custom LUTs at the end of the editing chain. 3. Select Panasonic V-LOG RAW to V-Gamut LUT <= This step brings the colors back to where they should be 🙂 4. Select Panasonic V-Gamut to Rec 709 FINALLY!!
-
Experimenting with Resolve right now to figure out why the above is happening. Not very familiar with the software, but what I did, I imported a PRR clip to FCPX and exported it into ProRes 422 HQ without any adjustments. Now I have imported the clip to Resolve and put the V-LOG to Rec709 LUT in the last serial node. Before that node I have created a color space transform. Now testing various settings. Could it be, that there is some sort of input gamma issue and because of that the colors are not saturated enough?
-
To follow up on this topic. I am now working the intended way with the V-log conversion and LUT. From what I see the color saturation is about 50% off. Meaning not saturated enough. Fortunately I have a Leica SL2-S available so that I can check how the color checker should look like after converting L-log to Rec709. If I go the way with the V-log files and their LUTs it is not a one click solution, but at least it is close after pulling up the global saturation. Guess that is what we have to live with, because there is no Sigma log and no proper Rec709 LUT.
-
Ok thanks. That seems logical. However we now have established that ISO100-800 is the same in regards to sensor clipping. If you check the fp dual iso manual. The most balanced amount of stops above and below middle grey is with ISO 800. comparing this chart to the one from ARRI Alexa is very similar with the Alexa having more steps. But ARRI gives 800 as native value. As from my understanding than both cameras could have an EI of 800 as base and decreasing ISO relocates the stops more to the dark side. With the Alexa you can do the opposite as well, while with the fp you will not get more steps available for the highlights than with ISO800.
-
I came to this because if you select something lower than ISO 320 you will reach sensor clipping before 100 IRE in the LUT. Do not know if this is intentional or I am misunderstanding something though...
-
@Llaasseerr I am now learning to use the camera in the V-log way (with and without a LUT). What I simply do not understand is that if the camera records RAW data, ISO value is basically just metadata. That being said since the fp has dual iso it must have two native EIs. The DR of the camera is always the same no matter the ISO setting both native EIs. Have seen couple of videos explaining that in a dark environment you should use a low EI value and in bright a higher EI. They try to explain that with selecting different ISO values, you are just shifting the middle grey point. On one hand it makes sense to let as much light into the camera in a dark environment as possible, and in a bright environment do the opposite. But yet I am not 100% sure I understand what they mean. For the fp I have noticed that with false colors turned on (and the V-log LUT) only as from ISO 320 you are touching 100 IRE. So I assume that is in reality the native ISO value of the sensor. Or is that already wrong? Maybe you are willing to explain so maybe I can understand this?
-
And that is exactly the reason why b/w footage of "bad" cameras which are exposed for the highlights are still looking good. You can try this easily basically with every photo in Lightroom, if you see the ugly yellow ring around the sun, turn the picture into b/w and the rolloff immediately looks great. 🙂
-
Thank you very much! I think I now got it. Weather is getting really nice here the next days, so finally I will try to capture some footage with this new knowledge. 🙂 When is your camera supposed to arrive? Guess you have a good starting point established now as well.
-
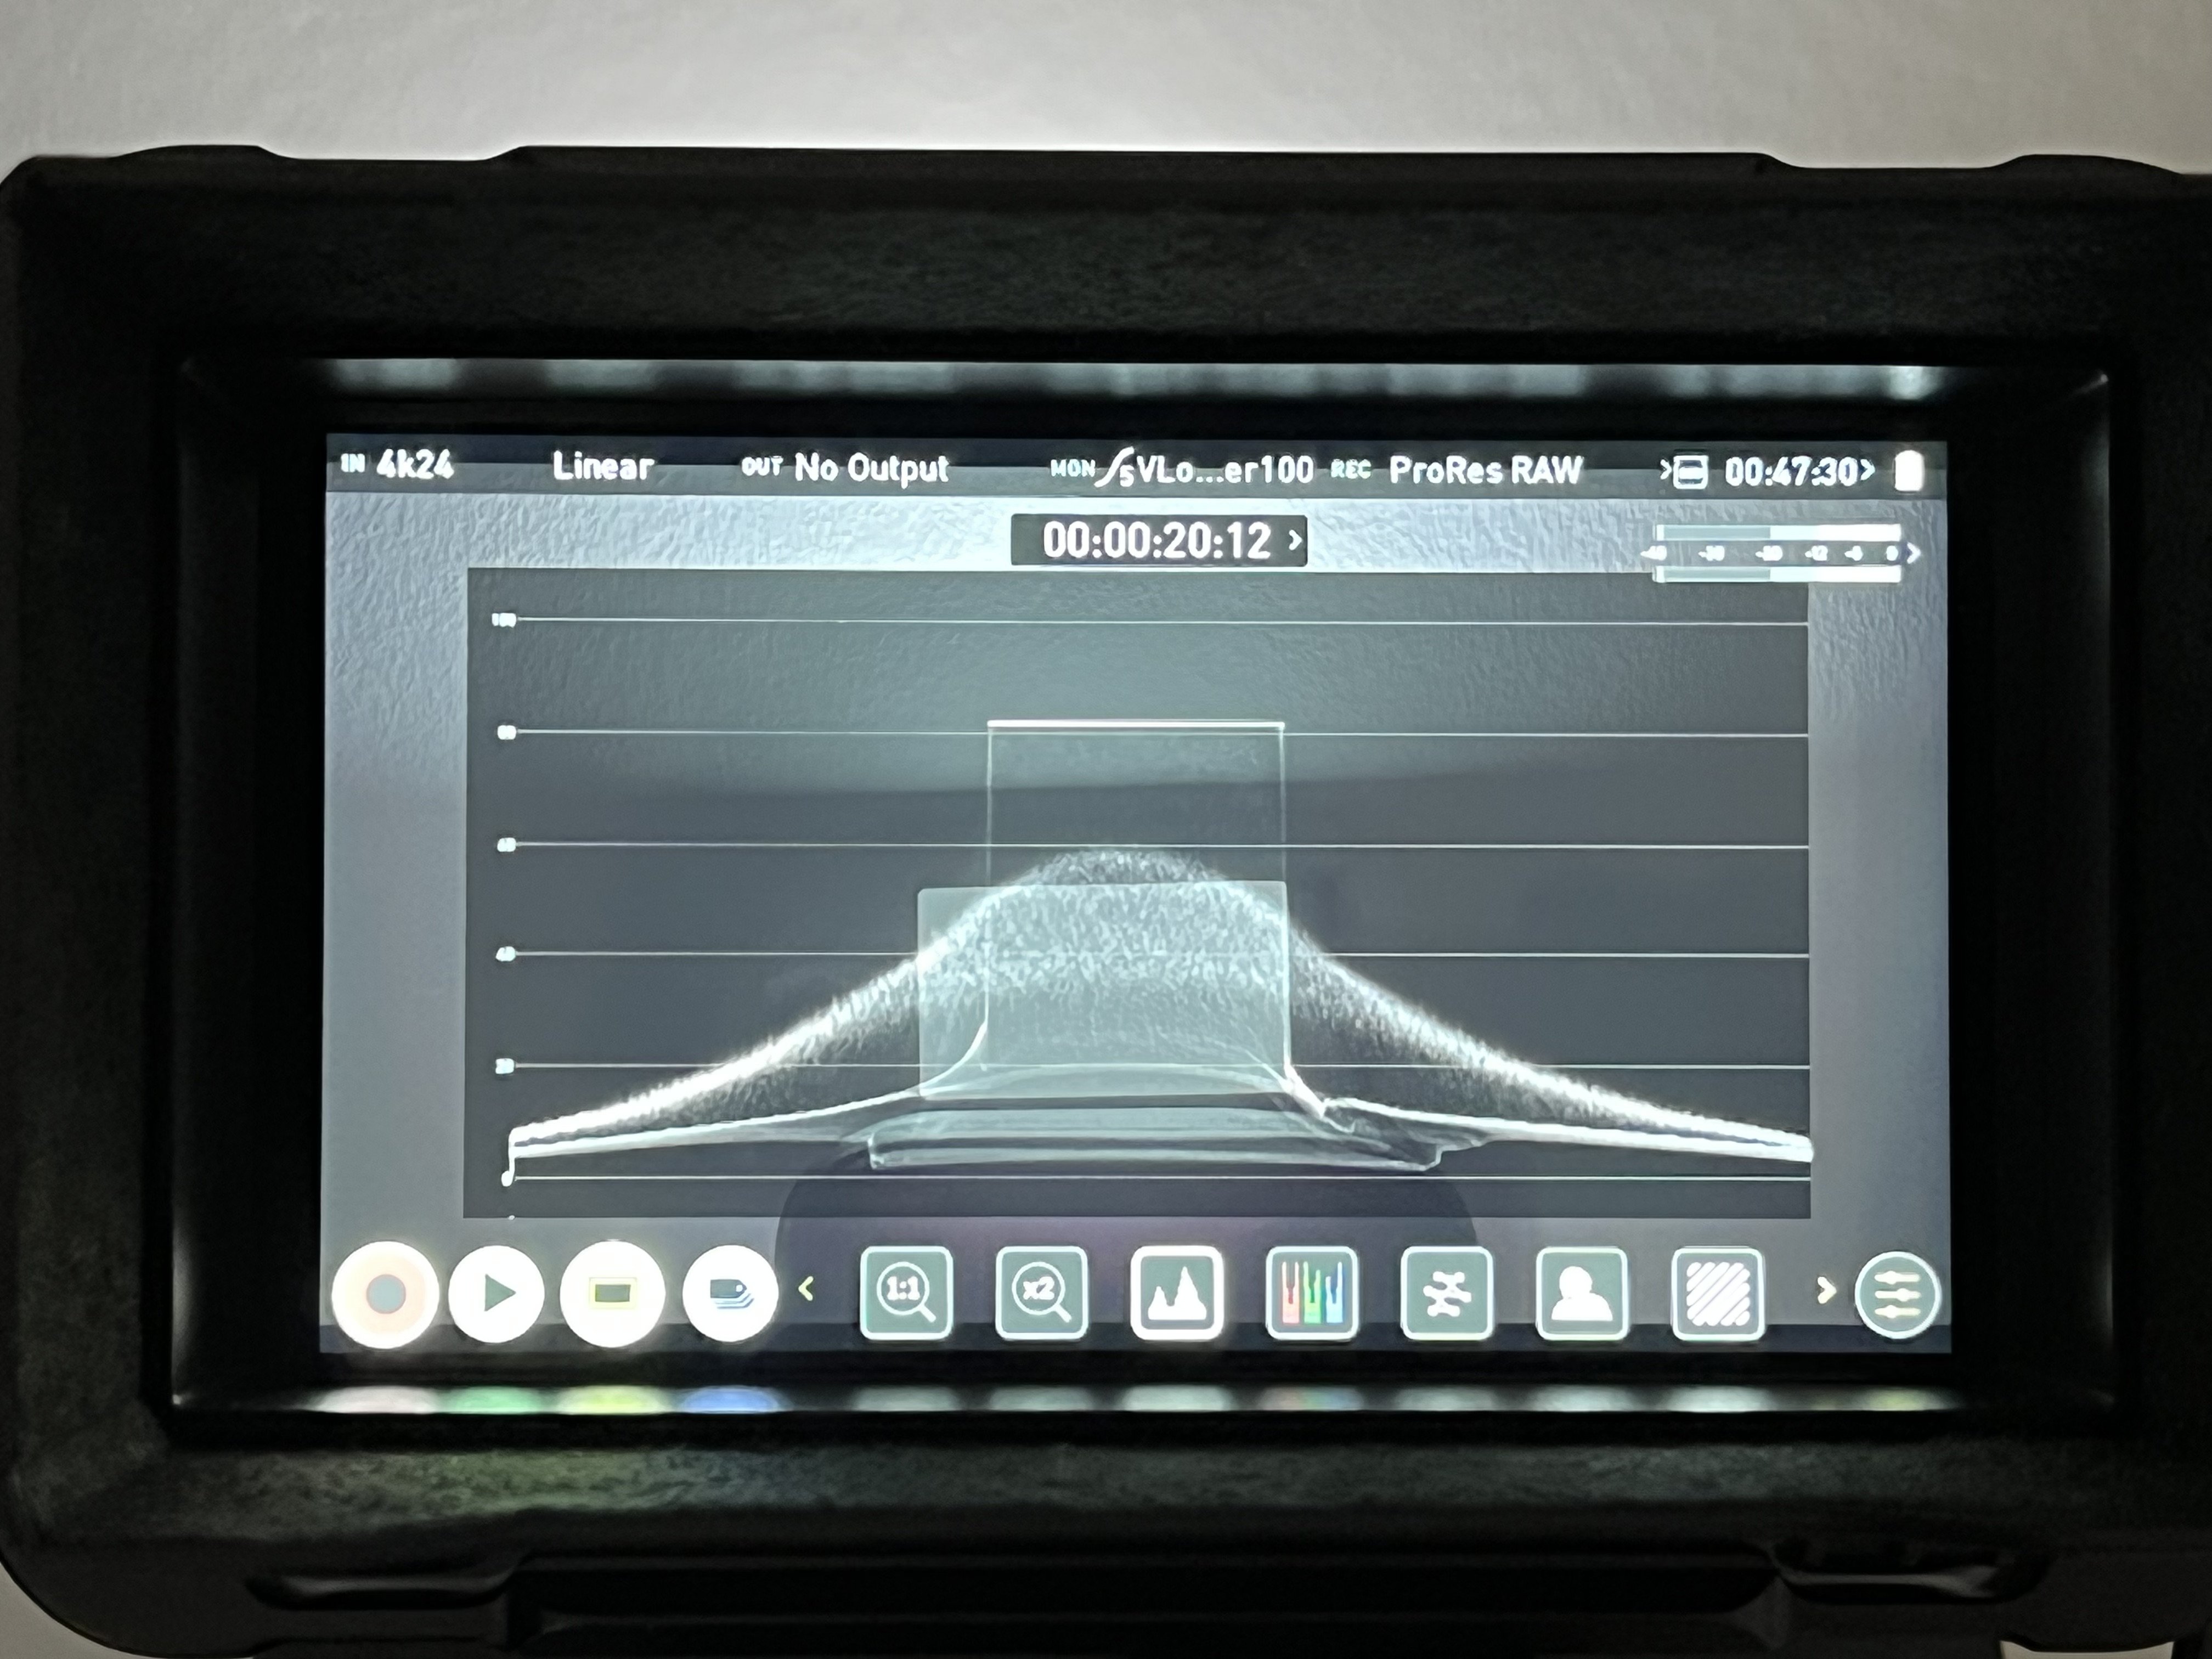
Thank you for the extensive write-up Llaasseerr. Agree, that with the V-log LUT loaded on the Ninja V you have something to work with. If you select the same in FCPX the result is very close to what has been shown on the monitor. Now the only thing I do not understand ist that in native (V-log) mode the clipping points of the sensor are different with the various ISO settings. I would have expected that the DR is the same for every ISO setting...Let me give you some values to show you what I mean. ISO 100 - clips at about 65 IRE ISO 200 - clips at about 75 IRE ISO 400 - clips at about 82 IRE ISO 800 - clips at about 90 IRE ISO 1600 - clips at about 90 IRE ISO 3200 - clips at about 85 IRE ISO 6400 - clips at about 90 IRE rest stays at 90 IRE The noise floor / black level stays the same for every ISO setting. About 8 IRE. What might be behind this? When reading these figures I would assume that for max DR I should use ISO 800... When inspecting the scene with the LUT thrown on you are facing a situation where the absolute whites on ISO 100 are not reaching red, and cannot go higher than yellow. This is confusing me, because I am not understanding the intention behind this, if any. If you can shed some light on this, would love to hear 🙂
-
Have investigated this further. Look what I have found in regards to the fp behavior in RAW on the Atomos. Monitoring of RAW input in: - Native – Linear to VLog for use with 3D LUTs – can use any existing VLog LOOK LUTs - Rec709 – to view RAW input in SDR up to 6.7 stops of dynamic range - HLG – to view RAW in HLG with up 10.5 stops of dynamic range - PQ – to view RAW in PQ/HDR10 with up to 10.5 stops of dynamic range, for scenes with extended spectral highlights. Am about 99% sure that the camera is showing Vlog when switched to native. As far as I understand from the Vlog white paper 90% reflection is located at about 60 IRE, on ISO 100 the fp clips at about 62 IRE. The higher you go with the ISO (up to ISO 800). The more headroom on top is available. That seems to match the design of Vlog. Panasonic itself writes that Vlog was build to capture the DR of the Varicam, cameras like the GH5 can use the same Vlog but will clip below 100 IRE because of the less DR available. That means you can use the cameras in one shoot and mix them with the same Vlog look. Have also read that Blackmagic took another approach and always create a log for each camera to use the best DR available. So yes, it seems that you can get a quite good match with the Vlog and the official Panasonic Vlog Rec709 as LUT on the monitor. However I am not too sure if this is at least for me a good way of working since I do not know if the next step would be now to figure out the native ISO of the camera for maximum DR in Vlog? S1 or S5 seem to have dual ISO as well with possibly the same sensor, but min ISO would be 640...Cannot imagine that with the fp you can set it to ISO 100 and get good results with Vlog? Or am I getting something wrong now? For now I prefer the manual colorspace matching in FCPX directly from the untouched linear RAW, which gives me great results. And with the PQ view in the monitor I can get a really good idea on how the picture will look like.
-
Thanks, would try that. Where do I get such a LUT file? 🙂
-
For those of you who would like to play around a little with my method. I have uploaded my sample PRR file with the sun as ultimate highlight and the preset I have created for exposure correction, highlight rolloff etc. into the following folder. 🙂 https://www.dropbox.com/sh/cgm80q9w682oc19/AADWHieOS-Wka9JuD-GnXerca?dl=0 All you need is FCPX (trial is available for free). Am very satisfied with the results.
-
Yes, that should do it. Within my tests with the V-log LUT the biggest pain point was that the highlights cannot be monitored unless you select ISO 800 and upwards. Despite that it looked promising. Interestingly the very same issue with the PRR files is happening for all cameras which do not have a manufacturer LUT and log conversion available. Like Z Cam for instance. Atomos has a video on YouTube how to deal with the Z Cam PRR footage and their official way is the same I have used, but with the color wheels for exposure adjustments. Final Cut is not applying any sort of highlight rolloff, they leave it to the manufacturer of the camera to provide for the camera, or for the user to create it themselves. From what I have seen I think they are not in terms of how they handle ISO. cDNG seems to use as well digital applied gain. That is why in the camera all looks good in the newly created internal false colors, but in ISO 800 you can pull back lots of highlights over middle grey. That can only be the case if the camera is still using ISO 100 and after that is underexposing 3 stops to reach ISO 800 and adjust the preview accordingly. PRR in that respect seems to be 'more' RAW. It only takes the ISO analog gain levels and that ISO setting of the camera per se is only a metadata entry. Remember that article you have shared weeks ago from DPreview? The fp seems to have partly ISO variant settings and is pushing and pulling them to reach 'real' ISO values. Would fit the behavior I have noticed perfectly. Anyway, looking forward to your own results. Agree it is quite complicated to follow up without the camera and possibly the Atomos in hands.
-
This topic seems to be endless the more I put my brain into. Have read through the white paper of ProRes RAW and studied a few more webpages. Since the fp does not provide a Sigma RAW to Log conversion and no LUT which is fitting that Log back into Rec709, FCPX uses its standard settings. That means it is importing the file without any sort of adjustment (tone mapping) into the color space of the project. In my case usually Rec709. Because the Rec709 color space has way less stops of DR (about 6 if I am not mistaken) only the first 6 will be shown, rest will cause the picture to be looking overexposed as they do not fit in there in a linear way. Should be about 6 stops more available out of the fp totaling 12 stops of DR. This is how FCPX was designed, so that is something we cannot blame Apple for. The correct mapping should have been provided by Sigma. Seems what I did with my curves is basically a reverse engineered tone mapping. That curve fits the linear DR data of the ProRes RAW file back into Rec709. Additionally taking into consideration a middle grey and the false color steps of the fp in PQ mode. According to the white paper (we already knew that) RAW is HDR, so it absolutely makes sense to monitor the 10 stops we can see in this setting on the Ninja V to get an as close as possible preview of what the sensor captures. In regards to ISO, usually ISO is completely irrelevant for the exposure of a RAW file. Only iris opening and shutter angle have an impact. The ISO value in the metadata is just an information telling the NLE what (digital) amplification to apply. But that seems to be true for complete iso invariant sensors only. The fp however seems to apply some analog gain on some ISO settings making it only partly ISO invariant. This is what the Ninja V shows in the false color mode when you turn up the ISO settings. All in all we are missing that tone mapping stage from Sigma. If I knew how to create a LUT out of these settings there would be possibly the solution to take that LUT onto the Ninja V to grab the RAW data and show a near to final image in Rec709 as well...
-
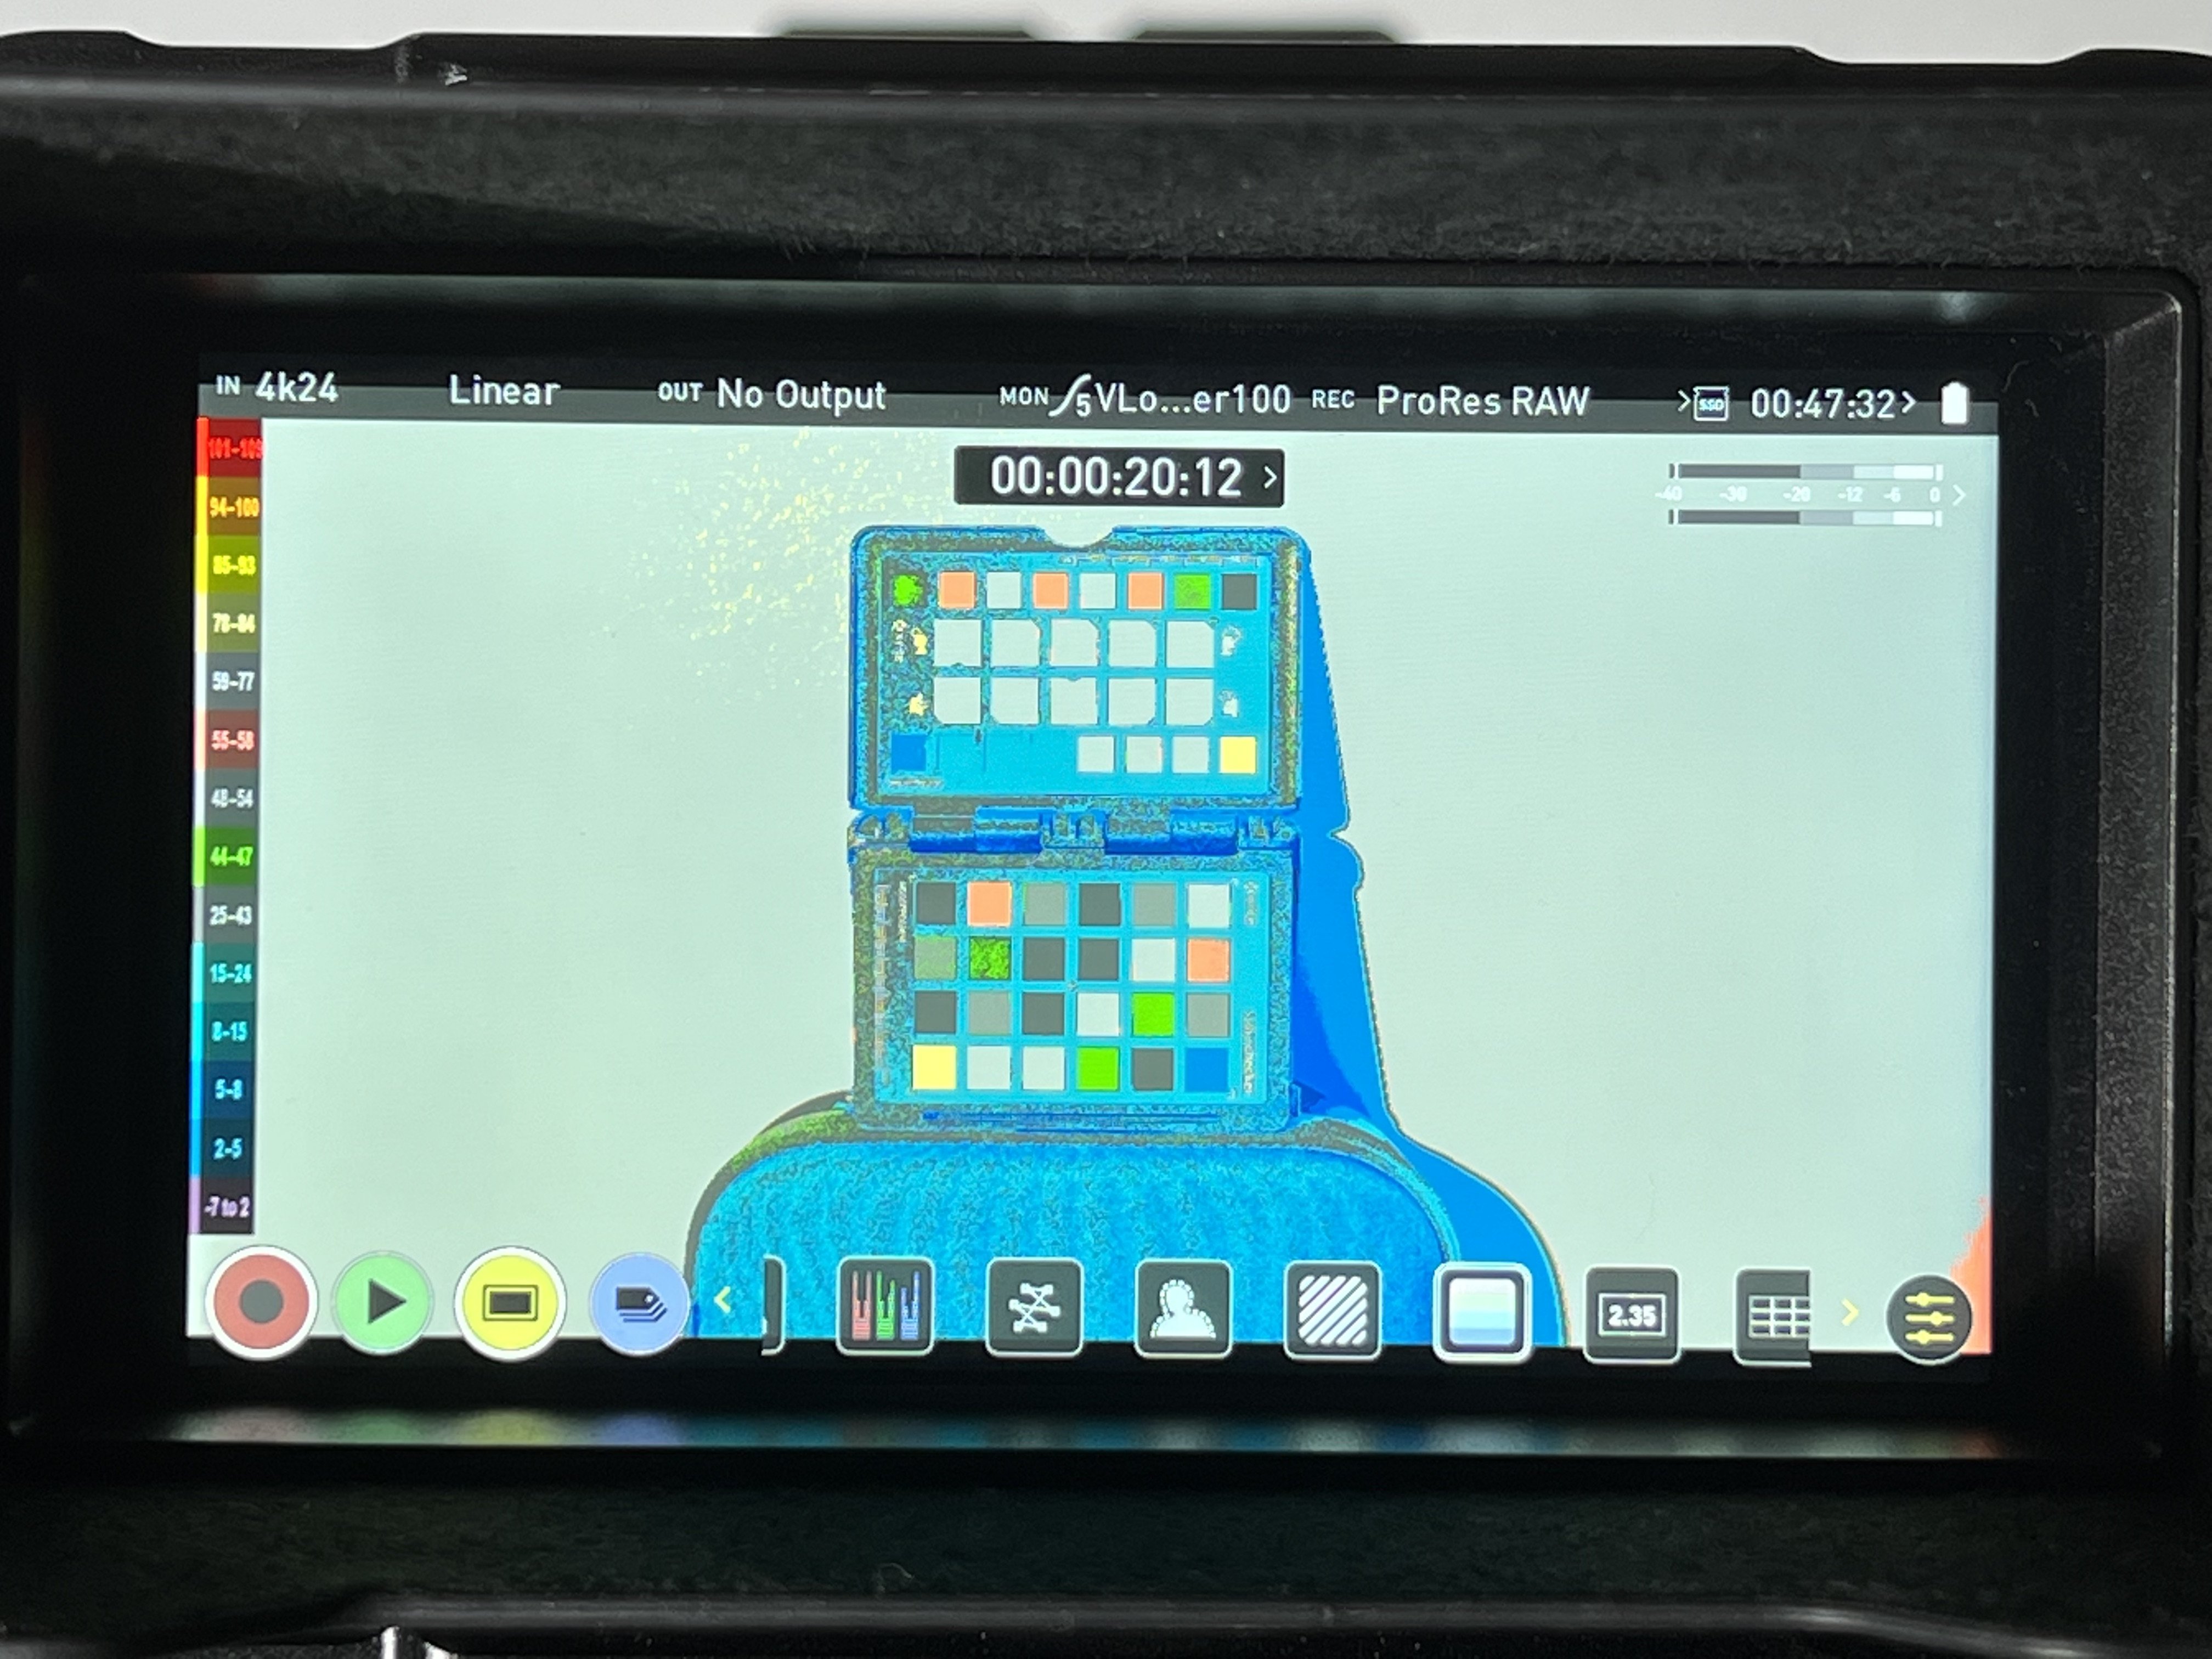
Have checked, the data itself is not clipping. So everything is there. However the IRE value for the white patch was my fault. Middle grey is the forth patch, correct. What I did incorrectly is the exposure, it does not have to be green, it has to be grey. Which in fact is around 50 IRE in the Ninja V. If you do that, the procedure with the LUT would be working. However I do not find the colors to be very pleasing. My way with the custom data to video curve seems to bring me better results. So I have decided that I will stick with the method of monitoring PQ and import it with my presets. Look of both is absolutely identical then. Let us see if Sigma will bring a future firmware update to make this a little more streamlined.
-
Any idea how to do that in FCPX? I have no idea how to do it. 😒
-
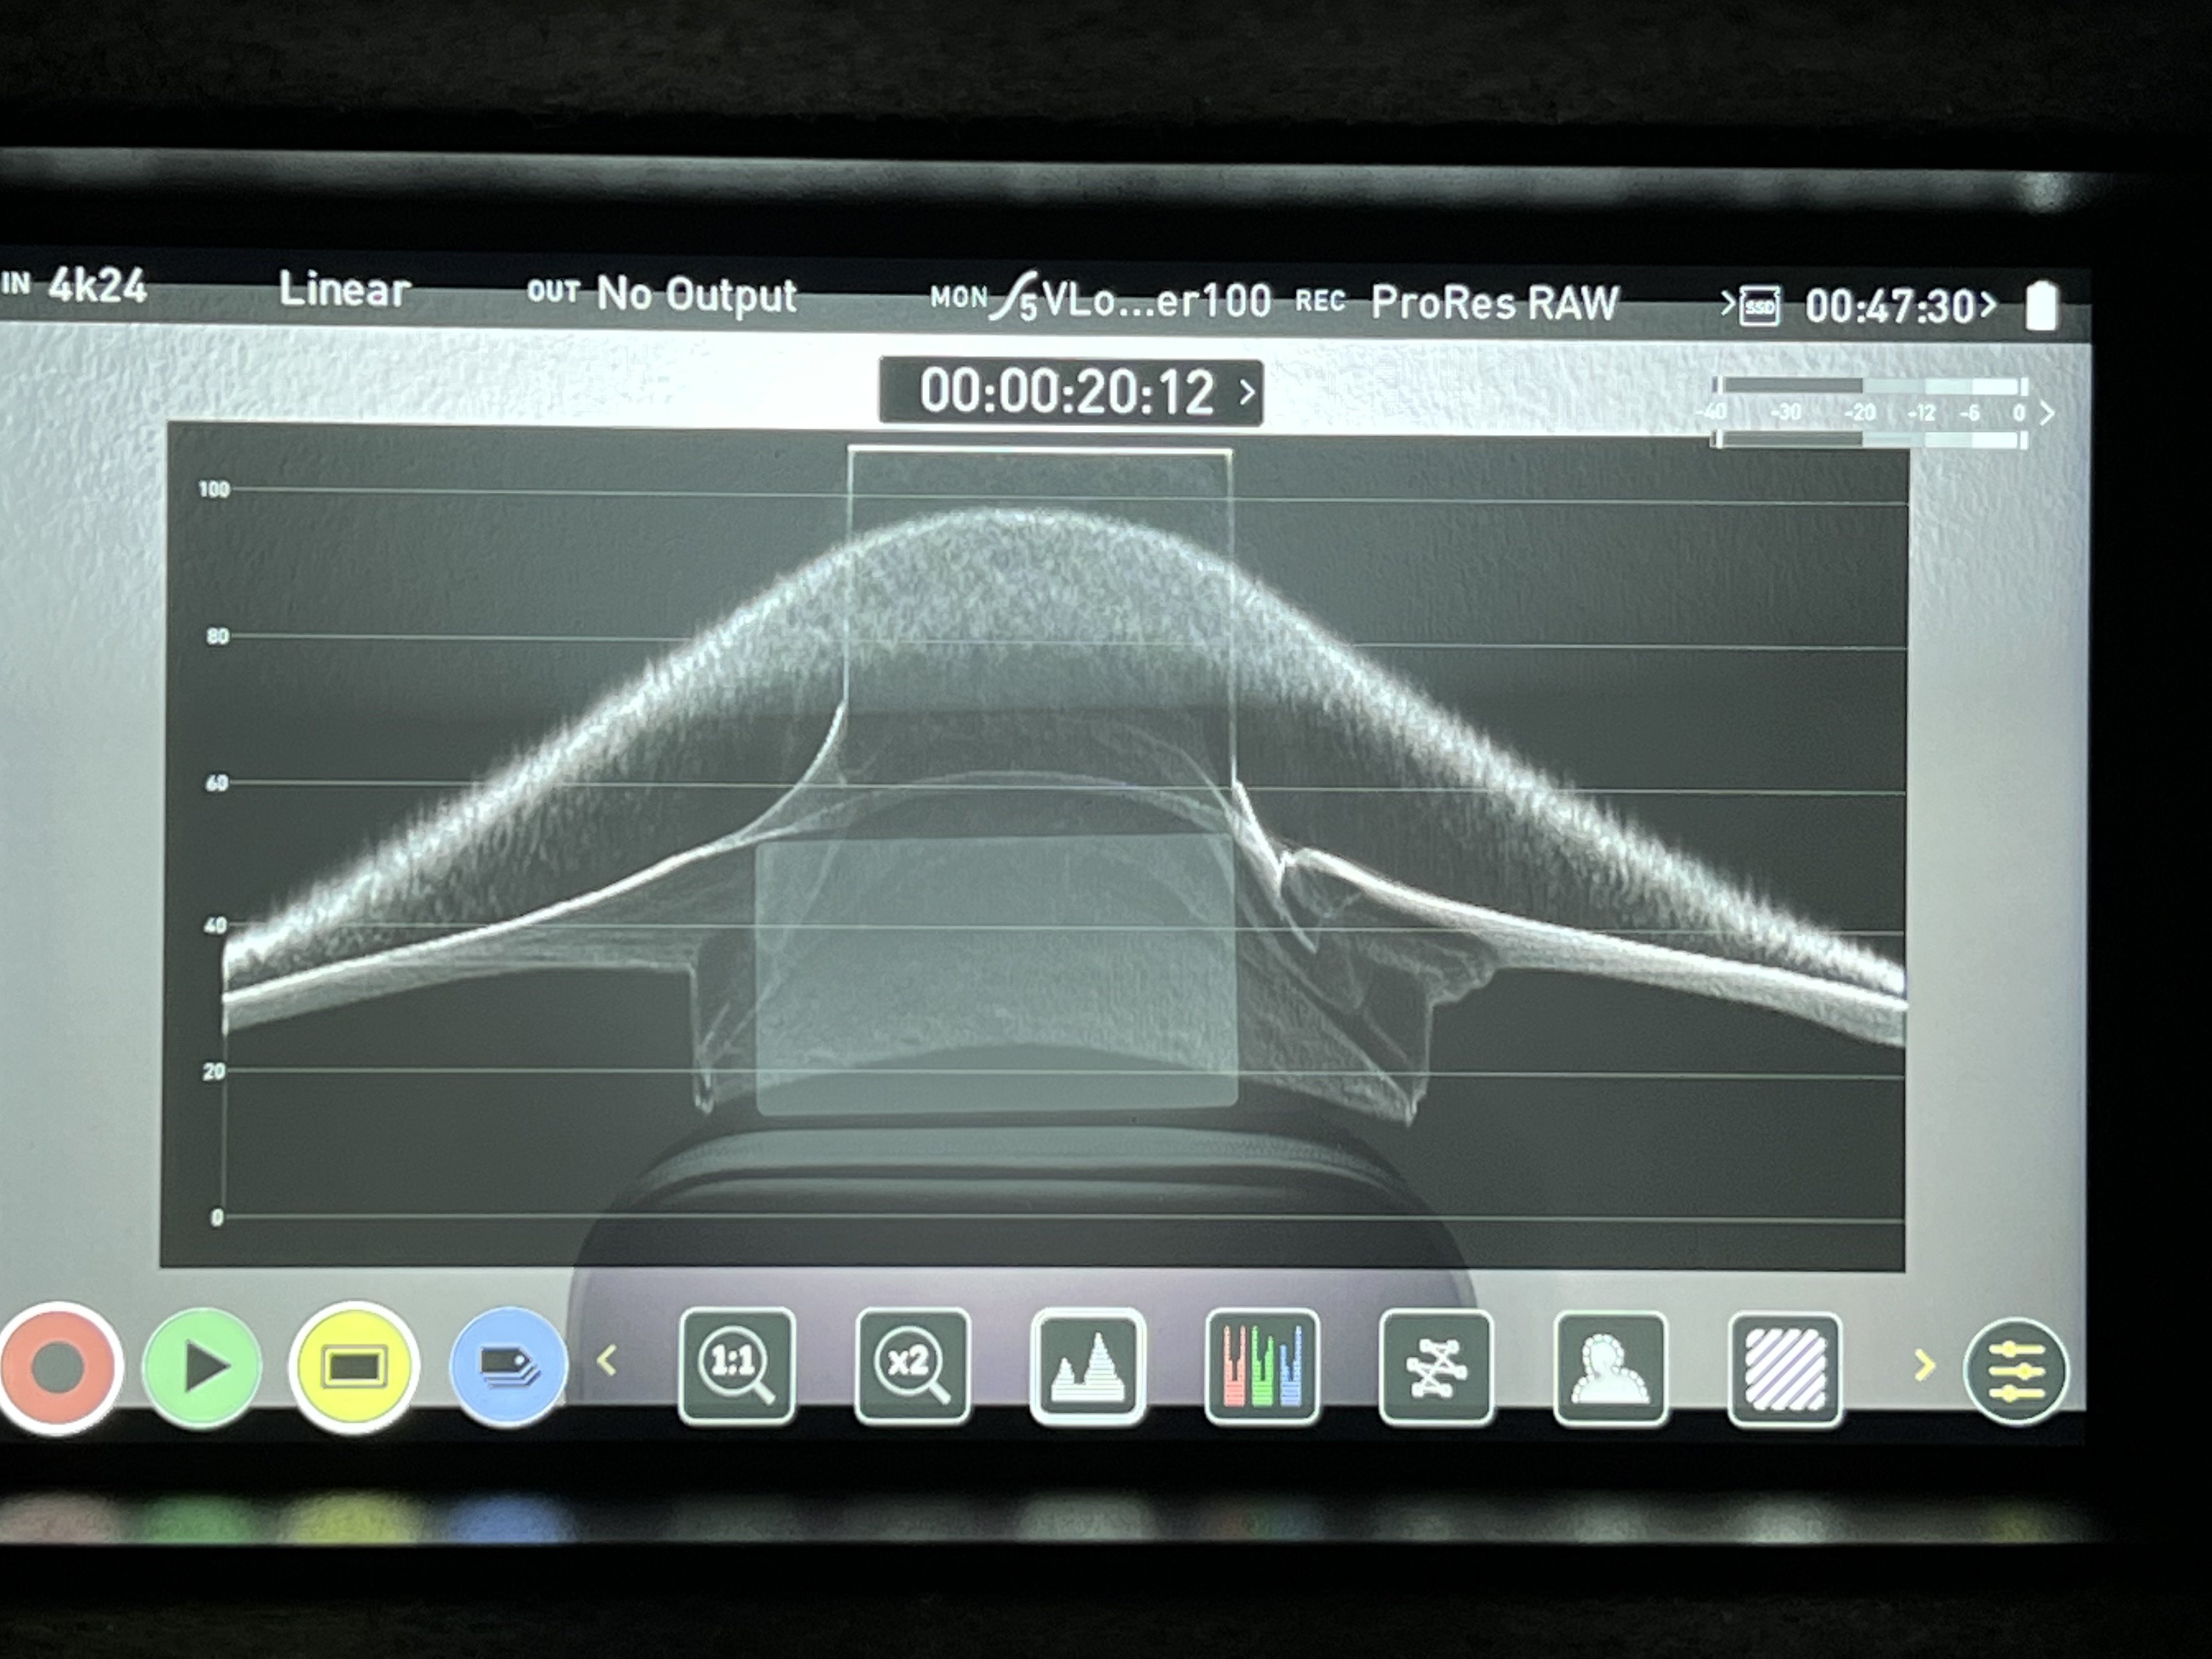
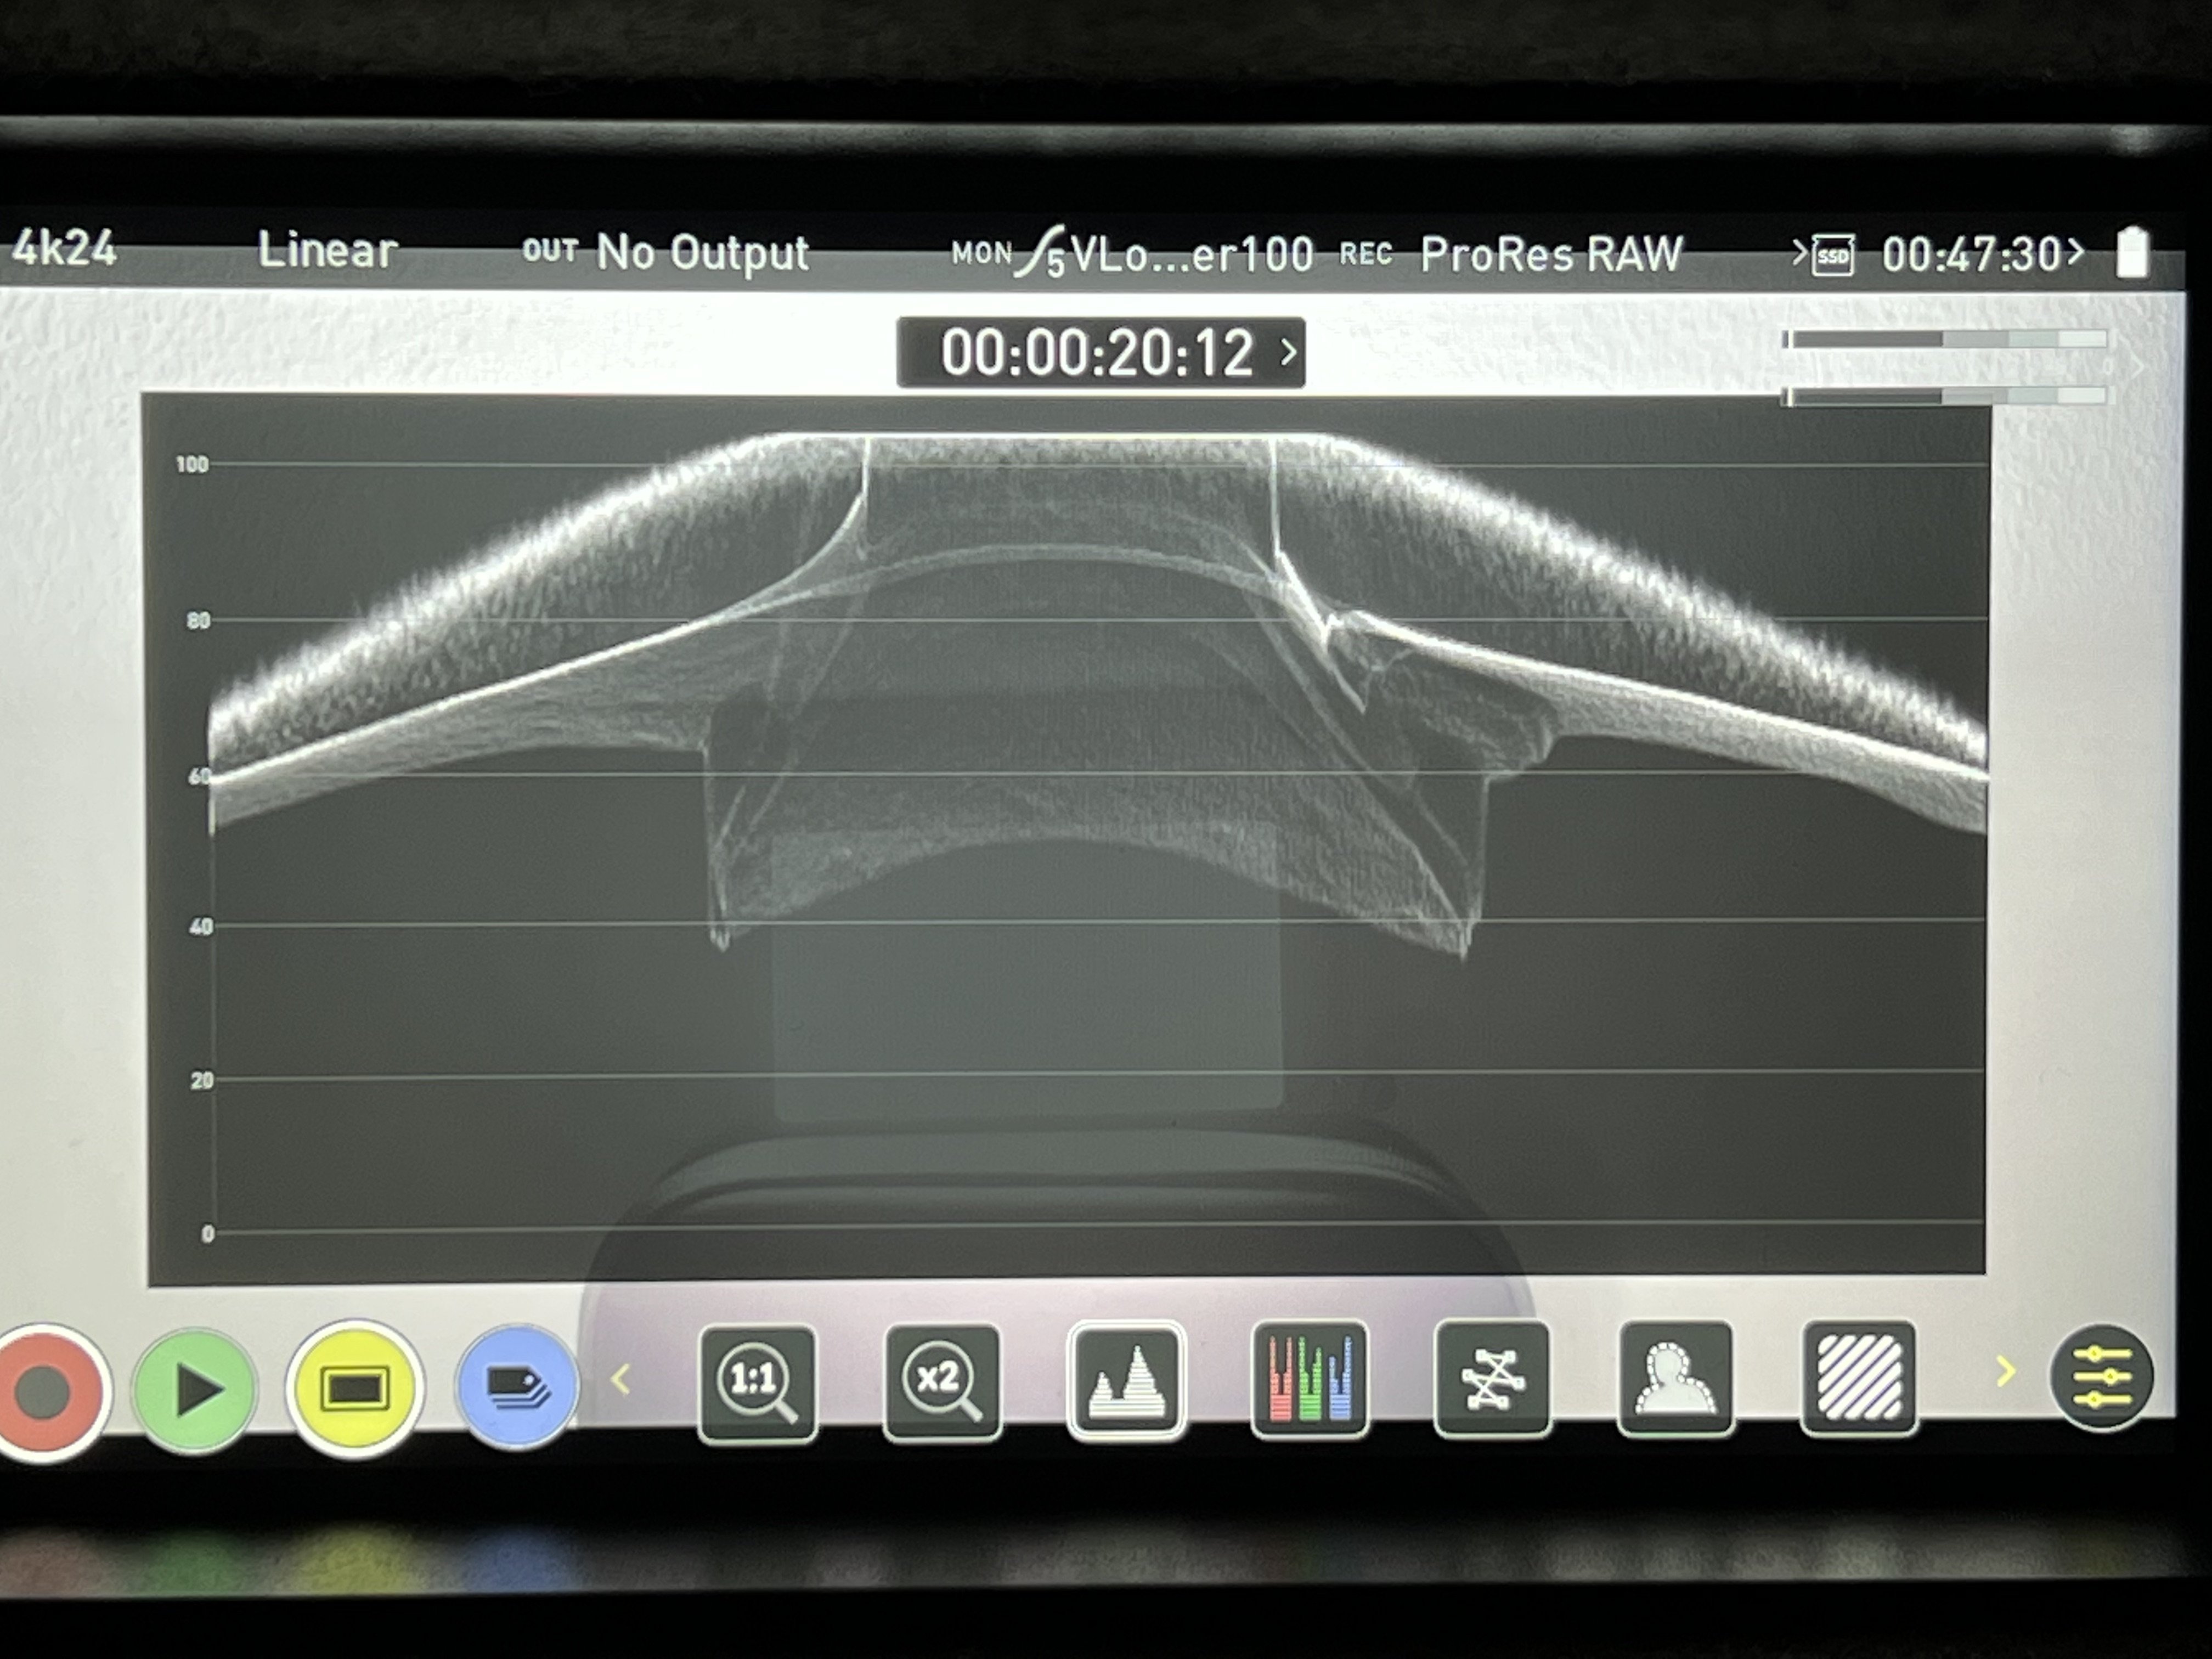
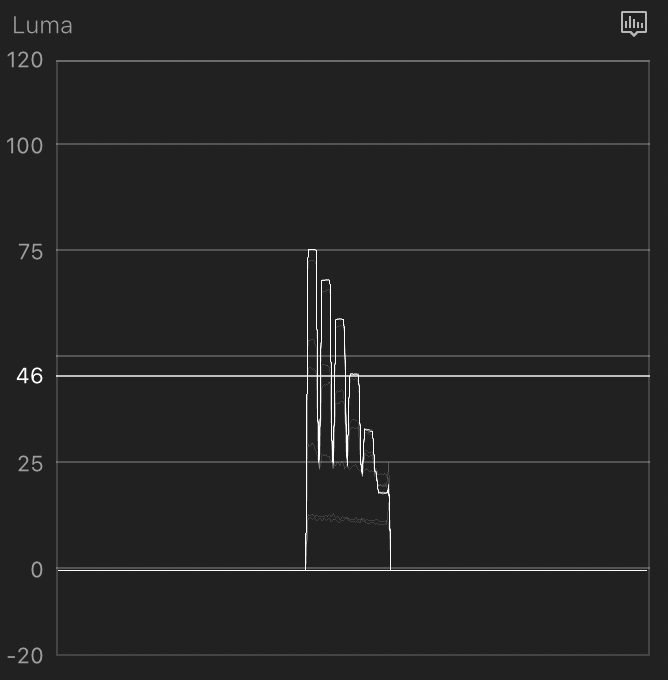
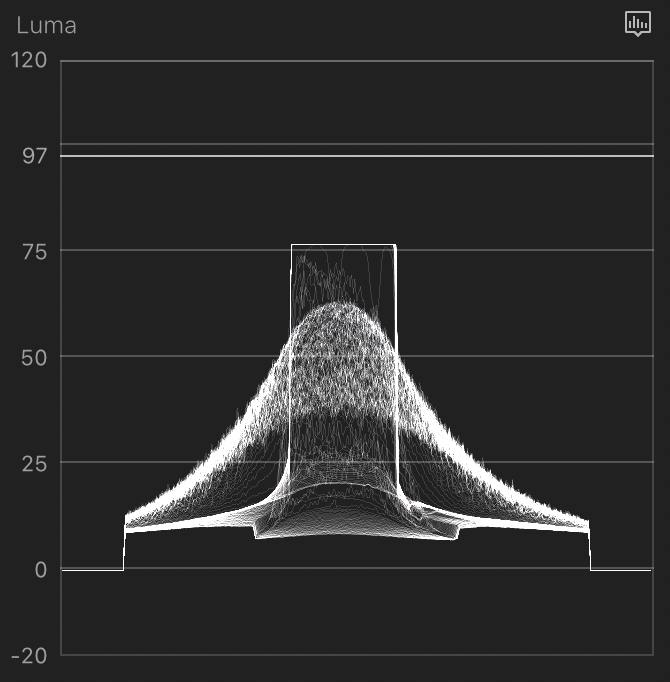
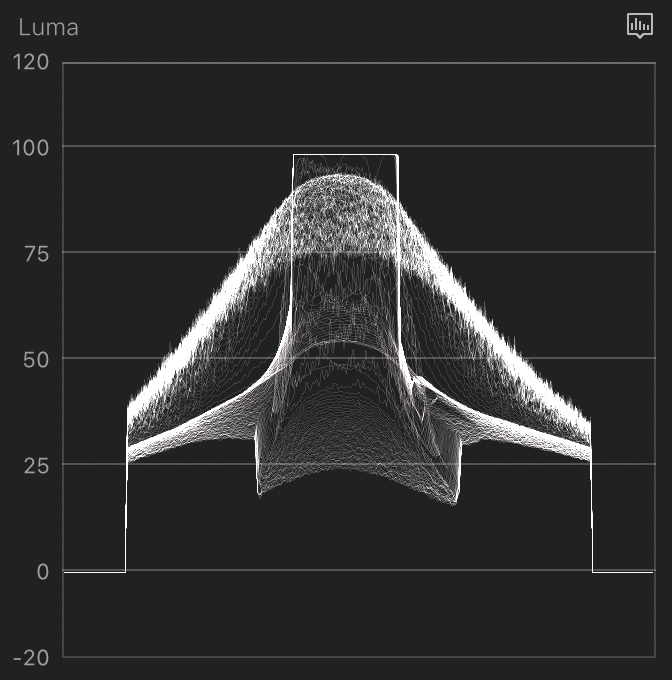
So here we go, took the measurements and uploaded the files for your own tests. https://www.dropbox.com/sh/cgm80q9w682oc19/AADWHieOS-Wka9JuD-GnXerca?dl=0 Have used the LUT which is also included in the dropbox for monitoring and as LOG to Rec709 conversion in the FCPX info tab. RAW to LOG was the build in Panasonic V-log. You cannot load custom conversions into that tab by the way. Good things first, the light meter is matching for all ISO settings with the middle grey representation on the false colors screen of the Ninja V. Visually the preview picture is also a pretty good match. So that part ist out of the way. ISO 100 representation on the Ninja V: How the greyscale looks after import and conversion settings applied in FCPX: That seems to be really close, with a little bit of less highlight brightness. Middle grey is still where it belongs though. All ISO settings will result into the exact same picture of the luma values. Also positive. Now we are coming to the clipping. ISO 100 clipping point as per waveform in the monitor: After import: That is a little bit weird already. Would have expected that the LUT is extending the values further. So basically clipping will be at over 100 IRE in FCPX, but that is only the case roughly for ISO 800. Waveform ISO 800: Waveform ISO 3200: Looking forward to your own investigation results. For my part I will try to create some more footage to see how this works with real pictures. The colors need work as from what I see, too little saturation for my taste.

-
For Rec709 and PQ it is true that ISO 800 = ISO 100 in terms of sensor clipping and the metering starts to change only from ISO 800 and upwards. Native mode and now with the standard V-Log to Rec709 LUT the Ninja measures as from ISO 100 (both waveform and false colors change). However I do not know if this really showing something in regards to real sensor saturation or if it is just showing applied gain. Actually I think it is the later because of the Sigma ISO guide. ISO 100-800 is the same but with different distribution and gain levels. Will take the measures tomorrow, at least for some key ISO values like 100, 800, 3200. Update to follow.
-
Will check that tomorrow in detail. But at first glance I would say they are extremely similar (V-Log transform and native monitoring). What I don't get is that with ISO 100 & 200 the false colors with LUT applied are not going to full 100 IRE, they stay well below. I was under the impression that the LUT should stretch that out. Middle grey is shifting correctly with the ISO steps and display is as well doing so. All in all at least another really good approach which might turn out to be the best choice instead of my cumbersome curve editing.
-
We are getting really close. The LUT seems to do the trick. There is a minimal difference in highlight brightness (monitor shows 78 IRE, FCPX shows 75 IRE) when imported into FCPX and applying the same LUT as in the monitor. Suppose this is due to the not 100% matching RAW to V-log conversion which is built into FCPX. ISO values and middle grey seem to work as intended now. Interestingly the brightest part in the picture is only reaching red in the false colors when using ISO 400 and upwards. Seems the maximum steps from middle grey to white are increasing (that reacts as per Sigma ISO manual). Will investigate further now.
-
Have read that big part of the Arri look is that they let color saturate only until middle grey luma. After that saturation stays the same only brightness increases. Does the LUT do the same? Or is there a post production way (curves) to do the same?
-
Will check that once I am back from the office. If this is turns out to be true, the solution might be as simple as adding that V-log to Rec709 LUT on the Ninja V…