OleB
-
Posts
132 -
Joined
-
Last visited
Content Type
Profiles
Forums
Articles
Everything posted by OleB
-
If you use the Rec709 based exposure preview, like the one the camera is able to show when you want to record cDNG, it is correct to assume that if you use ISO 800 you will get "better" highlight clipping. But that is only so because the camera in reality is underexposing 3 stops compared to ISO 100, leaving you with an ok looking image with 3 stops of additional highlight headroom compared to ISO 100. In fact you are throwing quality away because you are lowering your exposure by 3 stops compared to what the real clipping value should be. This can only be shown with an external monitor which is able to record RAW, the process I have described above. But of course in that circumstance you have to be careful to not clip the highlights, because you are getting the best quality with the penalty that once they are gone, they are gone. Next to no safety margin. To make highlight rolloff nicer I usually use Tiffen Black Pro Mist filters 😉 so that already takes place before recording. But in the end it is up to you to decide which way is best. However I personally find it very much misleading that the camera behaves like this and correct exposure metering in camera is only possibly for ISO 100. In still mode however all is working like it should...
-
Update on version 4.00. Does not change anything in regards to exposure metering ... 😞 Still the above mentioned workaround has to be applied for best quality.
-
Happens for all...EVF, LCD and external monitoring. Indeed it is a pain and would need a firmware update to be fixed...
-
Second observation if Ninja V is set to Rec709 monitoring and you ignore the false colors. The camera ISOs and the dynamic range chart from above are indeed correct. However that leaves you with possibly less image quality because you are underexposing in relation to sensor capabilities. Meaning more noise (which could be also a good thing if considered as filmic texture). Basically I think it is now for the user to decide. Most precise measurement and best image quality, go the PQ route with above mentioned ISO settings/conversation and little room for mistakes (sensor clipping quite near). For a more cinematographic measuring approach and more room for error compensation, go the Rec709 route.
-
Hi all, have done further investigation on this. Seems (at least with the latest firmware 3.01) that in Cine mode and external ProRes Recording via Atomos Ninja V the ISO settings in camera are operating a lot different than what you think. Monitoring mode is PQ (Rec709 is not working at all despite for ISO 100 setting in camera) ISO 800 = ISO 100 ISO 1000 = ISO 125 ISO 1250 = ISO 160 ISO 1600 = ISO 200 ISO 2000 = ISO 320 ISO 2500 = ISO 500 ISO 3200 = ISO 640 (camera switches to second native ISO) ISO 4000 = ISO 640 (that value is weird, does not change the picture at all) ISO 6400 = ISO 800 ISO 8000 = ISO 1000 ISO 10000 = ISO 1250 ISO 12800 = ISO 1600 ISO 16000 = ISO 2000 ISO 20000 = ISO 2500 ISO 25600 = ISO 3200 With all these changes the false color screen / zebras are showing correct clipping values. So if you are not clipping highlights you are always getting max dynamic range. However in the PQ mode no changes in the mid grey point are visible like in the sigma diagram posted above. That means you are not getting different distribution of stops between highlight and shadow areas. Seems that is only applicable for Rec709, but then again metering is not working with tools like false color etc, unless you stay in ISO 100. On import to FCX just make sure, that you select the "correct" ISO value, as the camera will push through the Atomos its measures, which are not correct. Both in real world and compared to an incident meter.
-
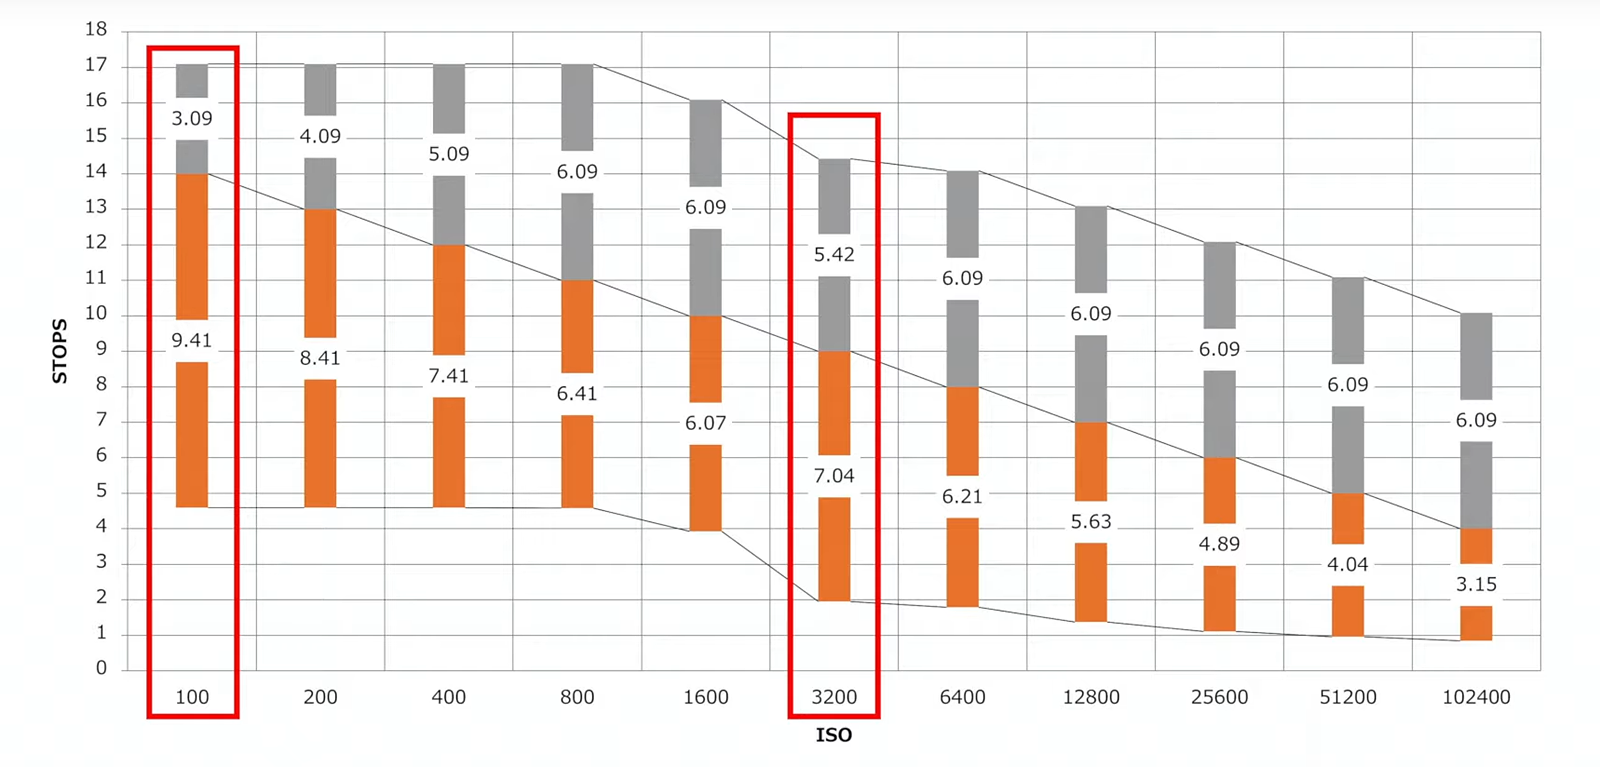
Actually you can choose the distribution of the split between highlights and shadows on your own with the Sigma fp. How much is above or below middle grey is a matter of the selected ISO value. Chart attached. But there is also a pdf floating in the internet which is called Sigma fp Dual Base ISO Technology. Which explains the behaviour better. Basically the answer is, if you need as much shadow details as possible select ISO 100, if you need maximum of highlight details go for ISO 800. Keep in mind the camera is recording ISO 100 even if you select ISO 800. So make sure you are exposing for ISO 100 if you do not want to sacrifice the quality by underexposing. And you have to dial back exposure in the editing software.

-
Hi all, I have invested much time to investigate on the monitoring and ISO behavior of the fp. Finally in combination with the Ninja V I have found a working solution for me which gets both the monitoring picture and the metering right. Basically after reading through your posts I understood that the fp is ISO invariant and has only two native ISO values available for metering and recording. (ISO 100 & ISO 3200) Others are digitally amplified. False color screen with the Ninja V is working on both of these ISO values to meter the correct exposure. However as a lot of you have mentioned the Rec709 monitor view is only showing the correct picture in ISO 100. The 3200 setting will be overexposed and useless. After several tests I have figured out that if you set the Ninja V to PQ the ISO 3200 screen will look correct. Different story for ISO 100, but this can be tricked if you select ISO 400 in camera. Screen will look exactly the same now for both ISO values. Metering for ISO 100 is unaffected, since the false color mode is only showing the values for ISO 100. Since the recorded ISO values of the Ninja V are pushed into Final Cut Pro X you will get an overblown picture in Rec709, BUT and this is really nice, if you select ISO 100 instead of ISO 400 and ISO 640 instead of ISO 3200 everything will look as expected. Correctly metered and captured. Remember, in the additional manual of the fp in regards to the ISO behavior, Sigma is mentioning ISO 100 and ISO 640 for photos... If you need to work with Zebras the correct settings are for ISO 400 => 55% and for ISO 3200 => 60% if you want to avoid anything in the 100% range. You could go slightly higher as the fp has some more headroom over 100 IRE. Quite a lot of hassle if you ask me, but once you have got used to this you will get a nice picture on both. Hoping this will help some of you 🙂