BTM_Pix
-
Posts
6,104 -
Joined
-
Last visited
Content Type
Profiles
Forums
Articles
Everything posted by BTM_Pix
-
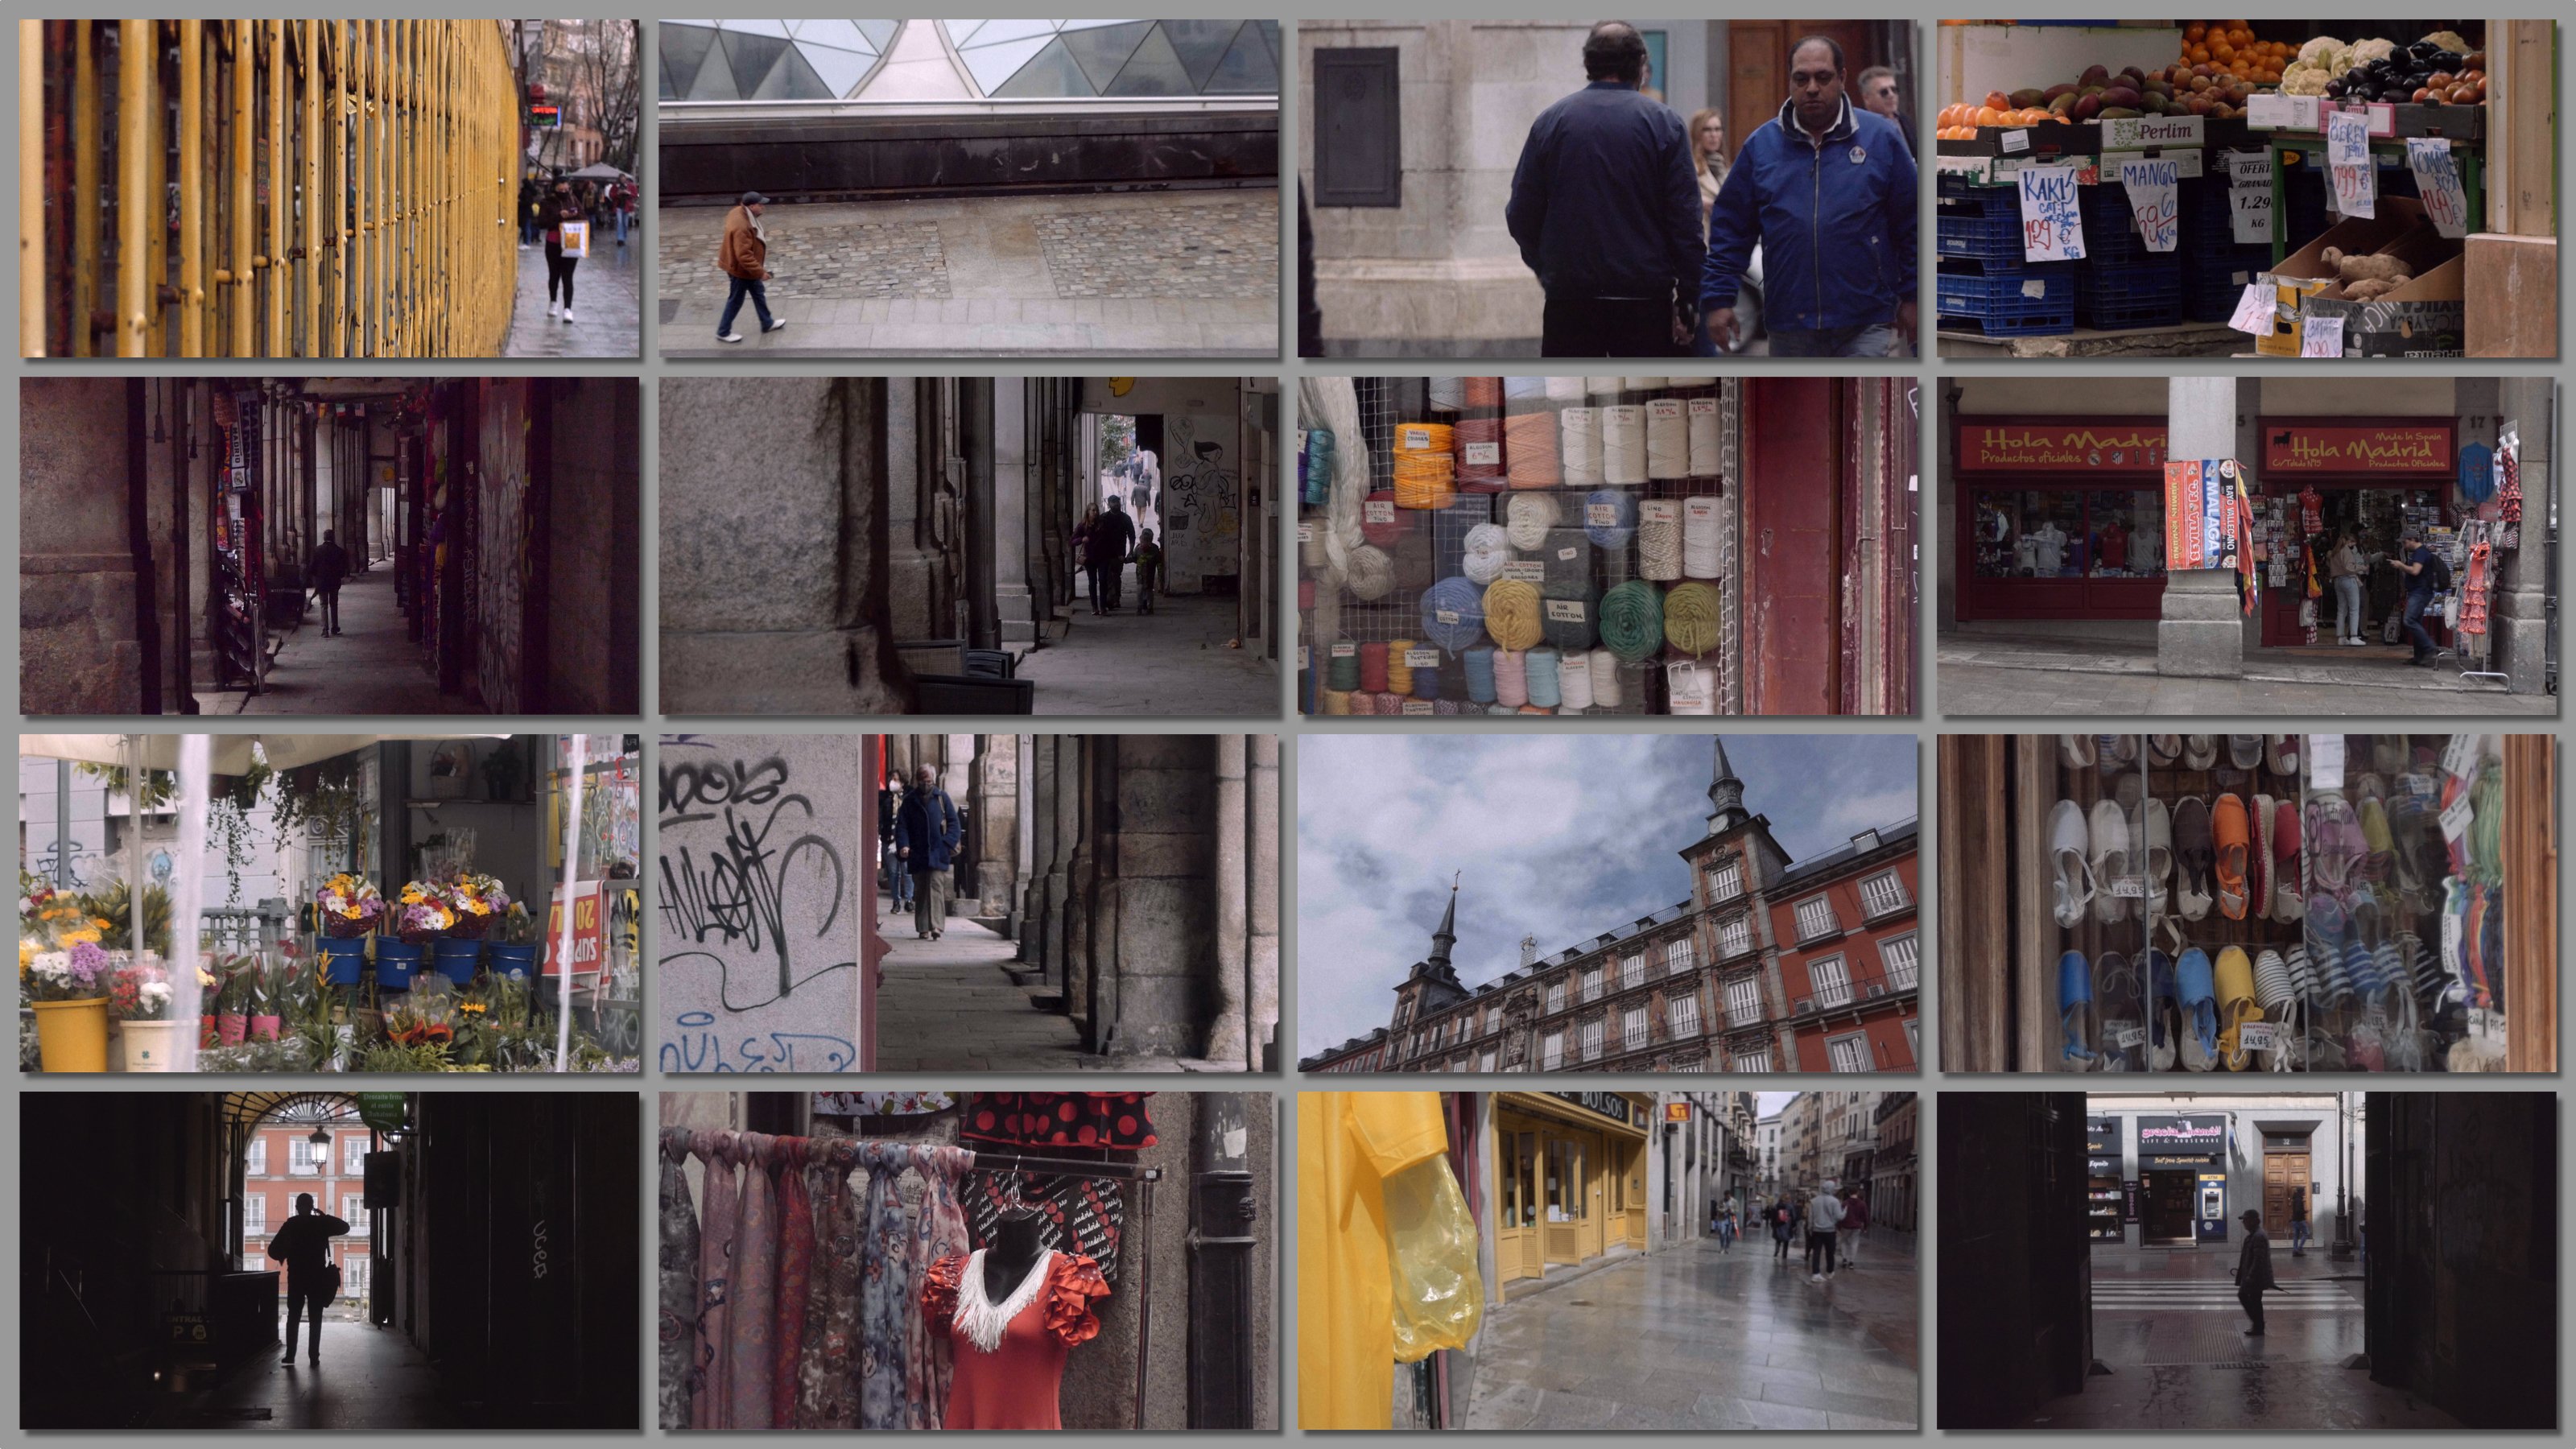
Some frame grabs from different focal lengths of the Tokina 18-200 EF boosted on an OG Pocket Cinema Camera.

-

EOSHD interview with Panasonic manager about the GH6
BTM_Pix replied to Andrew - EOSHD's topic in Cameras
I think perhaps a lot of the similarity aspect might be to do with there being so much more received/perceived wisdom about the best way to expose and colour footage etc now than there was a decade ago so a lot of people ploughing a very similar furrow. Back then people were finding their own way and working within what they had in camera a lot more, particularly as the then £250K DaVinci colour correction suite had yet to be released as a free of charge piece of software, so there was a lot less fannying around in post. At some stage, helpful advice and shared experience morphed into dogma and many people end up singing the same song. An example of which would be a sizeable amount of Tokyo Rain Cinematic videos you'd find on YouTube now would have a substantial amount of slow motion in them as that is the common expected aesthetic. Also, life was a lot less shit ten years ago so there's that as well. -
EOSHD interview with Panasonic manager about the GH6
BTM_Pix replied to Andrew - EOSHD's topic in Cameras
Don't think its necessarily the cameras myself. Its mainly the move away from slowing down, seeing the composition rather than just the opportunity and using the lost art of putting it on a tripod. Too much running, too much gunning and not enough cunning these days. -
EOSHD interview with Panasonic manager about the GH6
BTM_Pix replied to Andrew - EOSHD's topic in Cameras
Backstory here for the lovely 10 year old Tokyo footage. https://www.eoshd.com/news/tokyo-test-footage-attempting-a-ridley-scott-with-the-hacked-gh2-and-olympus-12mm-f2/ -
As per the shitty links that he edited into his post (and every other one he's made on this forum) after it was posted, this is the most applicable video to what was happening.
-
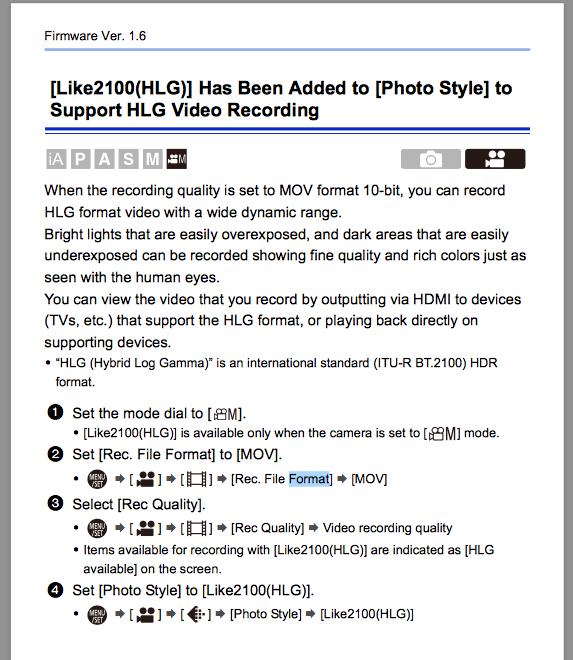
I thought they added HLG video in version 1.6 ? Has to be in Manual exposure, 10bit MOV format and the lowest ISO is capped to 320 according to the manual. Maybe they hide it as an option if you are not in Manual and 10bit MOV ? It wouldn't be the first time Panasonic have hidden a picture profile.....
-
My favourite line from the description is : It will not work for everyone (no app or box does). I was curious about the reviews, this one on Play store caught my eye : It actually works!!!! Not fake like the other apps. I just wonder how many spirit decoder apps one has to go through first before thinking that maybe its a load of old bollocks. My limit would be less than one so credit to that user for having the patience to do the heavy lifting for everyone else so that they can now buy the real deal. Maybe you can review lenses that can spot unbiased reviews on YouTube? Probably need to start with something like this though.
-
His "Miracle Box" app for communicating with spirits seems to be doing quite well for him. He just needs to be careful that the spirits he's communicating with don't have names that can inadvertently lead to creating phrases that are so hilarious that they can bring the facade of even leading TV programmes about it crashing down.
-
Silent mode being switched on is usually the culprit for this with Panasonic cameras.
-
How's that been working out for them ?
-
He does supernatural investigation videos too. Maybe he got a tip off from the other side that the end was nigh for camera reviews. Equally they might have told him to repent.
-
This is an interesting video from the host of one of the more long running camera review websites. I don't know whether he has recently found God or recently found himself off the favoured reviewers list but for whatever reason he has decided to spill some of the beans about his fourteen year history in the game. I say some of the beans as, although he gives specific detail about one source of revenue (the affiliate deal with B&H), he leaves it up to the viewer to extrapolate an estimate of the overall total when including the other streams such as Amazon, advertising and sponsorship etc. He also holds back much in terms of too many specifics amongst the war stories of complementary trips, free or heavily discounted gear, passive agressive editorial control and so on. However, there is enough there to put the picture together about his own activities as well as more than enough hint of how his own discomfort with it have caused him to reign it in whereas a great number most definitely haven't. Obviously, most of us will file this under "absolutely not shocked at all" My own view of Steve Huff was that he seemed personable enough but that he seemingly never came across a product that he didn't like. Which is an obvious red flag. On the generous side, you could say that that was due to him being so enthusiastic about gear. Or, on the less generous side, you could say that he lacked sufficient judgement to differentiate between good and great. Or, most cynically, you could say he was just simply "at it" and every new wow equalled more affiliate clicks. Clearly, the money that he has declared from B&H shows that he was obviously "at it" to a certain degree and I don't think anyone would do a public confessional video if they too didn't accept that they were "at it" either. But the majority of his income was based around the website rather than YouTube so the degree to which he was nakedly "at it" compared to some of his latter day peers was likely a bit more of a side effect than the whole raison d'etre of the new wave of teleshopping hosts. I was quite interested in footage he had in there of earlier promotional trips and how wide eyed giddy many of the invitees seemed to be. I bet the marketing arms of these companies absolutely wet themselves when they realised how easy and cheap it was to drive sales without so much as a half page ad buy in a magazine. It seems if you didn't feel generous enough to give a free camera away to an attendee then just massaging their ego with the invite and a discount on retail was enough. I hope that the what I would politely describe as "whining cunts" who trail our very own host of this ad-free and affiliate link free website around social media posting shitty replies to his posts watch this video. They want everyone to be polite nice guys who keep their criticisms of manufacturers to themselves while they show them slow motion B roll and make them feel better about their purchases. Well, here's one of your politest nice guys and guess what? He was at it. For years.
-
Barring a complete U turn from Sigma, it will definitely be L mount as they announced they will not be developing any new SA mount cameras when they joined the L mount alliance. https://www.sigmaphoto.com/article/to-our-customers-using-sigma-sa-mount-cameras
-
I had to google what that was. The advantage of VR headsets though is they can do mixed reality so you can carry on playing your game whilst using the in built forward facing video camera overlay function to safely navigate to the toilet without having to compromise the integrity of any hosiery. Even better, if you are playing some sort of Star Trek, game you can confirm the successful dispatch of the payload to the rest of the online players and stay in character by saying "Captain's Log".
-
I'm going to pitch this to YouTube as a new option so I don't have to keep switching otherwise potentially interesting videos off.
-
I'm guessing that from the protracted development cycle then it might well be going back to that as well as going full frame. You'd imagine that they could have put the SD Quattro into an Fp body relatively quickly and I'm still surprised that they haven't as an interim version. Switching to L mount would open up their own APS-C 16/30/56mm f1.4 lens range which would be an absolutely great match with the existing sensor. Being in the Fp body would also mean it not being built like a brick shithouse. I think they're committed to full frame though and I'm hoping that the delay is also being caused by them managing to squeeze video out of it. I'd take APS-C and video over Full Frame and not.
-
With the SA mount, you are pretty much limited to M42 adapters. Leitax do a mount product for Leica R where you physically change the mount so you would need one per lens. The "limitation" of only having an M42 option is all relative, of course, as there are plenty of excellent affordable lenses out there. Sigma dropped the SA mount for new cameras to concentrate on the L mount so any new Foveon will be in that mount, but you can still buy the lenses which include ART favourites like the 18-35mm, 50-150mm etc
-
Here you go, try it with this thumbnail to tick all the boxes that will get you on the front page.
-
Yes, consider it an MMX of sorts that takes input from the AFX and then talks to the lens of the virtual camera in the same way the MMX talks to FIZ motors. And it speaks to both simultaneously of course. The additional development is in the integration of a positioning element. More (relatively) soon.
-
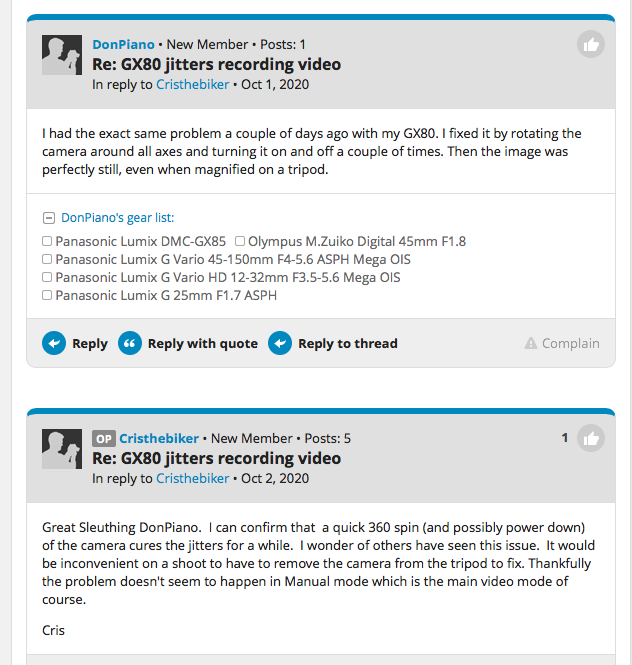
I remember a similar thing came up a couple of years ago and a fix that apparently worked was to rotate it a couple of times around its axis. It might be worth a go.
-
The role of it in this scenario is just as a cheap and dirty way for me to generate basic input so an LPD-3806 would be overkill 😉 The real time dynamic information is coming from the camera system. Essentially, this is sending the raw data and the Blueprint itself is doing the interpretation so its conceptually the same. Because I am generating the MIDI data directly rather than taking it from a control surface and re-interpreting it, I'm able to use the standard MIDI data structures in different ways to work around the limitations of unsigned 8 bit values because the Blueprint will know how to interpret them. So if I want to change the aperture to f5.6, for example, then I can split that inside a basic Note On message on a specific channel so that I send that on channel 7 with a note value of 5 and a velocity value of 6. The Blueprint knows that anything it receives on MIDI channel 7 will be an aperture value and to take the note value as the unit and the velocity value as the fractional and re-constitutes it to 5.6 for the virtual camera. Using the 14 bit MIDI messages such as Pitch Bend or Breath Control also offers more scope to create workarounds for negative values by using, for example, the midway value of the range (8191) as a "0" point and then interpreting positive and negative values relative to that and using division if necessary to create fractional values (e.g. -819.1 to +819.1 or -81.91 to +81.91 etc). The reason to take the MIDI path was to use BLE MIDI to keep everything wireless and enable it to sit within the existing BLE architecture that I have created for camera and lens/lens motor control so it made for much faster integration. Having said all that...... As the saying goes, there is no point having a mind if you can't change it and things do change with this over the subsequent steps.
-
The video is purely a prototyping illustration of the transmission of the parameter changes to the virtual from an external source rather than a demonstration of the performance, hence the coarse parameter changes from the encoder. So is purely a communication hub that sits within a far more comprehensive system that is taking dynamic input from a positional system but also direct input from the physical camera itself in terms of focus position, focal length, aperture, white balance etc. As a tracking only option, the Virtual Plugin is very good though but, yes, my goal is not currently in the actual end use of the virtual camera. A spoiler alert though, is that what you see here is a description of where I was quite a few weeks ago 😉
-
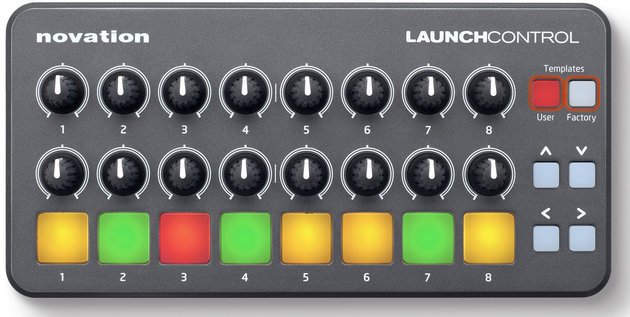
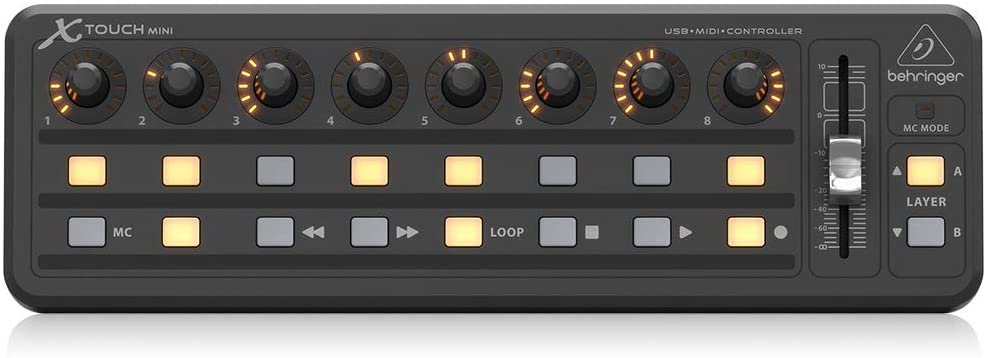
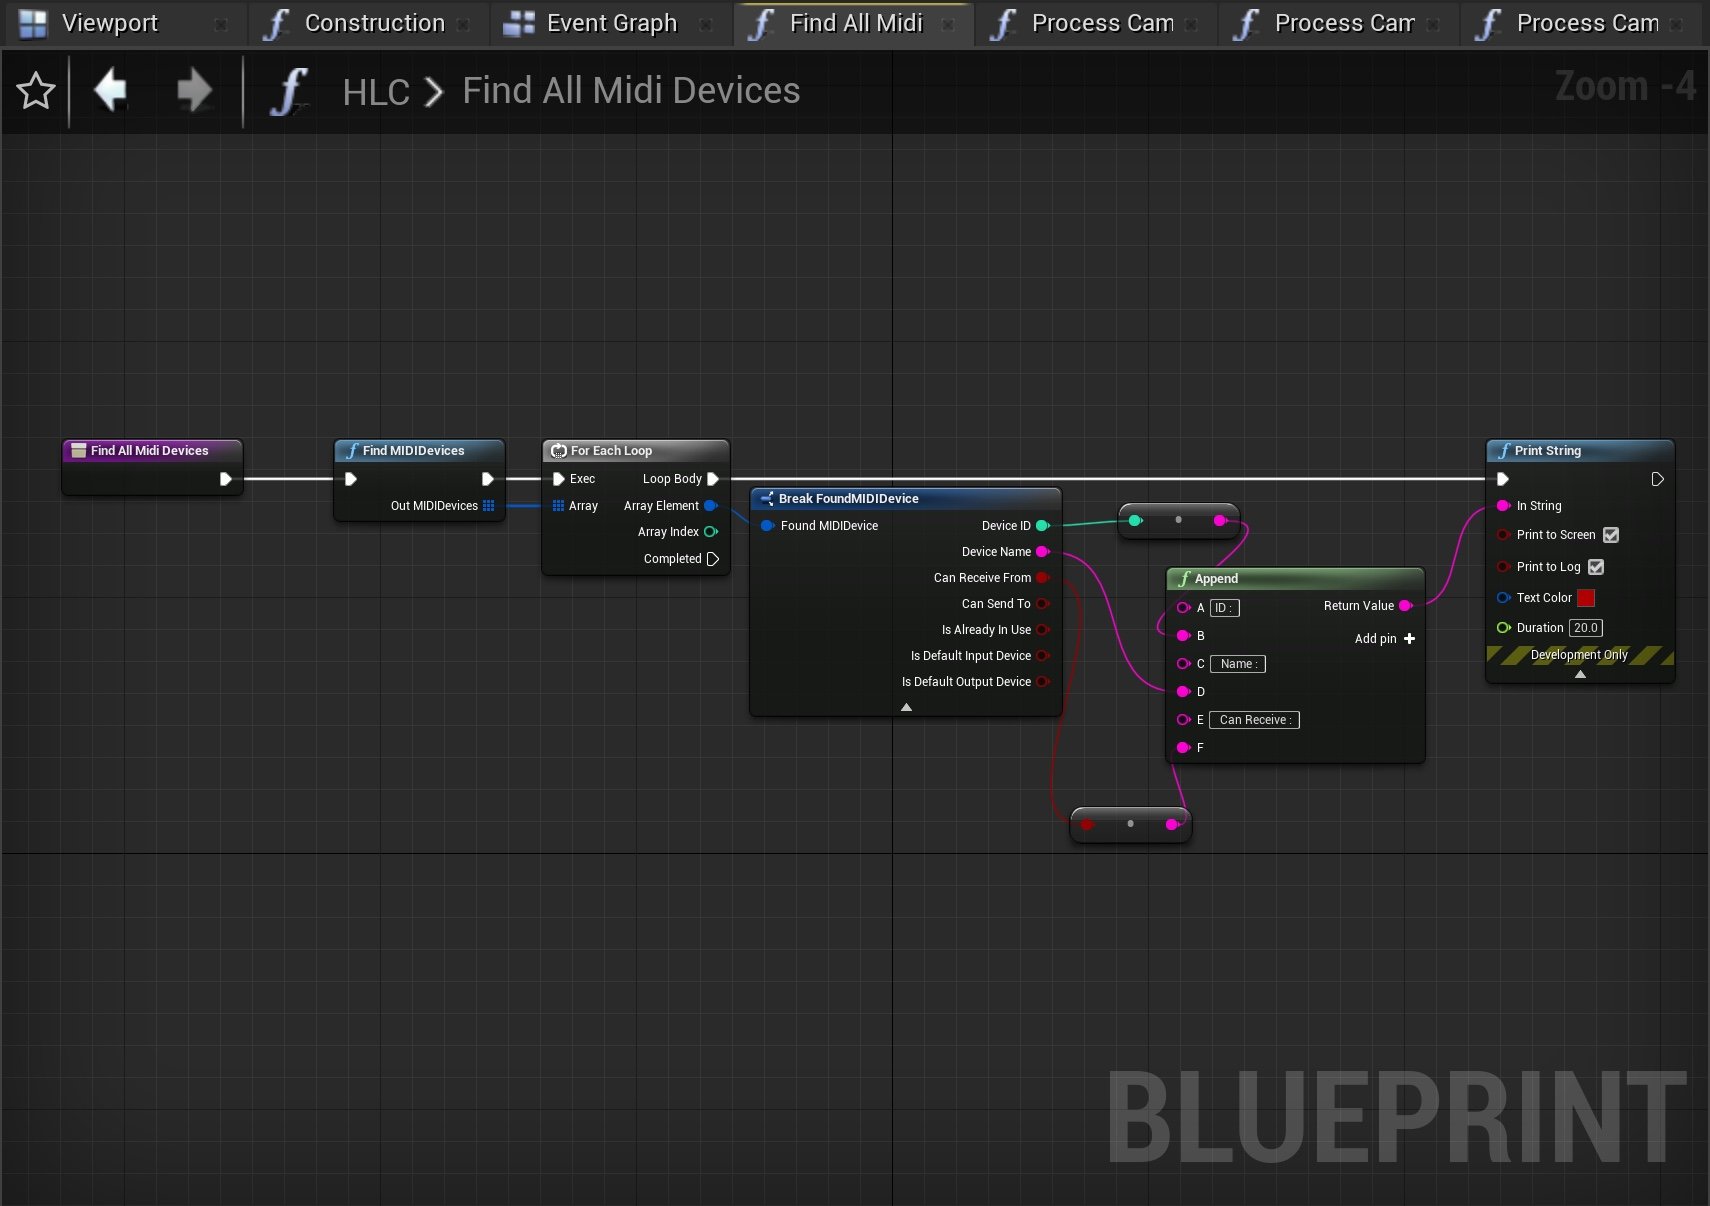
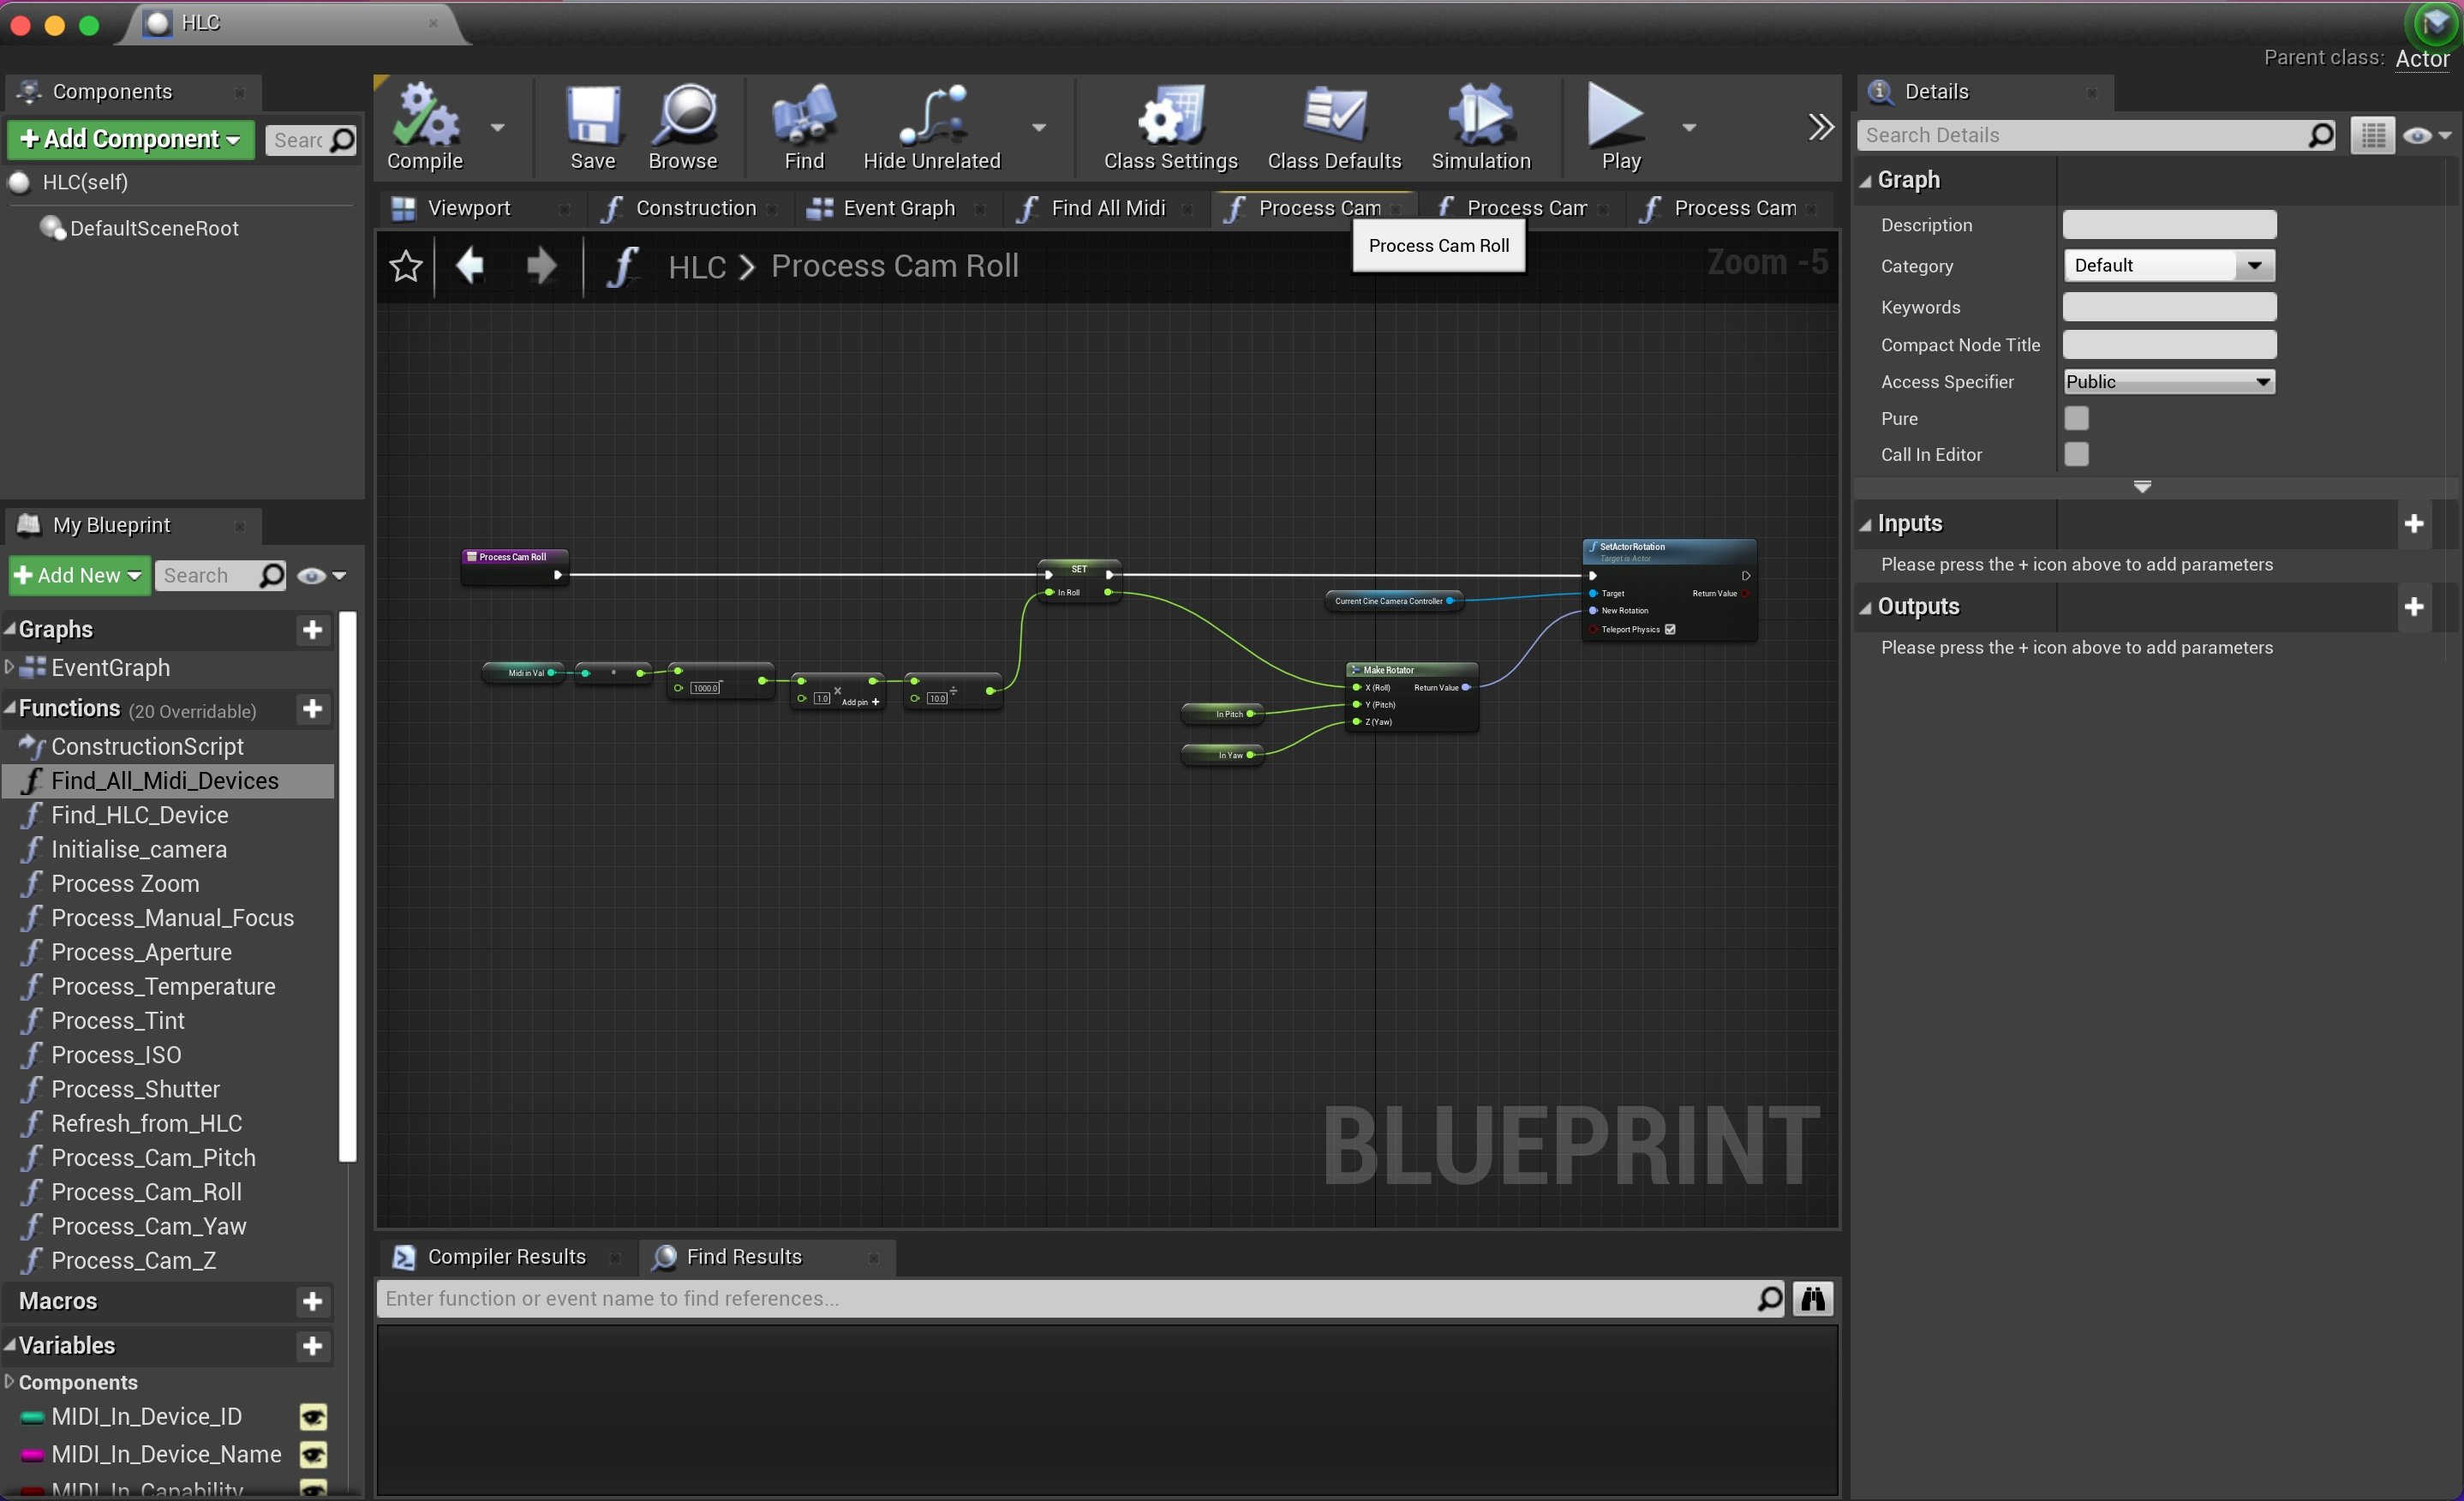
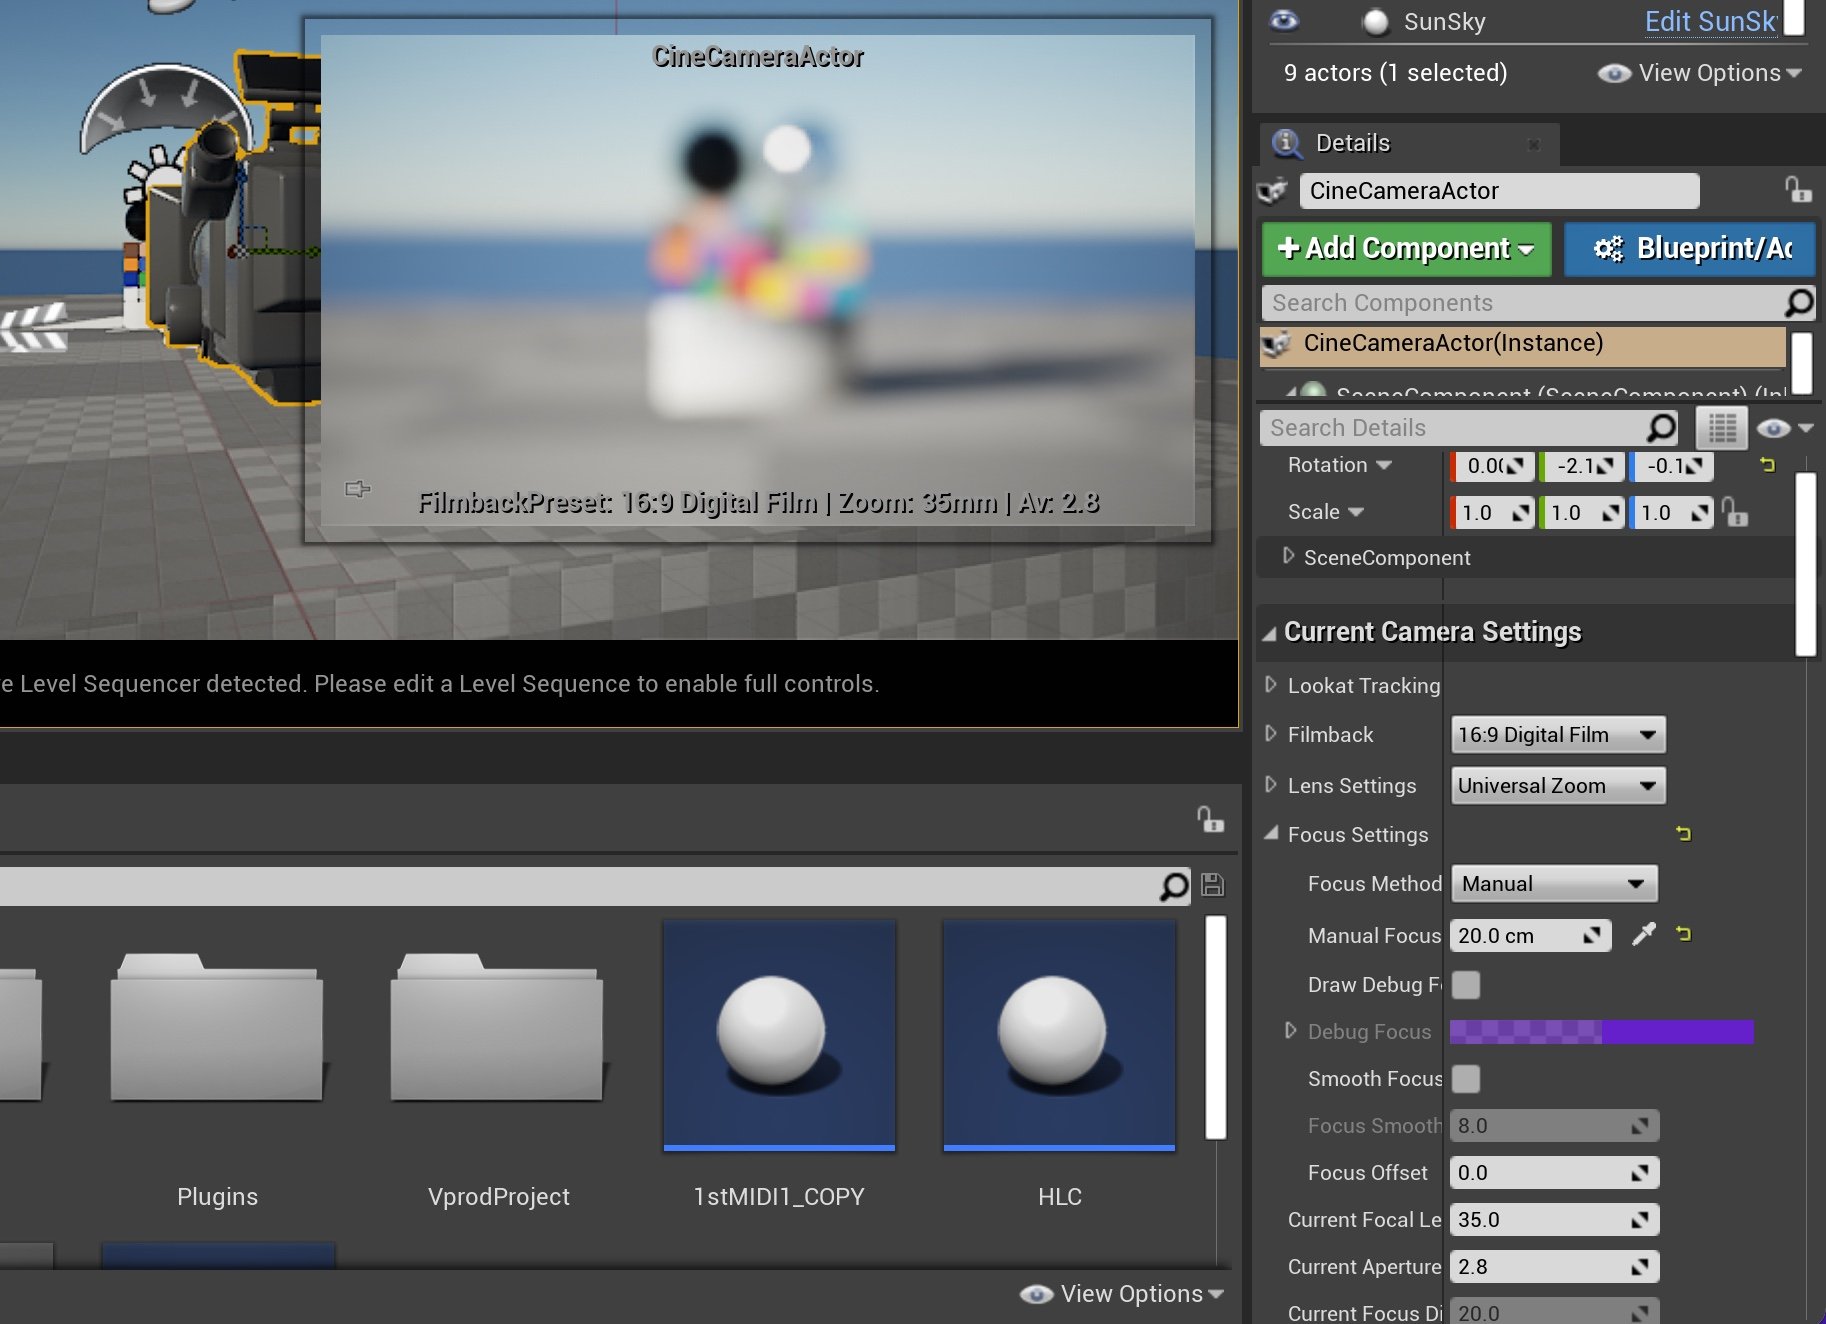
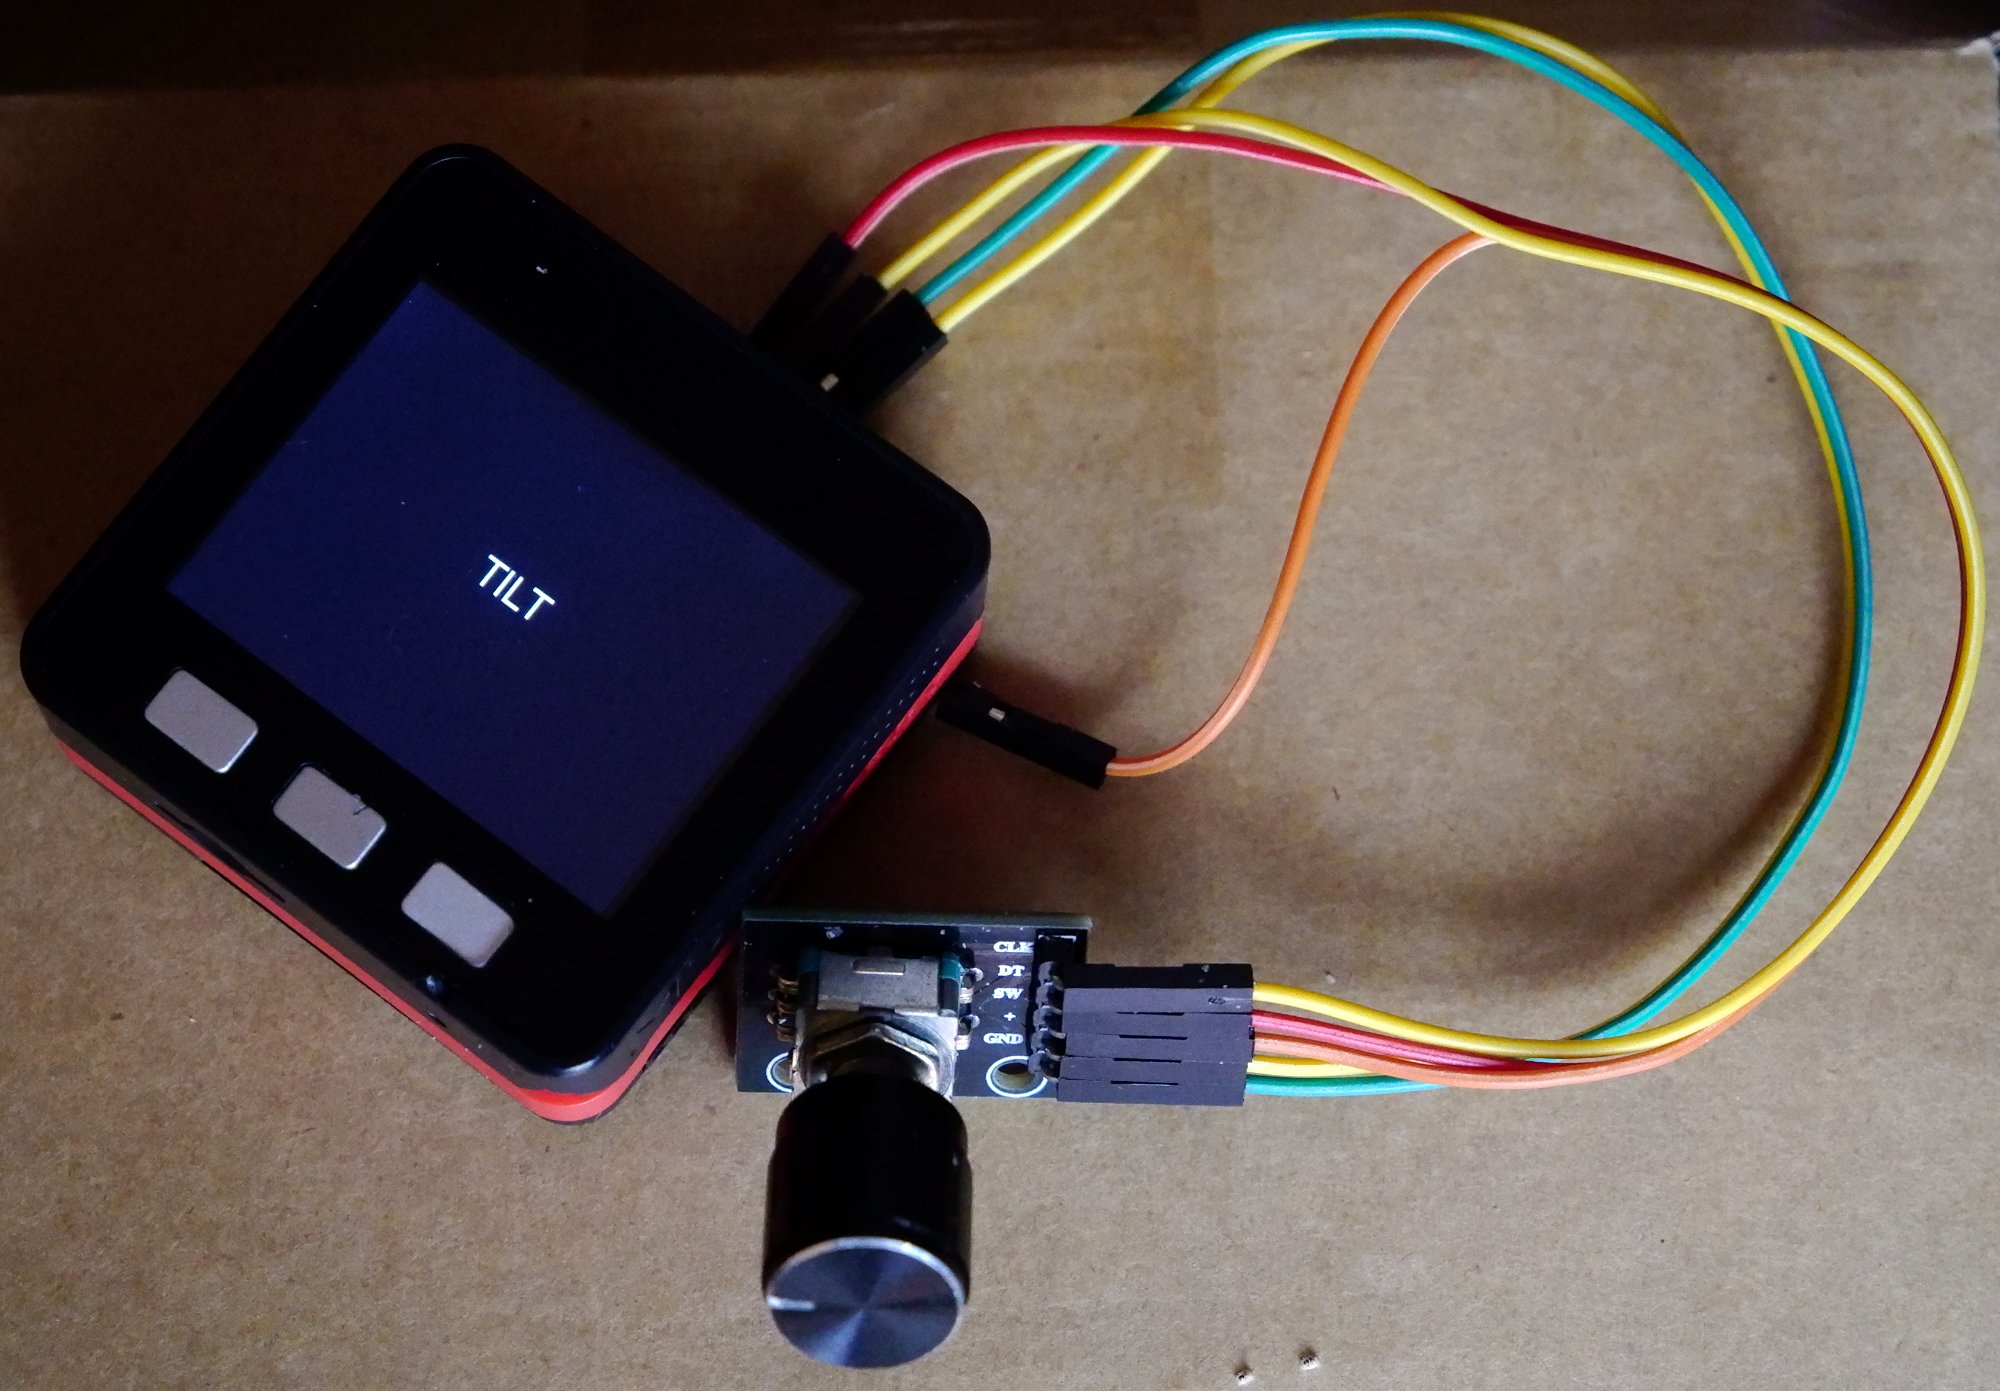
So....getting into the time machine and going back to where the journey was a few weeks ago. To recap, my interest in these initial steps is in exploring methods of externally controlling the virtual camera inside Unreal Engine rather than getting live video into it to place in the virtual world. To me, that is the bigger challenge as, although far from trivial, the live video and keying aspect is a known entity to me and the virtual camera control is the glue that will tie it together. For that, we need to get the data from the outside real world in terms of the camera position, orientation and image settings in to Unreal Engine and then do the processing to act upon that and translate it to the virtual camera. To achieve this, Unreal Engine offers Plug Ins to get the data in and Blueprints to process it. The Plug Ins on offer for different types of data for Unreal Engine are numerous and range from those covering positional data from VR trackers to various protocols to handle lens position encoders, translators for PTZ camera systems and more generic protocols such as DMX and MIDI. Although it is obviously most closely associated with music, it is this final one that I decided to use. The first commercially available MIDI synth was the Sequential Prophet 600 which I bought (and still have!) a couple of years after it was released in 1982 and in the intervening four decades (yikes!) I have used MIDI for numerous projects outside of just music so its not only a protocol that I'm very familiar with but it also offers a couple of advantages for this experimentation. The first that, due to its age, it is a simple well documented protocol to work with and the second is that due to its ubiquity there are tons of cheaply available control surfaces that greatly help when you are prodding about. And I also happen to have quite a few lying around including these two, the Novation LaunchControl and the Behringer X-Touch Mini. The process here, then, is to connect either of these control surfaces to the computer running Unreal Engine and use the MIDI plug in to link their various rotary controls and/or switches to the operation of the virtual camera. Which brings us now to using Blueprints. In very simple terms, Blueprints allow the linking of elements within the virtual world to events both inside it and external. So, for example, I could create a Blueprint that when I pressed the letter 'L' on the keyboard could toggle the light on and off in a scene or if I pressed a key from 1 to 9 it could vary its intensity etc. For my purpose, I will be creating a Blueprint that effectively says "when you receive a value from pot number 6 of the LaunchControl then change the focal length on the virtual camera to match that value" and "when you receive a value from pot number 7 of the LaunchControl then change the focus distance on the virtual camera to match that value" and so on and so on. By defining those actions for each element of the virtual camera, we will then be able to operate all of its functions externally from the control surface in an intuitive manner. Blueprints are created using a visual scripting language comprising of nodes that are connected together that is accessible but contains enough options and full access to the internals to create deep functionality if required. This is the overview of the Blueprint that I created for our camera control. Essentially, what is happening here is that I have created a number of functions within the main Blueprint which are triggered by different events. The first function that is triggered on startup is this Find All MIDI Devices function that finds our MIDI controller and shown in expanded form here. This function cycles through the attached MIDI controllers and lists them on the screen and then steps on to find our specific device that we have defined in another function. Once the MIDI device is found, the main Blueprint then processes incoming MIDI messages and conditionally distributes them to the various different functions that I have created for processing them and controlling the virtual camera such as this one for controlling the roll position of the camera. When the Blueprint is running, the values of the parameters of the virtual camera are then controlled by the MIDI controller in real time. This image shows the viewport of the virtual camera in the editor with its values changed by the MIDI controller. So far so good in theory but the MIDI protocol does present us with some challenges but also some opportunities. The first challenge is that the value for most "regular" parameters such as note on, control change and so on that you would use as a vehicle to transmit data only ranges from 0 to 127 and doesn't support fractional or negative numbers. If you look at the pots on the LaunchControl, you will see that they are regular pots with finite travel so if you rotate it all the way to the left it will output 0 and will progressively output a higher value until it reaches 127 when it is rotated all the way to the right. As many of the parameters that we will be controlling have much greater ranges (such as focus position) or have fractional values (such as f stop) then another solution is required. If you look at the pots on the X-Touch Mini, these are digital encoders so have infinite range as they only interpret relative movement rather than absolute values like the pots on the LaunchControl do. This enables them to take advantage of being mapped to MIDI events such as Pitch Bend which can have 16,384 values. If we use the X-Touch Mini, then, we can create the Blueprint in such a way that it either increments or decrements a value by a certain amount rather than absolute values, which takes care of parameters with much greater range than 0 to 127, those which have negative values and those which have fractional values. Essentially we are using the encoders or switches on the X-Touch Mini has over engineered plus and minus buttons with the extent of each increment/decrement set inside the Blueprint. Workable but not ideal and it also makes it trickier to determine a step size for making large stepped changes (think ISO100 to 200 to 400 to 640 is only four steps on your camera but a lot more if you have to go in increments of say 20) and of course every focus change would be a looooongg pull. There is also the aspect that, whilst perfectly fine for initial development, these two MIDI controllers are not only wired but also pretty big. As our longer term goal is for something to integrate with a camera, the requirement would quickly be for something far more compact, self powered and wireless. So, the solution I came up with was to lash together a development board and a rotary encoder and write some firmware that would make it a much smaller MIDI controller that would transmit to Unreal Engine over wireless Bluetooth MIDI. Not pretty but functional enough. To change through the different parameters to control, you just press the encoder in and it then changes to control that one. If that seems like less than real time in terms of camera control as you have to switch, then you are right it is but this form is not its end goal so the encoder is mainly for debugging and testing. The purpose of how such a module will fit in is in how a camera will talk to it and it then processing that data for onward transmission to Unreal Engine. So its a just an interface platform for other prototypes. In concert with the Blueprint, as we now control the format of the data being transmitted and how it is then interpreted, it gives us all the options we need to encode it and decode it so that we can fit what we need within its constraints and easily make the fractional numbers, negative numbers, large numbers that we will need. It also offers the capability of different degrees of incremental control as well as direct. But that's for another day. Meanwhile, here is a quick video of the output of it controlling the virtual camera in coarse incremental mode.
-
Yes, I have one and posted some examples on a Leica T about 34282 page ago 😉
-
Mmmm.... So I've been looking further into this today and its actually a complete mess. And not just because of the app. First off, I should have been clearer in the original post regarding the requirement to use an UltraSync Blue unit (€150 approx) for syncing multiple Zoom, Atomos and iOS apps over BLE. Which brings us to an issue... The Zoom units with BLE functionality can use the connectivity for the app or for wireless timecode but not both simultaneously. This is a menu switched option (such as on my H3-VR and the new F3) but the F2-BT doesn't have an obvious mechanism to change this on the fly as it has neither a screen nor a switch to do it with. Unbelievably, Zoom's solution to this lack of UI on the the unit is that you have to connect it via USB to a Mac or a PC running Zoom's F2 Editor application to switch its mode. The F2BT unit has five physical buttons on it that Zoom could have used to control that switch on boot up (i.e. hold down Stop button when switching on for Control and hold down Play when booting for timecode mode) but instead have opted for an utterly ridiculous and clunky solution. So dynamically changing it on the hoof is completely impractical. In terms of control from the mobile app, it is inexplicable why it can't control more than one device at a time. I've had a bit of a hack around interrogating the H3VR this morning and I can see that there are enough BLE Services and Characteristics to make it happen to address units individually within the limits of how many simultaneous BLE devices can be connected. A more simplified app option for multi units that did basic rec start/stop and signal present leds rather than full metering and settings changes etc would be perfectly doable and adequate for at least four units. For now, in terms of rec start/stop its doable across multiple units if you close the app and re-open it to choose a different unit on the initial scan but thats clunky as hell too. So, as it stands, to do two timecode synced F2BTs and the F3 they would have to all be in timecode mode (and you'd have to have set the F2s up beforehand) and started manually because there is also no mechanism to do a record start/stop command for the whole group. OK, so considering that the F2BT has a run time of about 15 hours on batteries and an entire recording for that period would take up a fairly trivial (compared to video files) of about 8gb then the solution would be to sync it to the UltraSync Blue, put it in record and use the lock mechanism to keep it there and then pressing Record on the F3 and leaving it running all day. But you'd have to be careful with that too as what this guy shows in his video review is that it is easily possible to think the F2 is in record when it isn't due to the enormous delay after pressing the Rec button and it actually beginning the recording. In essence, I don't think any of this is insurmountable and can be filed under first world problems considering the amount of scope on offer here by having a couple of F2-BTs, an F3 and an UltraSync Blue but its infuriating that Zoom seem to have had such a massive failure in joined up thinking on how it hangs together as a full system. The easiest solution to fix this would be to have an option in the Zoom devices to start/stop recording on receipt/suspension of Bluetooth timecode and use the UltraSync Blue as master controller by using its start and stop run function. Maddening how short sighted Zoom have been here.