Llaasseerr
-
Posts
347 -
Joined
-
Last visited
Content Type
Profiles
Forums
Articles
Everything posted by Llaasseerr
-
The issue I'm particularly taking about is separate to this. If I wanted to for example connect a director's monitor from the HDMI out of the Ninja V, there does not seem to be a way to disable the HDR Out to the external display. If you're monitoring in Vlog on the Ninja (with or without an additional LUT) and want to see the same image on the connected screen, then currently there doesn't appear to be a way because HDR Output over HDMI can't be disabled. This transforms the image to HLG or PQ when I want to stay in Vlog. If this works okay for you, I would be interested to know.
-
What OG cams you got your eyes on going into 2023?
Llaasseerr replied to Ty Harper's topic in Cameras
Also ideally for a C200 something like a DZO Vespid prime would be nice. So factor in another $1400. -
What OG cams you got your eyes on going into 2023?
Llaasseerr replied to Ty Harper's topic in Cameras
I have enough crap lying around that I can rig out a C200B. Def thinking about picking one up. It seems the sensor noise performance in the shadows is the Achilles heel in this DGO era, but considering it’s so much cheaper than a C70, one can maybe put up with a Neat Video pass. I’ve seen a bit of a nasty horizontal banding in the red channel for night footage, not too bad but it’s there. Maybe that person forgot to do the black balance which is apparently pretty essential with this camera. I have the Sigma fp and would say the s35 crop image is cleaner. But the fp is far from user friendly compared to the c200. Both have their place. -
What OG cams you got your eyes on going into 2023?
Llaasseerr replied to Ty Harper's topic in Cameras
Agreed! I went through a phase of wanting one, but I got talked down by an owner who said they loved it but moved on to an Alexa Classic. -
Hi all, I got sidetracked with a work project but coming back to the fp, I was looking at the combo with the Ninja V again and I could not immediately see how to output V-log over HDMI from the Ninja V to another monitor. Meaning, basically pass through the V-log encoded image seen on the Ninja V to a director's monitor or an EVF. I've selected V-log ("Native") for the monitoring and that all looks fine on the device itself. For me, HDR output over HDMI can't be disabled. So the color space needs to be PQ, HLG etc and the gamut also needs to be selected, which should be V-gamut but that's also not available. Its really odd if you can't just pass through the image. I'm going to also contact Atomos support and see what the deal is.
-
Right, for exposure as you say use the exp slider in the global bit in the HDR panel and in the ... wing menu set the color space and gamma. Then under the hood it does the transform in linear gamma. The color space doesn't matter for a global exposure adjustment, but you might as well set it anyway. Also the units for the slider are in stops. For doing a color temperature change in Kelvins, use the Chromatic Adaptation effect and set the source as the current temperature and the target to where you want to go. And again you set the gamma and color space so it does the operation in linear and knows the primaries which is important compared to the global exposure operation. So if it's not raw then it's just the temperature that was baked into the image, which might be in metadata if you check with exiftool or something like MediaInfo.app. Or if you just noted down what you recorded it at. You can also do tint there, which I assume will also match the raw tab.
-
I do think that there are times RAW Convertor (sp?) can be inaccurate, so it may be worth trying a demo and comparing to a Prores 4444 log export for accuracy. As far as grading experience and flexibility, there's no real difference between Prores Raw and DNG. Overall, if you export to Prores 4444 log, you will have the same experience as grading linear raw. You can get the same temperature, exposure and white balance controls with Resolve as the raw controls as long as you're correctly applying them.
-
I'm of the opinion that ProRes Raw quality is very good. Obviously it would be great if Sigma could apply lossless or lossy compression to the internal DNG recordings the same way BMD were able to pre-RED drama. It would also be great if Sigma could take a cue from Atomos about how they managed to implement log + LUT monitoring.
-
That is likely to be a fair solution for many people. I'm not sure about Premiere's working gamut management outside of 709 though. I mentioned I use Play Pro for conversion in the way you describe (to log master), which is guaranteed to be accurate with their color conversion. It's affordable, but it does have an obtuse flame-style interface which may put some people off.
-
Just a heads up that I tested this software and I found it didn't do an accurate conversion from PRR to DNG, at least with PRR from Sony cams. I think most users won't mind that slight shift though, but if you want a pretty tightly managed color pipeline then I found it doesn't cut it.
-
One thing i haven't tried yet is recording both internal (to an SSD) raw and simultaneously trying to output Prores raw to the Ninja V for monitoring. I read somewhere it was possible. What would be the point of that? Well if you could monitor on the Ninja V in Vlog with a LUT, but record internally to DNG, you could edit the DNG directly in Resolve. Also, you get highlight recovery with DNG so you get a bit more dynamic range. Having said that, obviously Prores raw is pretty nice. I personally use Assimilate Play Pro which was bundled with the Ninja V for a while to transcode to log Prores 4444 in order to use it in Resolve. I'm fine with the extra ingest/transcode step, but I know a lot of people aren't. Obviously using the BM monitor is more convenient for going into Resolve, but I don't know if it has any kind of color managed setup or highlight monitoring like the Ninja V offers.
-
Yeah, would absolutely love to see a Foveon sensor cinema camera! My takeaway from watching the interview was that the sensor might be ready by end of year, but not necessarily the camera. Hopefully I'm wrong though, and they do bring something out sooner rather than later.
-
Unless there's an error in their matrix transform, the "intermediate gamut" metadata tag being added into the raw stream by the Ninja V already displays the raw image in Vgamut. So under the hood it's already transforming from Sigma RAW gamut to Vgamut. So then all you need to do is apply the single Vlog/Vgamut to Rec709 LUT on the Ninja V. The two step transform is only an issue in FCPX. It's possible that the gamut transform LUT in FCPX is incorrect because it was supplied by Panasonic for their cameras. Having said that, I realize now that the S5 has the same sensor as the fp, so it's not too bad a choice for Atomos to co-opt Panavision's color science as a workaround for the lack of an equivalent from Sigma. If you suspect there may be an error on Atomos' part, what might be worth trying is using Play Pro to transform PRR to Vlog/Vgamut, then apply the standard Rec709 LUT. Then use the Ninja V as output from your computer via HDMI and seeing if it visually matches the way the Ninja displays the PRR clips.
-
I found something interesting yesterday. When you set the fp to output raw when you have a connected monitor over HDMI that is not the Ninja V, it displays the b+w mosaic sensor image. You can clearly see all the highlights and where they're clipping because it's underexposed. Obviously if you have a Ninja V connected, it can display the image as Vlog which is more clear, but I thought this was interesting.
-
Okay, that's interesting. I looked on youtube and I saw that the FCPX inspector only offers the Vlog conversion whereas with Sony it offers both the log and gamut conversion together. Too bad. I've been using Assimilate Play Pro to convert to ProRes4444 log and luckily they handle the gamut mapping accurately. That LUT is designed for PRR footage from the BS1H/S1H/S1/S5/BGH1/GH5S/GH6. So the transform will not be accurate from the native raw gamut of the Sigma FP. But if the gamut transform is not known by FCPX, then maybe this is a "close enough" workaround. There's already an "intermediate gamut" tag for Vgamut that was inserted by Atomos if you choose Vlog for monitoring on the Ninja V, and it seems Play Pro is able to use that to accurately transform PRR to Vgamut. I'm guessing Atomos worked out the native gamut to Vgamut transform when they included that tag. I downloaded Play Pro for free when I bought the Ninja.
-
Right, you get a desaturated image with a wide gamut recording. So in addition to the log transform, you need to do a gamut transform to make it look correct for your viewing device (probably a rec709 or sRGB screen). If you break it down, the log transform is a 1D curve (can be a 1D LUT). The gamut transform is a matrix transform. Both these operations can be collapsed into a LUT. So when Panasonic provides a Vlog to Rec709 3D LUT, what it's really doing is concatenating both those operations into one. I am not 100% clear on this, but Atomos seem to have established a native gamut for the Sigma recording that is different to Vgamut. But if I recall, you can transform the raw file in FCPX immediately to Vlog/Vgamut in the inspector before doing anything else. After you do that, you can apply the LUT and you won't get the saturation issues, which is actually just a gamut mismatch. Hopefully the images then match on both the Ninja V and the FCPX timeline.
-
Maybe what you are referring to is that with the Ninja V, Atomos decided to encode the linear raw image as Panasonic V-log, which does bring the highlights into a viewable range as a log image and would allow false color monitoring if the false color tool is expecting a Vlog input. So basically they are making up for one of the camera's deficiencies. I need to check more carefully but I'm pretty sure the internal image as displayed on the camera is clipping the highlights, at least in "OFF" color mode which is what I set it to. Because all it's doing is applying a Rec709 curve with no highlight shaping to a linear raw image and that causes anything above a certain level to get clipped. I hope the false color tool in the v4 firmware can be used to accurately check middle grey - but not highlights. This is assuming that the false color tool does read values directly from the sensor, which someone else mentioned.
-
There's no rule that a LUT has to necessarily show sensor clipping at 100 IRE, especially at a low ISO. If you look at the linear clipping value at low ISO especially on the Ninja V which does not use highlight reconstruction, it's a very low value and gives the impression that the fp is bad with highlight detail. So if you transform that low value to Vlog then apply a Vlog to Rec709 curve, I can't imagine it would get anywhere near 100 IRE, but it would also not be indicative of what is the native ISO. Depending on how aggressive the highlight rolloff is on a log to 709 LUT, it can be hard for anything to get to 100 IRE so viewing in log might be a better way to measure max IRE from the sensor.
-
It is basically just metadata except for when it switches from base ISO of 100 to 3200. There is also a difference in DR between different ISOs because some of them are clipping the highlights at the same value even as they raise middle grey. I also noticed there seems to be some good subtle in-camera work taming the noise floor with, for example, ISO 800 vs if you shot ISO 100 and boosted by +3 stops. From my tests with DNG, it's clear to see the advantage of ISO 3200 over ISO 800 when it comes to an improved noise floor, at the expense of about 2/3 stop less highlights. I would need to double check the behavior with the Ninja V though. It is nowhere near as dramatic as the higher base ISO in something like a Sony a7sIII/FX3/FX6 though. Here's an example using 12-bit DNG. On the left is shadow detail at ISO 3200 and on the right is ISO 800, both exposed for middle grey -2 stops (to protect more highlights) with the Sigma kit lens which is very contrasty. I'm pushing the exposure up in the extreme so you can see how the ISO 3200 is holding the color in the shadows, not clipping at black and also not contaminating with green. What interests me about 3200 besides shooting in under lit scenes, is using it with wide contrast scenes if I underexpose it by 1-2 stops. So I can take advantage of the better noise floor while protecting highlights. Otherwise 800 (base ISO 100) is a good choice. It's about setting a usable key/fill ratio. In an uncontrolled setup where you're not lighting from scratch it would be about ideally adding enough fill to keep shadows from being at zero and enough diffusion to tame extremely harsh bright light. I don't see why that would be the case.

-
@OleB I atted you for my last post but it wasn't highlighted, so you may not have seen it. I was having issues exposing, but I realized I made an error with my ND filter. All good now. I was able to expose 3200 by setting the light meter for 640. Thanks for your detective work. Seems to work fairly well with getting middle grey at close to 42 IRE on the Vlog display on the Ninja, then I can flick on a viewing LUT. I could also do it directly through the LUT. I just need to confirm in Resolve where middle grey falls on the waveform.
-
@OleB just an update on my early experience shooting with the Ninja V, monitoring as Vlog and with a correct LUT expecting Vlog and transforming to Rec709 works as expected, which is great and can replicate my timeline color at the start of a new Resolve project. In fact when I rewatched the Atomos setup video on Youtube, it even mentions on the screen that the "native" encoding is Vlog (in addition to the firmware release notes PDF you pointed out before), so it was staring me in the face before but I missed it. So that's the good news. The bad news is like you said, it's also been awkward in my early testing to get exposure with a light meter. Despite all my ranting about how I don't really like false colors and IRE and whatnot, it is totally legitimate to expose middle grey at around 42 IRE on the waveform when displaying as Vlog as a sanity check for the light meter reading. But so far I haven't got middle grey to hit 42 IRE when exposing as per the light meter. This is easy to do with other cameras I've used. I did try with the underlying ISO that you suggested (either 100 or 640) and will do a few more tests to get to the bottom of whatever weirdness is going on there. Possibly I just made a stupid mistake. What would be really great is if Sigma did a firmware update that allowed you to monitor with the Ninja V in Vlog, but record DNG raw internally or to the SSD. Currently it's either/or. Because obviously through the Ninja V we get all the highlights visible. Basically it adds the log monitoring capability that Sigma did not add. ProRes Raw is a good option though, but for example as opposed to DNG I don't think you get any highlight recovery.
-
I'm actually picking it up today! I'll probably be super lazy about getting around to learning it and shooting with it, but hopefully I'll post a few tests here eventually. Thanks for all the help from people here willing to post test footage.
-
This clipping point is in line with the characteristics of the PRR test clips you uploaded before, and broadly speaking, also the behaviour of the DNGs, so I don't see anything strange here. We established that up to ISO 800 was an amplification of the base ISO 100 signal so the clipping point is raised accordingly. As the signal increases it should also be raising the noise floor obviously, but we noticed that the noise floor stays pretty low which is a nice win. For whatever reason, this taps out above ISO 800, so there are diminishing returns as far as overall dynamic range. When a camera is baking in the ISO change, the clipping point would ideally continue to increase. Maybe Sigma prioritized a clean noise floor instead of highlights for the higher ISO ranges (>800). So using ISO 800 is a decent option. Regarding ISO 3200, the higher base ISO, it has a lower clipping point but my observation is that it has a proportionally lower noise floor. So my recommendation for absolute max DR was to shoot 3200 at least -1 stop underexposed since you could raise the noise floor and it would be the same as ISO 800/1600, but with additional highlight headroom. If you think about it, this is in line with the expected behavior with higher base ISOs: lower noise floor and slightly lower highlight clipping point. I understand this is a bit of a headache to track for a marginal gain, so shooting ISO 800 is a good rule of thumb to get max DR to keep things simple. Well again, the IRE value is LUT or view gamma-dependent, but your numbers make sense. The base ISO 100 has a lower clipping point than ISO 800 which is baking in an amplification of the signal, but somehow also keeping a similar noise floor. For example with this ISO 800 test clip, when importing as V-log into ACES and viewed through the standard ACES output display transform the clipping point is in the high 90's so it stands to reason that ISO 100 would clip lower.
-
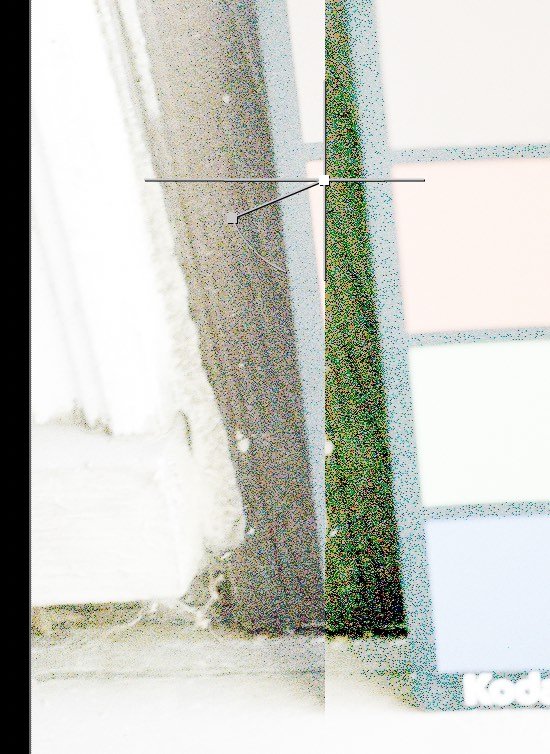
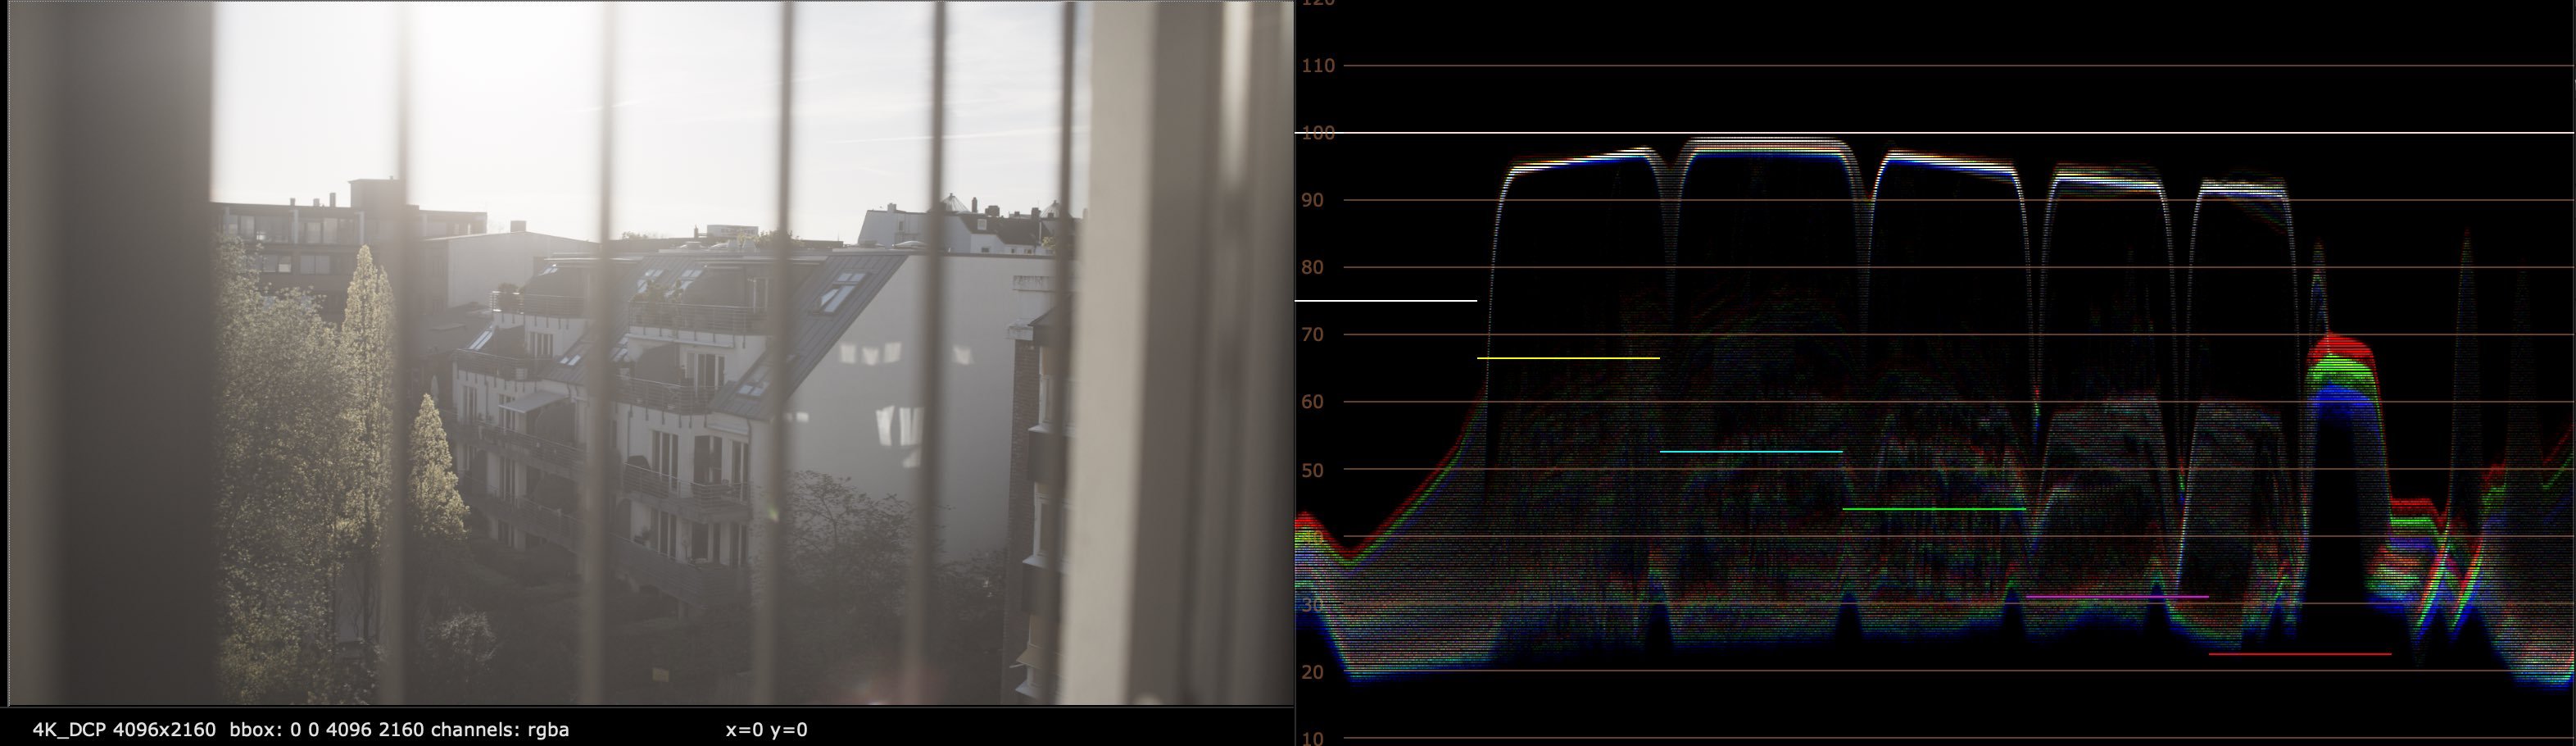
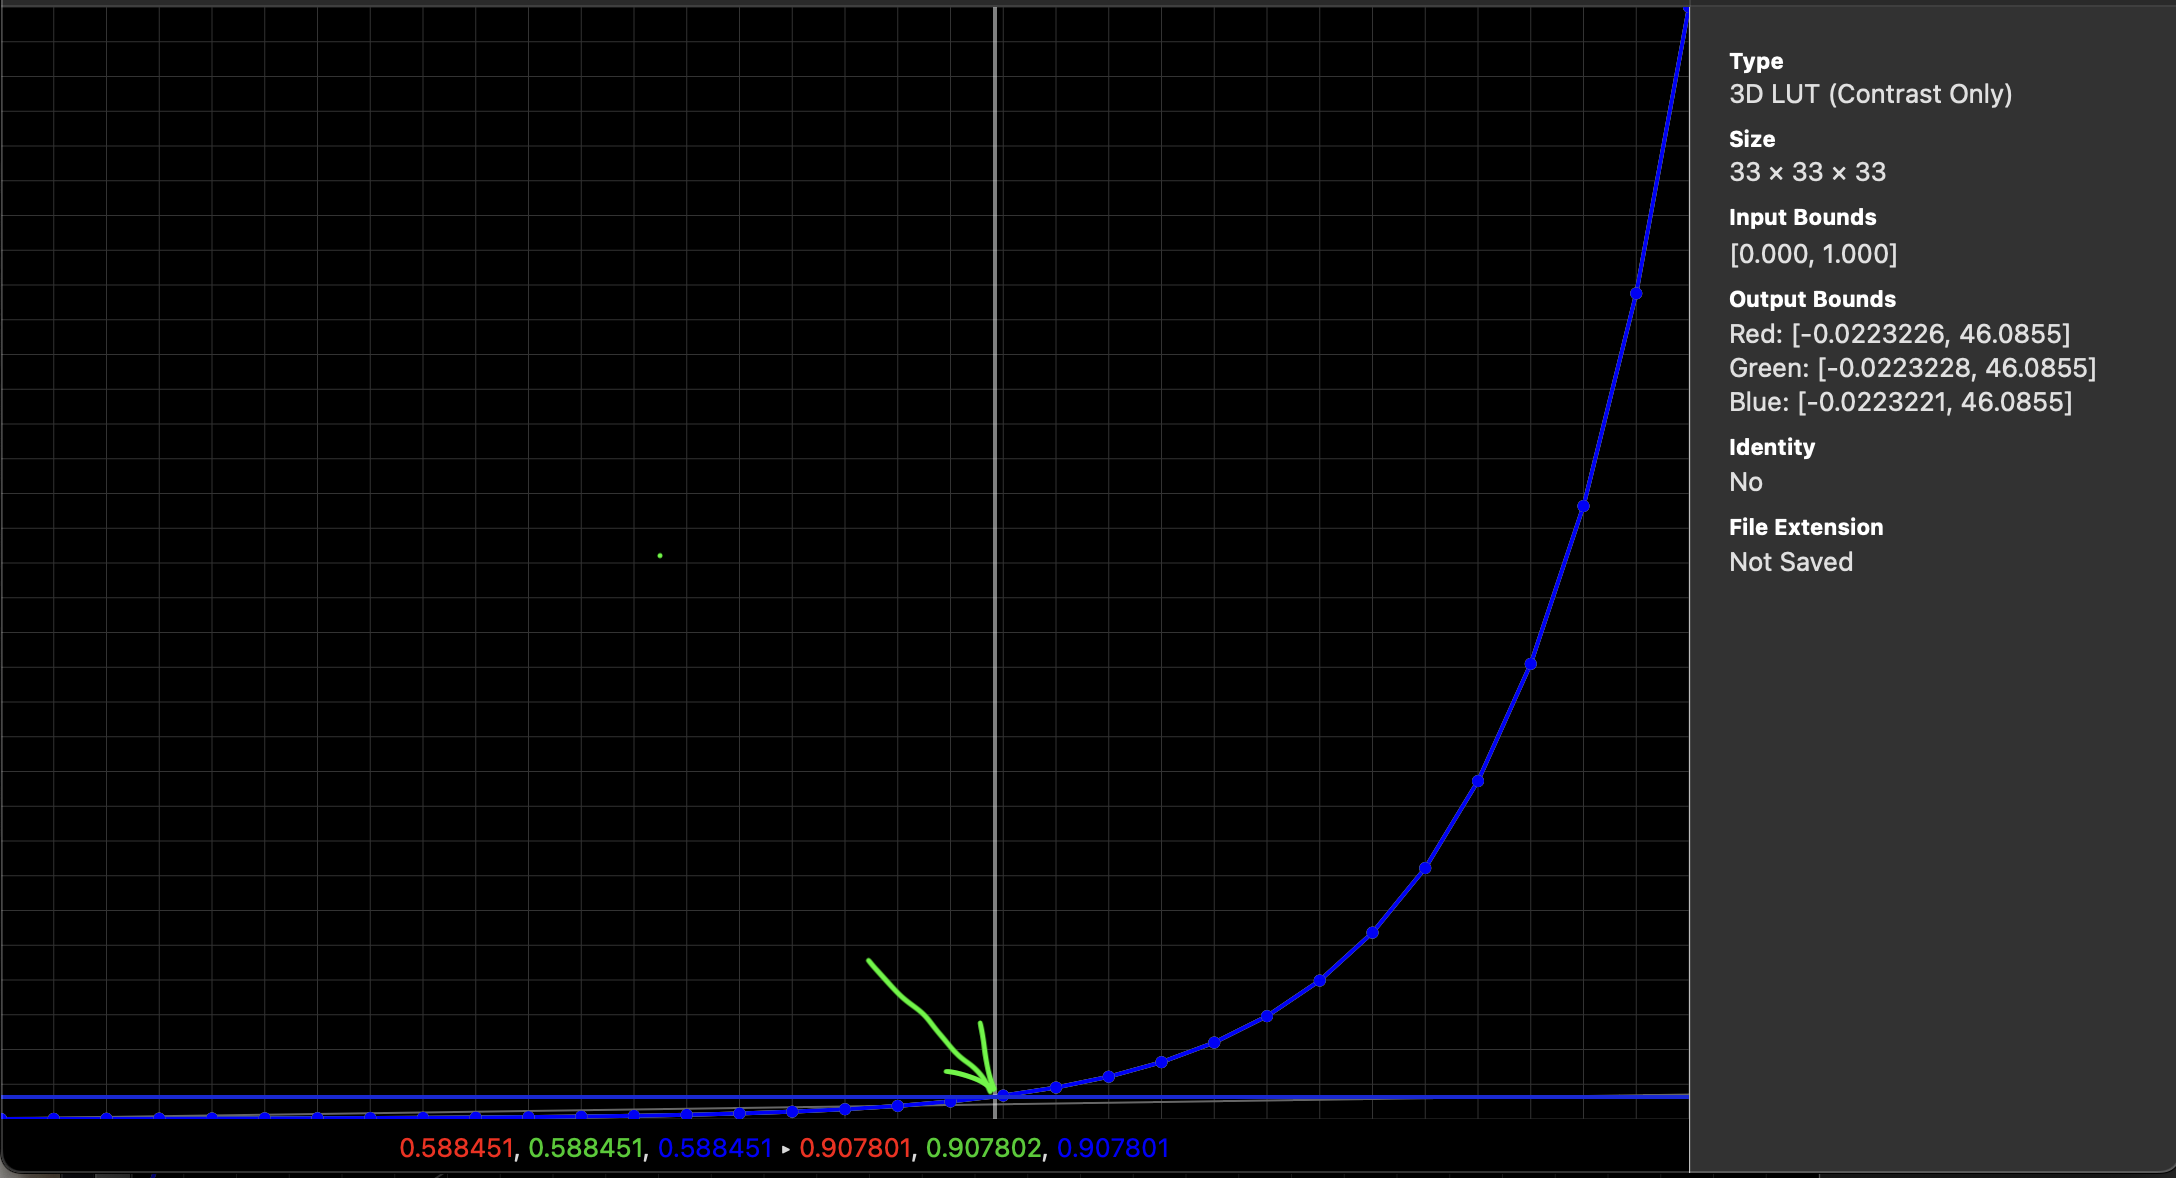
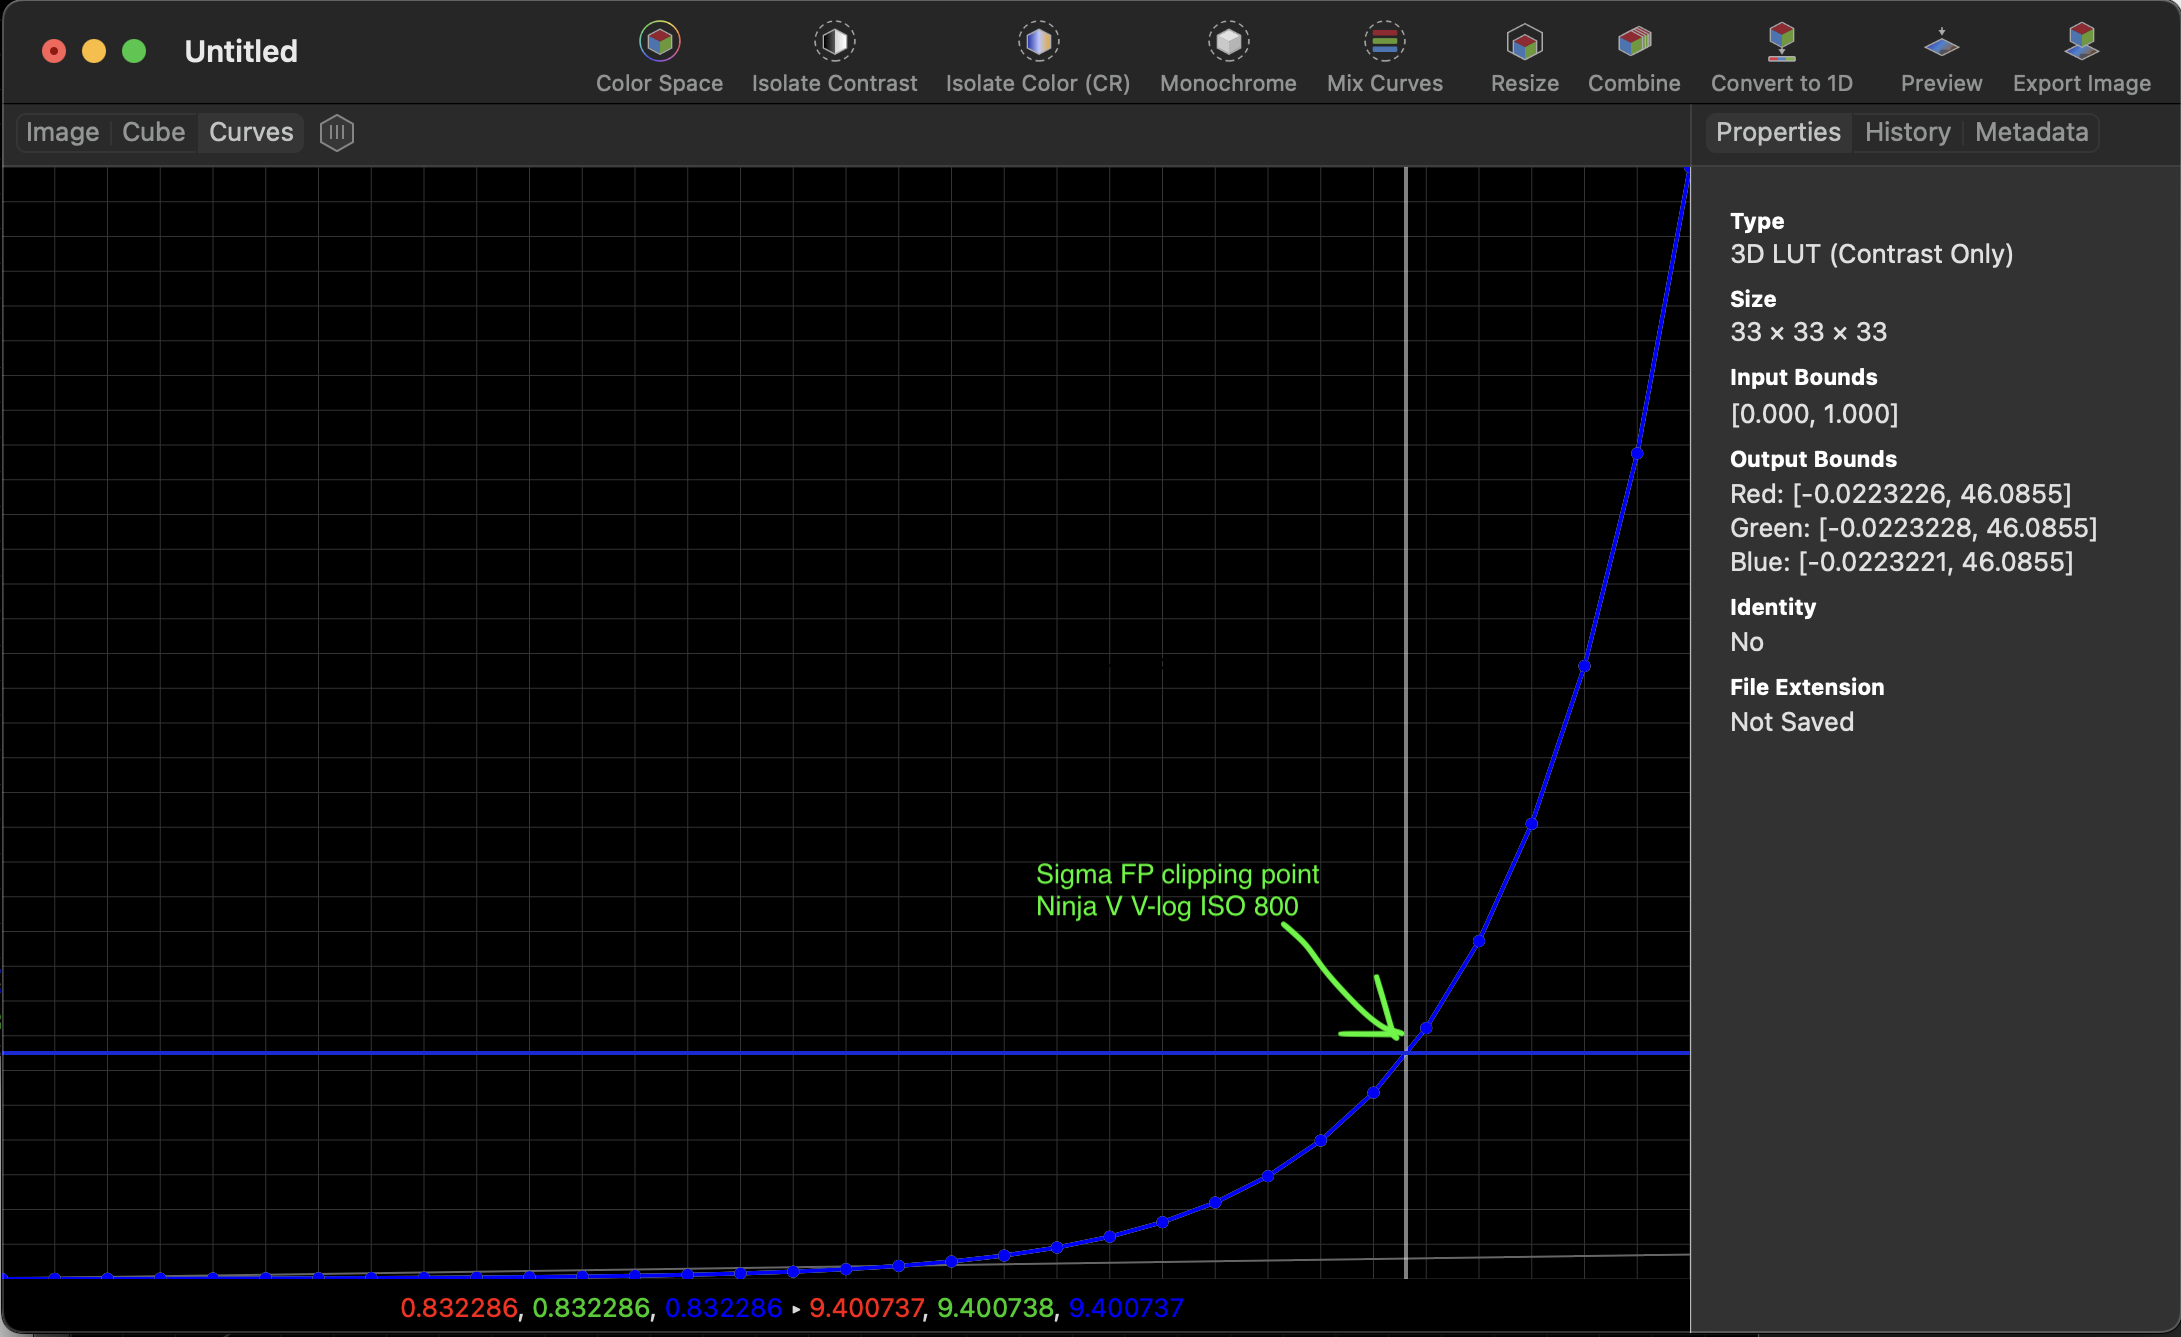
OK there you go. So yes it's confirmed that Atomos decided "Native" = Vlog. After you said it, I googled it and found the AtomOS release notes update PDF that you're quoting from. This certainly reduces a lot of uncertainty. It's a shame the Atomos rep was not able to clarify this when I emailed them a while ago. The Vlog curve spec defines 8 stops above middle grey, so the max linear value is 46.0855. (0.18*2*2*2*2*2*2*2*2). The fp sensor clips way before the max value that Vlog was designed to hold so it should not be an issue. Based on the test clip you recently uploaded with the sun clipping out of the window, it's clipping at about 0.833 in Vlog so that would be like 83 IRE. In scene reflectance terms once converted from Vlog to linear in Nuke, that's 9.36. So it's clipping more than 2 stops below the Vlog max value. This screengrab illustrates where that is in relation to the entire scene reflectance range defined by the Vlog curve. Specifically this shows a Vlog to linear transform, so it's the inverse of a Vlog curve. At the bottom, the input numbers represent the equivalent of an "IRE value" (0.83) and the output numbers represent the scene linear value (about 9.4, matches Nuke). So as you can see, there's a ton of headroom remaining that will never get used. That means on the same Vlog to linear transform the input is about 0.59 and the output is 0.9. Here's a screengrab showing you how much extra headroom you get for capturing highlights above that. You basically get all of the curve to the right of the green arrow I drew. So while it's not ideal that Sigma don't have their own log curve, Vlog is okay as a monitoring option on the Ninja V. It doesn't matter what ISO you use, you will never use up all of Vlog. This is assuming there's no funny business going on where the Atomos is somehow clipping the highlights as they come in from the camera, but I doubt that. Just to clarify, it doesn't matter which monitoring option you choose on the Ninja V, the underlying file is exactly the same. The difference between monitoring in PQ or V-log is that Vlog requires you add your own LUT, while PQ out of box creates a "display" image that takes advantage of the extra nits of the Ninja V but it's just a consumer HDR display standard for TVs. So if you want to view the same image while shooting as in your timeline, you would match the display settings in both the Ninja V and FCPX, which is all you do in any software/hardware combo anyway. All that's been figured out is that the "Native" input is a known log format (Vlog), so that means it's easy to figure out how to load the look from your editing/grading software into the Ninja V.
-
https://community.acescentral.com/t/luts-that-emulate-the-aces-workflow/1334 These were conveniently made available to download, so you would select the V-log LUT. They offer both full (data) range and legal (video) range versions depending on your device. I have a feeling the Ninja V is legal range, so if you use a full range LUT it will look too crunchy and contrasty. There are "normal" contrast versions which is the default look, which is what I would use if wanting to match the default image when importing into an ACES project in Resolve. There is also a more low contrast version, but I would ignore that since to me, the aim it to get a matching image to Resolve. You could also throw this LUT on PRR footage transformed to V-log in FCPX and although it would not be a true ACES project, you could see if the footage matches on the Ninja and on your Mac. Also, you have the option of trying the legal vs extended versions of the LUT in case there's a mismatch in how FCPX and the Ninja work. What I mean is, I don't know if internally FCPX works "full" range or "legal" range, or if there's the option to change that like there is on a per-clip basis in Resolve. It might actually be worth just exporting your timeline to Resolve to grade there 😉