Llaasseerr
-
Posts
347 -
Joined
-
Last visited
Content Type
Profiles
Forums
Articles
Everything posted by Llaasseerr
-
Can you send a DNG where middle grey is exposed correctly according to internal false colors? I can check it.
-
Great, that's a big deal that you got the image in FCP and the Ninja the same. That's half the battle. You might just find though that the false colors on the Ninja are not changing to account for PQ. That's a guess on my part though, as I haven't used them. Yes, raw (and film) is technically an HDR medium. Often the exposure will be adjusted to match the scene after capture because it captures integer values, so it wil transform to linear floating point raw which has values above 1.0. Then that is transformed to something like a log space or an HDR display space. All HDR is, is a way of displaying a linear raw file with more highlight range for high-nit 10-bit displays, using a custom gamma transform. Yes, any color transform for display purposes is always transforming linear data into a viewable range. You just don't want to add to that yourself directly on the footage when you're trying to work out what your color/exposure mismatch is. There is a more fundamental issue in the color processing pipeline that is causing the mismatch and you just need to identify the inconsistency, then it falls into place. Basically you have proven that the footage in FCPX and on the Ninja is the same with the same view transform applied on input to FCPX, but it doesn't mean you need to use it. You could just use it right now for troubleshooting while you work out the exposure issue. What I suggest is look at where middle grey falls in Rec2020 PQ as an IRE value (look at technical documentation online). I don't have that knowledge handy. Then you can see if the false colors are working in Rec2020 PQ on the Ninja and not just Rec709. Like, does it change the false color mode between Rec709 and PQ? It needs to do that. Basically, it should not matter what device you're viewing on (camera, Ninja, FCPX), the false color for middle grey should be green as long as the false color implementation is aware of the display space on the camera, Ninja, FCPX project.
-
Right, I just mean maybe try the false colors on the camera without the Ninja for now to see if you can get a result. I did hear that it was measuring the raw value directly off the sensor, but I'm not sure if that's true. Yes I'm not saying Rec709 mode will make a difference as to how the image is displayed in FCPX. Actually nothing on the Ninja will change it because the underlying linear raw image is the same on both the Ninja and in FCPX. It's just that they are by default displaying it differently. You shouldn't do any direct color correction directly to the image to get it to match between devices, because the underlying linear raw image already matches and so you are making it not match. It's just the non-destructive display color pipeline that needs to be figured out. Although like you say with lots of unknown steps, it's not clear.
-
Unfortunately without knowing all the color transforms occurring, you can't monitor the image and get the same result in FCPX. The underlying raw image is always linear with no gamma adjustment. It's just that the Ninja V by default applies a baseline adjustment, then you are applying PQ on top, then in FCPX it allows you to select a new way to display it. With a managed color pipeline, you do not have to do any adjustments at all. It looks the same on the monitoring device as it does when you initially import it into the editing software. Maybe try the internal false color and see if you can get that working, then go back to the Ninja knowing what your baseline is. Also try disabling PQ. Just cut out all the variables first. With ProRes Raw on a Sony camera, this all works very predictably and easily.
-
I just found this test from a few years back where the fp is camera #4 and it seems to hold its own pretty well, except for in the underexposure test (4:23) where it had that pre-firmware fix issue where it's flickering. But overall, except for the flickering it is holding detail remarkably well with no objectionable noise at -6 stops. This would also be before the higher base ISO 3200 was added via firmware.
-
Just a few quick notes here. First of all, the middle grey patch (0.18) is the third from right, so it's the lighter one immediately to the left of the patch you're using right now. Secondly, you never have to break linearity to get correct exposure when shooting raw. You just need to do exposure shifts on the whole image until the middle grey value is at 0.18 in linear spave. Overall, without having tested the Ninja V workflow with this camera myself, I think your approach of metering based on ISO 800 is sound, and using the Atomos false color to hit the *correct* middle grey patch. It's clear that in most cases the base ISO for the Ninja V interpreting Sigma fp raw footage is ISO 800. If you want, you can try exposing by getting the green in the false color to hit the correct patch, which we can assume for now will be based on exposing for ISO 800, and then send me the raw image so I can check the exposure in linear space. It really should be that simple.
-
Does that turn it into a full size HDMI port at the top? Yes, 48 would def be nice too.
-
I'm quite into 72fps because it's a clean multiple of 24 and there are advantages to that, but 60 is obviously handy too.
-
Just to put things in context, I measured ISO 3200 +1 stop with still a clean noise floor and clipping at a bit less than 20 in RGB, and Arri RAW clips at about 60. So pushing +3 stops with ISO 3200 could put it about 1/3 stop extra highlight detail over an Alexa, with the huge caveat of we would need to see how the shadow detail is holding in the raised noise floor. And obviously you could play this whole game of underexposing with an Alexa to a degree, but I'm just looking at a baseline.
-
My quick finding from these clips is that at the same exposure, ISO 3200 is only marginally noisier than 800 so my prior thesis still kind of holds. I'm trying to clarify what the advantage of 3200 is, rather than the stream of conscious observation in my prior long post, So I think the simplest way to describe it with the limited dataset is: ISO 3200 = about the noise level between 800 and 1600, probably due to the change to the higher base ISO. But also, lower highlights capture. ISO 3200 +1 stop = same noise level as ISO 6400, but 1/4 stop more highlight capture. I'm just speculating for now, but if you were going to play the underexpose game then underexposing ISO 3200 by one stop more than underexposing 800 will give the best DR. I think. So maybe pushing it to the limit would be comparing underexposing 3200 by 5 stops vs underexposing 800 by 4 stops. Then back off from there one stop at a time if the black details are getting destroyed. I'm not including 1600 or 6400 because they don't seem relevant.
-
I know this is getting off topic of the thread which is about the external recorders, but as far as using an SSD for internal DNG recording, if you use an NVMe stick and can get 1GB/s across USB-C then couldn't Sigma do a firmware upgrade where the camera could potentially output 6k RAW or HFR 4k 12-bit? It could potentially do 72fps.
-
For sure, shooting 3200 with that much ND seems like a really interesting possibility if the black levels hold up! Thanks for re-uploading.
-
Yes that makes sense, it would just be looking at the metadata tags in the ProRes RAW file that say it's V-log and applying the linear to log transform for display. But as you say since it's not baked in, you can easily change the transform to another log curve/gamut available from the drop-down list. I guess Atomos just decided that for generic cameras they will set it to V-log. It's not meant to make any difference what log curve and gamut you use as intermediate encoding if you have a colour managed pipeline. For example in ACES if you use the V-log IDT for V-log or the Alexa IDT for LogC. But it's worth noting that V-log clips at 46 in linear space vs 55 in LogC. Probably not a problem for the Sigma fp though!
-
I'm just noticing the shadow levels are getting a little lost at the bottom of the waveform for the pushed 3200 image, so despite the fact it looked visually the same to me when inspecting noise per channel, it evidently is throwing a bit of detail out in service of the highlights. It will be interesting to see how the deepest shadows hold up if the image is shot -2 stops or more underexposed. Also, sorry for the numerous typos in the above post.

-
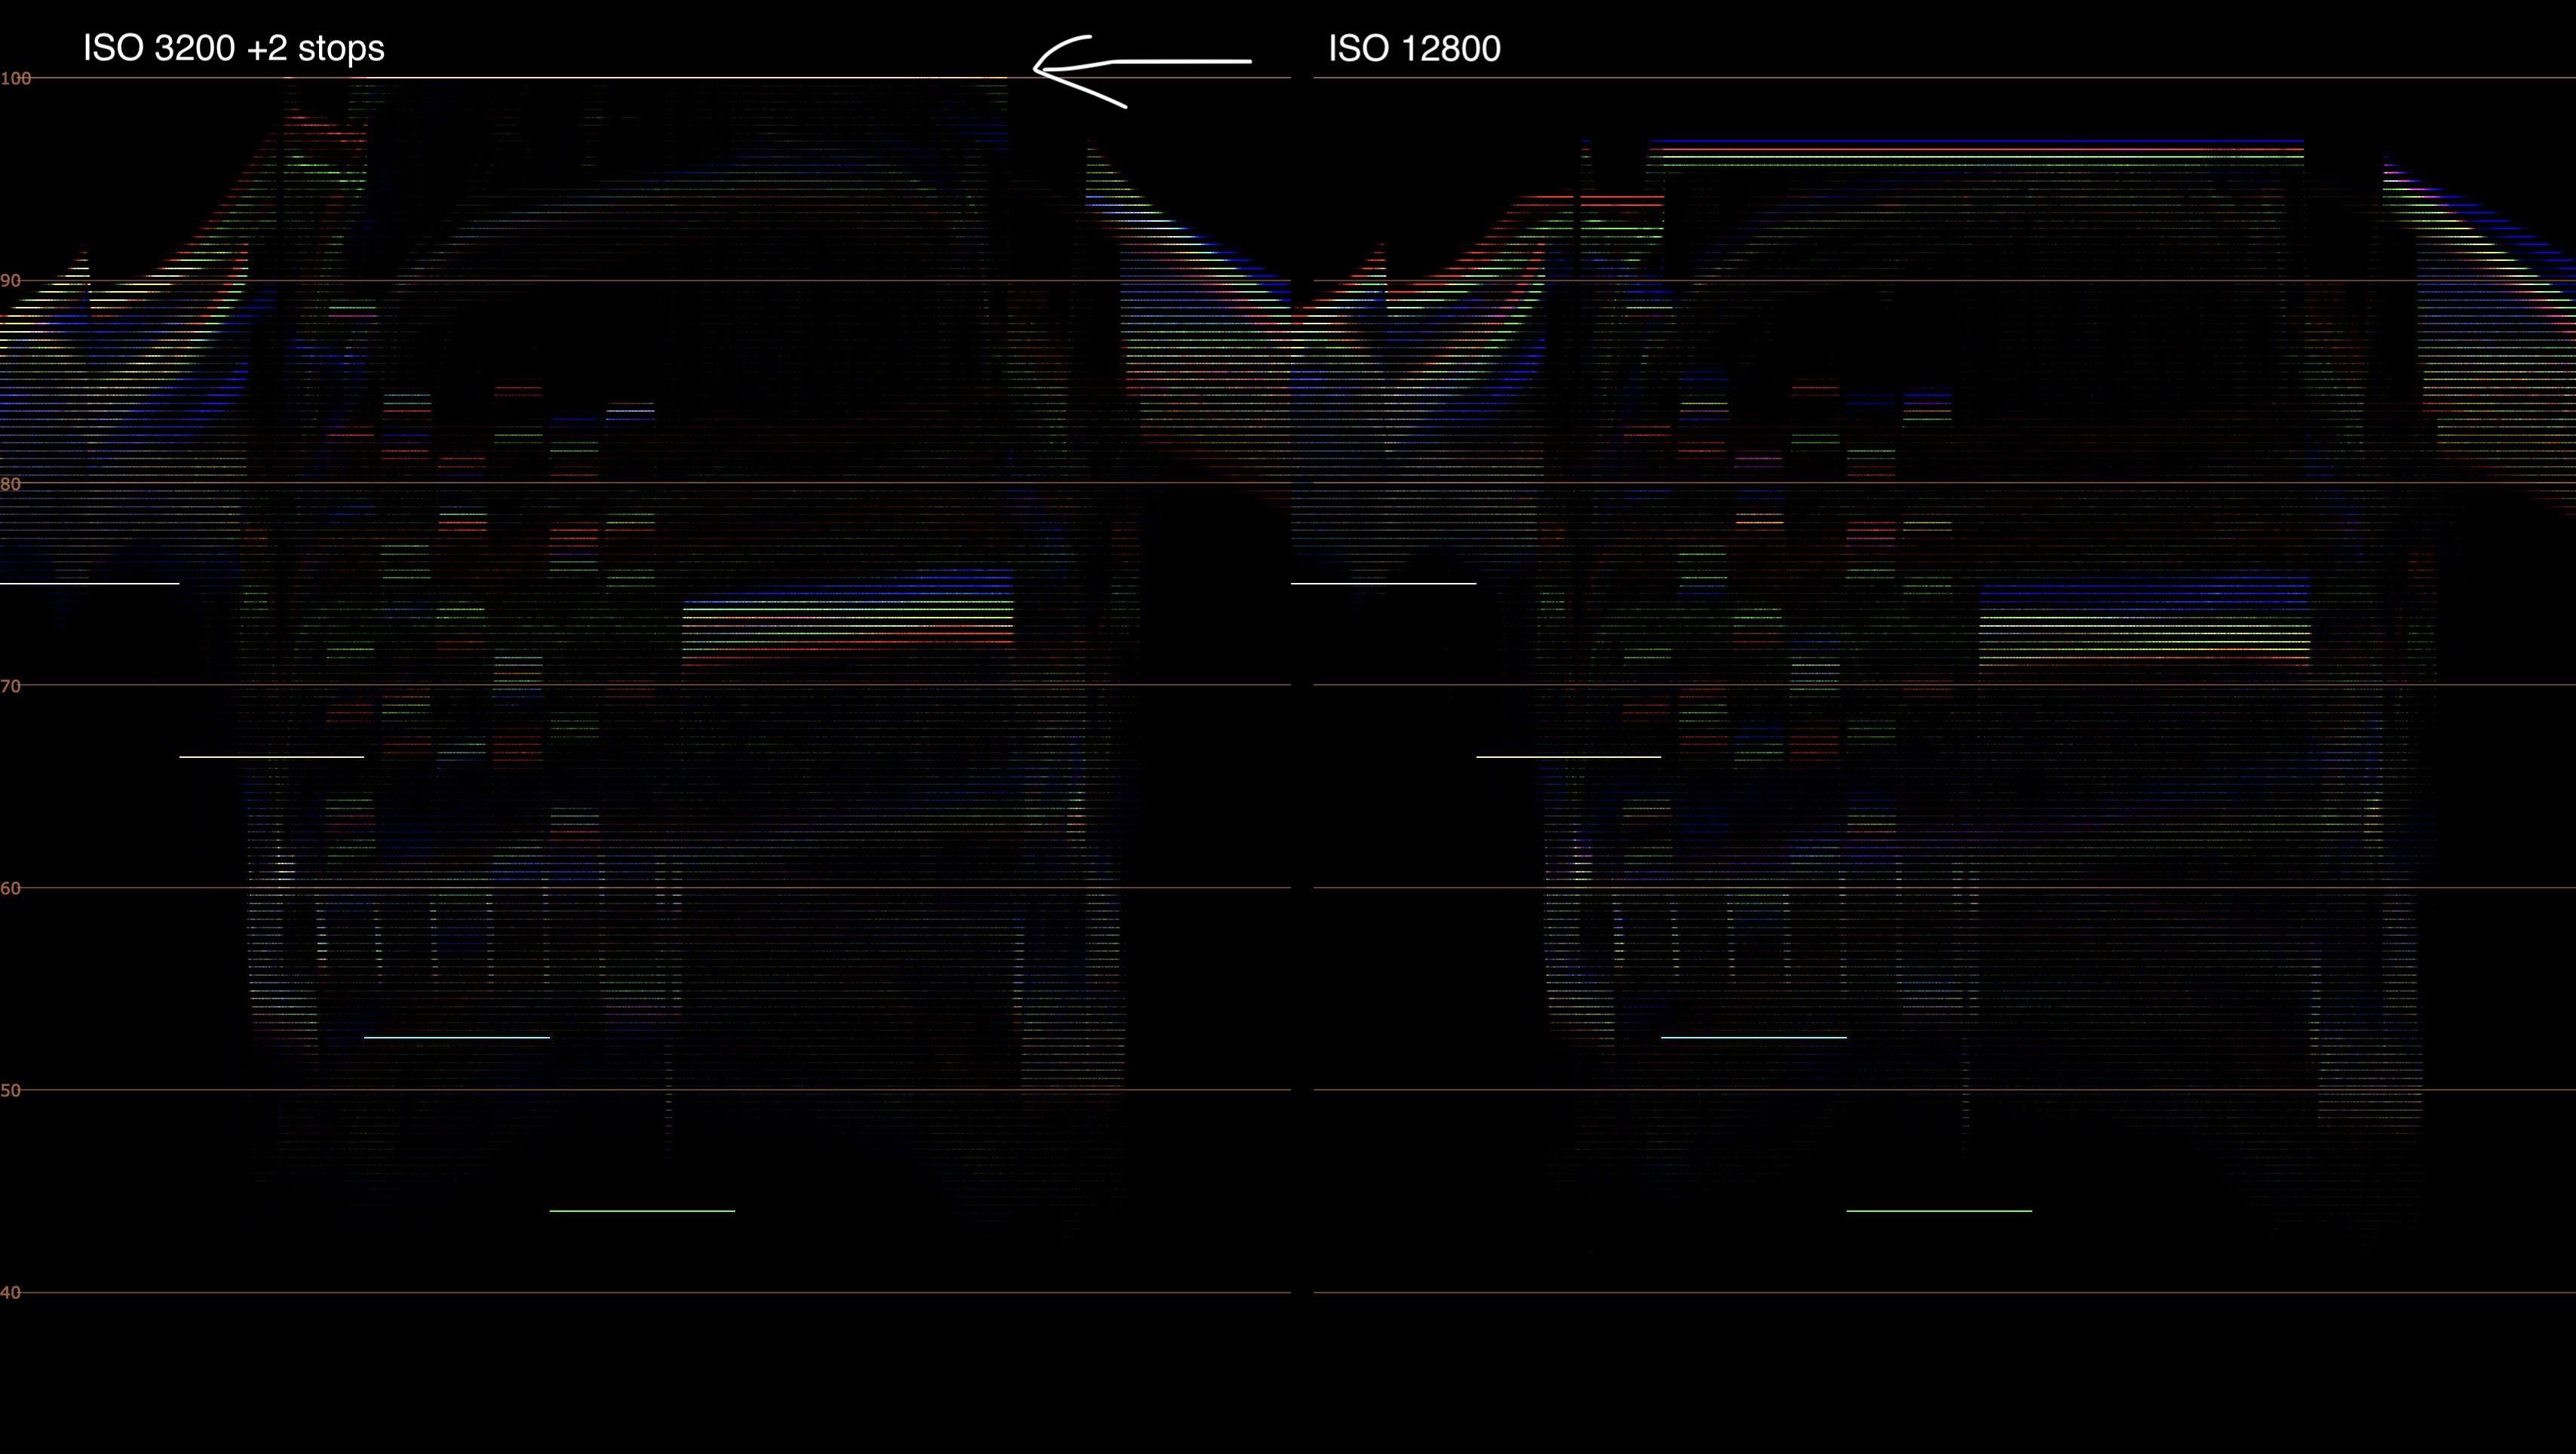
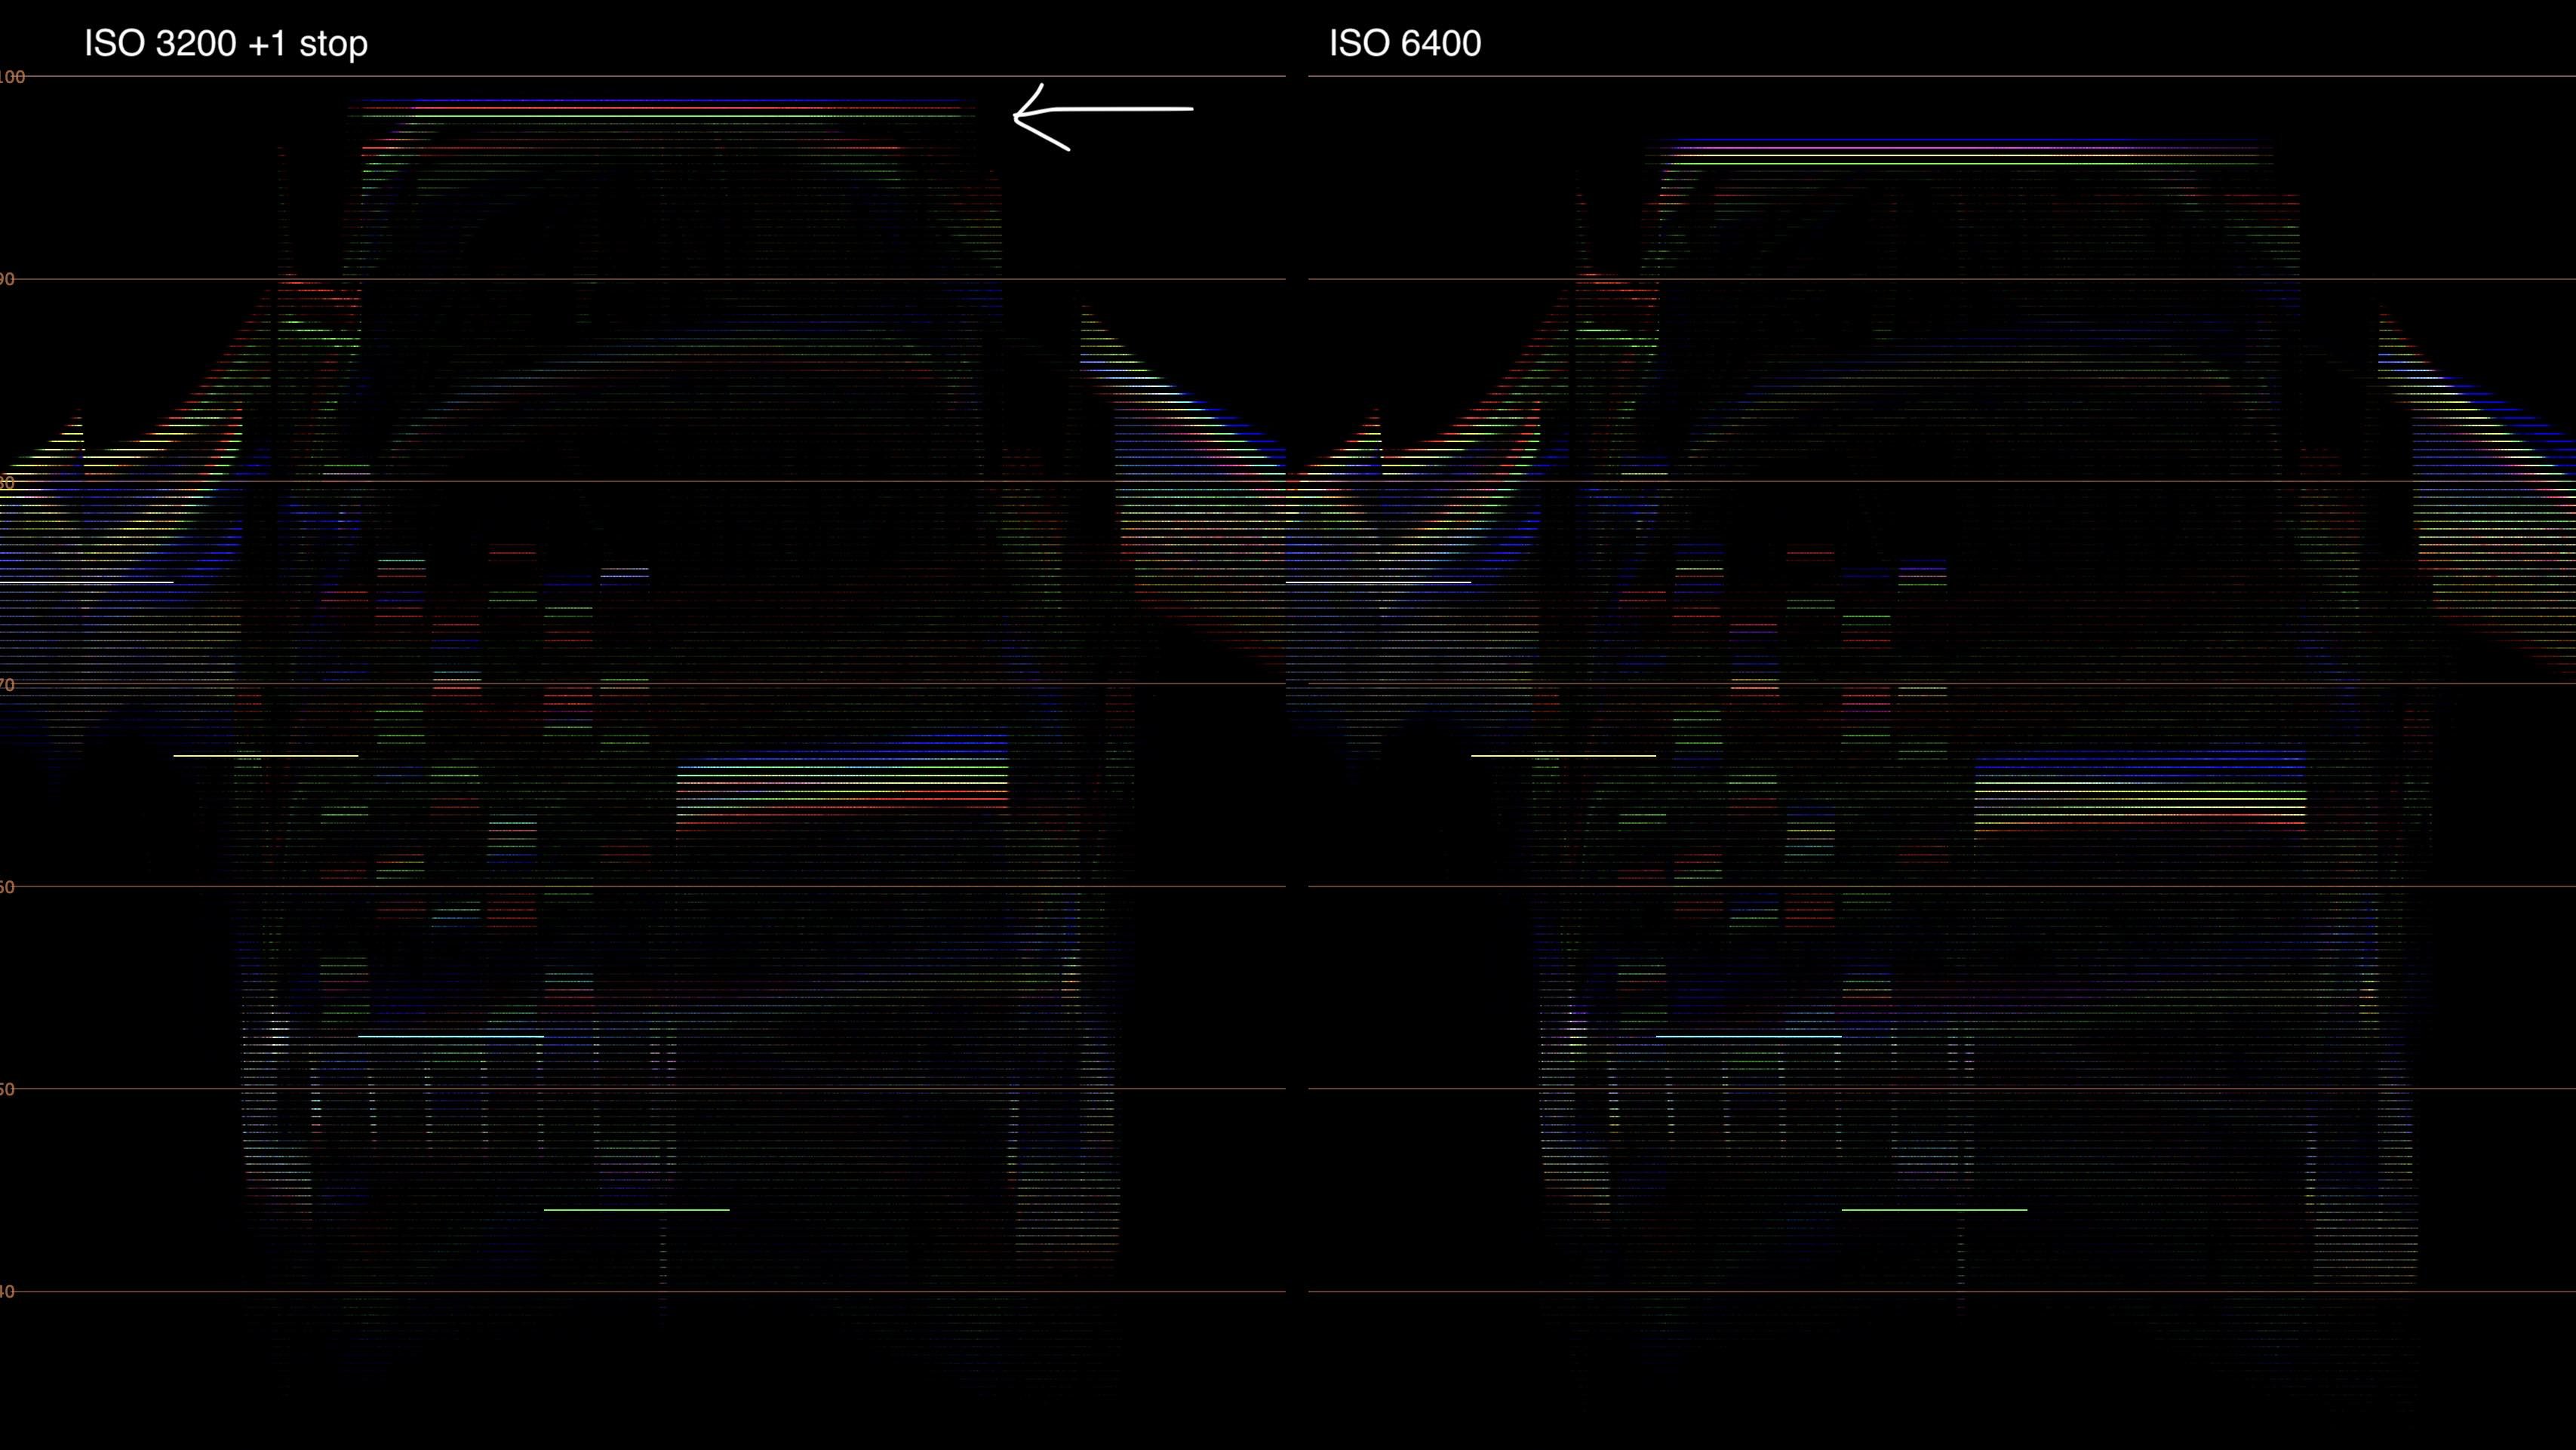
Here's the highlight clipping without/with highlight recovery based on the just the red channel: ISO 100: 1.0 / 2.09 ISO 200: 2.0 / 4.13 ISO 400: 4.0 / 8.25 ISO 800: 8.0 / 16.1 ISO 1600: 8.0 / 16.1 ISO 3200: 5.0 / 9.92 ISO 6400: 8.0 / 16.48 ISO 12800: 8.0 / 16.73 So the clipping point in the DNG is reached at ISO 800, but it's just due to amplifying the signal by +3 stops from base ISO 100. ISO 800 seems to be the starting point for the Ninja V implementation, which clips at ~9.34. This seems about right since I don't think it uses any kind of highlight recovery. When I balance ISOs 100-800 to the same exposure, they're the same clipping point because 800 hits the max highlight value form that point on. The noise floor actually looks the same to me as well. In this case, ISO 1600 and up are not adding anything in the highlights. ISO 3200 clips earlier than the rest, so ~9.9 vs 16.1, but the noise floor is about the same as ISO 800. If you think about it, there's a net gain here because the highlights are holding about 1/3 stop less than 6400 but the noise floor is -1 stop less. So it's the same as 800, which is really just ISO 100+3 stops). So to me, the way to take advantage of this is to underexpose 3200 by at least 1 stop so you're rating for at least 6400. The effect is that the noise floor is the same as 6400, but the highlights now clip a bit higher. This ISO difference is the same behaviour with the Ninja V at 3200. I'm uploading two waveforms: 1. ISO 3200+1 stop vs ISO 6400. = +1/4 stops more highlight detail. Max value 19.86 vs 16.48 in the red channel, noise floor the same. 2. ISO 3200+2 stops vs ISO 12800 = +1 1/4 stops more highlight detail. Max value 39.7 vs 16.48 in the red channel, noise floor the same. For reference, Alexa's sensor clips at 55 in linearized logC which is only half a stop more, so it seems that the shadow detail would hold up okay if the ISO rating was pushed further. I was going to upload a split screen of the shadow noise, but it honestly looks the same in each image when inspecting each channel individually so take my word for it. It would definitely be interesting in more test images showing the same ISO range at the same exposure level (adjusted with either lens or ND), and also protecting the highlights. It does seem like there's plenty of room to push shadow detail way down and still recover a decent image. EDIT: I just want to clarify that in the +2 stops waveform image (LHS), the highlights are not getting clipped but they're in the upper code values of the log range and can be pulled back.
-
Thanks! I'm taking a look right now. It's helpful that the light clips and that the underside of the cabinet is still relatively in shadow at the highest ISO.
-
I should add that with the Ninja V it would be possible to do a transform to a log-ish image with a LUT, but I'm not sure if the highlights would be preserved. And then an additional LUT would be required to transform to a Rec709 image. These two transforms can be collapsed into a single LUT at the expense of highlight values above 1. It's possible the entire range could be preserved by underexposing the image and using the LUT to lift the exposure. In summary, if there isn't a built-in way, there probably is a way of forcing the Ninja V or anything else to display a usable monitoring image with some hacks and workarounds.
-
You are correct, ProRes raw is linear raw the same as DNG. It is no great mystery. In ACES or a similar linear gamma project, the linearity is maintained but the exposure is shifted to account for where middle grey is so that there are superbright values in floating point above 1.0. In editing software besides Resolve, the ProRes raw file needs to be interpreted as log but it should still set it to the correct exposure. And then as you say, you apply a film print LUT to Rec709 or similar. You are meant to display raw images in log because it shows the entire range, before adding the look LUT in either HDR or SDR space. This is the big problem with this camera - people who say it doesn't need log are forgetting about monitoring. There is always an intermediate transform of linear raw to a log format before applying the display LUT since LUTs only work in 0-1 space. I spoke to Atomos, and they could not even say what the colour space is of the Sigma fp when monitoring native on the Ninja V, but I suspect it's somewhat like the OFF profile. This goes back to Sigma not documenting this. So it might be a kind of Rec709 space, but it seems that it's more flat than that. I also asked if there was a way to transform the native image into a known log format and they said no. So I don't believe there's any value in writing down those IRE values, since they are only ever within the context of the gamma encoded space of the image display (even though the underlying image is linear) and no-one can say how the image is encoded. That is why I asked, can you check false colour on the camera itself? If as others have said, it takes the values directly from the sensor. That might also give you some clues as to how to set it on the Ninja V. You can also create your own false colour LUT for the Ninja V.
-
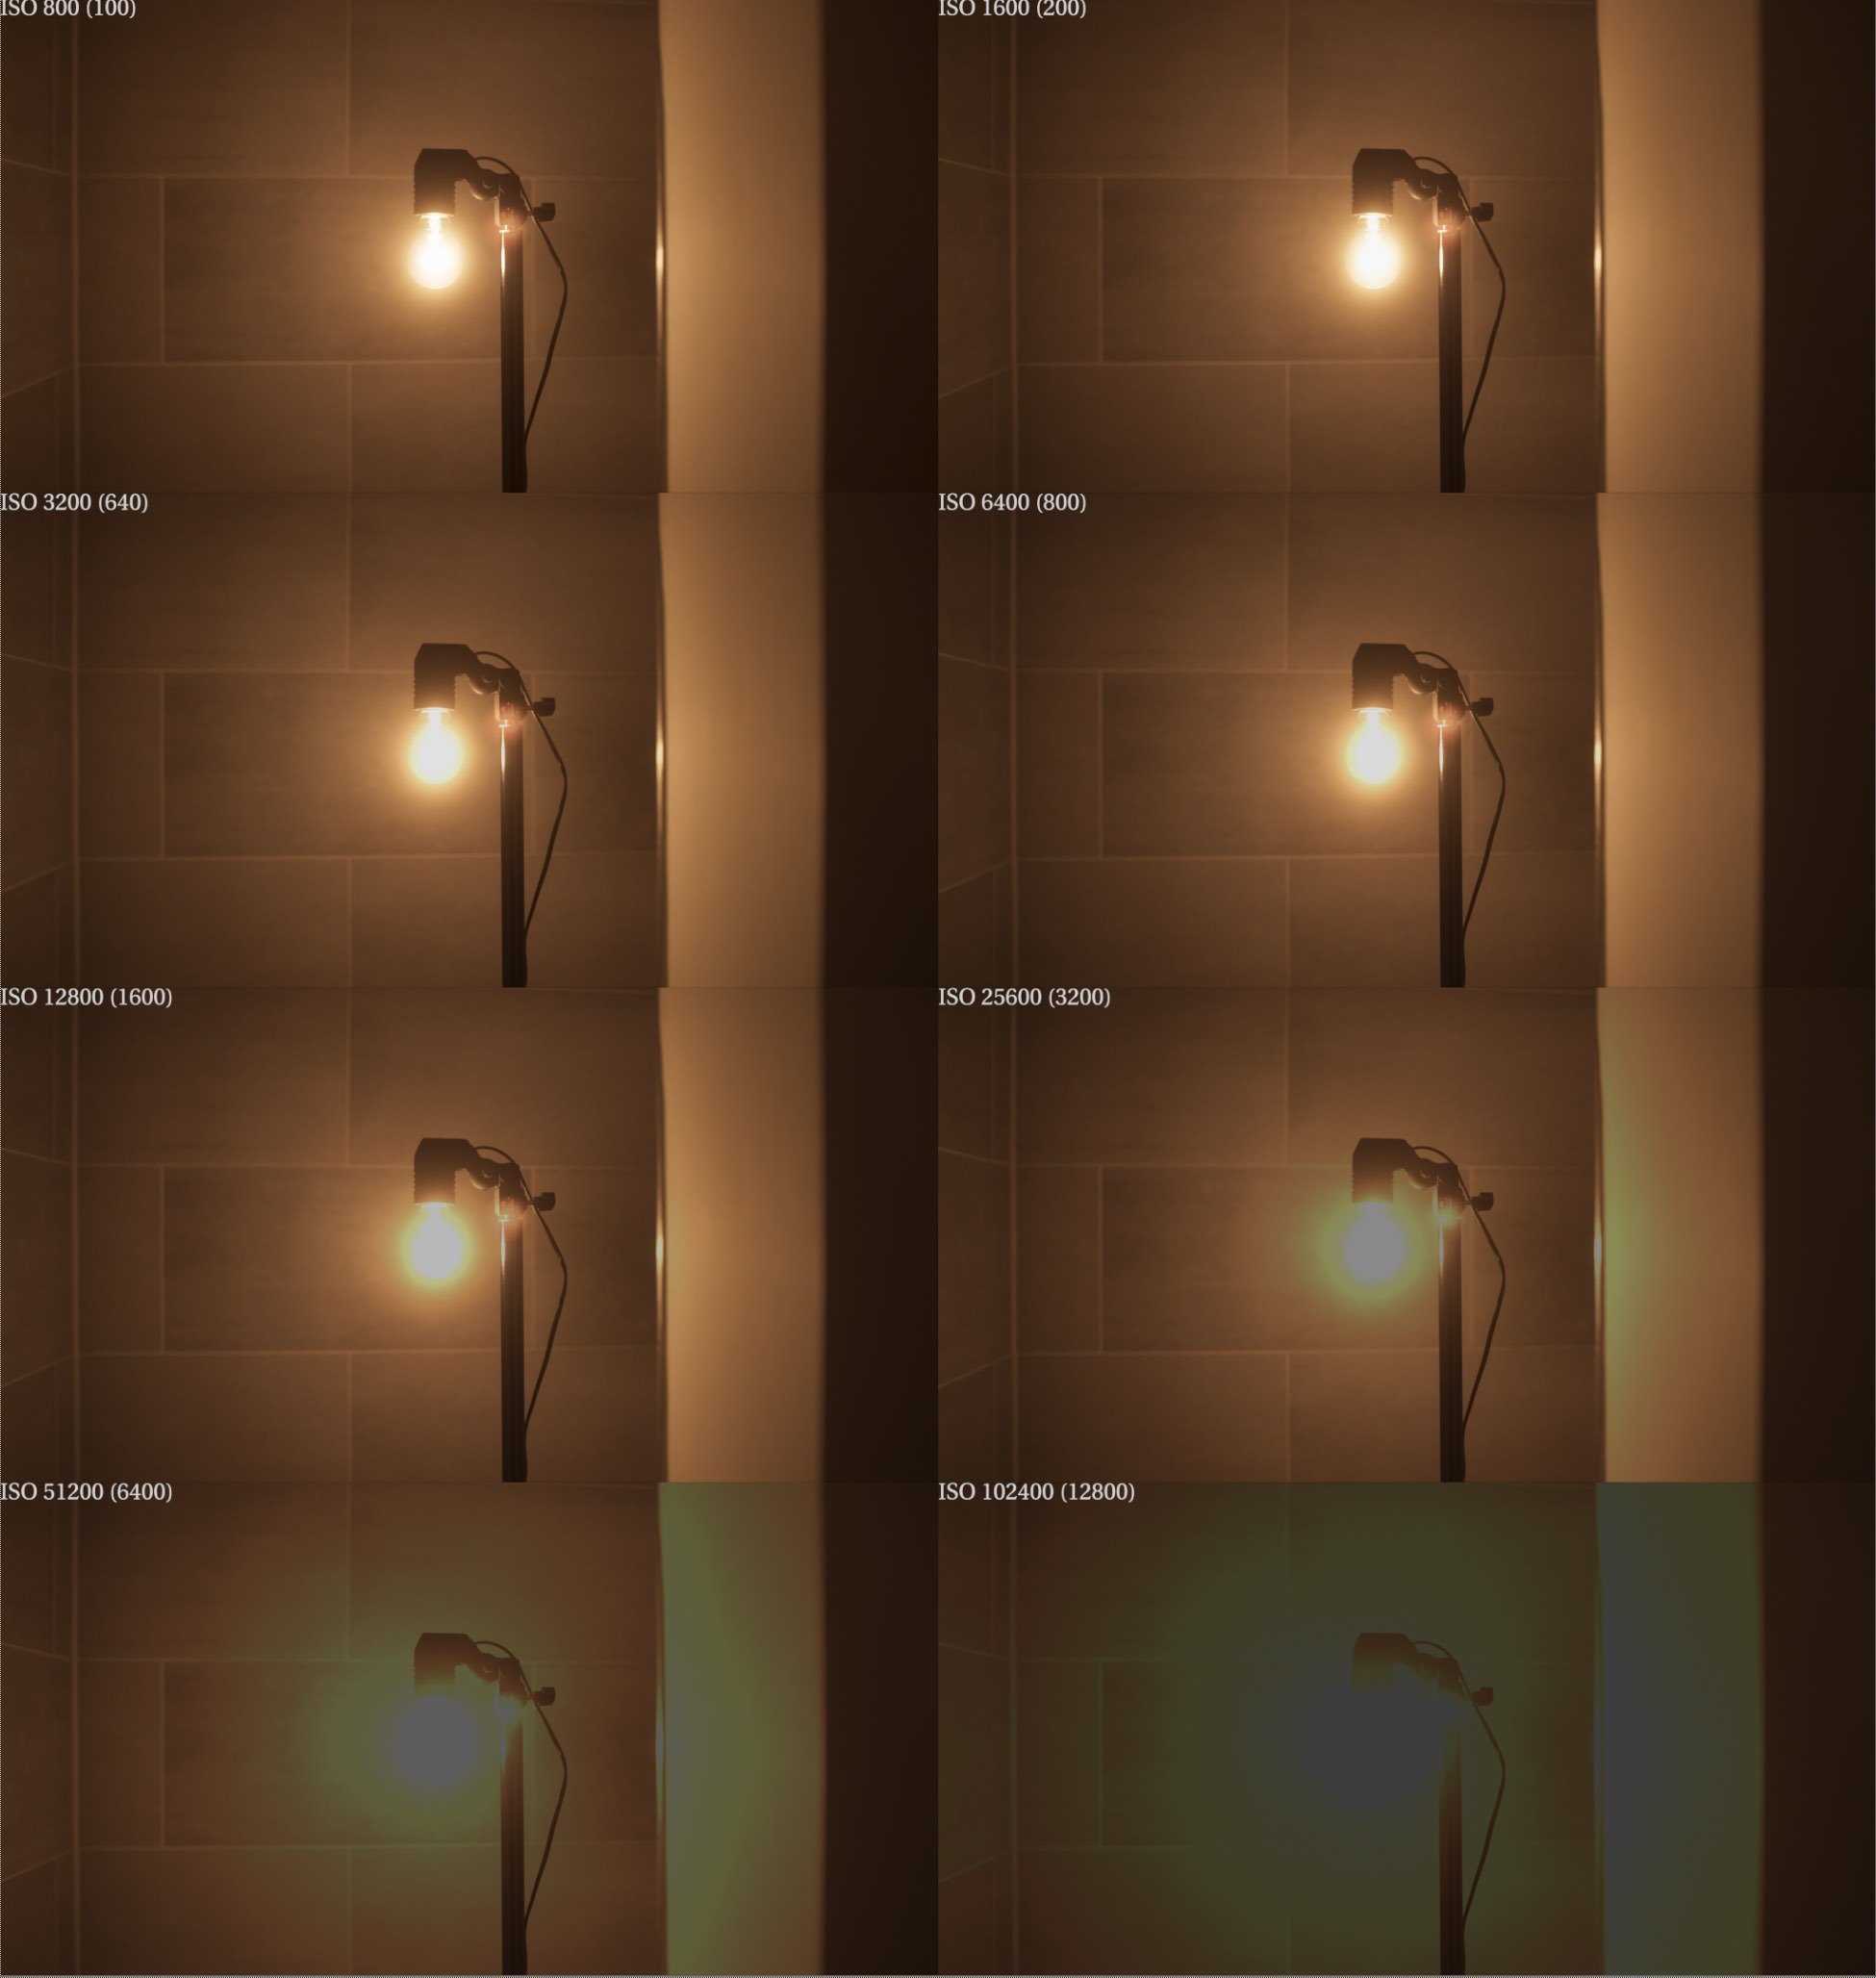
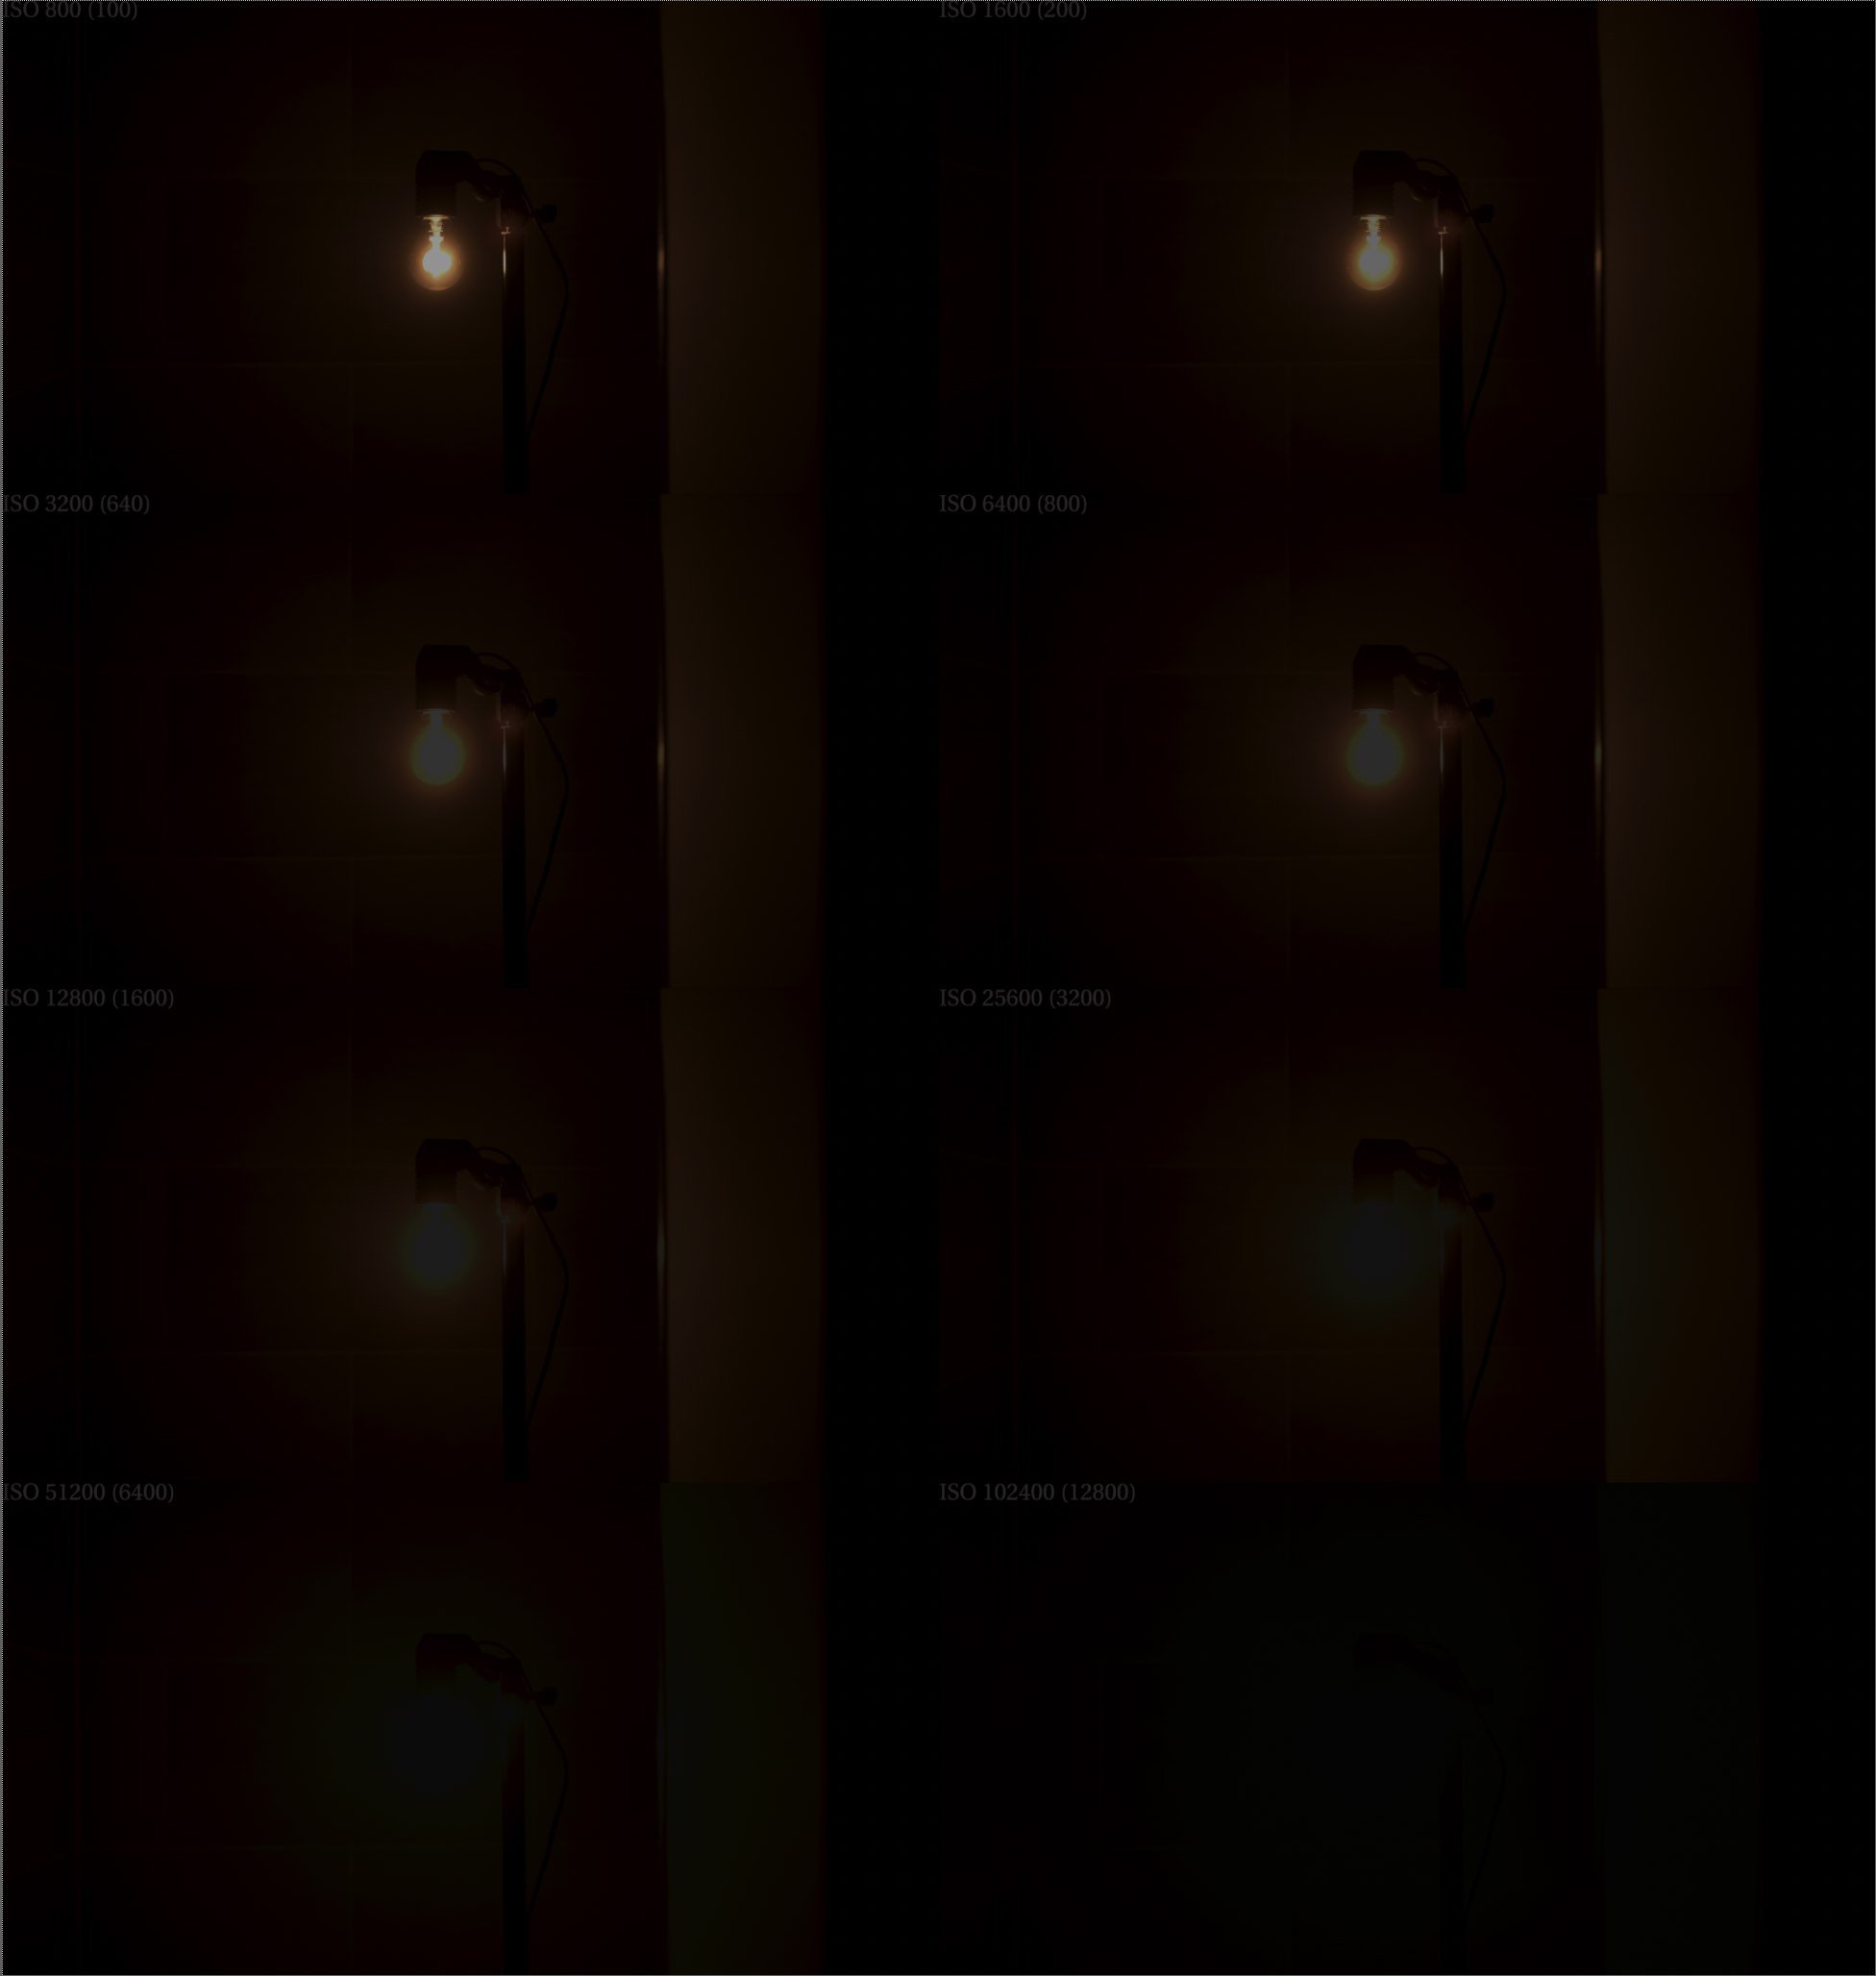
I'm thinking of making this as simple as possible, just an ISO change. Just so that there's a bright enough source that will clip the sensor at all those ISO settings, and also that there's enough shadow detail to challenge the noise level a bit.
-
If anyone can upload some 12-bit DNGs shot through the ISO range with shadows and something bright enough to clip the sensor, that would be great! I think the following: 100, 200, 400, 640 (if that's possible), 800, 1600, 3200, 6400, 12800. Bonus for a grey card, but not essential. @OleB both your lightbulb tests were great, but maybe what would be easiest for a DNG test is to replicate the second test with the exposure increase via the ISO change, and without the compensation of stopping down the lens. It then cuts out one more variable.
-
Before I say anything else, I want to clarify that when I mentioned a blue tint in my last post I did not mean from the camera - just that there was blue light in the scene that made the colorchecker skew towards blue, which is fine. What I was referring to as metering for the "Atomos ISO rating" is that you said you metered based on ISO 200 instead of 1600, for example. Given the amount of overexposure, I suggest trying to meter for the Atomos ISO value. if you just forget about false colour, what works for me with other cameras is to just take a meter reading and adjust the exposure based on that (with ND or stop down lens). Then I check in linear space in Nuke and it should be at around 0.18 in each channel of RGB (depending on scene light tint). Without Nuke, what I suggest is encode the linear image to a known log curve where you know the code value or IRE for middle grey, then check the raw log image to see that it's a close match. So the log encoding would need to be documented, which for example some Blackmagic ones are not. It seems the false colour "north star" would be to establish if the recent v4 internal version works predictably, if that actually measures the scene radiance as captured by the sensor. The grey card should hit green on the false colour as a sanity check for you while shooting. Regarding false colour on the Atomos and in general, I'll admit I have not been tracking exactly what you've been doing as it sounded a bit complicated. This may just be my preferred workflow and others might not like it, but I generally ignore manually reading IRE values. If I was going to consider using the Atomos false colour at all, I would instead aim to know that the false colour display is designed specifically for the image that you're monitoring. But again, there are many variables here since we don't know what the encoding of the OFF image is that is being sent by the Sigma to the Atomos, although I speculate it's the middle range of the linear scene capture that is then transformed to Rec709. But then you mention you're monitoring in PQ, so I don't know if the false colour is accounting for that transform, either. It seems that there are several undefined variables at play due to the undefined transforms. You might also find it helpful to see how the Falsify plugin in Resolve interprets the image: https://xtremestuff.net/falsify-false-color-transform-released-for-davinci-resolve/ Without having the camera in front of me, I would guess that the OFF output displayed is Rec709, so maybe first take PQ out of the equation and see if it works for you. Also just a note that it seems to me that for a ProRes RAW recording from the Ninja V where the camera manufacturer does not have a defined log curve/gamut, that Atomos adds Vlog/V-gamut metadata tags. But I don't think it's monitoring in that space on the unit. I think it just means that by default, when you're in some software later that it will read those tags and transform the linear/native sensor gamut to Vlog/V-gamut. However I've been overriding this and exporting as Alexa LogC/AWG. Overall, it's pretty confusing.
-
Thanks, I just took a look at these. In my reading, broadly they are the same exposure except that the ISO 1600 file is ~.25 stop lighter than the others. As for the overall exposure, I'm seeing that they are ~2.5 stops overexposed (a little more for 1600). There is an overall blue tint which I'm somewhat taking into account, meaning I'm doing a bit of a neutral grade to get the RGB channels closer to 0.18 in addition to the exposure adjustment. I should make a note that to adjust the exposure I'm using an Exposure node in Nuke marked in stops, and processing in linear space. This is as opposed to the weird eyeballing using LGG wheels that youtubers and CineD typically do in their latitude tests. How about you try metering based on the Atomos rating? In that case then theoretically it should be 3 stops overexposed instead of 2.5, but maybe just see how it goes at 3 since that is what they are rating it as with their different ISO numbers compared to internal. I would be interested to see if there's more of a predictable logic with exposing the internal DNGs.
-
Correcting something I wrote: As expected, the highlight clipping point stays constant as the exposure and noise floor increase - except OOC, ISO 3200/640 has a lower clipping point by 2/3 stop.
-
I have found consistency in DNG clipping points, but only in the narrow range I've been able to test with multiple samples (ISO 100, 125 and 160). I expect that disabling highlight recovery will give a better idea since the results can be variable, and also I expect it would compare better to the Ninja V output since there isn't any PRR highlight recovery available in software right now. The main thing I've noticed is that the max highlight value in the DNGs scales as a factor of the increase in ISO, at least with 100-125, whereas with the Ninja V it remains constant. I had a chance to look at your new clips. This time, I reverted to using Assimilate Play Pro since I figured out the mistake I was making, and I think it's more accurate at ingesting PRR than EditReady. Play Pro sets the highlight clipping a bit lower at 9.34 vs 10.35. As expected, the highlight clipping point stays constant as the exposure and noise floor increase. To check the noise floor, I zero'd out the exposure in all clips. Once zero'ing out the exposure, it was apparent that ISO 3200/640 has a lower clipping point by 2/3 stop. I'm uploading two contact sheets with all clips with invariant exposure. The second sheet shows the overbright highlights visible in the first few clips when the viewer has the exposure pulled down. So my conclusions right now based on the PRR footage are: ISO 6400/800 has less noise than ISO 100 +3 stops in post. So depending on how you're shooting, there may be an advantage there. ISO 3200/640 has 2/3 stop less in the highlights. However it seems to me that if the exposure is bumped up +1 stop in post to match a 6400/800 clip, that the noise floor is the same but the highlights clip 1/4 of a stop higher (11.68 vs 9.34). I'm guessing that this may be because the higher base ISO has a slightly cleaner noise floor - not as dramatic as we have come to expect with other cameras, but maybe something.
-
Okay, wow - that's where the green comes from. Thanks for the test!