
tonydtv
-
Posts
60 -
Joined
-
Last visited
Content Type
Profiles
Forums
Articles
Everything posted by tonydtv
-
Finished just in time for October... BURNT POPCORN! A dark little ditty, a silly little skiffle, a twisted little tale about a woman (Amber Marie Bollinger) who loves her ricecakes, but hates the oppressive smell of, well, you get it. Shot on the Sony A7s and RX100 iv on an assortment of Nikkor and Rokinon glass (and stock lens on the RX), as well as a Fujinon A18x85 BEVM-28 for those zooms. Cut and colored on Premiere CC and VFX done in Blender and After Effects CC. Enjoy in either youtube or vimeo flavors:
-
Tech talk aside, this was a really powerful piece, you should be proud. Just bought myself an RX100 iv and I second it as a damn solid B cam and FS700 stand in.
-
Thanks Hans! The car vault was a tough shot to nail (though not for Amber). We were dollying back on a jib with no monitor and no remote focus, just aiming and hoping for the best! To one day have a crew and a video village instead of throwing out my back would be a dream...
-
Thanks Santiago! As far as diving into Blender, I recommend this youtube channel: https://www.youtube.com/channel/UCuGWRbFrq3bZkOEpQ02Xpww His videos are short (sometimes too short) but they are very clear, and he covers A LOT of topics. Start with this playlist: Blender 2.6 Tutorials for New Users Beyond these tutorials, just search for intro to Blender type vids on YouTube. And while there are constantly new versions of blender every few months (they are on Blender v2.7.5 now), you can safely follow any beginner tutorial that uses Blender 2.6 and up. For the intermediate level videos, try to stick closer to videos about Blender 2.7.x. Also recommend the website blenderguru.com. His tutorials are on the more intermediate/advanced levels, but they are very good. I will be honest, Blender can be frustrating to learn at first, so be patient. Like I said, it took me two weeks just to feel comfortable using the program!
-
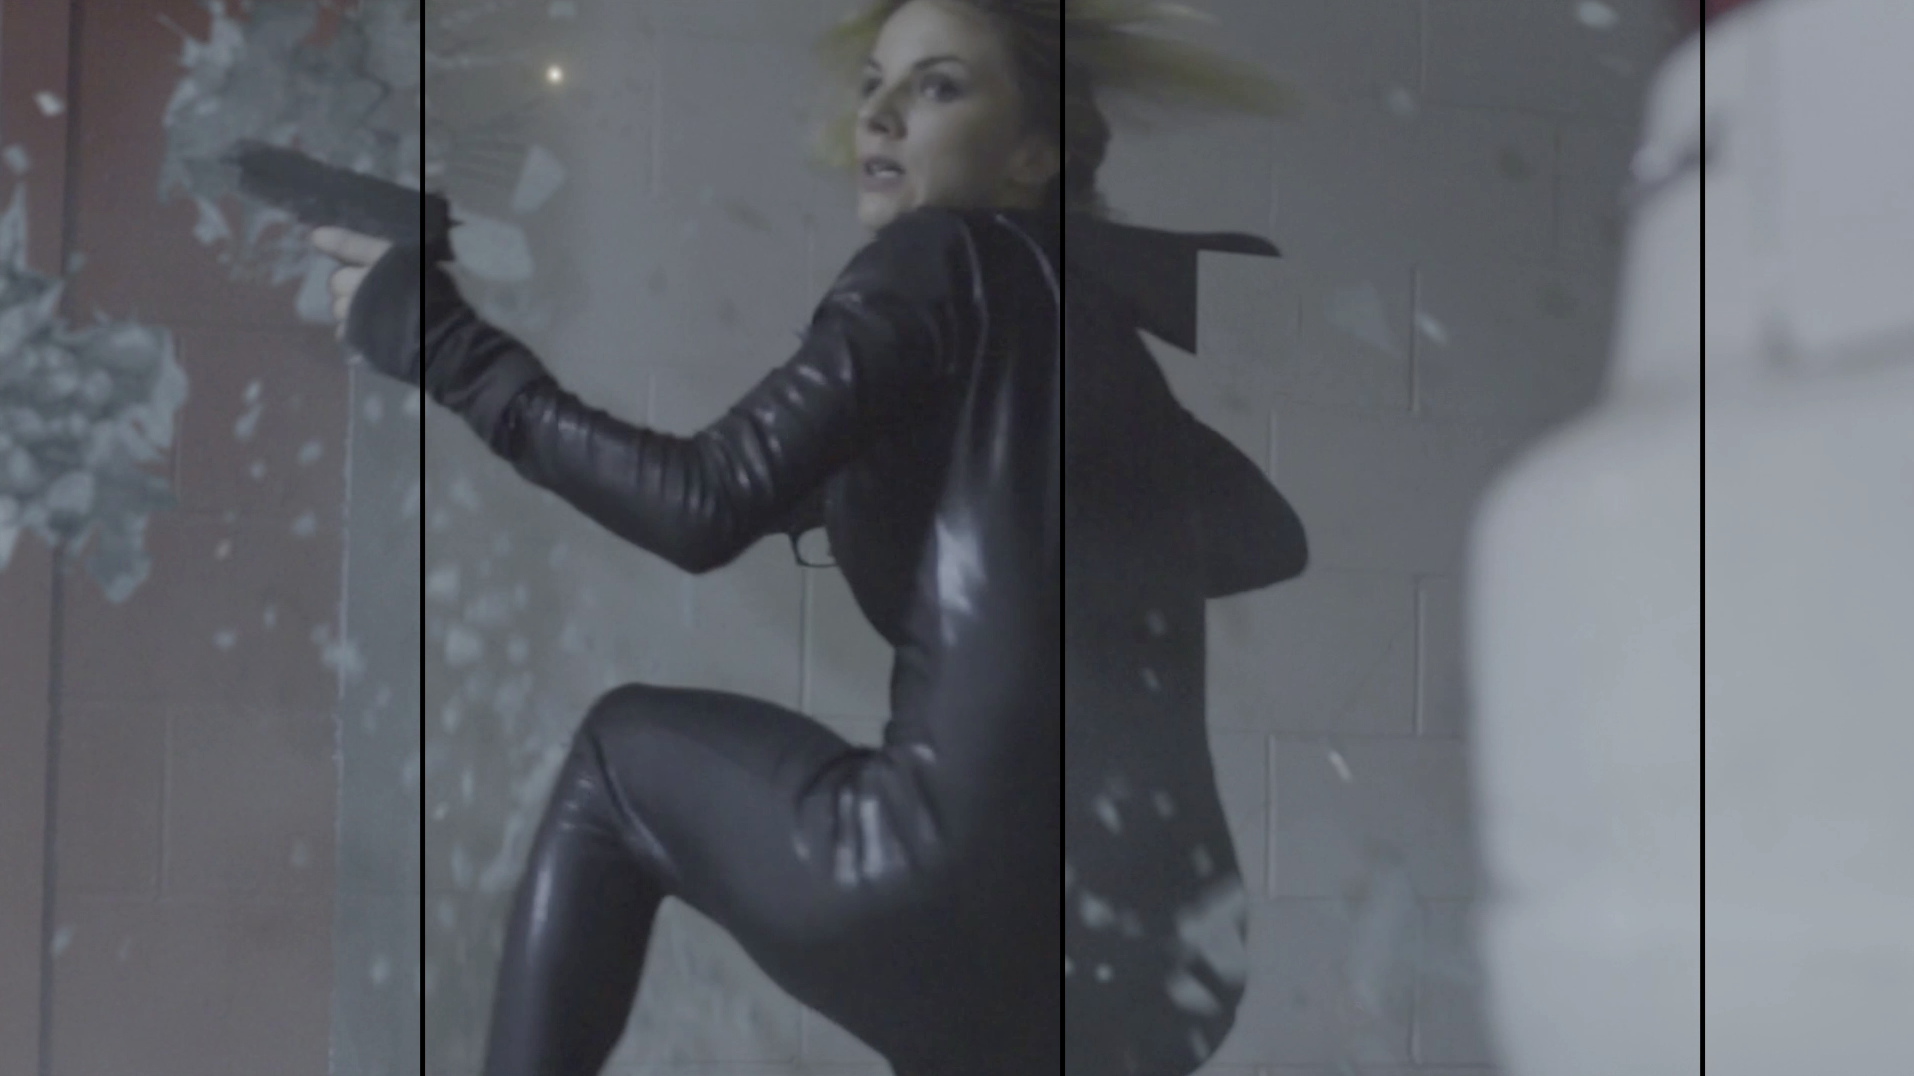
Hello all! Just completed a music video for the track 'Freefall' by Koishii & Hush. I was approached to make an action scene, no band performance at all, which was a challenge. There could be no dialogue and it had to be interesting for the length of the track. I wrote a detailed treatment about a female thief coerced into sneaking an organ into a fortified hospital, which the band approved. Casting the thief would be tricky; the character I wanted to create was not a tough-as-nails-seen-everything-badass. I wanted a sense of humor, not a female Steven Seagal. So I needed someone first and foremost who could act, but who was also athletic enough to handle the role. Thank god for Amber Marie Bollinger. Amber was in an absurdist comedy webseries I stumbled across a while back called Hollywood Is Hard, and she was hilar. I looked up another couple roles and reels she was in, and she more than had chops to handle the acting required of the role. And to boot, she was a collegiate track and field competitor, which knowing as many stunt people as I do (married to one), is one of the gateway drugs to becoming a stunt performer. Odds are she could handle the athleticism of the role. I cold contacted Amber and she was game to play. We met up with my stunt coordinator James Hutchison and my wife (who happened to be the right height to double Amber) and ran her through some basic fight training, which she picked up impossibly fast. We did maybe six or seven fight training/rehearsal sessions before the shoot. The shoot was three full nights and two half nights. I had the parking garage at work locked down on weekends, which was a godsend (I still owe the building manager a case of booze). Even so, we needed to fly through setups, I want to say 25-30 a night, and with more than half of them being fights/stunts, with a skeleton crew. For lighting, we kept it natural, augmenting a bit here and there, throwing a backlight or scrape when needed. We used a lightweight homemade LED system I built that was battery powered, which allowed us to work quickly. We shot on the a7s with Nikkor glass. I chose the a7s mainly for its lowlight; I couldn't afford to light a whole underground parking lot. I also wanted a high shutter speed AND the ability to shoot slowmo, and in that low light, only the a7s made sense. Given the time constraints, I'm happy with what we got. And while I love good cinematography, nothing is more important than performance, and Amber and the stunt crew killed it. Hat tip to Mark Musashi and Darren Bailey (knife guy) who had the longest of the fights and made a meal out of their performances. But the biggest asset was Amber, who aside from pulling off all her choreo (and that car vault!) kept the cast and crew laughing throughout. Post was a whole other story. The edit took less than a week, but the effects took about eight months. Reason? I never had done 3D work before and I certainly had no budget to hire anyone. So I taught myself how to use Blender 3D. Why Blender? It's free and there is a huge community of users and tutorials to help learn it. Took maybe two weeks to get literate enough to know what kind of questions to ask. From there it was tutorials and trial and error. The learning curve was a bit steep, but by month two I stopped yelling at the screen. I think had there been a real deadline, I probably wouldn't have even had a gunfight, but since I didn't I did. So that's the long and short of it. Any questions, I'll be around. The Music Video: VFX Breakdowns:
-
Just to clarify, the processing here is happening while recording, not in post. That's what the $30 4K scaler is for What I'm surprised by more than the difference between the 4K output scaled and the XAVC S internal is the difference between the 4K output scaled and the 1080p output. Colors seem cleaner and less saturated (RED!). And, sure, a RAW camera would be that much better, but I think most of us doing indie work ride that line of quality vs the lint in our pockets. For 30 bucks, this seems worth it to get a better image.
-
True, but there's still a noticeable difference between the 4K out and 1080p out, specifically that sea of red that appears over the 1080p footage. And assuming I fix the blacks on the XAVCS footage, it'll still look just as blocky in the shadows. And I misspoke saying its sharper, I meant the noise looks sharper (if that makes sense), or better yet, the noise looks less blocky and compressed, especially in the shadows. Like the difference between watching a movie on bluray vs HD cable compression. Seems like I'll have more play in color correction with the 4k downconvert (vs the 1080p out or the internal 1080p) before the image breaks down into a JPG from 2002. Again, I'll have to test more, but for now, it looks promising. Especially considering it's a $30 box that gave me this much more latitude.
-
Apologies if this is old news, but the "GH4/a7s 4K downscale to 1080p" discussion got a bit too academic for me to follow, so if there has been a conclusion on this, it hasn't been in easily searchable laymen's terms. So. I figured I'd give it a shot. I picked up a 4K scaler off newegg.com for $30 (Coboc HM-SPL-4KUP-1X2 2 Ports 1 in 2 out 4K2K HDMI Scaler splitter, http://www.newegg.com/Product/Product.aspx?Item=N82E16812117500) and borrowed a buddy's Atomos Ninja 2. Did three shots: 1) a7s 4K 24p -> Coboc 4K Scaler, downconvert to 1080 24p -> Ninja 2, ProRes 422 2) a7s 1080 24p -> Coboc 4k Scaler, set to bypass -> Ninja 2, ProRes 422 3) a7s 1080 24p, internal XAVC S The clip below shows the three shots, then again with the saturation jacked up to 100, then a third time zoomed 200%. To me it seems clear that the 4K downconvert is cleaner and sharper, esp in the shadows. But, if anyone else has any input on what's going on here or if I am missing something or misinterpreting something, please chime in. Like what's up with the red noise in the non-4K shots? I'll be filming more footage this weekend (assuming I can make this setup portable) and will post.
-
 Mine just arrived not more than half an hour ago...
 -
Ken's right, the higher focal lengths should give coverage. I'm partial to APS-C as my default filming sensor size, so I'm perfectly happy with them.
-
I think you overpaid! I got most of my anamorphics for around that price... If anyone else has some of these lenses they want to sell, PM me!
-
Exactly what I'm doing! I fell in love with a 60mm that I have since lost and looking to get a new one. What do you use as your helicoid? I've been coring out old Sears lenses and stuffing these in there...
-
Looking for any really, but 60mm and 70mm are at the top of my list. Willing to go $15 a lens. Also a 50mm would be cool, as I think that's the widest they ever got with them.
-
Hey all! I've been playing around with the lenses you screw off the integrated anamorphic adapters and wanted to complete my set. Any of you guys got some you want to get rid of? PM me if you do!
-
That program's cool! I have something similar on my ipad, although I'm not literate enough in it yet. Any diagrams? I'm still playing around with what I've got in house. I'm planning on building a housing with the elements I have before I feel confident enough to start buying glass...
-
Interested, depending on tests/footage
-
Let us know what you find out!
-
I know for diopters, it's (power/1000mm) = focal length. So a +1 diopter has a focal length of 100mm, a +4 is 250mm, etc. Don't know about the wide angle adapters.
-
WOw! This looks really good! When you're focused to infinity, how far apart are your two lenses? Can you list out the ingredients? Lens, camera (FF or APS-C), which anamorphic adapter giving you awesome flares...
-
On close up filters vs achromats... Close up filter: Achromat: Detail: Note all the chromatic aberration in the close up filters, and how much softer the edges of the frame are (look at the top and bottom of frame).
-
Awesome first build! No tape or PVC I see... What's your focusing mechanism? Are you sliding the wide on the rails? How's the footage? Where's the footage? Post some footage.
-
Thanks bud! I think it's hella productive to hive mind these DIY projects. Who better to play with than a community of filmmakers who thought it was a good idea to strap a projector lens onto their camera? I've got nothing against the folks selling their wares, I'm sure they will work amazingly well (and judging by the tests, they do). But for those of us who can't afford the thousands of dollars for adapters or iscoramas, a couple hundred on achromats and old wide angle adapters let's us in on the whole "being able to focus my lens" rage. So let's play people!
-
Here's the 30mm (ish) anamorphic! She is a BEAST. Weighs about 6 pounds. My PVC and tape housing is not strong enough to hold all the glass securely so the elements do get misaligned in a few shots. BUT, as a proof of concept, I'm happy. Focus travel is probably a half inch or so between infinity to about an inch. The close focus shots in the clip are about an inch away. Working on an engineering solution to mount this on a 70-200 Canon zoom and have a 30 - 80 anamorphic zoom! Also, a programming note: I'm pretty sure I'm wrong about my redrock +10 achromat, I think the it's a +8 and NOT a +10.
-
Seems like focus would still only affect the horizontal plane if you're focusing on the anamorphic only, although I don't know enough about optics to say one way or the other...
-
+10 sounds right, considering that what I used on Build 2 was two 0.6x wide angles stacked, which equals 0.36x wide angle block, pretty close to your 0.4x. Blur may be from using 0.4x... I used a 16x9Inc 0.4x wide angle adapter and I would lose focus on the edges unless I stopped down like mad. Stacking weaker power wide angles might work better, or at least has from my experience. The achromat will help tho. I remember back during the redrock craze, people were DIY'ing achromats using old binocular glass. I think it was easy to get a +7 achromat out of them. Google "achromat binoculars dof adapter".
