
tupp
-
Posts
1,148 -
Joined
-
Last visited
Content Type
Profiles
Forums
Articles
Posts posted by tupp
-
-
7 hours ago, Brian Caldwell said:
You should be aware that this is a religious discussion.
37 minutes ago, Don Kotlos said:Yes but since its physics we are talking about it is just sad.
Perhaps one of you could explain -- from a physics perspective -- why the DOF doesn't appear to be equivalent in the DOF equivalence demonstrations that you linked.
-
10 hours ago, rdouthit said:
Was the "Beatles, move over" comment sarcasm?
My comment was dripping with sarcasm.
10 hours ago, rdouthit said:Because there's no way the two should be in the same sentence. As talented as she can be, no one can compare LDR's contributions to those of The Beatles as they literally changed music and society
Agreed.
10 hours ago, rdouthit said:Along with long-time producer George Martin, they were the first to introduce distortion, false endings and use symphonic instruments in pop music. They can even be credited with moving music videos to the forefront with their groundbreaking music films.
Hold on. The Beatles were probably the best rock band that ever existed, and they and their crew certainly innovated a lot of groundbreaking things. However, they were not the first to introduce distortion, nor to use symphonic instruments in pop (nor rock) music, nor to make entertaining films/video of music, that were not just documenting a musical performance.
I don't know what you mean by "false endings."
10 hours ago, rdouthit said:Even if you're not a fan of their music, they literally changed the trajectory of music, the music business and popular culture across the planet.
Agreed.
-
-
That's certainly some overt film grain.
If they did it all digitally, I don't know what filter(s)/plug-in(s) they used.
They might have shot a small format film stock with a coarse grain. The grain does look artificial in certain areas/moments, but that could be from the apparent over-tweaking of contrast and shadows.
-
You can rent/borrow a 77mm and/or 82mm filter(s) and just hold/tape it in front of your lens to check for vignetting. Position it slightly forward to simulate two stacked filters with the added length of a step-up ring (and the extra millimeter or two from a polarizer).
You could also just buy/rent a big matte box with the same filters.
-
Just to reiterate, you may find that softening/diffusion positioned behind the lens will boost their effect.
If your concern is possible vignetting when stacking filters in front of the lens, rent/borrow an oversized filter(s) (doesn't necessarily need to be the exact pola/"HBM" combo) and just hold it in front of your lens to check for vignetting. Position it slightly forward to simulate two stacked filters with the added length of a step-up ring (and the extra millimeter or two from a polarizer).
You could also just buy/rent a big matte box with the appropriate filters.
Another alternative to consider is simply shooting with vintage primes. Some of them give a nice softness, among other pleasing characteristics.
-
2 hours ago, Mattias Burling said:
Maybe worth getting back together with the ex
")
Ha! I think I'll just suffer through the smaller formats.
-
On 2/23/2017 at 6:59 AM, TwoScoops said:
6x9 is obviously slightly wider than 6x7, but 645 is the APS-C.
This graphic shows it quite clearly:
https://upload.wikimedia.org/wikipedia/commons/e/ec/35mm_MF_LF_Comparison.svg
For a medium format discussion, that graphic should orient the 645 frame vertically (portrait) to demonstrate the shared relationship of the "6" dimension. The "6" stands for six centimeters -- the typical usable width of 120/220 roll film. So, 645, 6x6, 6x7, 6x9 respectively have frame sizes of 6cmx4.5cm, 6cmx6cm, 6cmx7cm and 6cmx9cm. All of these frames share the 6cm width of 120/220 film.
The 6x6 square frame is the classic TLR and Hasselblad format, and some Bronica SLRs started with 6x6. As I recall 6x4.5 backs/cameras appeared in the early/mid 1970s, and 6x7 and 6x9 cameras a little later in the decade
On 2/23/2017 at 7:11 AM, Mattias Burling said:Here are some other images from the Mamiya adapter and Macro lens that shows that the "issue" really isn't any "issue".


On this one the detail can be shown quite effectively. The image is already cropped btw.
If you click on it and full screen and serve the towers, then click to zoom in, and you will see these thin wires appearing going down from the roof of each tower.
Makes me really want to try the A7r.
Wow! I really love this focal reducer! I would get one if I could afford it and a FF Sony mirrorless camera and if I could get my Mamiya gear from my ex-sister-in-law.
-
1 hour ago, Ben J. said:
So In correlation to a question I had here:
If it is not possible to put two filters on a 16mm lens connected to a mirror-less full frame camera without vignetting, could I carefully cut the ring off the Hollywood black magic filter and put it in the space between my camera and my lens? I'd be using a commlite ef to e mount adapter, and was wondering if it would be possible to cut off the mounting bracket on the HBM filter and attach it to the rear of the lens hole, the adapter, or the rubber part of the emount next to the sensor?
There are ways to put filters behind the lens. Some rare lenses include filter holders behind/within them.
It would be a challenge to suspend a rigid filter behind a lens. Flexible materials such as gel, panty hose are much easier to stick on the back of a lens with an adhesive or double-stick tape.
It is probably not such a good idea to put a softening/diffusion filter behind the lens, as doing so could magnify the diffusion effect more than desired.
Definitely, keep filters far away from the sensor, as any imperfections or dust on the filter will become conspicuous in the image.
-
1 hour ago, jonpais said:
Does this mean that when shooting with a full frame lens like the Sigma 50mm f/1.4 with a MB SB on the G85, diffraction will no longer begin at f/8?
It is my understanding that diffraction from the aperture is a matter of degree, and that the relative amount of diffraction is a direct function of the physical diameter of the aperture. Diffraction always exists, but the ratio of diffracted light to usable light increases as the aperture closes.
Given two simple lenses of the same focal length, a particular f-stop on one lens should give the same amount of diffraction as the same f-stop on the other lens. The reason for this is that f-stops are simply a ratio of the focal length over the aperture diameter. So, two 50mm lenses should have identical aperture diameters at any given f-stop -- same aperture diameter, same diffraction.
Of course, there are other variables that affect focus, DOF, and focal plane flatness.
-
On 2/21/2017 at 0:47 AM, zerocool22 said:
What is the widest lens you can use with this adapter? (I like the 35mm-50mm on full frame)
Don't know what is the widest MF lens that can fit on these adapters, but focal lengths as wide as 35mm were fairly common on MF, which is similar to having a 22mm lens on FF.
2 hours ago, webrunner5 said:The biggest advantage of moving to a larger format, even if it is film based or digital based, is Lens Diffraction, ergo the lack of it.
This is a excellent point, and diffraction can affect the focus, and, hence, the DOF roll-off.
2 hours ago, webrunner5 said:That is the big problem with m4/3 it creeps in a f8 a lot and damn sure is at F11.
Of course, the greater prevalence of diffraction with small formats is due to the physically smaller apertures of shorter focal length lenses -- not caused by the small sensor/film formats themselves.
-
De-clicking is definitely be beneficial if one shoots documentaries/events that often require the aperture to be ramped up/down during the shot (especially when using an on-camera mic).
I have a few vintage Nikkors, but I rarely ramp the aperture while rolling, so I haven't really needed to de-click.
-
6 hours ago, Don Kotlos said:
Again, nobody has yet done a conclusive, worthwhile "equivalence" test.
I don't mean to sound harsh (nor to hijack this thread), but the pages you linked either lack actual equivalence tests or give dubious, useless results.
The first page linked doesn't seem to contain any equivalence test -- it is just an essay titled "Sensor Crop Factors and Equivalence." If there is an actual test of DOF equivalence on that page, please point it out.
The second page you linked actually contains a DOF equivalence test that seems to demonstrate that optics for larger sensors yield quite a significant difference in DOF when compared to the DOF of to smaller optic. So, it seems to demonstrate that the equivalence principle fails. I spotted the differences immediately, and I will point to some of the more obvious discrepancies. Here are the two images flashed back-to-back in a gif file:
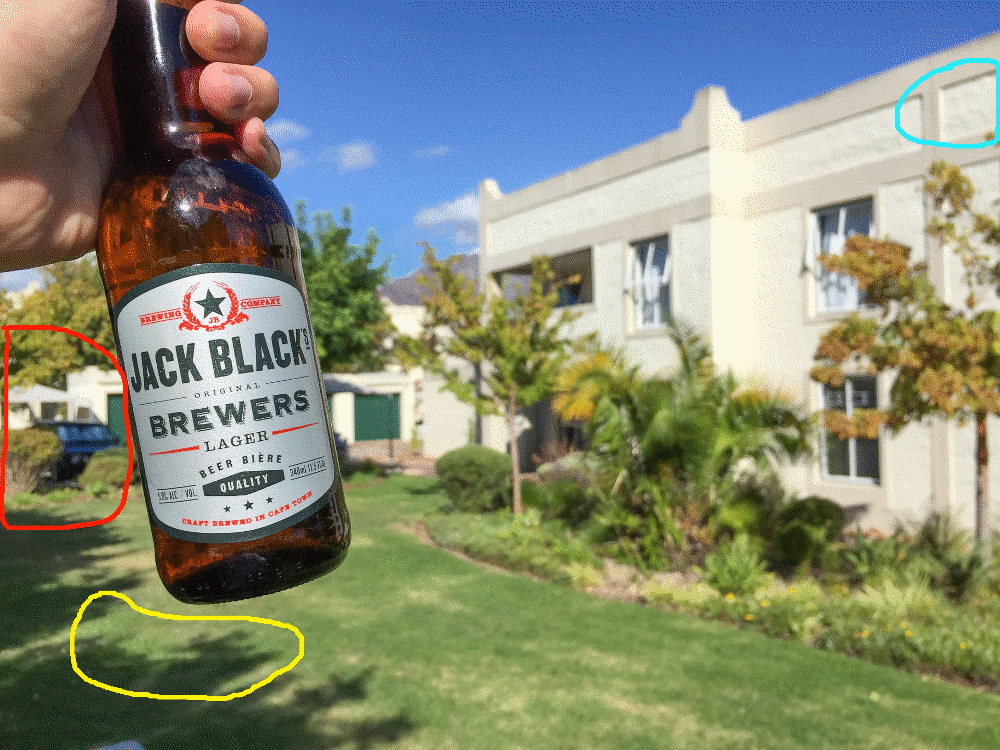
The bottle in the foreground stays sharp in both images, but look at how the sharpness of the bush and car dramatically change (red circle). Look at how the sharpness of the cast shadow and grass change (yellow circle). Look at how the sharpness of the building changes (blue circle).
Does the DOF in these two flashing images seem equivalent? It doesn't seem the same to me.
Now, I am not very good at making gif images, and I apologize for the rough dithering, but you can further confirm these differences yourself by downloading the two images from the linked site and switching back and forth between them in your favorite image viewer. Actually, anyone should be able to see the difference inside the red circle, merely by viewing the two images on their web site.
On the other hand, I have to confess that this test is worthless. In the first place, it appears that the tester failed to eliminate the variable of in-camera sharpening, so it is very possible that one camera sharpened its entire image while the other camera didn't. More importantly, the tester put a lot of air between the foreground and the distant background. Some of the "magic" of larger format optics happens in that air between the FG and BG, but this comparison has no objects nor charts in that air to reveal what is happening to the focus there. This fatal blunder occurs in almost every equivalence test that I see.
The third link that you gave is the Brightland Studios test which has been referenced by me and others on this forum in several threads. I am afraid that this is yet another misguided experiment in which the equivalence principle doesn't seem to hold up.
The tester made two comparisons using the same camera and zoom lens in both tests. First he compared the equivalence between camera's full sensor read-out and the camera's crop mode:
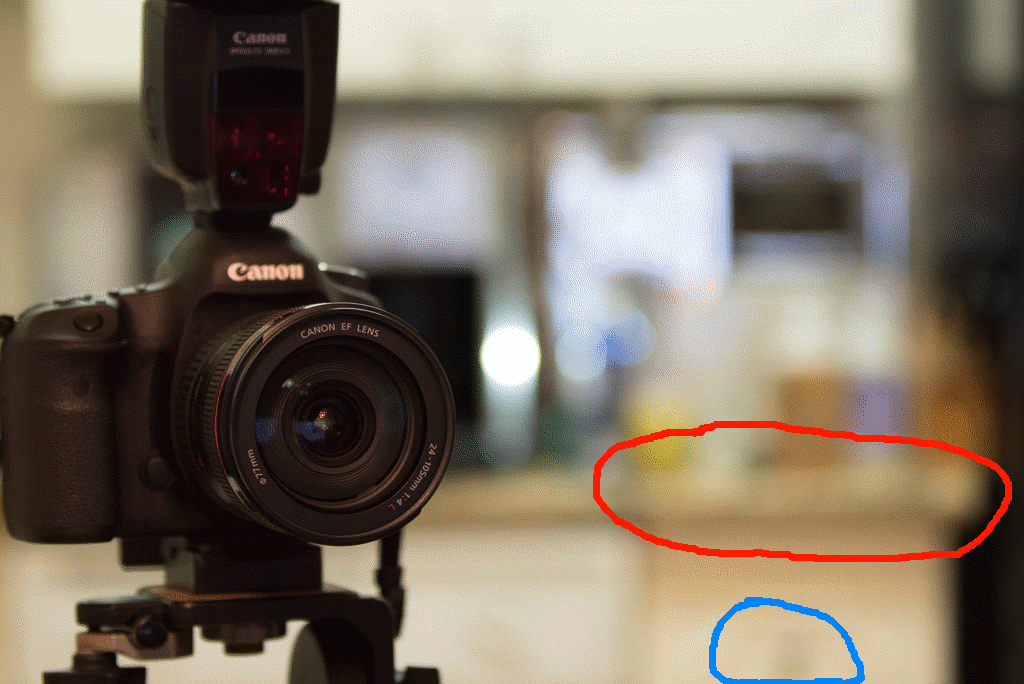
With the front of the subject sharp in both images, the apparent counter top (red circle) in the distant background,changes focus, and does not appear to be equivalent in the two images. Likewise, there is another detail in the distant background (blue circle) lacking equivalence of focus between the two test images. There seems to be other subtle focus discrepancies, that I will mention later.
The tester acknowledged that the camera might apply a different degree of image processing/sharpening in full sensor mode than it would in crop mode, which could make the focus/DOF of the two test images seem more similar. So, he made another comparison, in which he shot both images in full sensor mode, but one of the images was shot optically as if it was in crop mode. That "simulated crop mode" photo was then cropped to matching size in post. Thus, in this second comparison, there was optical equivalence along with no difference in image processing/sharpening between the two shots:
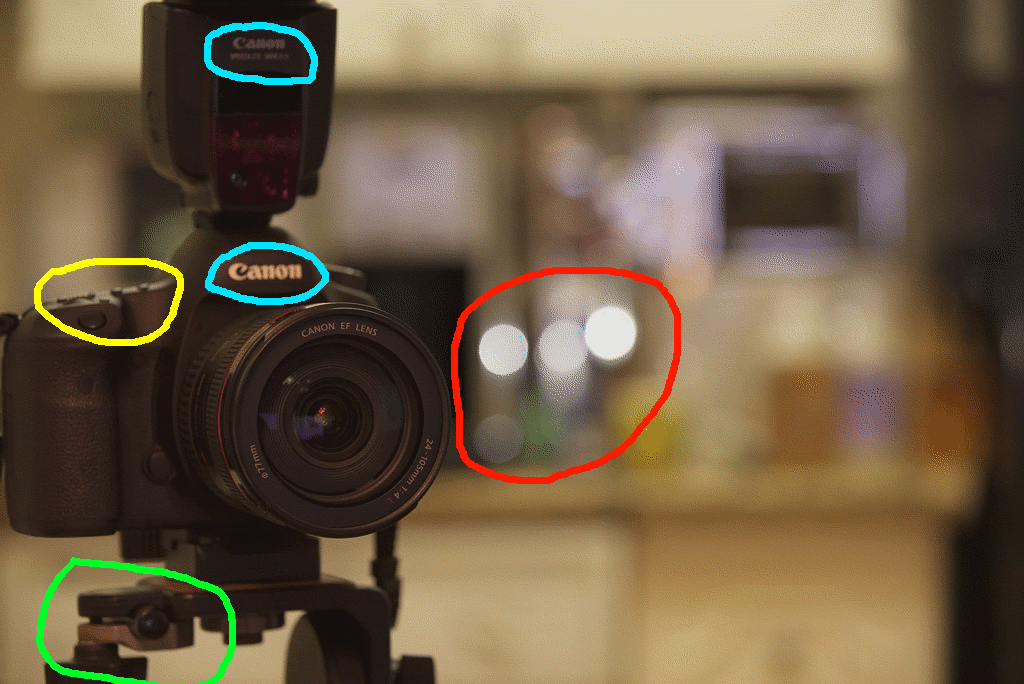
As you can see, with the difference in in-camera processing eliminated, there are significant areas of non-equivalence. In addition to the counter top changing, the bokeh changes size and softness (red circle), while the front of the subject remains sharp. The Canon logos conspicuously change their focus (blue circles) which happened more subtly in the first comparison, while the top buttons on the camera (yellow circle) do likewise. Part of the tripod head (green circle) also conspicuously goes in and out of focus, and it does so more subtly in the first comparison.
So, the equivalence principle certainly seems to fail here, as well.
However, there are serious problems with this test. For one thing he used the same zoom lens on all images. Not only does the character of the lens look the same in each photo, but aperture position (virtual/actual) doesn't necessarily change with the zoom's set focal length. So the zoom lens' aperture position probably doesn't match the differing aperture positions found on a prime lenses of the same focal length. This discrepancy could make the DOF appear more uniform than if the test were done with separate prime lenses of different focal lengths.
Also, these Brightland Studios tests suffer from the same lack of any objects/charts in the important long stretch between the foreground subject and the distant background, so there is literally "nothing to see here."
The fourth and fifth links you provided seem to go to different pages of the same earlier thread concerning the Kipon MF focal reducer. I am not sure what you expect me to find on these forum pages, but I do not see any equivalency tests. By the way, on page two of that very thread, I address the Brightland Studios test in several posts.
I am hoping that one day someone will do a proper equivalency test with charts/objects placed at regular intervals extended behind the foreground. Ideally, one camera would use a tiny format (2/3" or S16) while the other camera would be a large format (Gonzalo Ezcurra's Mini Cyclops, the LargeSense back, or a shift/stitch adapter). Of course, a full frame camera with this Kipon focal reducer would be interesting to compare, too.
-
10 minutes ago, hyalinejim said:
At the risk of flogging a dead horse, 444 Log masters is the answer.
Agreed. Raw is great to have, but I've never really needed anything more than 10-bit, 4:4:4, flat and at a nice resolution. A lot of the time, even that is overkill.
- sam and Justin Bacle
-
 2
2
-
6 hours ago, Mattias Burling said:7 hours ago, BasiliskFilm said:
The medium format look was all about proportionally finer grain, allowing faster films, better in low light, and relatively shallow DOF. Faster full frame primes take the speed advantage away from a lot of medium format lenses.
I know this is a relatively slow macro lens, but your reducer is giving you 56mm f2.8 equivalence, with a fairly bulky set up. Do you perceive any advantages?Though question since I don't agree with your assessment of the advantages of Medium Format.
I still shoot film, both medium format and full frame (small picture). And I definitely don't use medium format to get faster films.
If anything I use the opposite.When I was shooting medium format, its primary advantages were:
- less-grain/higher-resolution;
- nicer DOF/focus roll-off;
- and increased color depth.
The MF benefits of higher resolution and increased color depth don't necessarily apply to digital medium format cameras, but it would be great to inexpensively have a little of the nice DOF/focus roll-off found in medium format cameras.
I used large format for the same reasons (less-grain/higher-resolution, nicer DOF/focus roll-off and increased color depth), which are even further increased with 4"x5", 5"x7" and 8"x10." However, large format view cameras offered the added benefit of Scheimpflug capability when shooting table-top work. LF with view cameras also allowed shifting for architectural work.
-
1 hour ago, cantsin said:
But medium format lenses normally don't go wider than 50mm (usually with f3.5, at best with f2.8
Huh? I seem to recall a lot of wide angle lenses ranging from 35mm to 45mm lenses for Mamiya and Bronica, back when I was shooting medium format. Heck, there were Schneider 38mm lenses for 4"x5" cameras.
2 hours ago, cantsin said:You also gain no DoF advantages in comparison to a native 35mm/2.0 FF lens - in fact, you can have shallower DoF with one of the many available 35mm/1.4 FF lenses (Canon, Nikon, Samyang, Sigma, Zeiss, Tamron).
I am not so sure about this. The optical look of medium format lenses has always appeared different to me. Nobody has yet done a conclusive "equivalence" test.
51 minutes ago, Don Kotlos said:Strap on a modern 35mm f/1.4 on a FF camera and it will be miles better than most ~50mm MF lenses with the speed booster.
I don't know about that. This focal reducer essentially converts full frame into a medium format, so by using MF lenses with this Kipon reducer, one gets all the benefits/properties of MF optics. Judging from @Mattias Burling's test shots, this focal reducer is going to produce amazing images/footage.
-
48 minutes ago, shijan said:
2 piece forms are more clear and precise and able to produce more copies before lose accuracy.
Huh? Well, it can be somewhat of an art to pour the top surface of a one-piece mold, but below that surface, everything should be perfectly precise.
Also (and, again), this piece might not require the precision you think it needs.
48 minutes ago, shijan said:I want to make a matte finish, seems there are a some kind of spays that makes a little random drops on surface. Cameras bodies usually have this kind of finish.
You can roughen up the surface of your master with a higher grit to give it a matte finish. However, if you seek a "fancy" texture, then a spray coat might be better, or the finish could just be incorporated into the 3D printing if you are using a hi-res machine.
48 minutes ago, shijan said:Some people tell me do not mess with SLA 3D Printer because it is not too precise for this size and needs a lot of post production. and suggest go for more expensive professional stomatology 3D prints. So i'm still thinking about it...
I cannot advise you on which printer is better for your purpose. One must consider printing cost vs. finishing time/effort on the master (and final parts) vs. anticipated production quantity. If you design with enough slop, you should be okay, regardless.
-
25 minutes ago, Kisaha said:
@tupp in India(I guess) and "strange" markets (like mine) around the world, working "under budget" is the normal, you do not try to bring it under budget, you are seriously under budget and try to survive in a continuous "under-budgeting" market!
Ha! Yes, such "no-budget" scenarios are unheard of here in the states -- especially on Craigslist.

-
7 minutes ago, zerocool22 said:
Cool can you make a test video?
I 2nd this!
@Mattias Burling
Also, could you do a DOF "equivalence" test between this set-up and your Digi-Bolex with a prime lens?
Thanks for showing these photos. They look spectacular!
-
Those are nice mold mock-ups, but you might be able to get away with a one-piece silicone mold for each part. To do so, you may have to sacrifice some of the side holes and top recesses and make those as separate drilling/machining operations after casting. To ease such drilling, you can include small pilot/alignment indentations in your master. This could be an easier way to go if you are making small quantities.
By the way, for finishing/buffing the surfaces of your master, you can use pro nail buffing blocks or use pro nail buffing sticks. The lowest "grit" surface on theses blocks/sticks should buff your plastic master to a nice glossy shine.
-
You might also mention something in regards to your ability to bring the project in on time and on/under budget.
-
In addition to the suggestions above, you might consider a used camera: the Digital Bolex; the Sony F3 (w/4:4:4 capability); the Sony FS700 (w/raw recorder); or a KiniMini refurb.
Also, I've heard good things about the DJI X5R.
-
By the way, PC-7 Epoxy might stick to glass glass better than J-B Weld.
Here is a photo of an old PC-7 hardware store display with various objects epoxied to a glass soda bottle:
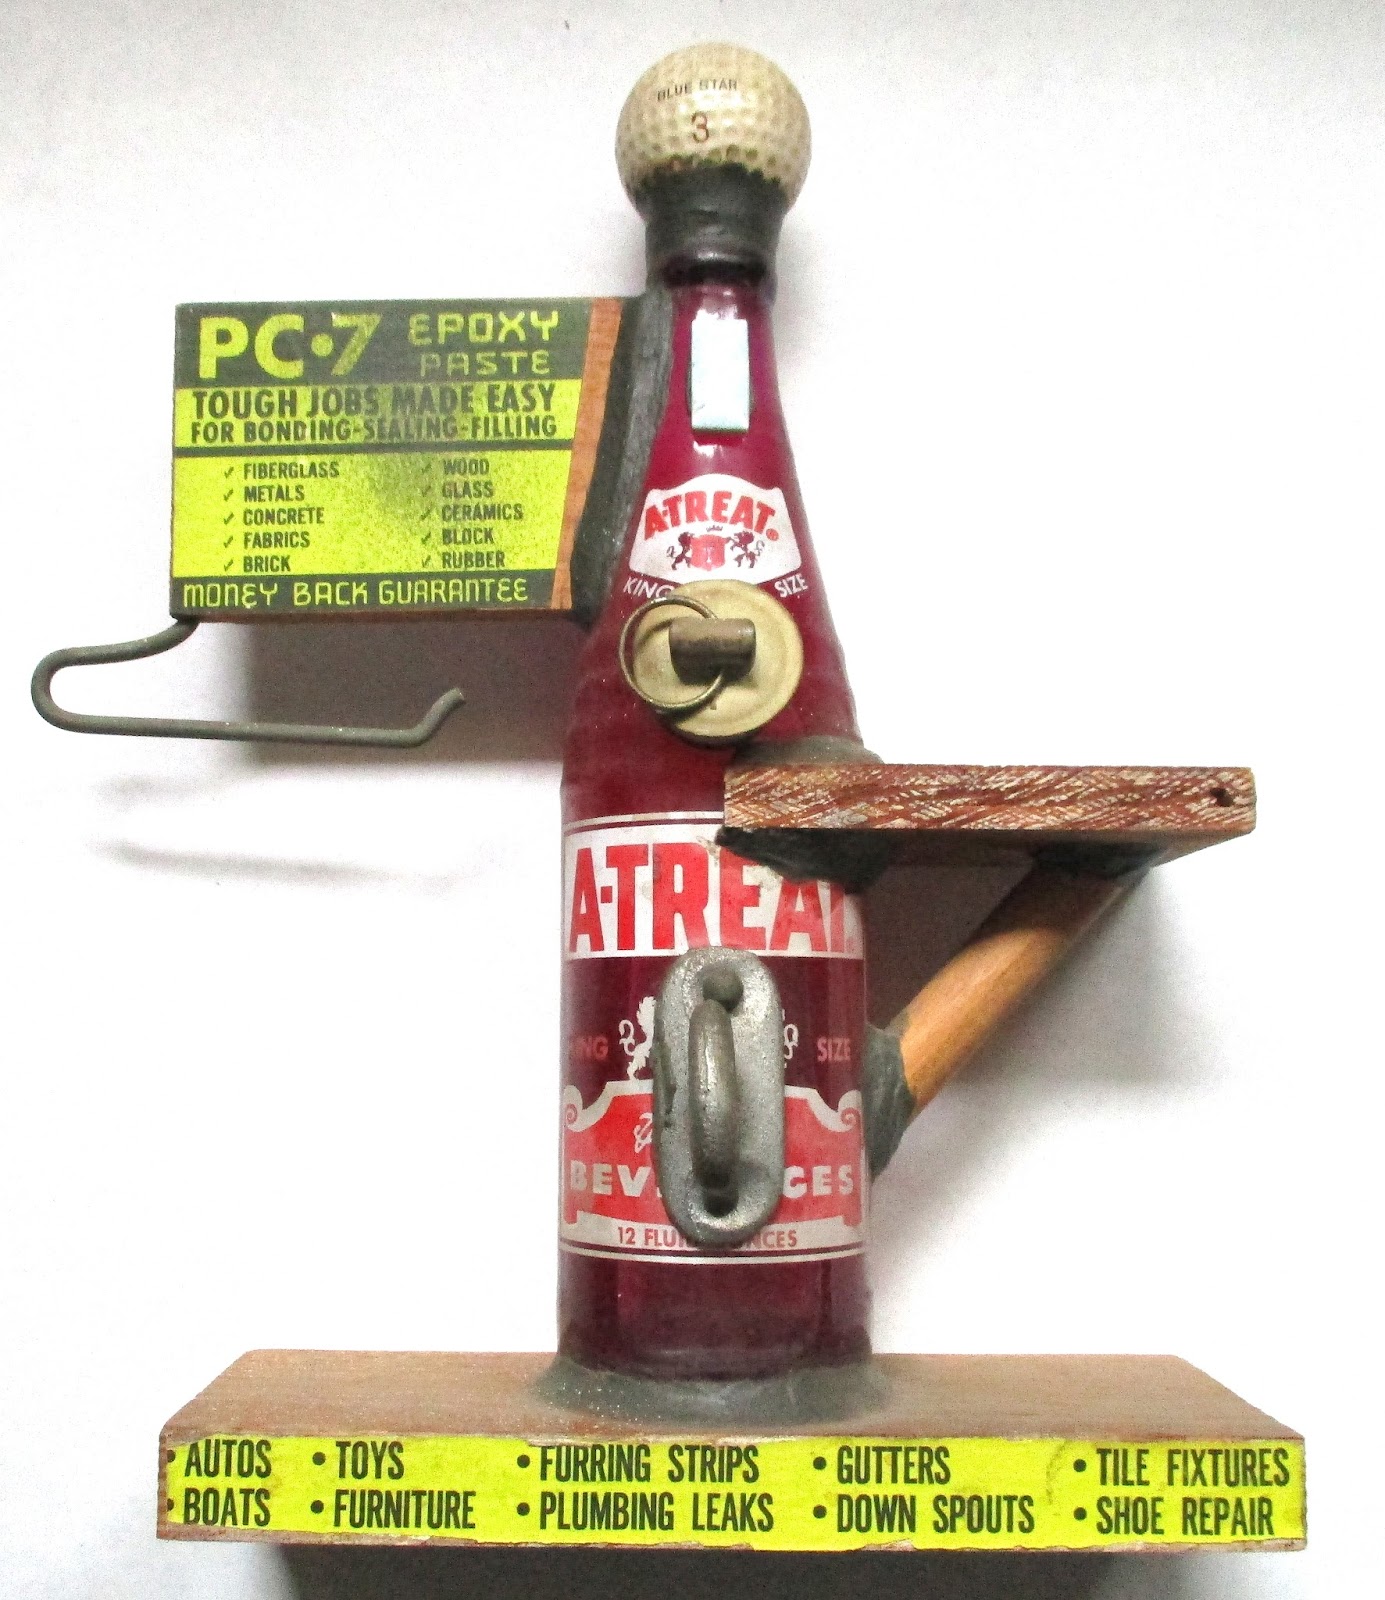
I remember these displays and there was no way to remove the glued objects without breaking the glass bottle.
-
The easiest solution is a cardellini clamp with a magic arm.
If the jaws of the cardellini are too big (visible on the bottle), you could use a thin plumbing pipe clamp with a rubber liner around the bottom of the bottle. Use plumber's epoxy on the head of the clamp's bolt to keep it from rotating and attach the magic arm to the exposed threads at the other end of that bolt.
You could likewise make a clamp plumbing strap and a long 1/4-20 bolt. Plumber's epoxy would also work here in keeping the bolt fixed so that you could attach a magic arm to the exposed threads. Rubber scraps from an old bike inner tube could be used as a clamp liner.
Or, you could just use J-B Weld to glue two, stacked, 1/4-20 nuts directly to the bottle. J-B Weld sticks to glass (seems to hold up to pot smoke and heat, too!) -- not sure if plumbers epoxy sticks to glass as good as J-B Weld. You might have to score (roughen) the surface of the glass to improve the adherence of the J-B Weld. Screw two 1/4-20 nuts onto the end of a 1/4-20 bolt, then use plenty of J-B Weld around the nuts and around the surface of the bottle. When the J-B Weld has hardened, simply unscrew the bolt from the two nuts, and the nuts will be perfectly aligned within the J-B Weld. Screw the 1/4-20 threads of the magic arm into the epoxied nuts.
My thoughts on the Kipon Medium Format "Speedbooster"
In: Cameras
Posted
It most definitely does not show equivalence -- the foreground (front of lens) stays sharp in both images while the focus on the background changes between images.
The circled items in the above image do not seem dark or shadow-like: they appear to be a well lit counter-top edge and a detail on the front of a cabinet door. Nevertheless, the focus one those to items is most certainly changing. It is obvious that they go soft and then back to sharper focus.
In addition, the bokeh changes significantly -- a telltale sign that the DOF/background-focus has changed:
In the read circle, note that the bokeh changes size dramatically, while the dark rectangular object that it overlaps changes less so. It is very obvious how the proportions of that bokeh changes relative to the dark corner it overolaps.
The bokeh in the yellow circle changes size and its edge changes softness.
The two overlapping bokehs in the orange circle are more blurred and blend together in one image, but are sharper and more distinct in the other image.
Bokeh is not shadows.
In the blue circle, there is some purple item that is softer in one image, yet becomes more defined in the other image. Is that a purple shadow?
In the green circle the leftward edge of the tripod head bracket is sharper in one image but blurrier in the other image. It is lit brightly enough to see that the focus there has changed, while the focus on the front of the lens stays sharp.
The DOF is different -- not equivalent -- in these two images.